Bring your own IP addresses (BYOIP) in Amazon EC2
You can bring part or all of your publicly routable IPv4 or IPv6 address range from your on-premises network to your AWS account. You continue to control the address range and you can advertise the address range on the internet through AWS. After you bring the address range to AWS, it appears in your AWS account as an address pool.
For a list of Regions where BYOIP is available, see Regional availability.
Note
-
When you bring an IP address range to AWS, AWS validates that you control the IP address range. There are two methods that you can use to show that you control the range:
-
If your IP address range is registered with an Internet Registry that supports RDAP (such as ARIN, RIPE and APNIC), you can verify control of your domain with an X.509 certificate by using the process on this page.
-
Regardless of whether your Internet Registry supports RDAP, you can use Amazon VPC IPAM to verify control of your domain with a DNS TXT record. That process is documented in Tutorial: Bring your IP addresses to IPAM in the Amazon VPC IPAM User guide.
-
-
The steps on this page describe how to bring your own IP address range for use in Amazon EC2 only. To bring your own IP address range for use in AWS Global Accelerator, see Bring your own IP addresses (BYOIP) in the AWS Global Accelerator Developer Guide. To bring your own IP address range for use with Amazon VPC IP Address Manager, see Tutorial: Bring your IP addresses to IPAM in the Amazon VPC IPAM User Guide.
Contents
BYOIP definitions
-
X.509 Self-sign certificate — A certificate standard most commonly used to encrypt and authenticate data within a network. It is a certificate used by AWS to validate control over IP space from an RDAP record. For more information about X.509 certificates, see RFC 3280
. -
Autonomous System Number (ASN) – A globally unique identifier that defines a group of IP prefixes run by one or more network operators that maintain a single, clearly-defined routing policy.
-
Regional Internet Registry (RIR) – An organization that manages allocation and registration of IP addresses and ASNs within a region of the world.
-
Registry Data Access Protocol (RDAP) — A read-only protocol to query current registration data within a RIR. Entries within the queried RIR database are referred to as "RDAP records". Certain record types need to be updated by customers via a RIR-provided mechanism. These records are queried by AWS to verify control of an address space in the RIR.
-
Route Origin Authorization (ROA) — An object created by RIRs for customers to authenticate IP advertisement in particular autonomous systems. For an overview, see Route Origin Authorizations (ROAs)
on the ARIN website. -
Local Internet Registry (LIR) — Organizations such as internet service providers that allocate a block of IP addresses from an RIR for their customers.
Requirements and quotas
-
The address range must be registered with your Regional Internet Registry (RIR). See your RIR for any policies regarding geographic regions. BYOIP currently supports registration in the American Registry for Internet Numbers (ARIN), Réseaux IP Européens Network Coordination Centre (RIPE), or Asia-Pacific Network Information Centre (APNIC). It must be registered to a business or institutional entity and cannot be registered to an individual person.
-
The most specific IPv4 address range that you can bring is /24.
-
The most specific IPv6 address range that you can bring is /48 for CIDRs that are publicly advertisable and /56 for CIDRs that are not publicly advertisable.
-
ROAs are not required for CIDR ranges that are not publicly advertisable, but the RDAP records still need to be updated.
-
You can bring each address range to one AWS Region at a time.
-
You can bring a total of five BYOIP IPv4 and IPv6 address ranges per AWS Region to your AWS account. You cannot adjust the quotas for BYOIP CIDRs using the Service Quotas console, but you can request a quota increase by contacting the AWS Support Center as described in AWS service quotas in the AWS General Reference.
-
You cannot share your IP address range with other accounts using AWS RAM unless you use Amazon VPC IP Address Manager (IPAM) and integrate IPAM with AWS Organizations. For more information, see Integrate IPAM with AWS Organizations in the Amazon VPC IPAM User Guide.
-
The addresses in the IP address range must have a clean history. We might investigate the reputation of the IP address range and reserve the right to reject an IP address range if it contains an IP address that has a poor reputation or is associated with malicious behavior.
-
Legacy address space, the IPv4 address space that was distributed by the Internet Assigned Numbers Authority's (IANA) central registry prior to the formation of the Regional Internet Registry (RIR) system, still requires a corresponding ROA object.
-
For LIRs, it is common that they use a manual process to update their records. This can take days to deploy depending on the LIR.
-
A single ROA object and RDAP record are needed for a large CIDR block. You can bring multiple smaller CIDR blocks from that range to AWS, even across multiple AWS Regions, using the single object and record.
-
BYOIP is not supported for Wavelength Zones or on AWS Outposts.
-
Do not make any manual changes for BYOIP in RADb or any other IRR. BYOIP will automatically update RADb. Any manual changes that include the BYOIP ASN will cause the BYOIP provision operation to fail.
-
Once you bring an IPv4 address range to AWS, you can use all of the IP addresses in the range, including the first address (the network address) and the last address (the broadcast address).
Onboarding prerequisites for your BYOIP address range
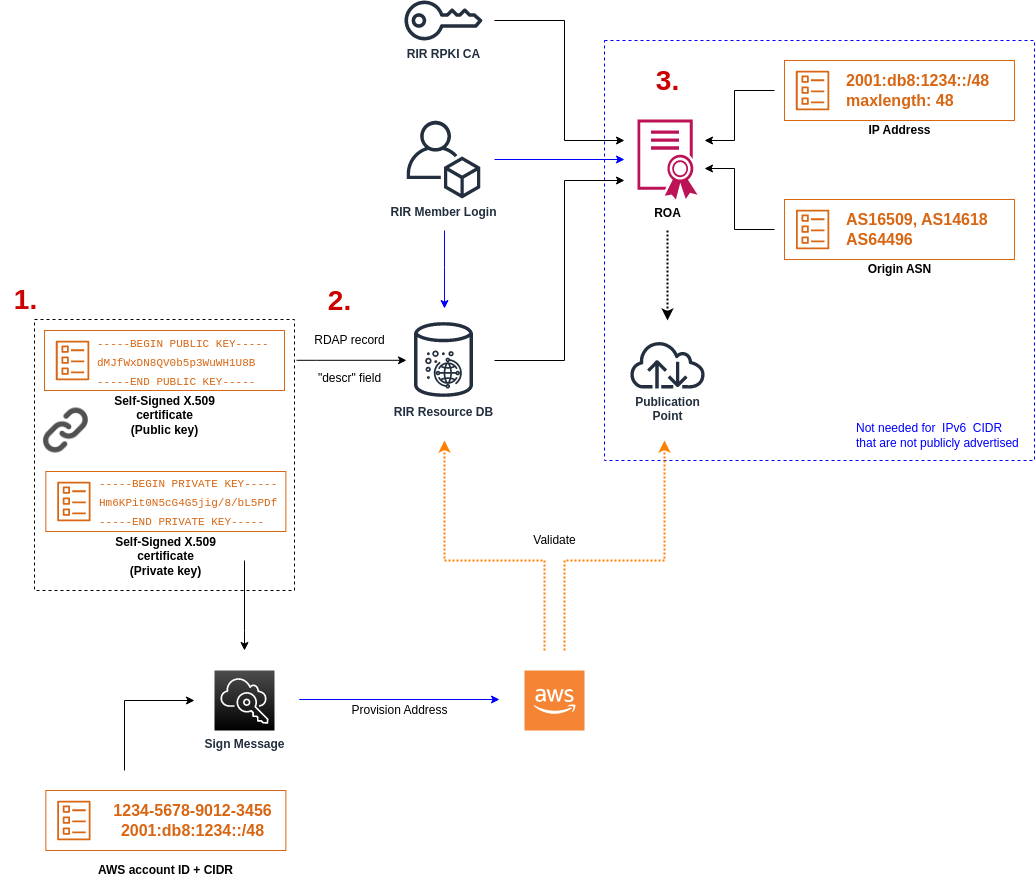
The onboarding process for BYOIP has two phases, for which you must perform three steps. These steps correspond to the steps depicted in the following diagram. We include manual steps in this documentation, but your RIR might offer managed services to help you with these steps.
Preparation phase
1. Create a private key and use it to generate a self-signed X.509 certificate for authentication purposes. This certificate is only used during the provisioning phase.
RIR configuration phase
2. Upload the self-signed certificate to your RDAP record comments.
3. Create a ROA object in your RIR. The ROA defines the desired address range, the Autonomous System Numbers (ASNs) allowed to advertise the address range, and an expiration date to register with the Resource Public Key Infrastructure (RPKI) of your RIR.
Note
A ROA is not required for non-publicly advertisable IPv6 address space.
To bring on multiple non-contiguous address ranges, you must repeat this process with each address range. However, the preparation and RIR configuration steps don't need to be repeated if splitting a contiguous block across several different AWS Regions.
Bringing on an address range has no effect on any address ranges that you brought on previously.
Important
Before onboarding your address range, complete the following prerequisites. The
tasks in this section require a Linux terminal and may be performed using Linux, the
AWS CloudShell
1. Create a private key and generate an X.509 certificate
Use the following procedure to create a self-signed X.509 certificate and add it to the RDAP record for your RIR. This key pair is used to authenticate the address range with the RIR. The openssl commands require OpenSSL version 1.0.2 or later.
Copy the following commands and replace only the placeholder values (in colored italic text).
This procedure follows the best practice of encrypting your private RSA key and requiring a passphrase to access it.
-
Generate an RSA 2048-bit private key as shown in the following.
$openssl genpkey -aes256 -algorithm RSA -pkeyopt rsa_keygen_bits:2048 -out private-key.pemThe
-aes256parameter specifies the algorithm used to encrypt the private key. The command returns the following output, including prompts to set a passphrase:......+++ .+++ Enter PEM pass phrase:xxxxxxxVerifying - Enter PEM pass phrase:xxxxxxxYou can inspect the key using the following command:
$openssl pkey -in private-key.pem -textThis returns a passphrase prompt and the contents of the key, which should be similar to the following:
Enter pass phrase for private-key.pem:xxxxxxx-----BEGIN PRIVATE KEY----- MIIEvgIBADANBgkqhkiG9w0BAQEFAASCBKgwggSkAgEAAoIBAQDFBXHRI4HVKAhh 3seiciooizCRTbJe1+YsxNTja4XyKypVGIFWDGhZs44FCHlPOOSVJ+NqP74w96oM 7DPS3xo9kaQyZBFn2YEp2EBq5vf307KHNRmZZUmkn0zHOSEpNmY2fMxISBxewlxR FAniwmSd/8TDvHJMY9FvAIvWuTsv5l0tJKk+a91K4+tO3UdDR7Sno5WXExfsBrW3 g1ydo3TBsx8i5/YiVOcNApy7ge2/FiwY3aCXJB6r6nuF6H8mRgI4r4vkMRsOlAhJ DnZPNeweboo+K3Q3lwbgbmOKD/z9svk8N/+hUTBtIX0fRtbG+PLIw3xWRHGrMSn2 BzsPVuDLAgMBAAECggEACiJUj2hfJkKv47Dc3es3Zex67A5uDVjXmxfox2Xhdupn fAcNqAptV6fXt0SPUNbhUxbBKNbshoJGufFwXPli1SXnpzvkdU4Hyco4zgbhXFsE RNYjYfOGzTPwdBLpNMB6k3Tp4RHse6dNrlH0jDhpioL8cQEBdBJyVF5X0wymEbmV mC0jgH/MxsBAPWW6ZKicg9ULMlWiAZ3MRAZPjHHgpYkAAsUWKAbCBwVQcVjGO59W jfZjzTX5pQtVVH68ruciH88DTZCwjCkjBhxg+OIkJBLE5wkh82jIHSivZ63flwLw z+E0+HhELSZJrn2MY6Jxmik3qNNUOF/Z+3msdj2luQKBgQDjwlC/3jxp8zJy6P8o JQKv7TdvMwUj4VSWOHZBHLv4evJaaia0uQjIo1UDa8AYitqhX1NmCCehGH8yuXj/ v6V3CzMKDkmRr1NrONnSz5QsndQ04Z6ihAQlPmJ96g4wKtgoC7AYpyP0g1a+4/sj b1+o3YQI4pD/F71c+qaztH7PRwKBgQDdc23yNmT3+Jyptf0fKjEvONK+xwUKzi9c L/OzBq5yOIC1Pz2T85gOe1i8kwZws+xlpG6uBT6lmIJELd0k59FyupNu4dPvX5SD 6GGqdx4jk9KvI74usGeOBohmF0phTHkrWKBxXiyT0oS8zjnJlEn8ysIpGgO28jjr LpaHNZ/MXQKBgQDfLNcnS0LzpsS2aK0tzyZU8SMyqVHOGMxj7quhneBq2T6FbiLD T9TVlYaGNZ0j71vQaLI19qOubWymbautH0Op5KV8owdf4+bf1/NJaPIOzhDUSIjD Qo01WW31Z9XDSRhKFTnWzmCjBdeIcajyzf10YKsycaAW9lItu8aBrMndnQKBgQDb nNp/JyRwqjOrNljk7DHEs+SD39kHQzzCfqd+dnTPv2sc06+cpym3yulQcbokULpy fmRo3bin/pvJQ3aZX/Bdh9woTXqhXDdrrSwWInVYMQPyPk8f/D9mIOJp5FUWMwHD U+whIZSxsEeE+jtixlWtheKRYkQmzQZXbWdIhYyI3QKBgD+F/6wcZ85QW8nAUykA 3WrSIx/3cwDGdm4NRGct8ZOZjTHjiy9ojMOD1L7iMhRQ/3k3hUsin5LDMp/ryWGG x4uIaLat40kiC7T4I66DM7P59euqdz3w0PD+VU+h7GSivvsFDdySUt7bNK0AUVLh dMJfWxDN8QV0b5p3WuWH1U8B -----END PRIVATE KEY----- Private-Key: (2048 bit) modulus: 00:c5:05:71:d1:23:81:d5:28:08:61:de:c7:a2:72: 2a:28:8b:30:91:4d:b2:5e:d7:e6:2c:c4:d4:e3:6b: 85:f2:2b:2a:55:18:81:56:0c:68:59:b3:8e:05:08: 79:4f:38:e4:95:27:e3:6a:3f:be:30:f7:aa:0c:ec: 33:d2:df:1a:3d:91:a4:32:64:11:67:d9:81:29:d8: 40:6a:e6:f7:f7:d3:b2:87:35:19:99:65:49:a4:9f: 4c:c7:39:21:29:36:66:36:7c:cc:48:48:1c:5e:c2: 5c:51:14:09:e2:c2:64:9d:ff:c4:c3:bc:72:4c:63: d1:6f:00:8b:d6:b9:3b:2f:e6:5d:2d:24:a9:3e:6b: dd:4a:e3:eb:4e:dd:47:43:47:b4:a7:a3:95:97:13: 17:ec:06:b5:b7:83:5c:9d:a3:74:c1:b3:1f:22:e7: f6:22:54:e7:0d:02:9c:bb:81:ed:bf:16:2c:18:dd: a0:97:24:1e:ab:ea:7b:85:e8:7f:26:46:02:38:af: 8b:e4:31:1b:0e:94:08:49:0e:76:4f:35:ec:1e:6e: 8a:3e:2b:74:37:97:06:e0:6e:63:8a:0f:fc:fd:b2: f9:3c:37:ff:a1:51:30:6d:21:7d:1f:46:d6:c6:f8: f2:c8:c3:7c:56:44:71:ab:31:29:f6:07:3b:0f:56: e0:cb publicExponent: 65537 (0x10001) privateExponent: 0a:22:54:8f:68:5f:26:42:af:e3:b0:dc:dd:eb:37: 65:ec:7a:ec:0e:6e:0d:58:d7:9b:17:e8:c7:65:e1: 76:ea:67:7c:07:0d:a8:0a:6d:57:a7:d7:b7:44:8f: 50:d6:e1:53:16:c1:28:d6:ec:86:82:46:b9:f1:70: 5c:f9:62:d5:25:e7:a7:3b:e4:75:4e:07:c9:ca:38: ce:06:e1:5c:5b:04:44:d6:23:61:f3:86:cd:33:f0: 74:12:e9:34:c0:7a:93:74:e9:e1:11:ec:7b:a7:4d: ae:51:f4:8c:38:69:8a:82:fc:71:01:01:74:12:72: 54:5e:57:d3:0c:a6:11:b9:95:98:2d:23:80:7f:cc: c6:c0:40:3d:65:ba:64:a8:9c:83:d5:0b:32:55:a2: 01:9d:cc:44:06:4f:8c:71:e0:a5:89:00:02:c5:16: 28:06:c2:07:05:50:71:58:c6:3b:9f:56:8d:f6:63: cd:35:f9:a5:0b:55:54:7e:bc:ae:e7:22:1f:cf:03: 4d:90:b0:8c:29:23:06:1c:60:f8:e2:24:24:12:c4: e7:09:21:f3:68:c8:1d:28:af:67:ad:df:97:02:f0: cf:e1:34:f8:78:44:2d:26:49:ae:7d:8c:63:a2:71: 9a:29:37:a8:d3:54:38:5f:d9:fb:79:ac:76:3d:a5: b9 prime1: 00:e3:c2:50:bf:de:3c:69:f3:32:72:e8:ff:28:25: 02:af:ed:37:6f:33:05:23:e1:54:96:38:76:41:1c: bb:f8:7a:f2:5a:6a:26:b4:b9:08:c8:a3:55:03:6b: c0:18:8a:da:a1:5f:53:66:08:27:a1:18:7f:32:b9: 78:ff:bf:a5:77:0b:33:0a:0e:49:91:af:53:6b:38: d9:d2:cf:94:2c:9d:d4:34:e1:9e:a2:84:04:25:3e: 62:7d:ea:0e:30:2a:d8:28:0b:b0:18:a7:23:f4:83: 56:be:e3:fb:23:6f:5f:a8:dd:84:08:e2:90:ff:17: bd:5c:fa:a6:b3:b4:7e:cf:47 prime2: 00:dd:73:6d:f2:36:64:f7:f8:9c:a9:b5:fd:1f:2a: 31:2f:38:d2:be:c7:05:0a:ce:2f:5c:2f:f3:b3:06: ae:72:38:80:b5:3f:3d:93:f3:98:0e:7b:58:bc:93: 06:70:b3:ec:65:a4:6e:ae:05:3e:a5:98:82:44:2d: dd:24:e7:d1:72:ba:93:6e:e1:d3:ef:5f:94:83:e8: 61:aa:77:1e:23:93:d2:af:23:be:2e:b0:67:8e:06: 88:66:17:4a:61:4c:79:2b:58:a0:71:5e:2c:93:d2: 84:bc:ce:39:c9:94:49:fc:ca:c2:29:1a:03:b6:f2: 38:eb:2e:96:87:35:9f:cc:5d exponent1: 00:df:2c:d7:27:4b:42:f3:a6:c4:b6:68:ad:2d:cf: 26:54:f1:23:32:a9:51:ce:18:cc:63:ee:ab:a1:9d: e0:6a:d9:3e:85:6e:22:c3:4f:d4:d5:95:86:86:35: 9d:23:ef:5b:d0:68:b2:35:f6:a3:ae:6d:6c:a6:6d: ab:ad:1f:43:a9:e4:a5:7c:a3:07:5f:e3:e6:df:d7: f3:49:68:f2:0e:ce:10:d4:48:88:c3:42:8d:35:59: 6d:f5:67:d5:c3:49:18:4a:15:39:d6:ce:60:a3:05: d7:88:71:a8:f2:cd:fd:74:60:ab:32:71:a0:16:f6: 52:2d:bb:c6:81:ac:c9:dd:9d exponent2: 00:db:9c:da:7f:27:24:70:aa:33:ab:36:58:e4:ec: 31:c4:b3:e4:83:df:d9:07:43:3c:c2:7e:a7:7e:76: 74:cf:bf:6b:1c:d3:af:9c:a7:29:b7:ca:e9:50:71: ba:24:50:ba:72:7e:64:68:dd:b8:a7:fe:9b:c9:43: 76:99:5f:f0:5d:87:dc:28:4d:7a:a1:5c:37:6b:ad: 2c:16:22:75:58:31:03:f2:3e:4f:1f:fc:3f:66:20: e2:69:e4:55:16:33:01:c3:53:ec:21:21:94:b1:b0: 47:84:fa:3b:62:c6:55:ad:85:e2:91:62:44:26:cd: 06:57:6d:67:48:85:8c:88:dd coefficient: 3f:85:ff:ac:1c:67:ce:50:5b:c9:c0:53:29:00:dd: 6a:d2:23:1f:f7:73:00:c6:76:6e:0d:44:67:2d:f1: 93:99:8d:31:e3:8b:2f:68:8c:c3:83:d4:be:e2:32: 14:50:ff:79:37:85:4b:22:9f:92:c3:32:9f:eb:c9: 61:86:c7:8b:88:68:b6:ad:e3:49:22:0b:b4:f8:23: ae:83:33:b3:f9:f5:eb:aa:77:3d:f0:d0:f0:fe:55: 4f:a1:ec:64:a2:be:fb:05:0d:dc:92:52:de:db:34: ad:00:51:52:e1:74:c2:5f:5b:10:cd:f1:05:74:6f: 9a:77:5a:e5:87:d5:4f:01Keep your private key in a secure location when it is not in use.
-
Generate an X.509 certificate using the private key created in the previous step. In this example, the certificate expires in 365 days, after which time it cannot be trusted. Be sure to set the expiration appropriately. The certificate must only be valid for the duration of the provisioning process. You can remove the certificate from your RIR's record after provisioning is complete. The
tr -d "\n"command strips newline characters (line breaks) from the output. You need to provide a Common Name when prompted, but the other fields can be left blank.$openssl req -new -x509 -key private-key.pem -days 365 | tr -d "\n" > certificate.pemThis results in output similar to the following:
Enter pass phrase for private-key.pem:xxxxxxxYou are about to be asked to enter information that will be incorporated into your certificate request. What you are about to enter is what is called a Distinguished Name or a DN. There are quite a few fields but you can leave some blank For some fields there will be a default value, If you enter '.', the field will be left blank. ----- Country Name (2 letter code) []: State or Province Name (full name) []: Locality Name (eg, city) []: Organization Name (eg, company) []: Organizational Unit Name (eg, section) []: Common Name (eg, fully qualified host name) []:example.comEmail Address []:Note
The Common Name is not needed for AWS provisioning. It can be any internal or public domain name.
You can inspect the certificate with the following command:
$cat certificate.pemThe output should be a long, PEM-encoded string without line breaks, prefaced by
-----BEGIN CERTIFICATE-----and followed by-----END CERTIFICATE-----.
2. Upload the X.509 certificate to the RDAP record in your RIR
Add the certificate that you previously created to the RDAP record for your RIR.
Be sure to include the -----BEGIN CERTIFICATE----- and -----END
CERTIFICATE----- strings before and after the encoded portion. All of
this content must be on a single, long line. The procedure for updating RDAP depends
on your RIR:
-
For ARIN, use the Account Manager portal
to add the certificate in the "Public Comments" section for the "Network Information" object representing your address range. Do not add it to the comments section for your organization. -
For RIPE, add the certificate as a new "descr" field to the "inetnum" or "inet6num" object representing your address range. These can usually be found in the "My Resources" section of the RIPE Database portal
. Do not add it to the comments section for your organization or the "remarks" field of the above objects. -
For APNIC, email the certificate to helpdesk@apnic.net
to manually add it to the "remarks" field for your address range. Send the email using the APNIC authorized contact for the IP addresses.
You can remove the certificate from your RIR's record after the provisioning stage below has been completed.
3. Create a ROA object in your RIR
Create a ROA object to authorize the Amazon ASNs 16509 and 14618 to advertise your address range, as well as the ASNs that are currently authorized to advertise the address range. For the AWS GovCloud (US) Regions, authorize ASN 8987 instead of 16509 and 14618. You must set the maximum length to the size of the CIDR that you are bringing in. The most specific IPv4 prefix you can bring is /24. The most specific IPv6 address range that you can bring is /48 for CIDRs that are publicly advertisable and /56 for CIDRs that are not publicly advertisable.
Important
If you are creating a ROA object for Amazon VPC IP Address Manager (IPAM),
when you create the ROAs, for IPv4 CIDRs you must set the maximum length of an
IP address prefix to /24. For IPv6 CIDRs, if you are adding them to
an advertisable pool, the maximum length of an IP address prefix must be
/48. This ensures that you have full flexibility to divide your
public IP address across AWS Regions. IPAM enforces the maximum length you
set. For more information about BYOIP addresses to IPAM, see Tutorial: BYOIP address CIDRs to IPAM in the
Amazon VPC IPAM User Guide.
It might take up to 24 hours for the ROA to become available to Amazon. For more information, consult your RIR:
-
ARIN — ROA Requests
-
RIPE — Managing ROAs
-
APNIC — Route Management
When you migrate advertisements from an on-premises workload to AWS, you must create a ROA for your existing ASN before creating the ROAs for Amazon's ASNs. Otherwise, you might see an impact to your existing routing and advertisements.
Important
For Amazon to advertise and continue advertising your IP address range, your ROAs with Amazon ASNs must be compliant with the above guidelines. If your ROAs are invalid or not compliant with the above guidelines, Amazon reserves the right to stop advertising your IP address range.
Note
This step is not required for non-publicly advertisable IPv6 address space.
Onboard your BYOIP
The onboarding process for BYOIP has the following tasks depending on your needs.
Tasks
Provision a publicly advertisable address range in AWS
When you provision an address range for use with AWS, you are confirming that you control the address range and are authorizing Amazon to advertise it. We also verify that you control the address range through a signed authorization message. This message is signed with the self-signed X.509 key pair that you used when updating the RDAP record with the X.509 certificate. AWS requires a cryptographically signed authorization message that it presents to the RIR. The RIR authenticates the signature against the certificate that you added to RDAP, and checks the authorization details against the ROA.
To provision the address range
-
Compose message
Compose the plaintext authorization message. The format of the message is as follows, where the date is the expiry date of the message:
1|aws|account|cidr|YYYYMMDD|SHA256|RSAPSSReplace the account number, address range, and expiry date with your own values to create a message resembling the following:
text_message="1|aws|0123456789AB|198.51.100.0/24|20211231|SHA256|RSAPSS"This is not to be confused with a ROA message, which has a similar appearance.
-
Sign message
Sign the plaintext message using the private key that you created previously. The signature returned by this command is a long string that you need to use in the next step.
Important
We recommend that you copy and paste this command. Except for the message content, do not modify or replace any of the values.
signed_message=$( echo -n $text_message | openssl dgst -sha256 -sigopt rsa_padding_mode:pss -sigopt rsa_pss_saltlen:-1 -sign private-key.pem -keyform PEM | openssl base64 | tr -- '+=/' '-_~' | tr -d "\n") -
Provision address
Use the AWS CLI provision-byoip-cidr command to provision the address range. The
--cidr-authorization-contextoption uses the message and signature strings that you created previously.Important
You must specify the AWS Region where the BYOIP range should be provisioned if it differs from your AWS CLI configuration
Default region name.aws ec2 provision-byoip-cidr --cidraddress-range--cidr-authorization-context Message="$text_message",Signature="$signed_message" --regionus-east-1Provisioning an address range is an asynchronous operation, so the call returns immediately, but the address range is not ready to use until its status changes from
pending-provisiontoprovisioned. -
Monitor progress
While most provisioning will be completed within two hours, it might take up to one week to complete the provisioning process for publicly advertisable ranges. Use the describe-byoip-cidrs command to monitor progress, as in this example:
aws ec2 describe-byoip-cidrs --max-results 5 --regionus-east-1If there are issues during provisioning and the status goes to
failed-provision, you must run theprovision-byoip-cidrcommand again after the issues have been resolved.
Provision an IPv6 address range that's not publicly advertisable
By default, an address range is provisioned to be publicly advertisable to the internet. You can provision an IPv6 address range that will not be publicly advertisable. For routes that are not publicly advertisable, the provisioning process generally completes within minutes. When you associate an IPv6 CIDR block from a non-public address range with a VPC, the IPv6 CIDR can only be accessed through hybrid connectivity options that support IPv6, such as AWS Direct Connect, AWS Site-to-Site VPN, or Amazon VPC Transit Gateways.
A ROA is not required to provision a non-public address range.
Important
-
You can only specify whether an address range is publicly advertisable during provisioning. You cannot change the advertisable status later on.
-
Amazon VPC doesn't support unique local address
(ULA) CIDRs. All VPCs must have unique IPv6 CIDRs. Two VPCs can’t have the same IPv6 CIDR range.
To provision an IPv6 address range that will not be publicly advertisable, use the following provision-byoip-cidr command.
aws ec2 provision-byoip-cidr --cidraddress-range--cidr-authorization-context Message="$text_message",Signature="$signed_message" --no-publicly-advertisable --regionus-east-1
Advertise the address range through AWS
After the address range is provisioned, it is ready to be advertised. You must advertise the exact address range that you provisioned. You can't advertise only a portion of the provisioned address range.
If you provisioned an IPv6 address range that will not be publicly advertised, you do not need to complete this step.
We recommend that you stop advertising the address range or any portion of the range from other locations before you advertise it through AWS. If you keep advertising your IP address range or any portion of it from other locations, we can't reliably support it or troubleshoot issues. Specifically, we can't guarantee that traffic to the address range or a portion of the range will enter our network.
To minimize down time, you can configure your AWS resources to use an address from your address pool before it is advertised, and then simultaneously stop advertising it from the current location and start advertising it through AWS. For more information about allocating an Elastic IP address from your address pool, see Allocate an Elastic IP address.
Limitations
-
You can run the advertise-byoip-cidr command at most once every 10 seconds, even if you specify different address ranges each time.
-
You can run the withdraw-byoip-cidr command at most once every 10 seconds, even if you specify different address ranges each time.
To advertise the address range, use the following advertise-byoip-cidr command.
aws ec2 advertise-byoip-cidr --cidraddress-range--regionus-east-1
To stop advertising the address range, use the following withdraw-byoip-cidr command.
aws ec2 withdraw-byoip-cidr --cidraddress-range--regionus-east-1
Deprovision the address range
To stop using your address range with AWS, first release any Elastic IP addresses and disassociate any IPv6 CIDR blocks that are still allocated from the address pool. Then stop advertising the address range, and finally, deprovision the address range.
You cannot deprovision a portion of the address range. If you want to use a more specific address range with AWS, deprovision the entire address range and provision a more specific address range.
(IPv4) To release each Elastic IP address, use the following release-address command.
aws ec2 release-address --allocation-ideipalloc-12345678abcabcabc--regionus-east-1
(IPv6) To disassociate an IPv6 CIDR block, use the following disassociate-vpc-cidr-block command.
aws ec2 disassociate-vpc-cidr-block --association-idvpc-cidr-assoc-12345abcd1234abc1--regionus-east-1
To stop advertising the address range, use the following withdraw-byoip-cidr command.
aws ec2 withdraw-byoip-cidr --cidraddress-range--regionus-east-1
To deprovision the address range, use the following deprovision-byoip-cidr command.
aws ec2 deprovision-byoip-cidr --cidraddress-range--regionus-east-1
It can take up to a day to deprovision an address range.
Work with your address range
You can view and use the IPv4 and IPv6 address ranges that you've provisioned in your account.
IPv4 address ranges
You can create an Elastic IP address from your IPv4 address pool and use it with your AWS resources, such as EC2 instances, NAT gateways, and Network Load Balancers.
To view information about the IPv4 address pools that you've provisioned in your account, use the following describe-public-ipv4-pools command.
aws ec2 describe-public-ipv4-pools --regionus-east-1
To create an Elastic IP address from your IPv4 address pool, use the allocate-address command.
You can use the --public-ipv4-pool option to specify the ID of the
address pool returned by describe-byoip-cidrs. Or you can use the
--address option to specify an address from the address range that
you provisioned.
IPv6 address ranges
To view information about the IPv6 address pools that you've provisioned in your account, use the following describe-ipv6-pools command.
aws ec2 describe-ipv6-pools --regionus-east-1
To create a VPC and specify an IPv6 CIDR from your IPv6 address pool, use the
following create-vpc command.
To let Amazon choose the IPv6 CIDR from your IPv6 address pool, omit the
--ipv6-cidr-block option.
aws ec2 create-vpc --cidr-block10.0.0.0/16--ipv6-cidr-blockipv6-cidr--ipv6-poolpool-id--regionus-east-1
To associate an IPv6 CIDR block from your IPv6 address pool with a VPC, use the
following associate-vpc-cidr-block command. To let Amazon choose the IPv6 CIDR
from your IPv6 address pool, omit the --ipv6-cidr-block option.
aws ec2 associate-vpc-cidr-block --vpc-idvpc-123456789abc123ab--ipv6-cidr-blockipv6-cidr--ipv6-poolpool-id--regionus-east-1
To view your VPCs and the associated IPv6 address pool information, use the describe-vpcs command. To view information about associated IPv6 CIDR blocks from a specific IPv6 address pool, use the following get-associated-ipv6-pool-cidrs command.
aws ec2 get-associated-ipv6-pool-cidrs --pool-idpool-id--regionus-east-1
If you disassociate the IPv6 CIDR block from your VPC, it's released back into your IPv6 address pool.
Validate your BYOIP
-
Validate the self-signed x.509 key pair
Validate that the certificate has been uploaded and is valid via the whois command.
For ARIN, use
whois -h whois.arin.net r +to look up the RDAP record for your address range. Check the2001:0DB8:6172::/48Public Commentssection for theNetRange(network range) in the command output. The certificate should be added in thePublic Commentssection for the address range.You can inspect the
Public Commentscontaining the certificate using the following command:whois -h whois.arin.net r +2001:0DB8:6172::/48| grep Comments | grep BEGINThis returns output with the contents of the key, which should be similar to the following:
Public Comments:
-----BEGIN CERTIFICATE-----
MIID1zCCAr+gAwIBAgIUBkRPNSLrPqbRAFP8RDAHSP+I1TowDQYJKoZIhvcNAQE
LBQAwezELMAkGA1UEBhMCTloxETAPBgNVBAgMCEF1Y2tsYW5kMREwDwYDVQQHDA
hBdWNrbGFuZDEcMBoGA1UECgwTQW1hem9uIFdlYiBTZXJ2aWNlczETMBEGA1UEC
wwKQllPSVAgRGVtbzETMBEGA1UEAwwKQllPSVAgRGVtbzAeFw0yMTEyMDcyMDI0
NTRaFw0yMjEyMDcyMDI0NTRaMHsxCzAJBgNVBAYTAk5aMREwDwYDVQQIDAhBdWN
rbGFuZDERMA8GA1UEBwwIQXVja2xhbmQxHDAaBgNVBAoME0FtYXpvbiBXZWIgU2
VydmljZXMxEzARBgNVBAsMCkJZT0lQIERlbW8xEzARBgNVBAMMCkJZT0lQIERlb
W8wggEiMA0GCSqGSIb3DQEBAQUAA4IBDwAwggEKAoIBAQCfmacvDp0wZ0ceiXXc
R/q27mHI/U5HKt7SST4X2eAqufR9wXkfNanAEskgAseyFypwEEQr4CJijI/5hp9
prh+jsWHWwkFRoBRR9FBtwcU/45XDXLga7D3stsI5QesHVRwOaXUdprAnndaTug
mDPkD0vrl475JWDSIm+PUxGWLy+60aBqiaZq35wU/x+wXlAqBXg4MZK2KoUu27k
Yt2zhmy0S7Ky+oRfRJ9QbAiSu/RwhQbh5Mkp1ZnVIc7NqnhdeIW48QaYjhMlUEf
xdaqYUinzz8KpjfADZ4Hvqj9jWZ/eXo/9b2rGlHWkJsbhr0VEUyAGu1bwkgcdww
3A7NjOxQbAgMBAAGjUzBRMB0GA1UdDgQWBBStFyujN6SYBr2glHpGt0XGF7GbGT
AfBgNVHSMEGDAWgBStFyujN6SYBr2glHpGt0XGF7GbGTAPBgNVHRMBAf8EBTADA
QH/MA0GCSqGSIb3DQEBCwUAA4IBAQBX6nn6YLhz521lfyVfxY0t6o3410bQAeAF
08ud+ICtmQ4IO4A4B7zV3zIVYr0clrOOaFyLxngwMYN0XY5tVhDQqk4/gmDNEKS
Zy2QkX4Eg0YUWVzOyt6fPzjOvJLcsqc1hcF9wySL507XQz76Uk5cFypBOzbnk35
UkWrzA9KK97cXckfIESgK/k1N4ecwxwG6VQ8mBGqVpPpey+dXpzzzv1iBKN/VY4
ydjgH/LBfdTsVarmmy2vtWBxwrqkFvpdhSGCvRDl/qdO/GIDJi77dmZWkh/ic90
MNk1f38gs1jrCj8lThoar17Uo9y/Q5qJIsoNPyQrJRzqFU9F3FBjiPJF
-----END CERTIFICATE-----
For RIPE, use
whois -r -h whois.ripe.netto look up the RDAP record for your address range. Check the2001:0DB8:7269::/48descrsection for theinetnumobject (network range) in the command output. The certificate should be added as a newdescrfield for the address range.You can inspect the
descrcontaining the certificate using the following command:whois -r -h whois.ripe.net2001:0DB8:7269::/48| grep descr | grep BEGINThis returns output with the contents of the key, which should be similar to the following:
descr:
-----BEGIN CERTIFICATE-----MIID1zCCAr+gAwIBAgIUBkRPNSLrPqbRAFP8
RDAHSP+I1TowDQYJKoZIhvcNAQELBQAwezELMAkGA1UEBhMCTloxETAPBgNVBAg
MCEF1Y2tsYW5kMREwDwYDVQQHDAhBdWNrbGFuZDEcMBoGA1UECgwTQW1hem9uIF
dlYiBTZXJ2aWNlczETMBEGA1UECwwKQllPSVAgRGVtbzETMBEGA1UEAwwKQllPS
VAgRGVtbzAeFw0yMTEyMDcyMDI0NTRaFw0yMjEyMDcyMDI0NTRaMHsxCzAJBgNV
BAYTAk5aMREwDwYDVQQIDAhBdWNrbGFuZDERMA8GA1UEBwwIQXVja2xhbmQxHDA
aBgNVBAoME0FtYXpvbiBXZWIgU2VydmljZXMxEzARBgNVBAsMCkJZT0lQIERlbW
8xEzARBgNVBAMMCkJZT0lQIERlbW8wggEiMA0GCSqGSIb3DQEBAQUAA4IBDwAwg
gEKAoIBAQCfmacvDp0wZ0ceiXXcR/q27mHI/U5HKt7SST4X2eAqufR9wXkfNanA
EskgAseyFypwEEQr4CJijI/5hp9prh+jsWHWwkFRoBRR9FBtwcU/45XDXLga7D3
stsI5QesHVRwOaXUdprAnndaTugmDPkD0vrl475JWDSIm+PUxGWLy+60aBqiaZq
35wU/x+wXlAqBXg4MZK2KoUu27kYt2zhmy0S7Ky+oRfRJ9QbAiSu/RwhQbh5Mkp
1ZnVIc7NqnhdeIW48QaYjhMlUEfxdaqYUinzz8KpjfADZ4Hvqj9jWZ/eXo/9b2r
GlHWkJsbhr0VEUyAGu1bwkgcdww3A7NjOxQbAgMBAAGjUzBRMB0GA1UdDgQWBBS
tFyujN6SYBr2glHpGt0XGF7GbGTAfBgNVHSMEGDAWgBStFyujN6SYBr2glHpGt0
XGF7GbGTAPBgNVHRMBAf8EBTADAQH/MA0GCSqGSIb3DQEBCwUAA4IBAQBX6nn6Y
Lhz521lfyVfxY0t6o3410bQAeAF08ud+ICtmQ4IO4A4B7zV3zIVYr0clrOOaFyL
xngwMYN0XY5tVhDQqk4/gmDNEKSZy2QkX4Eg0YUWVzOyt6fPzjOvJLcsqc1hcF9
wySL507XQz76Uk5cFypBOzbnk35UkWrzA9KK97cXckfIESgK/k1N4ecwxwG6VQ8
mBGqVpPpey+dXpzzzv1iBKN/VY4ydjgH/LBfdTsVarmmy2vtWBxwrqkFvpdhSGC
vRDl/qdO/GIDJi77dmZWkh/ic90MNk1f38gs1jrCj8lThoar17Uo9y/Q5qJIsoN
PyQrJRzqFU9F3FBjiPJF
-----END CERTIFICATE-----
For APNIC, use
whois -h whois.apnic.netto look up the RDAP record for your BYOIP address range. Check the2001:0DB8:6170::/48remarkssection for theinetnumobject (network range) in the command output. The certificate should be added as a newremarksfield for the address range.You can inspect the
remarkscontaining the certificate using the following command:whois -h whois.apnic.net2001:0DB8:6170::/48| grep remarks | grep BEGINThis returns output with the contents of the key, which should be similar to the following:
remarks: -----BEGIN CERTIFICATE----- MIID1zCCAr+gAwIBAgIUBkRPNSLrPqbRAFP8RDAHSP+I1TowDQYJKoZIhvcNAQE LBQAwezELMAkGA1UEBhMCTloxETAPBgNVBAgMCEF1Y2tsYW5kMREwDwYDVQQHDA hBdWNrbGFuZDEcMBoGA1UECgwTQW1hem9uIFdlYiBTZXJ2aWNlczETMBEGA1UEC wwKQllPSVAgRGVtbzETMBEGA1UEAwwKQllPSVAgRGVtbzAeFw0yMTEyMDcyMDI0 NTRaFw0yMjEyMDcyMDI0NTRaMHsxCzAJBgNVBAYTAk5aMREwDwYDVQQIDAhBdWN rbGFuZDERMA8GA1UEBwwIQXVja2xhbmQxHDAaBgNVBAoME0FtYXpvbiBXZWIgU2 VydmljZXMxEzARBgNVBAsMCkJZT0lQIERlbW8xEzARBgNVBAMMCkJZT0lQIERlb W8wggEiMA0GCSqGSIb3DQEBAQUAA4IBDwAwggEKAoIBAQCfmacvDp0wZ0ceiXXc R/q27mHI/U5HKt7SST4X2eAqufR9wXkfNanAEskgAseyFypwEEQr4CJijI/5hp9 prh+jsWHWwkFRoBRR9FBtwcU/45XDXLga7D3stsI5QesHVRwOaXUdprAnndaTug mDPkD0vrl475JWDSIm+PUxGWLy+60aBqiaZq35wU/x+wXlAqBXg4MZK2KoUu27k Yt2zhmy0S7Ky+oRfRJ9QbAiSu/RwhQbh5Mkp1ZnVIc7NqnhdeIW48QaYjhMlUEf xdaqYUinzz8KpjfADZ4Hvqj9jWZ/eXo/9b2rGlHWkJsbhr0VEUyAGu1bwkgcdww 3A7NjOxQbAgMBAAGjUzBRMB0GA1UdDgQWBBStFyujN6SYBr2glHpGt0XGF7GbGT AfBgNVHSMEGDAWgBStFyujN6SYBr2glHpGt0XGF7GbGTAPBgNVHRMBAf8EBTADA QH/MA0GCSqGSIb3DQEBCwUAA4IBAQBX6nn6YLhz521lfyVfxY0t6o3410bQAeAF 08ud+ICtmQ4IO4A4B7zV3zIVYr0clrOOaFyLxngwMYN0XY5tVhDQqk4/gmDNEKS Zy2QkX4Eg0YUWVzOyt6fPzjOvJLcsqc1hcF9wySL507XQz76Uk5cFypBOzbnk35 UkWrzA9KK97cXckfIESgK/k1N4ecwxwG6VQ8mBGqVpPpey+dXpzzzv1iBKN/VY4 ydjgH/LBfdTsVarmmy2vtWBxwrqkFvpdhSGCvRDl/qdO/GIDJi77dmZWkh/ic90 MNk1f38gs1jrCj8lThoar17Uo9y/Q5qJIsoNPyQrJRzqFU9F3FBjiPJF -----END CERTIFICATE----- -
Validate the creation of a ROA object
Validate the successful creation of the ROA objects using the RIPEstat Data API. Be sure to test your address range against the Amazon ASNs 16509 and 14618, plus the ASNs that are currently authorized to advertise the address range.
You can inspect the ROA objects from different Amazon ASNs with your address range by using the following command:
curl --location --request GET "https://stat.ripe.net/data/rpki-validation/data.json?resource=ASN&prefix=CIDRIn this example output, the response has a result of
"status":
                        "valid"
for the Amazon ASN 16509. This indicates the ROA object for the address range was created successfully:{ "messages": [], "see_also": [], "version": "0.3", "data_call_name": "rpki-validation", "data_call_status": "supported", "cached": false, "data": { "validating_roas": [ { "origin": "16509", "prefix": "2001:0DB8::/32", "max_length": 48, "validity": "valid" }, { "origin": "14618", "prefix": "2001:0DB8::/32", "max_length": 48, "validity": "invalid_asn" }, { "origin": "64496", "prefix": "2001:0DB8::/32", "max_length": 48, "validity": "invalid_asn" } ], "status": "valid", "validator": "routinator", "resource": "16509", "prefix": "2001:0DB8::/32" }, "query_id": "20230224152430-81e6384e-21ba-4a86-852a-31850787105f", "process_time": 58, "server_id": "app116", "build_version": "live.2023.2.1.142", "status": "ok", "status_code": 200, "time": "2023-02-24T15:24:30.773654" }
A status of “unknown” indicates the ROA object for the address range has
not been created. A status of “invalid_asn” indicates that the ROA object
for the address range was not created successfully.
Regional availability
The BYOIP feature is currently available in all commercial AWS Regions
Local Zone availability
A Local Zone is an extension of an AWS Region in geographic proximity to your users. Local Zones are grouped into "network border groups". In AWS, a network border group is a collection of Availability Zones (AZs), Local Zones, or Wavelength Zones from which AWS advertises a public IP address. Local Zones may have different network border groups than the AZs in an AWS Region to ensure minimum latency or physical distance between the AWS network and the customers accessing the resources in these Zones.
You can provision BYOIPv4 address ranges to and advertise them in the following Local
Zone network border groups using the --network-border-group option:
-
us-east-1-dfw-2
-
us-west-2-lax-1
-
us-west-2-phx-2
If you have Local Zones enabled (see Enable a Local Zone), you can choose a network border group for Local Zones when you provision and advertise a BYOIPv4 CIDR. Choose the network border group carefully as the EIP and the AWS resource it is associated with must reside in the same network border group.
Note
You cannot provision or advertise BYOIPv6 address ranges in Local Zones at this time.
Learn more
For more information, see the AWS Online Tech talk Deep Dive on Bring Your Own IP
