Amazon Monitron is no longer open to new customers. Existing customers can
continue to use the service as normal. For capabilities similar to Amazon
Monitron, see our blog post
Exporting your data with CloudShell
Topics
Step 1: Creating an Amazon S3 bucket (with AWS CloudShell)
-
Log in to the AWS Console.
-
Open AWS CloudShell
AWS CloudShell is a command-line environment that operates inside your browser. Inside AWS CloudShell, you can use the AWS Command Line Interface to launch and configure many AWS services.
-
In AWS CloudShell, enter the following command, where bucketname is the name of the bucket you are creating:
$aws s3api create-bucket --bucket bucketname --region us-east-1This command creates an Amazon S3 bucket to store your raw data. You will be able to easily access your bucket from the console, and download your data at your convenience. For more information, see Creating, configuring, and working with Amazon S3 buckets.
Important
You are responsible for taking the appropriate steps to secure your data. We strongly recommend using server-side encryption and blocking public access to your bucket.
In the command above, the bucket is created in the US East (N. Virginia) Region. You can optionally specify a different Region in the request body. For more information, see Regions, Availability Zones, and Local Zones.
You should see output that looks something like this:
{ "Location": "/
bucketname" } -
Identify the Amazon Resource Name (ARN) of the bucket you created, which will be:
arn:aws:s3:::
bucketname
Step 2: Granting Amazon Monitron access to your Amazon S3 bucket (with AWS CloudShell)
-
Paste the code below into a text editor, and save it as: monitron-assumes-role.json. Do not use Microsoft Word, which will add extra characters. Use a simple text editor like Notepad or TextEdit.
This policy gives Amazon Monitron permission to assume the role that will allow it to access your S3 bucket. For more information, see Policies and permissions in IAM.
-
Paste the text below into a text editor, and save it as: monitron-role-accesses-s3.json
This policy will allow Amazon Monitron (using the role created above) to access your Amazon S3 bucket.
-
In the text file you just created, replace every occurrence of
bucketnamewith the name of your bucket.For example, if the name of your bucket is relentless, then your file will look like this:
-
Upload both of the json files that you just created to CloudShell in the home directory.
To upload a file, choose Actions from the upper right hand corner of the CloudShell console page, then choose Upload file.
-
Enter the following on the command line in CloudShell:
aws iam create-role --role-name role-for-monitron --assume-role-policy-document "cat monitron-assumes-role.json"
This command creates the role and attaches the monitron-assumes-role policy.
You should see output that looks something like this:
 {
	"Role": {
		"Path": "/",
		"RoleName": "role-for-monitron",
		"RoleId": "AROAT7PQQWN6BMTMASVPP",
		"Arn": "arn:aws:iam::273771705212:role/role-for-monitron",
		"CreateDate": "2021-07-14T02:48:15+00:00",
		"AssumeRolePolicyDocument": {
			"Version": "2012-10-17",
			"Statement": [{
				"Sid": "",
				"Effect": "Allow",
				"Principal": {
					"Service": [
						"monitron.amazonaws.com"
					]
				},
				"Action": "sts:AssumeRole"
			}]
		}
	}
}
Take note of the ARN value for the role you just created. You will need it later.
In our example, the ARN value is:
arn:aws:iam::273771705212:role/role-for-monitron -
Enter the following on the command line in CloudShell:
aws iam create-policy --policy-name role-uses-bucket --policy-document "cat role-uses-bucket.json"
This command creates the monitron-role-accesses-s3 policy.
You should see output that looks something like this:
 {
	"Policy": {
		"PolicyName": "role-uses-bucket",
		"PolicyId": "ANPAT7PQQWN6I5KLORSDQ",
		"Arn": "arn:aws:iam::273771705212:policy/role-uses-bucket",
		"Path": "/",
		"DefaultVersionId": "v1",
		"AttachmentCount": 0,
		"PermissionsBoundaryUsageCount": 0,
		"IsAttachable": true,
		"CreateDate": "2021-07-14T02:19:23+00:00",
		"UpdateDate": "2021-07-14T02:19:23+00:00"
	}
}
Take note of the ARN value for the policy that you just created. You will need it for the next step.
In our example, the ARN value is:
arn:aws:iam::273771705212:policy/role-uses-bucket
-
Enter the following on the command line in CloudShell, replacing the ARN with the ARN for your role-uses-bucket policy:
 aws iam attach-role-policy --role-name role-for-monitron --policy-arn
      arn:aws:iam::273771705212:policy/role-uses-bucket
This command attaches the monitron-role-accesses-s3 policy to the role you just created.
Now you have created and provisioned an Amazon S3 bucket, a role that Amazon Monitron can assume, a policy that will allow Amazon Monitron to assume that role, and another policy that will allow the service using that role to use your Amazon S3 bucket.
You are responsible for taking the appropriate steps to secure your data. We strongly recommend using server-side encryption and blocking public access to your bucket. For more information, see Blocking public access.
Step 3: Creating your support ticket
-
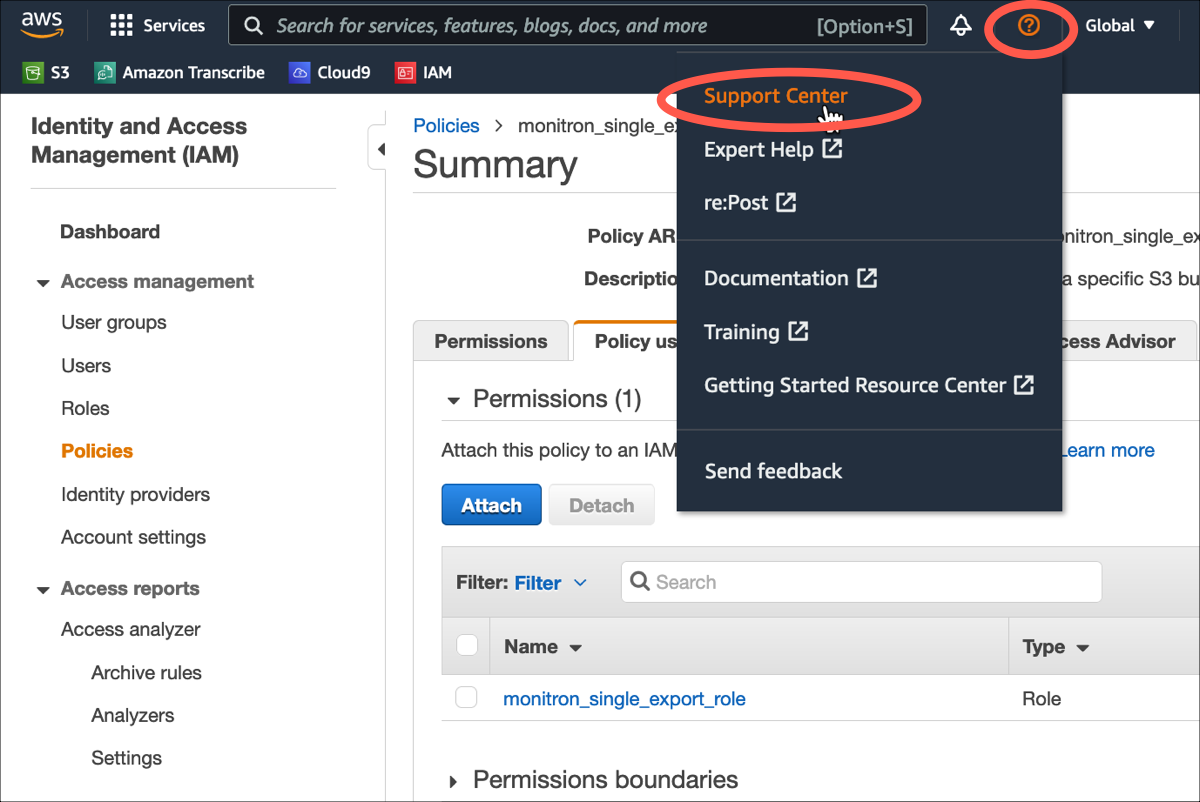
From your AWS console, choose the question mark icon near the upper right corner of any page, then choose Support Center.
-
On the next page, choose Create case.

-
On the How can we help? page, do the following:
-
Choose Account and billing support.
-
Under Service, choose Account.
-
Under Category, choose Compliance & Accreditations.
-
Choose Severity, if that option is available to you based on your support subscription.
-
Choose Next step: Additional information.

-
-
In Additional information do the following:
-
Under Subject, enter Amazon Monitron data export request.
-
In the Description field, enter:
-
your account ID
-
the region of the bucket you created
-
the ARN of the bucket you created (for example: "arn:aws:s3:::bucketname")
-
the ARN of the role you created (for example: "arn:aws:iam::273771705212:role/role-for-monitron")

-
-
Choose Next step: Solve now or contact us.
-
-
In Solve now or contact us do the following:
-
In Solve now, select Next.

-
In Contact us, choose your Preferred contact language and preferred method of contact.
-
Choose Submit. A confirmation screen with your case ID and details will be displayed.

-
An AWS customer support specialist will get back to you as soon as possible. If there are any issues with the steps listed, the specialist may ask you for more information. If all the necessary information has been provided, the specialist will let you know as soon as your data has been copied to the Amazon S3 bucket that you created above.
