Tutorial: Create a WebSocket chat app with a WebSocket API, Lambda and DynamoDB
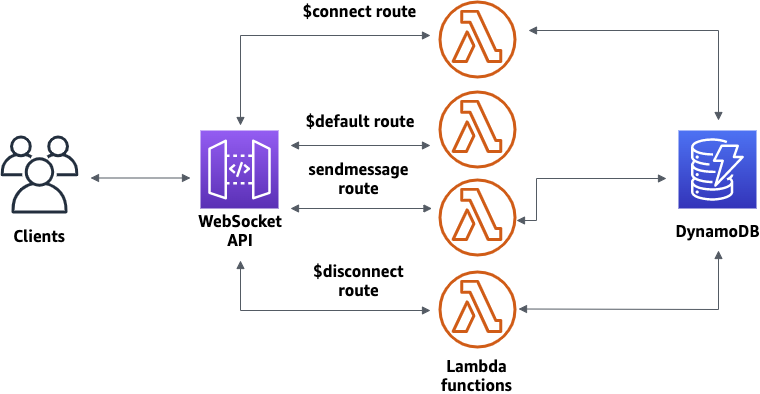
In this tutorial, you'll create a serverless chat application with a WebSocket API. With a WebSocket API, you can support two-way communication between clients. Clients can receive messages without having to poll for updates.
This tutorial takes approximately 30 minutes to complete. First, you'll use an CloudFormation template to create Lambda functions that will handle API requests, as well as a DynamoDB table that stores your client IDs. Then, you'll use the API Gateway console to create a WebSocket API that integrates with your Lambda functions. Lastly, you'll test your API to verify that messages are sent and received.
To complete this tutorial, you need an AWS account and an AWS Identity and Access Management user with console access. For more information, see Set up to use API Gateway.
You also need wscat to connect to your API. For more information, see Use wscat to connect to a WebSocket API and send messages to it.
Topics
Step 1: Create Lambda functions and a DynamoDB table
Download and unzip the app creation template for CloudFormation. You'll use this template to create a Amazon DynamoDB table to store your app's client IDs. Each connected client has a unique ID which we will use as the table's partition key. This template also creates Lambda functions that update your client connections in DynamoDB and handle sending messages to connected clients.
To create an CloudFormation stack
Open the CloudFormation console at https://console.aws.amazon.com/cloudformation
. -
Choose Create stack and then choose With new resources (standard).
-
For Specify template, choose Upload a template file.
-
Select the template that you downloaded.
-
Choose Next.
-
For Stack name, enter
websocket-api-chat-app-tutorialand then choose Next. -
For Configure stack options, choose Next.
-
For Capabilities, acknowledge that CloudFormation can create IAM resources in your account.
-
Choose Next, and then choose Submit.
CloudFormation provisions the resources specified in the template. It can take a few minutes to finish provisioning your resources. When the status of your CloudFormation stack is CREATE_COMPLETE, you're ready to move on to the next step.
Step 2: Create a WebSocket API
You'll create a WebSocket API to handle client connections and route requests to the Lambda functions that you created in Step 1.
To create a WebSocket API
Sign in to the API Gateway console at https://console.aws.amazon.com/apigateway
. -
Choose Create API. Then for WebSocket API, choose Build.
-
For API name, enter
websocket-chat-app-tutorial. -
For IP address type, select IPv4.
-
For Route selection expression, enter
request.body.action. The route selection expression determines the route that API Gateway invokes when a client sends a message. -
Choose Next.
-
For Predefined routes, choose Add $connect, Add $disconnect, and Add $default. The $connect and $disconnect routes are special routes that API Gateway invokes automatically when a client connects to or disconnects from an API. API Gateway invokes the
$defaultroute when no other routes match a request. -
For Custom routes, choose Add custom route. For Route key, enter
sendmessage. This custom route handles messages that are sent to connected clients. -
Choose Next.
-
Under Attach integrations, for each route and Integration type, choose Lambda.
For Lambda, choose the corresponding Lambda function that you created with CloudFormation in Step 1. Each function's name matches a route. For example, for the $connect route, choose the function named
websocket-chat-app-tutorial-ConnectHandler. -
Review the stage that API Gateway creates for you. By default, API Gateway creates a stage name
productionand automatically deploys your API to that stage. Choose Next. -
Choose Create and deploy.
Step 3: Test your API
Next, you'll test your API to make sure that it works correctly. Use the wscat command to connect
to the API.
To to get the invoke URL for your API
Sign in to the API Gateway console at https://console.aws.amazon.com/apigateway
. -
Choose your API.
-
Choose Stages, and then choose production.
-
Note your API's WebSocket URL. The URL should look like
wss://.abcdef123.execute-api.us-east-2.amazonaws.com/production
To connect to your API
-
Use the following command to connect to your API. When you connect to your API, API Gateway invokes the
$connectroute. When this route is invoked, it calls a Lambda function that stores your connection ID in DynamoDB.wscat -c wss://abcdef123.execute-api.us-west-2.amazonaws.com/productionConnected (press CTRL+C to quit)
-
Open a new terminal and run the wscat command again with the following parameters.
wscat -c wss://abcdef123.execute-api.us-west-2.amazonaws.com/productionConnected (press CTRL+C to quit)
This gives you two connected clients that can exchange messages.
To send a message
-
API Gateway determines which route to invoke based on your API's route selection expression. Your API's route selection expression is
$request.body.action. As a result, API Gateway invokes thesendmessageroute when you send the following message:{"action": "sendmessage", "message": "hello, everyone!"}The Lambda function associated with the invoked route collects the client IDs from DynamoDB. Then, the function calls the API Gateway Management API and sends the message to those clients. All connected clients receive the following message:
< hello, everyone!
To invoke your API's $default route
-
API Gateway invokes your API's default route when a client sends a message that doesn't match your defined routes. The Lambda function associated with the
$defaultroute uses the API Gateway Management API to send the client information about their connection.testUse the sendmessage route to send a message. Your info: {"ConnectedAt":"2022-01-25T18:50:04.673Z","Identity":{"SourceIp":"192.0.2.1","UserAgent":null},"LastActiveAt":"2022-01-25T18:50:07.642Z","connectionID":"Mg_ugfpqPHcCIVA="}
To disconnect from your API
-
Press
CTRL+Cto disconnect from your API. When a client disconnects from your API, API Gateway invokes your API's$disconnectroute. The Lambda integration for your API's$disconnectroute removes the connection ID from DynamoDB.
Step 4: Clean up
To prevent unnecessary costs, delete the resources that you created as part of this tutorial. The following steps delete your CloudFormation stack and WebSocket API.
To delete a WebSocket API
Sign in to the API Gateway console at https://console.aws.amazon.com/apigateway
. -
On the APIs page, select your
websocket-chat-app-tutorialAPI. Choose Actions, choose Delete, and then confirm your choice.
To delete an CloudFormation stack
Open the CloudFormation console at https://console.aws.amazon.com/cloudformation
. -
Select your CloudFormation stack.
-
Choose Delete and then confirm your choice.
Next steps: Automate with CloudFormation
You can automate the creation and cleanup of all of the AWS resources involved in this tutorial. For an CloudFormation template that creates this API and all related resources, see ws-chat-app.yaml.
