AWS Cloud9 is no longer available to new customers. Existing customers of
AWS Cloud9 can continue to use the service as normal.
Learn more
PHP tutorial for AWS Cloud9
This tutorial enables you to run some PHP scripts in an AWS Cloud9 development environment.
Following this tutorial and creating this sample might result in charges to your AWS
account. These include possible charges for services such as Amazon EC2 and Amazon S3. For more
information, see Amazon EC2 Pricing
Topics
Prerequisites
Before you use this sample, make sure that your setup meets the following requirements:
-
You must have an existing AWS Cloud9 EC2 development environment. This sample assumes that you already have an EC2 environment that's connected to an Amazon EC2 instance that runs Amazon Linux or Ubuntu Server. If you have a different type of environment or operating system, you might need to adapt this sample's instructions to set up related tools. For more information, see Creating an environment in AWS Cloud9.
-
You have the AWS Cloud9 IDE for the existing environment already open. When you open an environment, AWS Cloud9 opens the IDE for that environment in your web browser. For more information, see Opening an environment in AWS Cloud9.
Step 1: Install required tools
In this step, you install PHP, which is required to run this sample.
Note
The following procedure installs PHP only. To install related tools such as an Apache web server and a MySQL database, see Tutorial: Installing a LAMP Web Server on Amazon Linux in the Amazon EC2 User Guide.
-
In a terminal session in the AWS Cloud9 IDE, confirm whether PHP is already installed by running the
php --versioncommand. (To start a new terminal session, on the menu bar, choose Window, New Terminal.) If successful, the output contains the PHP version number. If PHP is installed, skip ahead to Step 2: Add code. -
Run the
yum updatefor (Amazon Linux) orapt updatefor (Ubuntu Server) command to help ensure the latest security updates and bug fixes are installed.For Amazon Linux 2 and Amazon Linux:
sudo yum -y updateFor Ubuntu Server:
sudo apt update -
Install PHP by running the
installcommand.For Amazon Linux 2:
sudo amazon-linux-extras install -y php7.2For Amazon Linux:
sudo yum -y install php72Note
You can view your version of Amazon Linux using the following command:
cat /etc/system-releaseFor Ubuntu Server:
sudo apt install -y php php-xmlFor more information, see Installation and Configuration
on the PHP website.
Step 2: Add code
In the AWS Cloud9 IDE, create a file with this content, and save the file with the name
hello.php. (To create a file, on the menu bar, choose
File, New File. To save the file, choose
File, Save, type hello.php for
Filename, and then choose Save.)
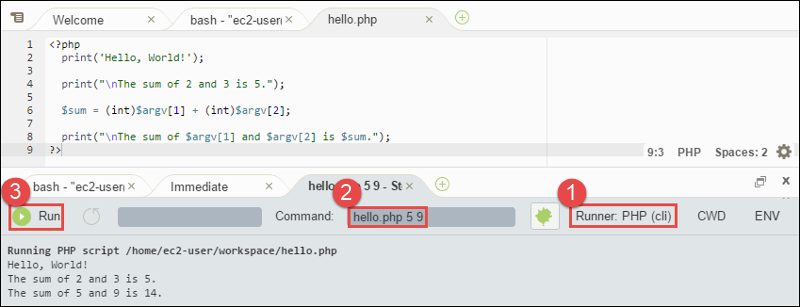
<?php
  print('Hello, World!');

  print("\nThe sum of 2 and 3 is 5.");

  $sum = (int)$argv[1] + (int)$argv[2];

  print("\nThe sum of $argv[1] and $argv[2] is $sum.");
?>
Note
The preceding code doesn't rely on any external files. However, if you ever include or require other PHP files in your file, and you want AWS Cloud9 to use those files to do code completion as you type, turn on the Project, PHP Support, Enable PHP code completion setting in Preferences, and then add the paths to those files to the Project, PHP Support, PHP Completion Include Paths setting. (To view and change your preferences, choose AWS Cloud9, Preferences on the menu bar.)
Step 3: Run the code
-
In the AWS Cloud9 IDE, on the menu bar, choose Run, Run Configurations, New Run Configuration.
-
On the [New] - Idle tab, choose Runner: Auto, and then choose PHP (cli).
-
For Command, type
hello.php 5 9. In the code,5represents$argv[1], and9represents$argv[2]. ($argv[0]represents the name of the file (hello.php).) -
Choose the Run button, and compare your output.
Hello, World!
The sum of 2 and 3 is 5.
The sum of 5 and 9 is 14.
Step 4: Install and configure the AWS SDK for PHP
You can enhance this sample to use the AWS SDK for PHP to create an Amazon S3 bucket, list your available buckets, and then delete the bucket you just created.
In this step, you install and configure the AWS SDK for PHP, which provides a convenient way
to interact with AWS services such as Amazon S3, from your PHP code. Before you can install
the AWS SDK for PHP, you should install Composer
To install Composer
Run the
curl
command with the silent (-s) and show error (-S)
options, piping the Composer installer into a PHP archive (PHAR) file, named
composer.phar by convention.
curl -sS https://getcomposer.org/installer | php
To install the AWS SDK for PHP
For Ubuntu Server, install additional packages that Composer needs to install the AWS SDK for PHP.
sudo apt install -y php-xml php-curl
For Amazon Linux or Ubuntu Server, use the php command to run the Composer installer to install the AWS SDK for PHP.
php composer.phar require aws/aws-sdk-php
This command creates several folders and files in your environment. The primary file you
will use is autoload.php, which is in the
vendor folder in your environment.
Note
After installation, Composer might suggest that you install additional dependencies. You can do this with a command such as the following, specifying the list of dependencies to install. For example, the following command instructs Composer to install the following list of dependencies.
php composer.phar require psr/log ext-curl doctrine/cache aws/aws-php-sns-message-validator
For more information, see Installation in the AWS SDK for PHP Developer Guide.
To set up credentials management in your environment
Each time you use the AWS SDK for PHP to call an AWS service, you must provide a set of credentials with the call. These credentials determine whether the AWS SDK for PHP has the appropriate permissions to make that call. If the credentials don't cover the appropriate permissions, the call will fail.
In this step, you store your credentials within the environment. To do this, follow the instructions in Calling AWS services from an environment in AWS Cloud9, and then return to this topic.
For additional information, see the "Creating a client" section of Basic Usage in the AWS SDK for PHP Developer Guide.
Step 5: Add AWS SDK code
In this step, you add some more code, this time to interact with Amazon S3 to create a bucket, list your available buckets, and then delete the bucket you just created. You will run this code later.
In the AWS Cloud9 IDE, create a file with this content, and save the file with the name
s3.php.
<?php
require './vendor/autoload.php';

if ($argc < 4) {
    exit("Usage: php s3.php <the time zone> <the bucket name> <the AWS Region to use>\n" .
        "Example: php s3.php America/Los_Angeles my-test-bucket us-east-2");
}

$timeZone = $argv[1];
$bucketName = $argv[2];
$region = $argv[3];

date_default_timezone_set($timeZone);

$s3 = new Aws\S3\S3Client([
    'region' => $region,
    'version' => '2006-03-01'
]);

# Lists all of your available buckets in this AWS Region.
function listMyBuckets($s3)
{
    print("\nMy buckets now are:\n");

    $promise = $s3->listBucketsAsync();

    $result = $promise->wait();

    foreach ($result['Buckets'] as $bucket) {
        print("\n");
        print($bucket['Name']);
    }
}

listMyBuckets($s3);

# Create a new bucket.
print("\n\nCreating a new bucket named '$bucketName'...\n");

try {
    $promise = $s3->createBucketAsync([
        'Bucket' => $bucketName,
        'CreateBucketConfiguration' => [
            'LocationConstraint' => $region
        ]
    ]);

    $promise->wait();
} catch (Exception $e) {
    if ($e->getCode() == 'BucketAlreadyExists') {
        exit("\nCannot create the bucket. " .
            "A bucket with the name '$bucketName' already exists. Exiting.");
    }
}

listMyBuckets($s3);

# Delete the bucket you just created.
print("\n\nDeleting the bucket named '$bucketName'...\n");

$promise = $s3->deleteBucketAsync([
    'Bucket' => $bucketName
]);

$promise->wait();

listMyBuckets($s3);

?>
Step 6: Run the AWS SDK code
-
In the AWS Cloud9 IDE, on the menu bar, choose Run, Run Configurations, New Run Configuration.
-
On the [New] - Idle tab, choose Runner: Auto, and then choose PHP (cli).
-
For Command, type
s3.php America/Los_Angeles
                  my-test-bucket us-east-2
, where:-
America/Los_Angelesis your default time zone ID. For more IDs, see List of Supported Timezoneson the PHP website. -
my-test-bucketis the name of the bucket you want to create and then delete.Note
Amazon S3 bucket names must be unique across AWS—not just your AWS account.
-
us-east-2is the ID of the AWS Region you want to create the bucket in. For more IDs, see Amazon Simple Storage Service (Amazon S3) in the Amazon Web Services General Reference.
-
-
Choose the Run button, and compare your output.
My buckets now are:

Creating a new bucket named 'my-test-bucket'...

My buckets now are:

my-test-bucket

Deleting the bucket named 'my-test-bucket'...

My buckets now are:
Step 7: Clean up
To prevent ongoing charges to your AWS account after you're done using this sample, you should delete the environment. For instructions, see Deleting an environment in AWS Cloud9.
Troubleshooting issues with PHP runner for AWS Cloud9
In the event that you encounter issues with the PHP CLI runner, you must ensure that the runner has been set to PHP and that debugger mode is enabled.
