On July 31, 2024, Amazon Web Services (AWS) will discontinue support for creating and viewing AWS CodeStar projects. After July 31, 2024, you will no longer be able to access the AWS CodeStar console or create new projects. However, the AWS resources created by AWS CodeStar, including your source repositories, pipelines, and builds, will be unaffected by this change and will continue to function. AWS CodeStar Connections and AWS CodeStar Notifications will not be impacted by this discontinuation.
If you wish to track work, develop code, and build, test, and deploy
your applications, Amazon CodeCatalyst provides a streamlined getting started
process and additional functionality to manage your software projects. Learn
more about functionality
Create a Project in AWS CodeStar
You use the AWS CodeStar console to create a project. If you use a project template, it sets up the required resources for you. The template also includes sample code that you can use to start coding.
To create a project, sign in to the AWS Management Console with an IAM user that has the
AWSCodeStarFullAccess policy or equivalent permissions.
For more information, see Setting Up AWS CodeStar.
Note
You must complete the steps in Setting Up AWS CodeStar before you can complete the procedures in this topic.
Create a Project in AWS CodeStar (Console)
Use the AWS CodeStar console to create a project.
To create a project in AWS CodeStar
-
Sign in to the AWS Management Console, and then open the AWS CodeStar console at https://console.aws.amazon.com/codestar/
. Make sure that you are signed in to the AWS Region where you want to create the project and its resources. For example, to create a project in US East (Ohio), make sure you have selected that AWS Region. For information about AWS Regions where AWS CodeStar is available, see Regions and Endpoints in the AWS General Reference .
-
On the AWS CodeStar page, choose Create project.
-
On the Choose a project template page, choose the project type from the list of AWS CodeStar project templates. You can use the filter bar to narrow your choices. For example, for a web application project written in Node.js to be deployed to Amazon EC2 instances, select the Web application, Node.js, and Amazon EC2 check boxes. Then choose from the templates available for that set of options.
For more information, see AWS CodeStar Project Templates.
-
Choose Next.
-
In the Project name text input field, enter a name for the project, such as
My First Project. In Project ID, the ID for the project is derived from this project name, but is limited to 15 characters.For example, the default ID for a project named
My First Projectismy-first-projec. This project ID is the basis for the names of all resources associated with the project. AWS CodeStar uses this project ID as part of the URL for your code repository and for the names of related security access roles and policies in IAM. After the project is created, the project ID cannot be changed. To edit the project ID before you create the project, in Project ID, enter the ID you want to use.For information about the limits on project names and project IDs, see Limits in AWS CodeStar.
Note
Project IDs must be unique for your AWS account in an AWS Region.
-
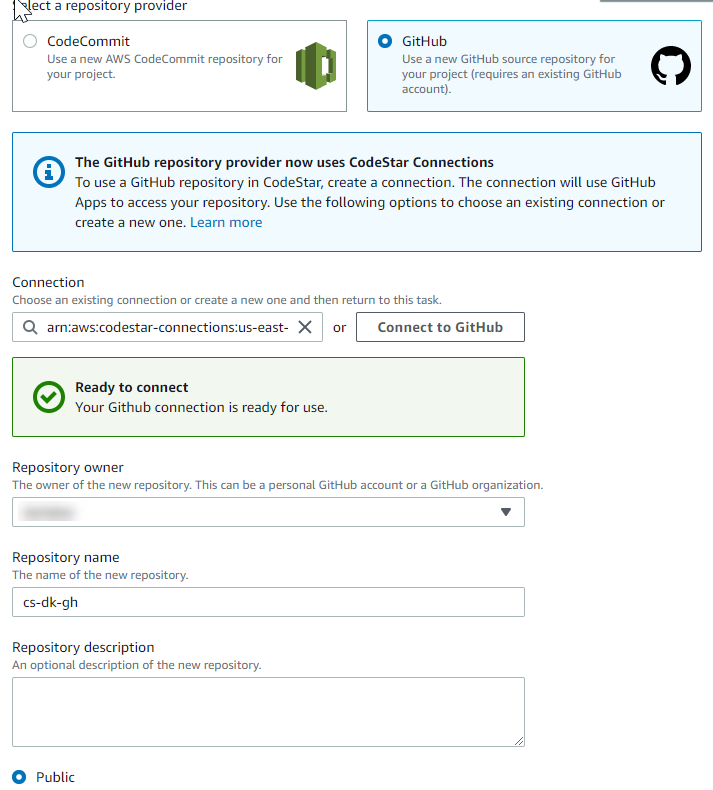
Choose the repository provider, AWS CodeCommit or GitHub.
-
If you chose AWS CodeCommit, for Repository name, accept the default AWS CodeCommit repository name, or enter a different one. Then skip ahead to step 9.
-
If you chose GitHub, you need to choose or create a connection resource. If you have an existing connection, choose it in the search field. Otherwise, create a new connection now. Choose Connect to GitHub.
The Create a connection page displays.
Note
To create a connection, you must have a GitHub account. If you are creating a connection for an organization, you must be the organization owner.

-
Under Create GitHub App connection, in the Connection name input text field, enter a name for your connection. Choose Connect to GitHub.
The Connect to GitHub page displays and shows the GitHub Apps field.
-
Under GitHub Apps, choose an app installation or choose Install a new app to create one.
Note
You install one app for all of your connections to a particular provider. If you have already installed the AWS Connector for GitHub app, choose it and skip this step.
-
On the Install AWS Connector for GitHub page, choose the account where you want to install the app.
Note
If you previously installed the app, you can choose Configure to proceed to a modification page for your app installation, or you can use the back button to return to the console.
-
If the Confirm password to continue page is displayed, enter your GitHub password, and then choose Sign in.
-
On the Install AWS Connector for GitHub page, keep the defaults, and choose Install.
-
On the Connect to GitHub page, the installation ID for your new installation appears in the GitHub Apps text input field.
After the connection is created, in the CodeStar create project page, the message Ready to connect displays.
Note
You can view your connection under Settings in the Developer Tools console. For more information, see Getting started with connections.
-
For Repository owner, choose the GitHub organization or your personal GitHub account.
-
For Repository name, accept the default GitHub repository name, or enter a different one.
-
Choose Public or Private.
Note
To use AWS Cloud9 as your development environment, you must choose Public.
-
(Optional) For Repository description, enter a description for the GitHub repository.
Note
If you choose an Alexa Skill project template, you need to connect an Amazon developer account. For more information about working with Alexa Skill projects, see Tutorial: Create an Alexa Skill Project in AWS CodeStar.
-
-
If your project is deployed to Amazon EC2 instances and you want to make changes, configure your Amazon EC2 instances in Amazon EC2 Configuration. For example, you can choose from available instance types for your project.
Note
Different Amazon EC2 instance types provide different levels of computing power and might have different associated costs. For more information, see Amazon EC2 Instance Types
and Amazon EC2 Pricing . If you have more than one virtual private cloud (VPC) or multiple subnets created in Amazon Virtual Private Cloud, you can also choose the VPC and subnet to use. However, if you choose an Amazon EC2 instance type that is not supported on dedicated instances, you cannot choose a VPC whose instance tenancy is set to Dedicated.
For more information, see What Is Amazon VPC? and Dedicated Instance Basics.
In Key pair, choose the Amazon EC2 key pair you created in Step 4: Create an Amazon EC2 Key Pair for AWS CodeStar Projects. Select I acknowledge that I have access to the private key file.
-
Choose Next.
-
Review the resources and configuration details.
-
Choose Next or Create project. (The displayed choice depends on your project template.)
It might take a few minutes to create the project, including the repository.
-
After your project has a repository, you can use the Repository page to configure access to it. Use the links in Next steps to configure an IDE, set up issue tracking, or add team members to your project.
While your project is being created, you can add team members or configure access to your project repository from the command line or your favorite IDE.
Create a Project in AWS CodeStar (AWS CLI)
An AWS CodeStar project is a combination of source code and the resources created to deploy the code. The collection of resources that help you build, release, and deploy your code are called toolchain resources. At project creation, an AWS CloudFormation template provisions your toolchain resources in a continuous integration/continuous deployment (CI/CD) pipeline.
When you use the console to create a project, the toolchain template is created for you. When you use the AWS CLI to create a project, you create the toolchain template that creates your toolchain resources.
A complete toolchain requires the following recommended resources:
-
A CodeCommit or GitHub repository that contains your source code.
-
A CodePipeline pipeline that is configured to listen to changes to your repository.
-
When you use CodeBuild to run unit or integration tests, we recommend that you add a build stage to your pipeline to create build artifacts.
-
We recommend that you add a deployment stage to your pipeline that uses CodeDeploy or AWS CloudFormation to deploy your build artifact and source code to your runtime infrastructure.
Note
Because CodePipeline requires at least two stages in a pipeline, and the first stage must be the source stage, add a build or deploy stage as the second stage.
-
AWS CodeStar toolchains are defined as a CloudFormation template.
For a tutorial that walks through this task and sets up sample resources, see Tutorial: Create a Project in AWS CodeStar with the AWS CLI.
Prerequisites:
When you create a project, you provide the following parameters in an input file. If the following are not provided, AWS CodeStar creates an empty project.
-
Source code. If this parameter is included in your request, then you must also include a toolchain template.
-
Your source code must include the application code required to run your project.
-
Your source code must include any required configuration files, such as a buildspec.yml for a CodeBuild project or an appspec.yml for a CodeDeploy deployment.
-
You can include optional items in your source code such as a README or a template.yml for non-toolchain AWS resources.
-
-
Toolchain template. Your toolchain template provisions the AWS resources and IAM roles to be managed for your project.
-
Source locations. If you specify source code and a toolchain template for your project, you must provide a location. Upload your source files and your toolchain template to the Amazon S3 bucket. AWS CodeStar retrieves the files and uses them to create the project.
Important
Make sure you configure the preferred AWS Region in the AWS CLI. Your project is created in the AWS Region configured in the AWS CLI.
-
Run the create-project command and include the
--generate-cli-skeletonparameter:aws codestar create-project --generate-cli-skeletonJSON-formatted data appears in the output. Copy the data to a file (for example,
input.json{ "name": "project-name", "id": "project-id", "description": "description", "sourceCode": [ { "source": { "s3": { "bucketName": "s3-bucket-name", "bucketKey": "s3-bucket-object-key" } }, "destination": { "codeCommit": { "name": "codecommit-repository-name" }, "gitHub": { "name": "github-repository-name", "description": "github-repository-description", "type": "github-repository-type", "owner": "github-repository-owner", "privateRepository": true, "issuesEnabled": true, "token": "github-personal-access-token" } } } ], "toolchain": { "source": { "s3": { "bucketName": "s3-bucket-name", "bucketKey": "s3-bucket-object-key" } }, "roleArn": "service-role-arn", "stackParameters": { "KeyName": "key-name" } }, "tags": { "KeyName": "key-name" } }Replace the following:
-
project-name: Required. The friendly name for this AWS CodeStar project. -
project-id: Required. The project ID for this AWS CodeStar project.Note
You must have a unique project ID when you create a project. You receive an error if you submit an input file with a project ID that already exists.
-
description: Optional. The description for this AWS CodeStar project. -
sourceCode: Optional. The configuration information for the source code provided for the project. Currently, only a singlesourceCodeobject is supported. EachsourceCodeobject contains information about the location where source code is retrieved by AWS CodeStar and the destination where the source code is populated.-
source: Required. This defines the location where you uploaded your source code. The only supported source is Amazon S3. AWS CodeStar retrieves the source code and includes it in the repository after your project is created.-
S3: Optional. The Amazon S3 location of your source code.-
bucket-name: The bucket that contains your source code. -
bucket-key: The bucket prefix and object key that points to the .zip file that contains your source code (for example,src.zip).
-
-
-
destination: Optional. The destination locations where your source code is to be populated when the project is created. The supported destinations for your source code are CodeCommit and GitHub.You can provide only one of these two options:
-
codeCommit: The only required attribute is the name of the CodeCommit repository that should contain your source code. This repository should be in your toolchain template.Note
For CodeCommit, you must provide the name of the repository that you defined in your toolchain stack. AWS CodeStar initializes this repository with the source code you provided in Amazon S3.
-
gitHub: This object represents information required to create the GitHub repository and seed it with source code. If you choose a GitHub repository, the following values are required.Note
For GitHub, you cannot specify an existing GitHub repository. AWS CodeStar creates one for you and populates this repository with the source code you uploaded to Amazon S3. AWS CodeStar uses the following information to create your repository in GitHub.
-
name: Required. The name of your GitHub repository. -
description: Required. The description of your GitHub repository. -
type: Required. The type of GitHub repository. Valid values are User or Organization. -
owner: Required. The GitHub user name for the owner of your repository. If the repository should be owned by a GitHub organization, provide the organization name. -
privateRepository: Required. Whether you want this repository to be private or public. Valid values are true or false. -
issuesEnabled: Required. Whether you want to enable issues in GitHub with this repository. Valid values are true or false. -
token: Optional. This is a personal access token AWS CodeStar uses to access your GitHub account. This token must contain the following scopes: repo, user, and admin:repo_hook. To retrieve a personal access token from GitHub, see Creating a Personal Access Token for the Command Lineon the GitHub website. Note
If you use the CLI to create a project with a GitHub source repository, AWS CodeStar uses your token to access the repository through OAuth apps. If you use the console to create a project with a GitHub source repository, AWS CodeStar uses a connection resource, which accesses the repository with GitHub apps.
-
-
toolchain: Information about the CI/CD toolchain to be set up when the project is created. This includes the location where you uploaded the toolchain template. The template creates the AWS CloudFormation stack that contains your toolchain resources. This also includes any parameter overrides for AWS CloudFormation to reference and the role to be used to create the stack. AWS CodeStar retrieves the template and uses AWS CloudFormation to run the template.-
source: Required. The location of your toolchain template. Amazon S3 is the only supported source location.-
S3: Optional. The Amazon S3 location where you uploaded your toolchain template.-
bucket-name: The Amazon S3 bucket name. -
bucket-key: The bucket prefix and object key that points to the .yml or .json file that contains your toolchain template (for example,files/toolchain.yml).
-
-
-
stackParameters: Optional. Contains key-value pairs to be passed to AWS CloudFormation. These are the parameters, if any, your toolchain template is set up to reference. -
role: Optional. The role used to create your toolchain resources in your account. The role is required as follows:-
If the role is not provided, AWS CodeStar uses the default service role created for your account if the toolchain is an AWS CodeStar quickstart template. If the service role doesn't exist in your account, you can create one. For information, see Step 2: Create the AWS CodeStar Service Role.
-
You must provide the role must if you are uploading and using your own custom toolchain template. You can create a role based on the AWS CodeStar service role and policy statement. For an example of this policy statement, see AWSCodeStarServiceRole Policy .
-
-
-
tags: Optional. The tags attached to your AWS CodeStar project.Note
These tags are not attached to the resources contained in the project.
-
-
-
-
Switch to the directory that contains the file you just saved, and run the create-project command again. Include the
--cli-input-jsonparameter.aws codestar create-project --cli-input-json file://input.json -
If successful, data similar to the following appears in the output:
{ "id": "project-ID", "arn": "arn" }-
The output contains information about the new project:
-
The
idvalue represents the project ID. -
The
arnvalue represents the ARN of the project.
-
-
-
Use the describe-project command to check the status of your project creation. Include the
--idparameter.aws codestar describe-project --id <project_ID>Data similar to the following appears in the output:
{ "name": "MyProject", "id": "myproject", "arn": "arn:aws:codestar:us-east-1:account_ID:project/myproject", "description": "", "createdTimeStamp": 1539700079.472, "stackId": "arn:aws:cloudformation:us-east-1:account_ID:stack/awscodestar-myproject/stack-ID", "status": { "state": "CreateInProgress" } }-
The output contains information about the new project:
-
The
statevalue represents the status of the project creation, such asCreateInProgressorCreateComplete.
-
-
While your project is being created, you can add team members or configure access to your project repository from the command line or your favorite IDE.
