Using OIDC identity providers with a user pool
Users can sign in to your application using their existing accounts from OpenID Connect (OIDC) identity providers (IdPs). With OIDC providers, users of independent single sign-on systems can provide existing credentials while your application receives OIDC tokens in the shared format of user pools. To configure an OIDC IdP, set up your IdP to handle your user pool as the RP and configure your application to handle your user pool as the IdP. Amazon Cognito serves as an intermediate step between multiple OIDC IdPs and your applications. Your user pool applies attribute-mapping rules to the claims in the ID and access tokens that your provider passes directly to your user pool. Amazon Cognito then issues new tokens based on the mapped user attributes and any additional adjustments you've made to the authentication flow with Lambda triggers.
Users who sign in with an OIDC IdP aren't required to provide new credentials or information to access your user pool application. Your application can silently redirect them to their IdP for sign-in, with a user pool as a tool in the background that standardizes the token format for your application. To learn more about IdP redirection, see Authorize endpoint.
Like with other third-party identity providers, you must register your application with the OIDC provider and obtain information about the IdP application that you want to connect to your user pool. A user pool OIDC IdP requires a client ID, client secret, scopes that you want to request, and information about provider service endpoints. Your user pool can discover the provider OIDC endpoints from a discovery endpoint or you can enter them manually. You must also examine provider ID tokens and create attribute mappings between the IdP and the attributes in your user pool.
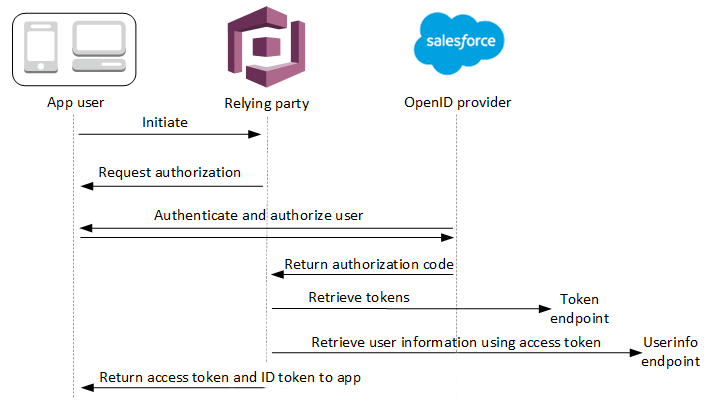
See OIDC user pool IdP authentication flow for more details about this authentication flow.
Note
Sign-in through a third party (federation) is available in Amazon Cognito user pools. This feature is independent of OIDC federation with Amazon Cognito identity pools.
You can add an OIDC IdP to your user pool in the AWS Management Console, through the AWS CLI, or with the user pool API method CreateIdentityProvider.
Topics
Prerequisites
Before you begin, you need the following:
-
A user pool with an app client and a user pool domain. For more information, see Create a user pool.
-
An OIDC IdP with the following configuration:
-
Supports
client_secret_postclient authentication. Amazon Cognito doesn't check thetoken_endpoint_auth_methods_supportedclaim at the OIDC discovery endpoint for your IdP. Amazon Cognito doesn't supportclient_secret_basicclient authentication. For more information on client authentication, see Client Authenticationin the OpenID Connect documentation. -
Only uses HTTPS for OIDC endpoints such as
openid_configuration,userInfo, andjwks_uri. -
Only uses TCP ports 80 and 443 for OIDC endpoints.
-
Only signs ID tokens with HMAC-SHA, ECDSA, or RSA algorithms.
-
Publishes a key ID
kidclaim at itsjwks_uriand includes akidclaim in its tokens. -
Presents a non-expired public key with a valid root CA trust chain.
-
Register an application with an OIDC IdP
Before you add an OIDC IdP to your user pool configuration and assign it to app clients, you set up an OIDC client application in your IdP. Your user pool is the relying-party application that will manage authentication with your IdP.
To register with an OIDC IdP
-
Create a developer account with the OIDC IdP.
Links to OIDC IdPs OIDC IdP How to Install OIDC Discovery URL Salesforce https://MyDomainName.my.salesforce.com/.well-known/openid-configurationOneLogin Connect an OIDC enabled app https://your-domain.onelogin.com/oidc/2/.well-known/openid-configurationJumpCloud SSO with OIDC https://oauth.id.jumpcloud.com/.well-known/openid-configurationOkta https://Your Okta subdomain.okta.com/.well-known/openid-configurationMicrosoft Entra ID https://login.microsoftonline.com/{tenant}/v2.0Values of
tenantcan include a tenant ID,common,organizations, orconsumers. -
Register your user pool domain URL with the
/oauth2/idpresponseendpoint with your OIDC IdP. This ensures that the OIDC IdP later accepts it from Amazon Cognito when it authenticates users.https://mydomain.auth.us-east-1.amazoncognito.com/oauth2/idpresponse -
Select the scopes that you want your user directory to share with your user pool. The scope openid is required for OIDC IdPs to offer any user information. The
emailscope is needed to grant access to theemailandemail_verifiedclaims. Additional scopes in the OIDC specification are profilefor all user attributes andphoneforphone_numberandphone_number_verified. -
The OIDC IdP provides you with a client ID and a client secret. Note these values and add them to the configuration of the OIDC IdP that you add to your user pool later.
Example: Use Salesforce as an OIDC IdP with your user pool
You use an OIDC IdP when you want to establish trust between an OIDC-compatible IdP such as Salesforce and your user pool.
-
Create an account
on the Salesforce Developers website. -
Sign in
through your developer account that you set up in the previous step. -
From your Salesforce page, do one of the following:
-
If you’re using Lightning Experience, choose the setup gear icon, then choose Setup Home.
-
If you’re using Salesforce Classic and you see Setup in the user interface header, choose it.
-
If you’re using Salesforce Classic and you don’t see Setup in the header, choose your name from the top navigation bar, and choose Setup from the drop-down list.
-
-
On the left navigation bar, choose Company Settings.
-
On the navigation bar, choose Domain, enter a domain, and choose Create.
-
On the left navigation bar, under Platform Tools, choose Apps.
-
Choose App Manager.
-
-
Choose New connected app.
-
Complete the required fields.
Under Start URL, enter a URL at the
/authorizeendpoint for the user pool domain that signs in with your Salesforce IdP. When your users access your connected app, Salesforce directs them to this URL to complete sign-in. Then Salesforce redirects the users to the callback URL that you have associated with your app client.https://mydomain.auth.us-east-1.amazoncognito.com/authorize?response_type=code&client_id=<your_client_id>&redirect_uri=https://www.example.com&identity_provider=CorpSalesforce -
Enable OAuth settings and enter the URL of the
/oauth2/idpresponseendpoint for your user pool domain in Callback URL. This is the URL where Salesforce issues the authorization code that Amazon Cognito exchanges for an OAuth token.https://mydomain.auth.us-east-1.amazoncognito.com/oauth2/idpresponse
-
-
Select your scopes
. You must include the scope openid. To grant access to the email and email_verified claims , add the email scope. Separate scopes by spaces. -
Choose Create.
In Salesforce, the client ID is called a Consumer Key, and the client secret is a Consumer Secret. Note your client ID and client secret. You will use them in the next section.
Add an OIDC IdP to your user pool
After you set up your IdP, you can configure your user pool to handle authentication requests with an OIDC IdP.
Test your OIDC IdP configuration
In your application, you must invoke a browser in the user's client so that they can sign in with their OIDC provider. Test sign-in with your provider after you have completed the setup procedures in the preceding sections. The following example URL loads the sign-in page for your user pool with a prefix domain.
https://mydomain.auth.us-east-1.amazoncognito.com/oauth2/authorize?response_type=code&client_id=1example23456789&redirect_uri=https://www.example.com
This link is the page that Amazon Cognito directs you to when you go to the App clients menu, select an app client, navigate to the Login pages tab, and select View login page. For more information about user pool domains, see Configuring a user pool domain. For more information about app clients, including client IDs and callback URLs, see Application-specific settings with app clients.
The following example link sets up silent redirect to the MyOIDCIdP
provider from the Authorize endpoint with an identity_provider query
parameter. This URL bypasses interactive user pool sign-in with managed login and
goes directly to the IdP sign-in page.
https://mydomain.auth.us-east-1.amazoncognito.com/oauth2/authorize?identity_provider=MyOIDCIdP&response_type=code&client_id=1example23456789&redirect_uri=https://www.example.com
