Annotating PDF files
Before you can annotate your training PDFs in SageMaker AI Ground Truth, complete the following prerequisites:
-
Install python3.8.x
-
Install jq
-
Install the AWS CLI
If you're using the us-east-1 Region, you can skip installing the AWS CLI because it's already installed with your Python environment. In this case, you create a virtual environment to use Python 3.8 in AWS Cloud9.
-
Configure your AWS credentials
-
Create a private SageMaker AI Ground Truth workforce to support annotation
Make sure to record the workteam name you choose in your new private workforce, as you use it during installation.
Topics
Setting up your environment
-
If using Windows, install Cygwin
; if using Linux or Mac, skip this step. -
Download the annotation artifacts
from GitHub. Unzip the file. -
From your terminal window, navigate to the unzipped folder (amazon-comprehend-semi-structured-documents-annotation-tools-main).
-
This folder includes a choice of
Makefilesthat you run to install dependencies, setup a Python virtualenv, and deploy the required resources. Review the readme file to make your choice. -
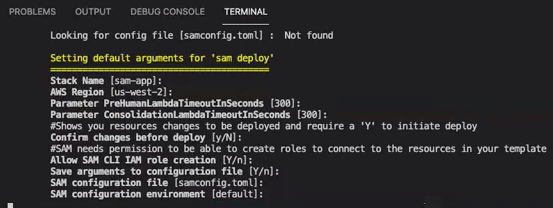
The recommended option uses a single command to install all dependencies into a virtualenv, builds the AWS CloudFormation stack from the template, and deploys the stack to your AWS account with interactive guidance. Run the following command:
make ready-and-deploy-guidedThis command presents a set of configuration options. Be sure your AWS Region is correct. For all other fields, you can either accept the default values or fill in custom values. If you modify the AWS CloudFormation stack name, write it down as you need it in the next steps.
The CloudFormation stack creates and manage the AWS lambdas
, AWS IAM roles, and AWS S3 buckets required for the annotation tool. You can review each of these resources in the stack details page in the CloudFormation console.
-
The command prompts you to start the deployment. CloudFormation creates all the resources in the specified Region.
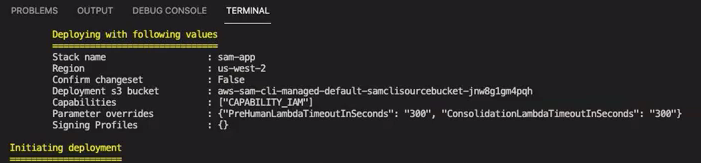
When the CloudFormation stack status transitions to create-complete, the resources are ready to use.
Uploading a PDF to an S3 bucket
In the Setting up section, you deployed a CloudFormation stack that creates an S3 bucket named comprehend-semi-structured-documents-${AWS::Region}-${AWS::AccountId}. You now upload your source PDF documents into this bucket.
Note
This bucket contains the data required for your labeling job. The Lambda Execution Role policy grants permission for the Lambda function to access this bucket.
You can find the S3 bucket name in the CloudFormation Stack details using the 'SemiStructuredDocumentsS3Bucket' key.
-
Create a new folder in the S3 bucket. Name this new folder 'src'.
-
Add your PDF source files to your 'src' folder. In a later step, you annotate these files to train your recognizer.
-
(Optional) Here's an AWS CLI example you can use to upload your source documents from a local directory into an S3 bucket:
aws s3 cp --recursivelocal-path-to-your-source-docss3://deploy-guided/src/Or, with your Region and Account ID:
aws s3 cp --recursivelocal-path-to-your-source-docss3://deploy-guided-Region-AccountID/src/ You now have a private SageMaker AI Ground Truth workforce and have uploaded your source files to the S3 bucket, deploy-guided/src/; you're ready to start annotating.
Creating an annotation job
The comprehend-ssie-annotation-tool-cli.py script in the bin directory is a
simple wrapper command that streamlines the creation of a SageMaker AI Ground Truth labeling job. The python script reads the
source documents from your S3 bucket and creates a corresponding single-page manifest file with one source
document per line. The script then creates a labeling job, which requires the manifest file as an input.
The python script uses the S3 bucket and CloudFormation stack that you configured in the Setting up section. Required input parameters for the script include:
-
input-s3-path: S3 Uri to the source documents you uploaded to your S3 bucket. For example:
s3://deploy-guided/src/. You can also add your Region and Account ID to this path. For example:s3://deploy-guided-Region-AccountID/src/. -
cfn-name: The CloudFormation stack name. If you used the default value for the stack name, your cfn-name is sam-app.
-
work-team-name: The workforce name you created when you built out the private workforce in SageMaker AI Ground Truth.
-
job-name-prefix: The prefix for the SageMaker AI Ground Truth labeling job. Note that there is a 29-character limit for this field. A timestamp is appended to this value. For example:
my-job-name-20210902T232116. -
entity-types: The entities you want to use during your labeling job, separated by commas. This list must include all entities that you want to annotate in your training dataset. The Ground Truth labeling job displays only these entities for annotators to label content in the PDF documents.
To view additional arguments the script supports, use the -h option to display the help content.
Run the following script with the input parameters as described in the previous list.
python bin/comprehend-ssie-annotation-tool-cli.py \ --input-s3-path s3://deploy-guided-Region-AccountID/src/ \ --cfn-namesam-app\ --work-team-namemy-work-team-name\ --regionus-east-1\ --job-name-prefixmy-job-name-20210902T232116\ --entity-types "EntityA,EntityB,EntityC" \ --annotator-metadata "key=info,value=sample,key=Due Date,value=12/12/2021"The script produces the following output:
Downloaded files to temp local directory /tmp/a1dc0c47-0f8c-42eb-9033-74a988ccc5aa
Deleted downloaded temp files from /tmp/a1dc0c47-0f8c-42eb-9033-74a988ccc5aa
Uploaded input manifest file to s3://comprehend-semi-structured-documents-us-west-2-123456789012/input-manifest/my-job-name-20220203-labeling-job-20220203T183118.manifest
Uploaded schema file to s3://comprehend-semi-structured-documents-us-west-2-123456789012/comprehend-semi-structured-docs-ui-template/my-job-name-20220203-labeling-job-20220203T183118/ui-template/schema.json
Uploaded template UI to s3://comprehend-semi-structured-documents-us-west-2-123456789012/comprehend-semi-structured-docs-ui-template/my-job-name-20220203-labeling-job-20220203T183118/ui-template/template-2021-04-15.liquid
Sagemaker GroundTruth Labeling Job submitted: arn:aws:sagemaker:us-west-2:123456789012:labeling-job/my-job-name-20220203-labeling-job-20220203t183118
(amazon-comprehend-semi-structured-documents-annotation-tools-main) user@3c063014d632 amazon-comprehend-semi-structured-documents-annotation-tools-main %
Annotating with SageMaker AI Ground Truth
Now that you have configured the required resources and created a labeling job, you can log in to the labeling portal and annotate your PDFs.
-
Log in to the SageMaker AI console
using either Chrome or Firefox web browsers. -
Select Labeling workforces and choose Private.
-
Under Private workforce summary, select the labeling portal sign-in URL that you created with your private workforce. Sign in with the appropriate credentials.
If you don't see any jobs listed, don't worry—it can take a while to update, depending on the number of files you uploaded for annotation.
-
Select your task and, in the top right corner, choose Start working to open the annotation screen.
You'll see one of your documents open in the annotation screen and, above it, the entity types you provided during set up. To the right of your entity types, there is an arrow you can use to navigate through your documents.
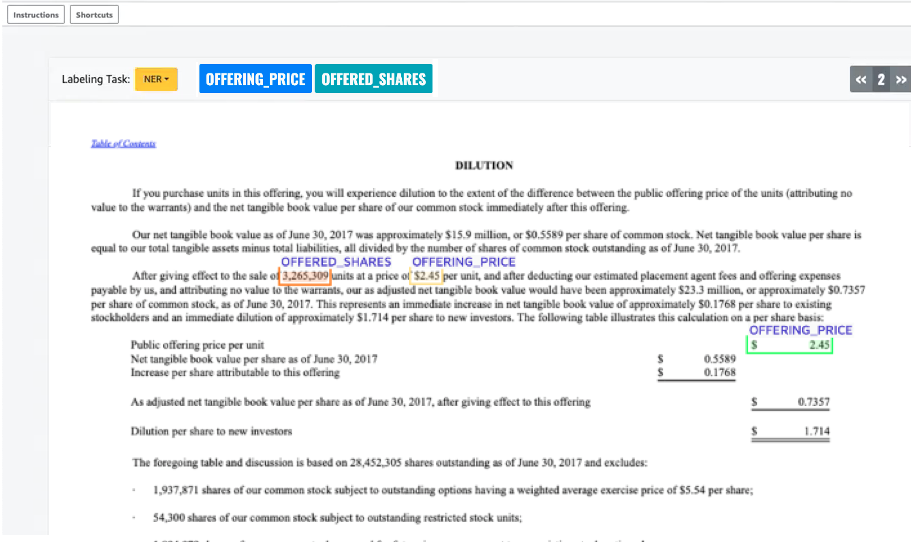
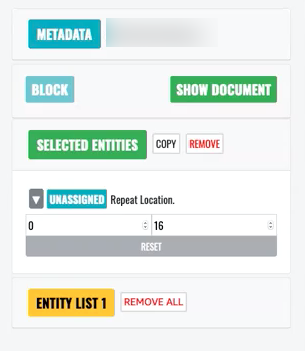
Annotate the open document. You can also remove, undo, or auto tag your annotations on each document; these options are available in the right panel of the annotation tool.
To use auto tag, annotate an instance of one of your entities; all other instances of that specific word are then automatically annotated with that entity type.
Once you've finished, select Submit on the bottom right, then use the navigation arrows to move to the next document. Repeat this until you've annotated all your PDFs.
After you annotate all the training documents, you can find the annotations in JSON format in the Amazon S3 bucket at this location:
/output/your labeling job name/annotations/
The output folder also contains an output manifest file, which lists all the annotations within your training documents. You can find your output manifest file at the following location.
/output/your labeling job name/manifests/
