Add attributes for personalizing quick responses in Amazon Connect
You can personalize quick responses by adding user-defined attributes. To do so, you use the Amazon Connect admin website to create responses that include Amazon Connect contact attributes. You can also use the Set contact attributes block to create user-defined attributes in flows.
When quick responses contain user-defined attributes, the value of those attributes, such as customer name, appear when an agent searches for a response in CCP.
The following steps explain how to add user-defined attributes to quick responses. You first create a set-contact attribute, and then you add the attribute to a quick response.
To create a set-contact attribute
-
Log in to the Amazon Connect admin website at https://instance name.my.connect.aws/. Use an Admin account, or an account assigned to a security profile that has Flows - Edit or Create permissions.
-
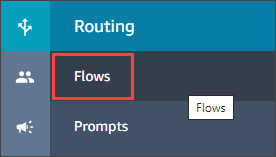
On the navigation bar, choose Routing, then Flows.
-
On the Flows page, the Type column lists each type of flow. Choose the flow that you want to add attributes to.
-
Follow the steps in Creating a set contact attribute.
Note
In the contact attribute configuration, select the User defined namespace, then save and publish the flow.
-
When finished, complete the next set of steps.
You can follow these steps when creating or updating a quick response.
To add an attribute to a quick response
-
Log in to the Amazon Connect admin website at https://instance name.my.connect.aws/. Use an Admin account, or an account assigned to a security profile that has Content Management - Quick responses - Create or Edit permission.
-
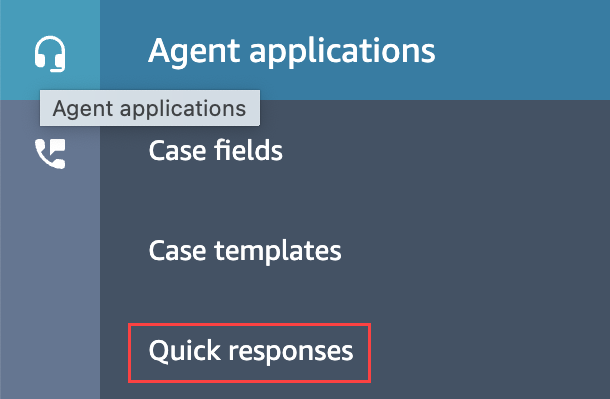
On the left navigation bar, choose Content Management, then Quick responses.
-
Choose Add response to create a response.
—or—
Select the checkbox next to the quick response that you want to personalize, then choose Edit.
-
Choose the content section, enter the quick response content, then use handlebar syntax to enter a user-defined attribute. Make sure you include the
Attributesnamespace prefix. For example,{{Attributes.Customer}}.The following image shows a quick response for an email.

-
Choose Save.
The following steps explain how to test attributes in CCP.
To test attributes
-
Log in to the Amazon Connect admin website chat testing page at https://instance name.my.connect.aws/test-chat.
-
Choose the flow with the user-defined attribute.
-
Start a chat and enter
/#searchText, where searchText is the assigned shortcut key.
Note
For more information, see Test voice, chat, and task experiences in Amazon Connect.
