Add a chat user interface to your website hosted by Amazon Connect
To support your customers through chat, you can add a communications widget to your website that is hosted by Amazon Connect. You can configure the communications widget in the Amazon Connect admin website. You can customize the font and colors, and secure the widget so that it can be launched only from your website. When finished, you will have a short code snippet that you add to your website.
Because Amazon Connect hosts the widget, it ensures that the latest version is always live on your website.
Tip
Use of the communications widget is subject to default service quotas, such as the number of required characters for each message. Before launching your communications widget into production, make sure that your service quotas are set for your organization's needs. For more information, see Amazon Connect service quotas.
Contents
Step 2: Specify the website domains where you expect to display the communications widget
Step 3: Confirm and copy communications widget code and security keys
Start chats in your applications by using Amazon Connect APIs
Send browser notifications to customers when chat messages arrive
Pass custom properties to override the defaults in the communications widget
Supported browsers
The pre-built communications widget supports the following browser versions and higher:
-
Google Chrome 85.0
-
Safari 13.1
-
Microsoft Edge version 85
-
Mozilla Firefox 81.0
The communications widget supports browser notifications for desktop devices. For more information, see Send browser notifications to customers when chat messages arrive.
Step 1: Customize your communications widget
In this step, you customize the experience of the communications widget for your customers.
-
Log in to the Amazon Connect admin website at https://
instance name.my.connect.aws/. Choose Customize communications widget.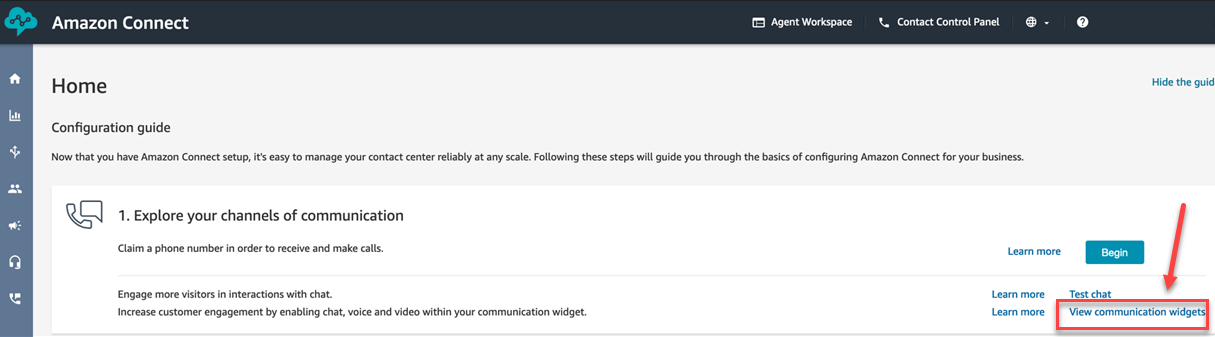
-
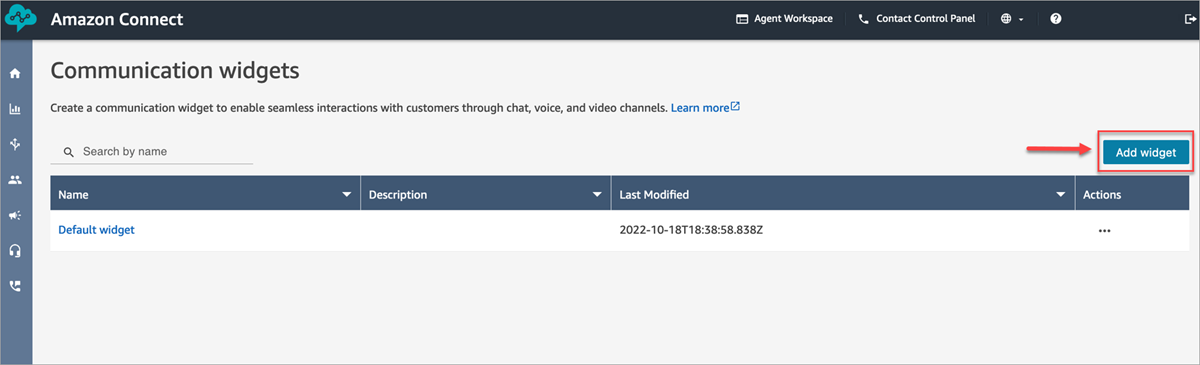
On the Communications widgets page, choose Add communications widget to begin customizing a new communications widget experience. To edit, delete, or duplicate an existing communications widget, choose from the options under the Actions column, as shown in the following image.
-
Enter a Name and Description for the communications widget.
Note
The Name must be unique for each communications widget created in an Amazon Connect instance.
-
In the Communications options section, choose how your customers can engage with your widget, and then choose Save and continue.
Note
you can only enable task or email pre contact form if chat and voice are not enabled.
The following image shows options to allow chat, message receipts, and create a pre-chat form for customers. To enable a pre chat form, you must first create a view with a connect action button and select the
StartChatContactaction. For more details on pre-chat and pre-contact forms, see Add the Amazon Connect widget to your website to accept chat, task, email, and web calling contacts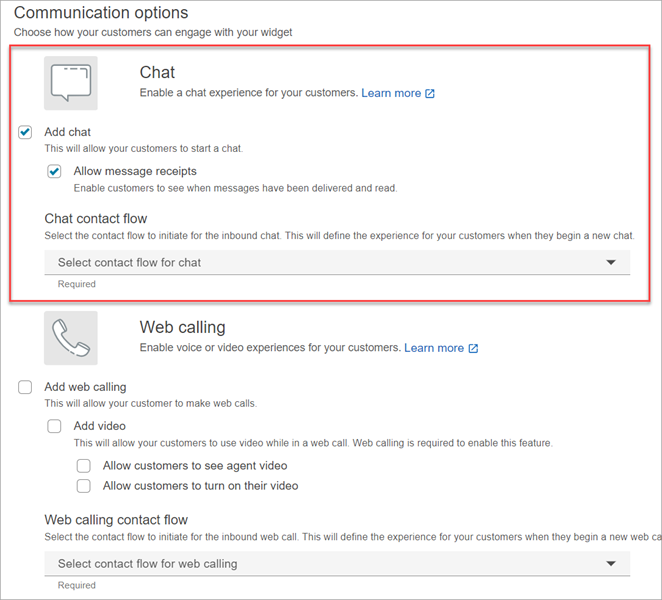
-
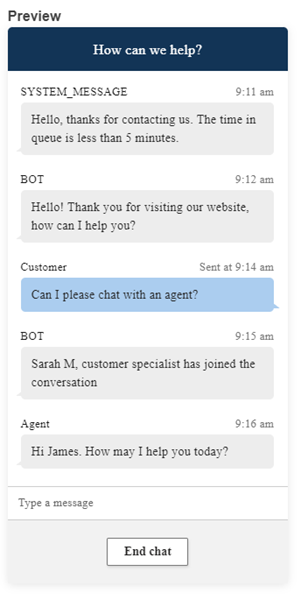
On the Create communication widget page, choose the widget button styles, and display names and styles.
As you choose these options, the widget preview updates automatically so that you can see what the experience will look like for your customers.
Button styles
-
Choose the colors for the button background by entering hex values (HTML color codes
). -
Choose White or Black for the icon color. The icon color can't be customized.
Widget header
-
Provide values for header message and color, and widget background color.
-
Logo URL: Insert a URL to your logo banner from an Amazon S3 bucket or another online source.
Note
The communications widget preview in the customization page will not display the logo if it's from an online source other than an Amazon S3 bucket. However, the logo will be displayed when the customized communications widget is implemented to your page.
The banner must be in .svg, .jpg or .png format. The image can be 280px (width) by 60px (height). Any image larger than those dimensions will be scaled to fit the 280x60 logo component space.
-
For instructions about how to upload a file such as your logo banner to S3, see Uploading objects in the Amazon Simple Storage Service User Guide.
-
Make sure that the image permissions are properly set so that the communications widget has permissions to access the image. For information about how to make a S3 object publicly accessible, see Step 2: Add a bucket policy in the Setting permissions for website access topic.
-
Chat view
-
Typeface: Use the dropdown to choose the font for the text in the communications widget.
-
-
System Message Display Name: Type a new display name to override the default. The default is SYSTEM_MESSAGE.
-
Bot Message Display Name: Type a new display name to override the default. The default is BOT.
-
Text Input Placeholder: Type new placeholder text override the default. The default is Type a message.
-
End Chat Button Text: Type new text to replace the default. The default is End chat.
-
-
Agent chat bubble color: Choose the colors for the agent's message bubbles by entering hex values (HTML color codes
). -
Customer chat bubble color: Choose the colors for the customer's message bubbles by entering hex values (HTML color codes
). -
Choose Save and continue.
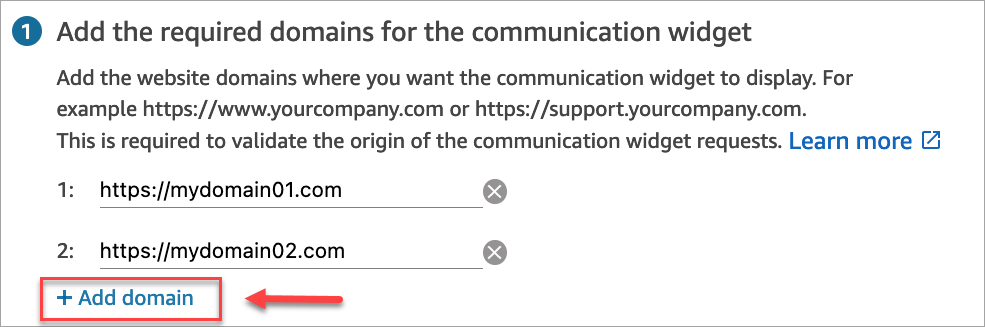
Step 2: Specify the website domains where you expect to display the communications widget
-
Enter the website domains where you want to place the communications widget. Chat loads only on websites that you select in this step.
Choose Add domain to add up to 50 domains.
Domain allowlist behavior:
-
Subdomains are automatically included. For example, if you allow example.com, all its subdomains (like sub.example.com) are also allowed.
-
Protocol http:// or https:// must exactly match your configuration. Specify the exact protocol when setting up allowed domains.
-
All URL paths are automatically allowed. For example, if example.com is allowed, all pages under it (such as example.com/cart or example.com/checkout) are accessible. You cannot allow or block specific subdirectories.
Important
-
Double-check that your website URLs are valid and does not contain errors. Include the full URL starting with https://.
-
We recommend using https:// for your production websites and applications.
-
-
Under Add security for your communications widget, we recommend choosing Yes, and working with your website administrator to set up your web servers to issue JSON Web Tokens (JWTs) for new chat requests. This provides you more control when initiating new chats, including the ability to verify that chat requests sent to Amazon Connect are from authenticated users.

Choosing Yes results in the following:
-
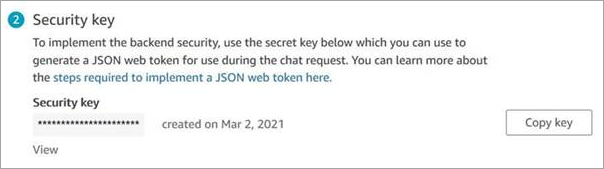
Amazon Connect provides a 44-character security key on the next page that you can use to create JSON Web Tokens (JWTs).
-
Amazon Connect adds a callback function within the communications widget embed script that checks for a JSON Web Token (JWT) when a chat is initiated.
You must implement the callback function in the embedded snippet, as shown in the following example.
amazon_connect('authenticate', function(callback) {
  window.fetch('/token').then(res => {
    res.json().then(data => {
      callback(data.data);
    });
  });
});
If you choose this option, in the next step you'll get a security key for all chat requests initiated on your websites. Ask your website administrator to set up your web servers to issue JWTs using this security key.
-
-
Choose Save.
Step 3: Confirm and copy communications widget code and security keys
In this step, you confirm your selections and copy the code for the communications widget and embed it in your website. If you chose to use JWTs in Step 2, you can also copy the secret keys for creating them.
Security key
Use this 44-character security key to generate JSON web tokens from your web server. You can also update, or rotate, keys if you need to change them. When you do this, Amazon Connect provides you with a new key and maintains the previous key until you have a chance to replace it. After you have the new key deployed, you can come back to Amazon Connect and delete the previous key.
When your customers interact with the Start chat icon on your website, the communications widget requests your web server for a JWT. When this JWT is provided, the widget will then include it as part of the end customer’s chat request to Amazon Connect. Amazon Connect then uses the secret key to decrypt the token. If successful, this confirms that the JWT was issued by your web server and Amazon Connect routes the chat request to your contact center agents.
JSON Web Token specifics
-
Algorithm: HS256
-
Claims:
-
sub:
widgetIdReplace
widgetIdwith your own widgetId. To find your widgetId, see the example at Communications widget script. -
iat: *Issued At Time.
-
exp: *Expiration (10 minute maximum).
-
segmentAttributes (optional): A set of system defined key-value pairs stored on individual contact segments using an attribute map. For more information check SegmentAttributes in the StartChatContact API.
-
attributes (optional): Object with string-to-string key-value pairs. The contact attributes must follow the limitations set by the StartChatContact API.
-
relatedContactId (optional): String with valid contact id. The relatedContactId must follow limitations set by the StartChatContact API.
-
customerId (optional): This can be either an Amazon Connect Customer Profiles ID or a custom identifier from an external system, such as a CRM.
* For information about the date format, see the following Internet Engineering Task Force (IETF) document: JSON Web Token (JWT)
, page 5. -
The following code snippet shows an example of how to generate a JWT in Python:
import jwt
import datetime
CONNECT_SECRET = "your-securely-stored-jwt-secret"
WIDGET_ID = "widget-id"
JWT_EXP_DELTA_SECONDS = 500

payload = {
'sub': WIDGET_ID,
'iat': datetime.datetime.utcnow(),
'exp': datetime.datetime.utcnow() + datetime.timedelta(seconds=JWT_EXP_DELTA_SECONDS),
'customerId': "your-customer-id",
'relatedContactId':'your-relatedContactId',
'segmentAttributes': {"connect:Subtype": {"ValueString" : "connect:Guide"}}, 'attributes': {"name": "Jane", "memberID": "123456789", "email": "Jane@example.com", "isPremiumUser": "true", "age": "45"} }
header = { 'typ': "JWT", 'alg': 'HS256' }
encoded_token = jwt.encode((payload), CONNECT_SECRET, algorithm="HS256", headers=header) // CONNECT_SECRET is the security key provided by Amazon Connect
Communications widget script
The following image shows an example of the JavaScript that you embed on the websites where you want customers to chat with agents. This script displays the widget in the bottom-right corner of your website.

When your website loads, customers first see the Start icon. When they choose this icon, the communications widget opens and customers are able to send a message to your agents.
To make changes to the communications widget at any time, choose Edit.
Note
Saved changes update the customer experience in a few minutes. Confirm your widget configuration before saving it.

To make changes to widget icons on the website, you will receive a new code snippet to update your website directly.
Getting error messages?
If you encounter error messages, see Troubleshoot issues with your Amazon Connect communications widget.
