Set up Amazon Connect outbound campaigns
This topic explains how to set up Amazon Connect outbound campaigns, a feature of Amazon Connect and formerly known as high-volume outbound communications.
Important things to know
-
The phone numbers that outbound campaigns can call are based on the AWS Region where your Amazon Connect instance is created. For a list of AWS Regions and countries, see Outbound campaigns in the Availability of Amazon Connect services by Region topic.
-
You must obtain pre-authorization by creating an AWS Support ticket to use Amazon Connect outbound campaigns for event-driven mass notifications, such as severe weather warnings, evacuation notices, disaster response communications, or utility disruptions that impact several thousand of customers.
This review process helps ensure the reliable delivery of these critical messages while maintaining service quality for all customers. While we may support these use-cases, they require additional technical validation due to their unique nature and implications, such as the impact on carrier networks for voice or SMS communications.
Follow the instructions in Requesting a quota increase in the Service Quotas User Guide to open a ticket that contains a detailed description of your requirements. Additional charges may apply based on your location and anticipated notification volumes.
Before you begin
You need a few things in order to use outbound campaigns:
-
Make sure your Amazon Connect instance is enabled for outbound calling.
-
Create a dedicated outbound campaigns queue to handle any contacts that will be routed to agents as a result of the campaign.
-
Assign the queue to the agent's routing profile.
-
Create and publish a flow that includes a Check call progress block. This block enables you to branch based on whether a person or a machine answered a call, for example.
Create an AWS KMS key
When you enable outbound campaigns, you can provide your own AWS KMS key. You create and manage these keys, and AWS KMS charges apply. You can also use an AWS owned key.
When using an API to enable or disable outbound campaigns, make sure the API user is either the
administrator or has the following permissions: kms:DescribeKey,
kms:CreateGrant, and kms:RetireGrant for the key.
Note
To switch the KMS key that is associated with outbound campaigns, first you need to disable outbound campaigns, and then re-enable it using a different AWS KMS key.
Configure outbound campaigns
-
Open the Amazon Connect console at https://console.aws.amazon.com/connect/
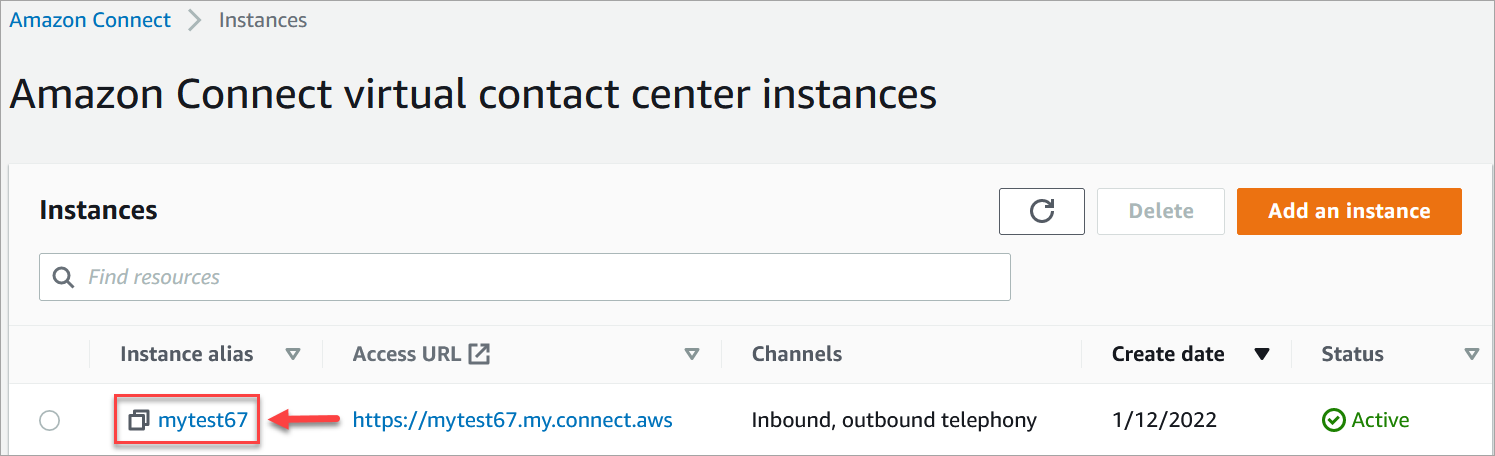
. On the instances page, choose the instance alias. The instance alias is also your instance name, which appears in your Amazon Connect URL. The following image shows the Amazon Connect virtual contact center instances page, with a box around the instance alias.
-
In the navigation pane, choose Channels and communications, Outbound campaigns.
-
On the Outbound campaigns page, choose Enable. If you don't see this option, then check whether outbound campaigns is available in your AWS Region.
Under Encryption, enter your own AWS KMS key or choose Create an AWS KMS key.
If you choose Create an AWS KMS key:
-
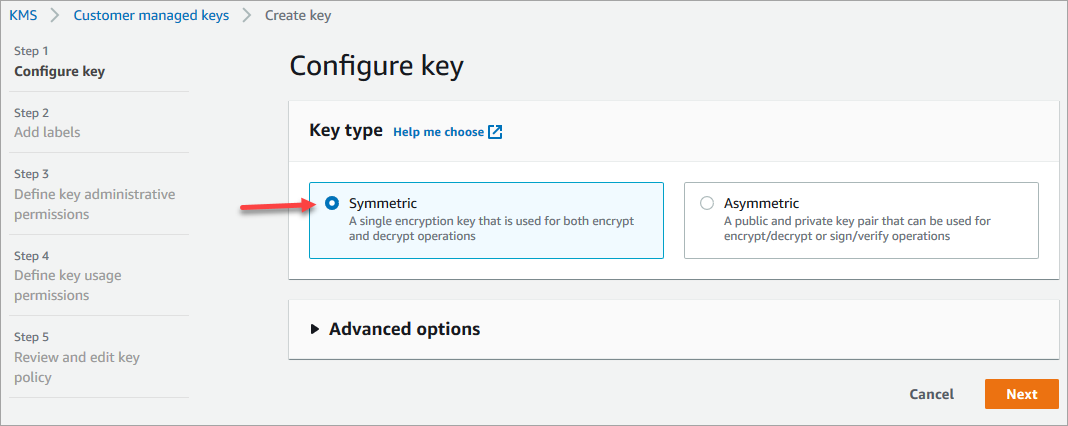
A new tab in your browser opens for the Key Management Service (KMS) console. On the Configure key page, choose Symmetric, and then choose Next, as shown in the following image.
-
On the Add labels page, add a name and description for the key, and then choose Next.
-
On the Define key administrative permissions page, choose Next.
-
On the Define key usage permissions page, choose Next.
-
On the Review and edit key policy page, choose Finish.
In the following example, the name of the key starts with bcb6fdd:

-
Return to the tab in your browser for the Amazon Connect console, Enable outbound campaigns page. Click or tap in the AWS KMS key for the key you created to appear in a dropdown list. Choose the key you created.
-
-
Choose Enable outbound campaigns.
-
It takes a few minutes for outbound campaigns to be enabled. When it's successfully enabled, you can create outbound campaigns in Amazon Connect for voice calls. If it does not enable, verify you have the required IAM permissions.
Best practices for ring duration and caller ID
The following best practices can help you comply with regulations.
- Meet the minimum ring duration requirements
-
Regulations may require unanswered calls to ring for a minimum amount of time, such as 15 seconds, so the customer has time to pick up the call. Amazon Connect outbound campaigns let unanswered calls ring until they go to voicemail or automatically terminate.
- Maintain Calling Line Identification
-
Many locations require you to display the phone number associated with a caller ID. Amazon Connect enforces the use of Calling Line Identification that corresponds to a number in an Amazon Connect instance. The phone number you specify as caller ID for an outbound campaign must be one you have claimed or ported in to your number inventory.
