Initial set-up for AI agents
To start using Connect AI agents, you first need to create a domain. As part of this process you can also optionally:
-
Create an encryption key to encrypt the excerpts that are provided in the recommendations to the agent.
-
Create a knowledge base using external data.
-
Encrypt the content importing from these applications using a KMS key.
The following sections explain how to use the Connect Customer console to enable Connect AI agents. Follow them in the order listed. If you want to use APIs, we assume you have the necessary programming skills.
Contents
Supported content types
Connect AI agents support the ingestion of HTML, Word, PDF, and text files up to 1 MB. Note the following:
-
Plain text files must be in UTF-8.
-
Word documents must be in DOCX format.
-
Word documents are automatically converted to simplified HTML and will not retain the source document’s font family, size, color, highlighting, alignment, or other formatting such as background colors, headers or footers.
-
PDF files cannot be encrypted or password protected.
-
Actions and scripts embedded into PDF files are not supported.
For a list of adjustable quotas, such as the number of quick responses per knowledge base, see Connect AI agents service quotas.
Integration overview
You follow these broad steps to enable Connect AI agents:
-
Create a domain (assistant). A domain consists of a single knowledge base, such as SalesForce or Zendesk.
-
Create an encryption key to encrypt the excerpts that are provided in the recommendations to the agent.
-
Create a knowledge base using external data:
-
Add data integrations from Amazon S3, Microsoft SharePoint Online, Salesforce
, ServiceNow , and ZenDesk using prebuilt connectors in the Connect Customer console. -
Encrypt the content importing from these applications using a KMS key.
-
For certain integrations, specify the sync frequency.
-
Review the integration.
-
-
Configure your flow.
-
Assign permissions.
Before you begin
Following is an overview of key concepts and the information that you'll be prompted for during the setup process.
To start using Connect AI agents, you must create a domain: an assistant that consists of one knowledge base. Follow these guidelines when creating domains:
-
You can create multiple domains, but they don't share external application integrations or customer data between each other.
-
You can associate each domain with one or more Connect Customer instances, but you can only associate an Connect Customer instance with one domain.
Note
All the external application integrations you create are at a domain level. All Connect Customer instances associated with a domain inherit the domain's integrations.
You can associate your Connect Customer instance with a different domain at any time by choosing a different domain.
-
All the external application integrations you create are at a domain level. All of the Connect Customer instances associated with a domain inherit the domain's integrations.
-
You can associate your Connect Customer instance with a different domain at any time by choosing a different domain.
How to name your domain
When you create a domain, you are prompted to provide a friendly domain name that's meaningful to you, such as your organization name.
(Optional) Create AWS KMS keys to encrypt the domain and the content
When you enable Connect AI agents, by default the domain and connection are encrypted with an AWS owned key. However, if you want to manage the keys, you can create or provide two AWS KMS keys:
-
Use one key for the Connect AI agents domain, used to encrypt the excerpt provided in the recommendations.
-
Use the second key to encrypt the content imported from Amazon S3, Microsoft SharePoint Online, Salesforce, ServiceNow, or ZenDesk. Note that Connect AI agents search indices are always encrypted at rest using an AWS owned key.
To create KMS keys, follow the steps in Step 1: Create a domain, later in this section.
Your customer managed key is created, owned, and managed by you. You have full control over the KMS key, and AWS KMS charges apply.
If you choose to set up a KMS key where someone else is the administrator,
the key must have a policy that allows kms:CreateGrant,
kms:DescribeKey, and kms:Decrypt and
kms:GenerateDataKey* permissions to the IAM identity using
the key to invoke Connect AI agents. To use Connect AI agents with chat, task, and emails, the key policy for
your Connect AI agents domain must allow kms:Decrypt,
kms:GenerateDataKey*, and kms:DescribeKey
permissions to the connect.amazonaws.com service principal.
Note
To use Connect AI agents with chat, task, and emails, the key policy for your domain
must grant the connect.amazonaws.com service principal the
following permissions:
-
kms:GenerateDataKey* -
kms:DescribeKey -
kms:Decrypt
For information about how to change a key policy, see Changing a key policy in the AWS Key Management Service Developer Guide.
Step 1: Create a domain
The following steps explain how to add a domain to an Connect Customer instance, and how to add an integration to the domain. To complete these steps, you must have an instance without a domain.
Open the Connect Customer console at https://console.aws.amazon.com/connect/
. -
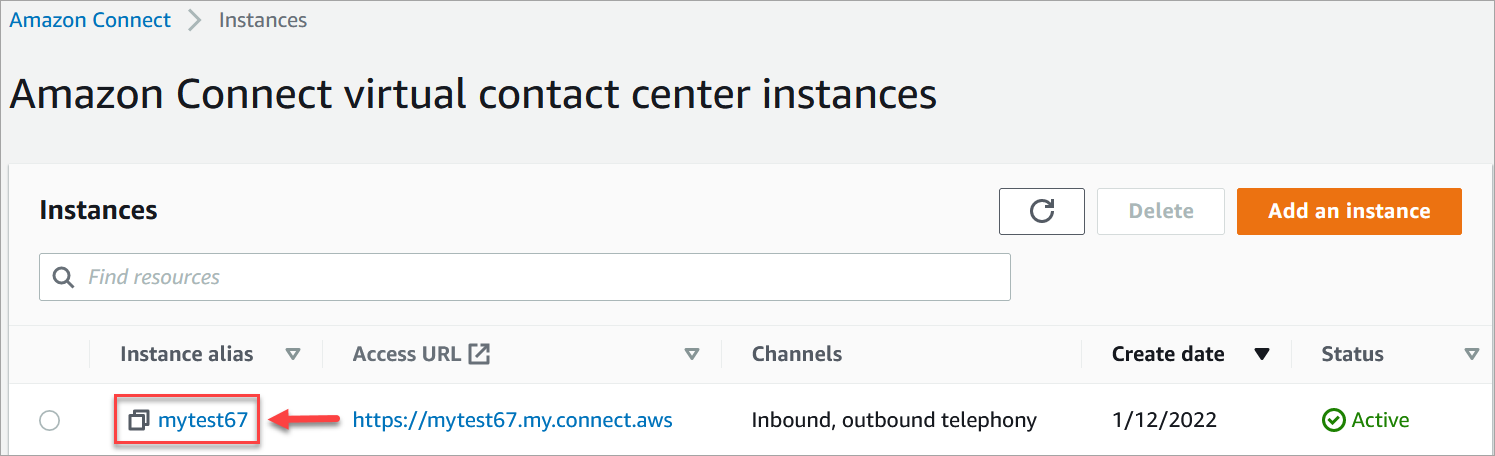
On the Connect Customer virtual contact center instances page, under Instance alias, choose the name of the instance. The following image shows a typical instance name.
-
In the navigation pane, choose AI Agents, and then choose Add domain.
-
On the Add domain page, choose Create a domain.
-
In the Domain name box, enter a friendly name, such as your organization name.

-
Keep the page open and go to the next step.
Step 2: Encrypt the domain
You can use the Connect Customer default key to encrypt your domain. You can also use an existing key, or you can create keys that you own. The following sets of steps explain how to use each type of key. Expand each section as needed.
Use the default key
-
Under Encryption, clear the Customize encryption settings checkbox.
-
Choose Add domain.
Use an existing key
-
Under Encryption, open the AWS KMS key list and select the desired key.
-
Choose Add domain.
Note
To use an existing key with Connect Customer chats, tasks, and emails, you must grant the
connect.amazonaws.com service principal the
kms:Decrypt, kms:GenerateDataKey*, and
kms:DescribeKey permissions.
The following example shows a typical policy.
Create an AWS KMS key
-
On the Add domain page, under Encryption, choose Create an AWS KMS key.

That takes you to the Key Management Service (KMS) console. Follow these steps:
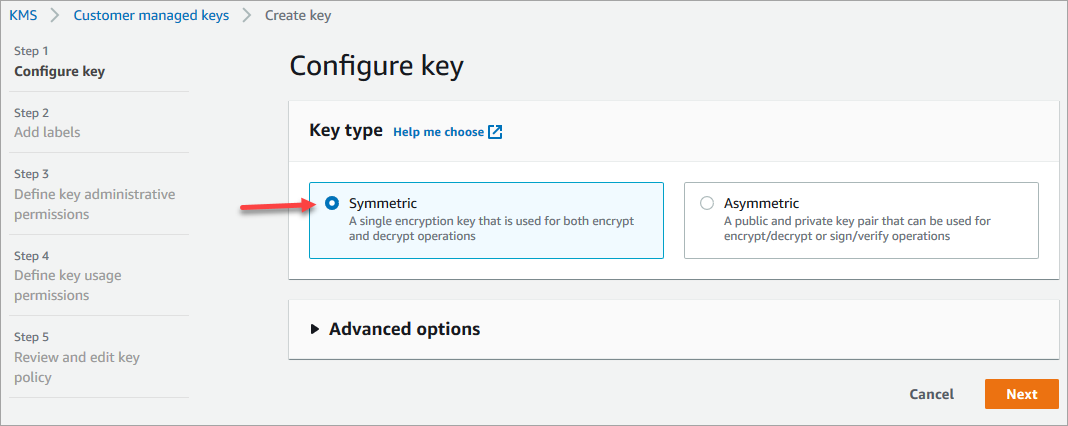
-
In the KMS console, on the Configure key page, choose Symmetric, and then choose Next.
-
On the Add labels page, enter an alias and description for the KMS key, and then choose Next.

-
On the Define key administrative permissions page, choose Next, and on the Define key usage permissions page, choose Next again.
-
On the Review and edit key policy page, scroll down to Key policy.
Note
To use Connect AI agents with chats, tasks, and emails, modify the key policy to allow the
kms:Decrypt,kms:GenerateDataKey*, andkms:DescribeKeypermissions to theconnect.amazonaws.comservice principal. The following code shows a sample policy. -
Choose Finish.
In the following example, the name of the KMS key starts with 82af7d87.

-
-
Return to the Connect AI agents browser tab, open the AWS KMS key list, and select the key that you created in the previous steps.

-
Choose Add domain.
Step 3: Create an integration (knowledge base)
-
On the AI Agents page, choose Add integration.
-
On the Add integration page, choose Create a new integration, and then select a source.
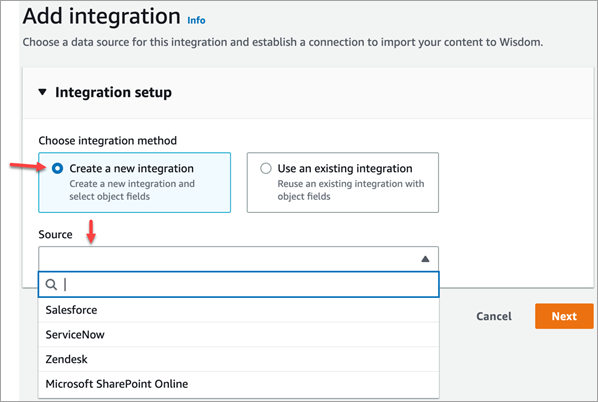
The steps for creating an integration vary, depending on the source that you choose. Expand the following sections as needed to finish creating an integration.
You follow a multi-step process to create a Salesforce integration. The following sections explain how to complete each step.
Step 1: Add the integration
-
Select all the checkboxes that appear. This acknowledges that you set up your Salesforce account properly:
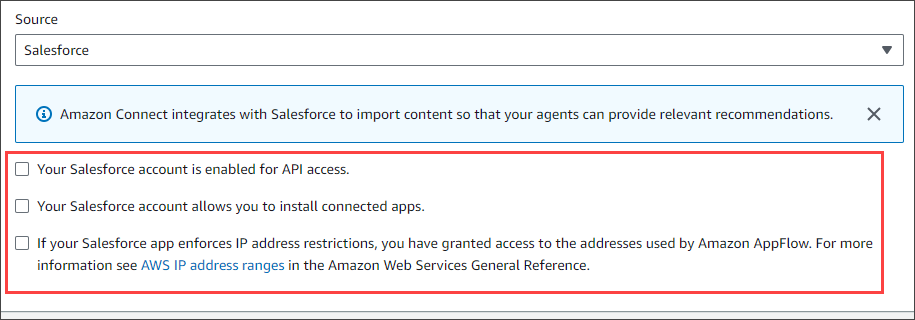
-
In the Integration name box, enter a name for the integration.
Tip
If you create multiple integrations from the same source, we recommend you develop a naming convention to make the names easy to distinguish.
-
Select Use an existing connection, open the Select an existing connection list and choose a connection, then choose Next.
—OR—
Select Create a new connection and follow these steps:
-
Choose Production or Sandbox.
-
In the Connection name box, enter the name of your connection. The name is your Salesforce URL without the https://.
-
Choose Connect, sign in to Salesforce, and when prompted, choose Allow.
-
-
Under Encryption, open the AWS KMS Key list and choose a key.
—OR—
Choose Create an AWS KMS Key and follow the steps listed in Create an AWS KMS key, earlier in this section.
-
(Optional) Under Sync frequency, open the Sync frequency list and select and select a synchronization interval. The system defaults to an hour.
-
(Optional) Under Ingestion start date, choose Ingest records created after, then select a start date. The system defaults to ingesting all records.
-
Choose Next and follow the steps in the next section of this topic.
Step 2: Select objects and fields
Tip
If you create multiple integrations from the same source, we recommend you develop a naming convention to make the names easy to distinguish.
-
On the Select objects and fields page, open the Available objects list and select an object. Only knowledge objects appear in the list.
-
Under Select fields for object name, select the fields that you want to use.
Note
By default, the system automatically selects all required fields.
-
Choose Next.
Step 3: Review and add the integration
-
Review the settings for the integration. When finished, choose Add integration.
-
Under Integration setup, select the checkbox next to Read and acknowledge that your ServiceNow account meets the integration requirements..
Important
You must enable versioning on your ServiceNow knowledge base articles. Connect AI agents requires versioning to correctly identify and ingest the latest version of your articles. Without versioning enabled, the integration will fail to create.
-
In the Integration name box, enter a name for the integration.
Tip
If you create multiple integrations from the same source, we recommend you develop a naming convention to make the names easy to distinguish.
-
Select Use an existing connection, open the Select an existing connection list and choose a connection, then choose Next.
—OR—
Select Create a new connection and follow these steps:
-
In the User name box, enter your ServiceNow user name. You must have administrator permissions.
-
In the Password box, enter your password.
-
In the Instance URL box, enter your ServiceNow URL.
-
In the Connection name box, enter a name for the connection.
-
Choose Connect.
-
Under Encryption, open the AWS KMS Key list and choose a key.
—OR—
Choose Create an AWS KMS Key and follow the steps listed in Create an AWS KMS key, earlier in this section.
-
(Optional) Under Sync frequency, open the Sync frequency list and select and select a synchronization interval. The system defaults to an hour.
-
(Optional) Under Ingestion start date, choose Ingest records created after, then select a start date. The system defaults to ingesting all records.
-
Choose Next.
-
-
Select the fields for the knowledge base. The following fields are required:
-
short_description
-
number
-
workflow_state
-
sys_mod_count
-
active
-
text
-
sys_updated_on
-
latest
-
sys_id
-
-
Choose Next.
-
Review your settings, change them as needed, then choose Add integration.
Prerequisites
You must have the following items to connect to Zendesk:
-
A client ID and a client secret. You obtain the ID and secret by registering your application with Zendesk and enabling an OAuth authorization flow. For more information, see Using OAuth authentication with your application
on the Zendesk support site. -
In Zendesk, a Redirect URL configured with
https://[AWS
                                    REGION].console.aws.amazon.com/connect/v2/oauth
. For example,https://ap-southeast-2.console.aws.amazon.com/connect/v2/oauth.
After you have those items, follow these steps:
-
Under Integration setup, select the checkboxes and enter a name for the integration.
Tip
If you create multiple integrations from the same source, we recommend you develop a naming convention to make the names easy to distinguish.
-
Select Use an existing connection, open the Select an existing connection list and choose a connection, then choose Next.
—OR—
Select Create a new connection and follow these steps:
-
Enter a valid client ID, client secret, account name, and connection name in their respective boxes, then choose Connect.
-
Enter your email address and password, then choose Sign in.
-
On the pop-up that appears, select Allow.
-
Under Encryption, open the AWS KMS Key list and choose a key.
—OR—
Choose Create an AWS KMS Key and follow the steps listed in Create an AWS KMS key, earlier in this section.
-
-
(Optional) Under Sync frequency, open the Sync frequency list and select and select a synchronization interval. The system defaults to an hour.
-
(Optional) Under Ingestion start date, choose Ingest records created after, then select a start date. The system defaults to ingesting all records.
-
Choose Next.
-
Select the fields for the knowledge base, then choose Next.
-
Review your settings, change them as needed, then choose Add integration.
After you create the integration, you can only edit its URL.
Prerequisites
You must have the following item to connect to SharePoint:
-
In SharePoint, a Redirect URL configured with
https://[AWS
                                    REGION].console.aws.amazon.com/connect/v2/oauth
. For example,https://ap-southeast-2.console.aws.amazon.com/connect/v2/oauth.
Note
Only AUTHORIZATION_CODE is supported for SharePoint Online connections. CLIENT_CREDENTIALS is not supported.
After you have this item, follow these steps:
-
Under Integration setup, select the checkbox and enter a name for the integration.
Tip
If you create multiple integrations from the same source, we recommend you develop a naming convention to make the names easy to distinguish.
-
Under Connection with S3, open the Select an existing connection list and choose a connection, then choose Next.
—OR—
Select Create a new connection and follow these steps:
-
Enter your tenant ID in both boxes, enter a connection name, then choose Connect.
-
Enter your email address and password to sign in to SharePoint.
-
Under Encryption, open the AWS KMS Key list and choose a key.
—OR—
Choose Create an AWS KMS Key and follow the steps listed in Create an AWS KMS key, earlier in this section.
-
Under Sync frequency, accept the default or open the Sync frequency list and select and select a synchronization interval.
-
Choose Next.
-
-
Under Select Microsoft SharePoint Online site, open the list and select a site.
-
Under Select folders from site name, select the folders that you want to include in your domain, then choose Next.
-
Review your settings, change them as needed, then choose Add integration.
-
In the Integration name box, enter a name for your integration.
Tip
If you create multiple integrations from the same source, we recommend you develop a naming convention to make the names easy to distinguish.
-
Under Connections with Microsoft SharePoint Online, open the Select an existing connection list and choose a connection, then choose Next.
—OR—
Under Connection with S3, enter the URI of your Amazon S3 bucket, then choose Next.
—OR—
Choose Browse S3, use the search box to find your bucket, select the button next to it, then select Choose.
-
Under Encryption, open the AWS KMS Key list and choose a key.
—OR—
Choose Create an AWS KMS Key and follow the steps listed in Create an AWS KMS key, earlier in this section.
-
Choose Next.
-
Review your settings, change them as needed, then choose Add integration.
The Web Crawler connects to and crawls HTML pages starting from the seed URL, traversing all child links under the same top primary domain and path. If any of the HTML pages reference supported documents, the Web Crawler will fetch these documents, regardless if they are within the same top primary domain.
Supported features
-
Select multiple URLs to crawl.
-
Respect standard robots.txt directives like 'Allow' and 'Disallow'.
-
Limit the scope of the URLs to crawl and optionally exclude URLs that match a filter pattern.
-
Limit the rate of crawling URLs.
-
View the status of URLs visited while crawling in Amazon CloudWatch.
Prerequisites
-
Check that you are authorized to crawl your source URLs.
-
Check the path to robots.txt corresponding to your source URLs doesn't block the URLs from being crawled. The Web Crawler adheres to the standards of robots.txt: disallow by default if robots.txt is not found for the website. The Web Crawler respects robots.txt in accordance with the RFC 9309
-
Check if your source URL pages are JavaScript dynamically generated, as crawling dynamically generated content is currently not supported. You can check this by entering the following in your browser:
view-source:https://examplesite.com/site/. If the body element contains only adivelement and few or noa hrefelements, then the page is likely dynamically generated . You can disable JavaScript in your browser, reload the web page, and observe whether content is rendered properly and contains links to your web pages of interest.
Note
Web crawls have a default timeout of one hour and will be automatically stopped when this limit is reached.
Note
When selecting websites to crawl, you must adhere to the Amazon Acceptable Use
Policy
Connection configuration
To reuse an existing integration with object fields, chose Use an existing connection, open the Select an existing connection list and choose a connection, then choose Next.
To create a new integration, use the following steps:
-
Choose Create a new connection.
-
In the Integration name box, assign a friendly name to the integration.

-
In the Connection with Web Crawler > Source URLs section, provide the Source URLs of the URLs you want to crawl. You can add up to 9 additional URLs by selecting Add Source URLs. By providing a source URL, you are confirming that you are authorized to crawl its domain.

-
Under Advanced settings, you can optionally configure to use the default KMS key or a Customer Managed Key (CMK).
-
Under Sync scope
-
Select an option for the scope of crawling your source URLs. You can limit the scope of the URLs to crawl based on each page URL's specific relationship to the seed URLs. For faster crawls, you can limit URLs to those with the same host and initial URL path of the seed URL. For broader crawls, you can choose to crawl URLs with the same host or within any subdomain of the seed URL.
Note
Make sure you are not crawling potentially excessive web pages. It's not recommended to crawl large websites, such as wikipedia.org, without filters or scope limits. Crawling large websites will take a very long time to crawl.
Supported file types are crawled regardless of scope and if there's no exclusion pattern for the file type.
-
Enter Maximum throttling of crawling speed. Ingest URLs between 1 and 300 URLs per host per minute. A higher crawling speed increases the load but takes less time.
-
For URL Regex patterns (optional) you can add Include patterns or Exclude patterns by entering the regular expression pattern in the box. You can add up to 25 include and 25 exclude filter patterns by selecting Add new pattern. The include and exclude patterns are crawled in accordance with your scope. If there's a conflict, the exclude pattern takes precedence.
-
You can include or exclude certain URLs in accordance with your scope. Supported file types are crawled regardless of scope and if there's no exclusion pattern for the file type. If you specify an inclusion and exclusion filter and both match a URL, the exclusion filter takes precedence and the web content isn’t crawled.
Important
Problematic regular expression pattern filters that lead to catastrophic backtracking and look ahead, are rejected.
-
The following is an example of a regular expression filter pattern to exclude URLs that end with ".pdf" or PDF web page attachments:
.*\.pdf$
-
-
-
Choose Next.
-
Review all the integration details.

-
Select Add integration.
-
The integration is added to your list.
Now with Orchestration Type AI Agent, you can bring your own Bedrock Knowledge Base to seamlessly work with Connect AI Agents.
Note
The Bedrock knowledge base integration type is only compatible with orchestration agent types.
Note
The Bedrock knowledge base integration is only available for on-contact calls and does not support off-contact manual search.
-
Add new integration

-
Choose Bedrock Knowledge Base

-
Select existing Bedrock Knowledge Base

-
Review and add integration

You have successfully integrated an existing Bedrock Knowledge Base with Connect's AI Agents
Note
-
If you delete objects from SaaS applications, such as SalesForce and ServiceNow, Connect Customer knowledge bases do not process those deletions. You must archive objects in SalesForce and retire articles in ServiceNow to remove them from those knowledge bases.
-
For Zendesk, Connect Customer knowledge bases do not process hard deletes or archives of articles. You must unpublish articles in Zendesk to remove them from your knowledge base.
-
For Microsoft SharePoint Online, you can select a maximum of 10 folders.
-
Connect Customer automatically adds an
AmazonConnectEnabled:Truetag to the Connect AI agent resources associated with your Connect Customer instance, such as a knowledge base and an Assistant. It does this to authorize the access from Connect Customer to Connect AI agent resources. This action is a result of the tag-based access control in the managed policy of the Connect Customer service linked role. For more information, see Service-linked role permissions for Connect Customer.
Step 4: Configure your flow for Connect AI agents
-
Add a Connect assistant block to your flow. The block associates an Connect AI agents domain to the current contact. This enables you to display information from a specific domain, based on criteria about the contact.
If you choose to customize the experience, you will instead create a Lambda and then use an AWS Lambda function block to add it to your flows.
-
To use Connect AI agents with calls, you must enable Contact Lens conversational analytics in the flow by adding a Set recording and analytics behavior block that is configured for Contact Lens conversational analytics real-time. It doesn't matter where in the flow you add the Set recording and analytics behavior block.
What if I have multiple knowledge bases?
You can configure your orchestration agent to use multiple knowledge bases by configuring multiple retrieve tools.
When was your knowledge base last updated?
To confirm the last date and time that your knowledge base was updated (meaning a
change in the content available), use the GetKnowledgeBase API to reference
lastContentModificationTime.
Cross-region inference service
Connect AI agents uses cross-region inference to automatically select the optimal AWS Region for processing your data, improving the customer experience by maximizing available resources and model availability. If you do not want your data processed in a different region from what you selected, you can contact AWS Support.
Note
While existing Custom prompts will continue using in-region inference, we recommend upgrading to the latest supported models to benefit from cross-region inference capabilities. You can contact AWS Support for migration assistance of your existing prompts.
