Integrate Amazon Connect chat into a mobile application
This topic explains how to integrate Amazon Connect Chat into your mobile application. You can use one of the following options:
Use the Amazon Connect StartChatContact API to initiate contact.
Contents
Which integration option to use
This section provides a description of each integration option to help you decide which one to use for your solution.
WebView integration
The Amazon Connect Chat WebView integration allows you to embed the full chat experience
into your mobile applications with minimal development effort. This method uses
WebView on Android and WKWebView on iOS to provide a
seamless and comprehensive chat interface. It is ideal for teams looking for a
quick, out-of-the-box solution to integrate chat functionality without extensive
customizations.
This approach ensures secure communication and leverages the web-based Amazon Connect chat interface. However, you will need to configure your app to handle cookies and JavaScript properly.
For more information on implementing WebView integration, see the Amazon Connect chat
UI Examples
Recommendation: WebView-based integration is ideal for rapid development and minimal maintenance while ensuring comprehensive chat functionality.
Amazon Connect Chat SDKs for Mobile
The Amazon Connect Chat SDKs for iOS and Android simplify the integration of Amazon Connect chat for native mobile applications. The SDKs help handle client side chat logic and back-end communications similar to the Amazon Connect ChatJS Library.
The Amazon Connect Chat SDKs wrap the Amazon Connect Participant Service APIs
and abstracts away the management of the chat session and WebSocket. This allows you
to focus on the user interface and experience while relying on the Amazon Connect Chat SDK to interact with all the back-end services. This approach still requires
you to use your own chat back end to call the Amazon Connect
StartChatContact API to initiate contact.
For more information on the Swift-based iOS SDK, see the Amazon Connect Chat SDK for iOS
GitHub page. For more information on the Kotlin-based Android SDK, see the Amazon Connect Chat SDK for Android
GitHub page.
Benefits: The Native SDKs enable robust functionality and high performance, making them ideal for applications that require deep customization and a seamless user experience.
React Native integration
Amazon Connect Chat React Native integration offers a cross-platform solution. It enables teams to build chat functionality for both Android and iOS with a shared codebase. This method balances customization and development efficiency while leveraging React Native's capabilities for creating robust mobile applications.
This integration uses native bridges to access advanced features and ensures
consistent performance and a uniform user experience across platforms. It's
easier to implement key features such as WebSocket communication by using
libraries such as react-native-websocket and API calls with
axios.
Best for: Teams that want to maximize code reuse while maintaining functional flexibility.
Amazon Connect chat integration workflow
The following diagram shows the programming flow between a customer using a mobile app and an agent. Numbered text in the diagram corresponds to numbered text below the image.
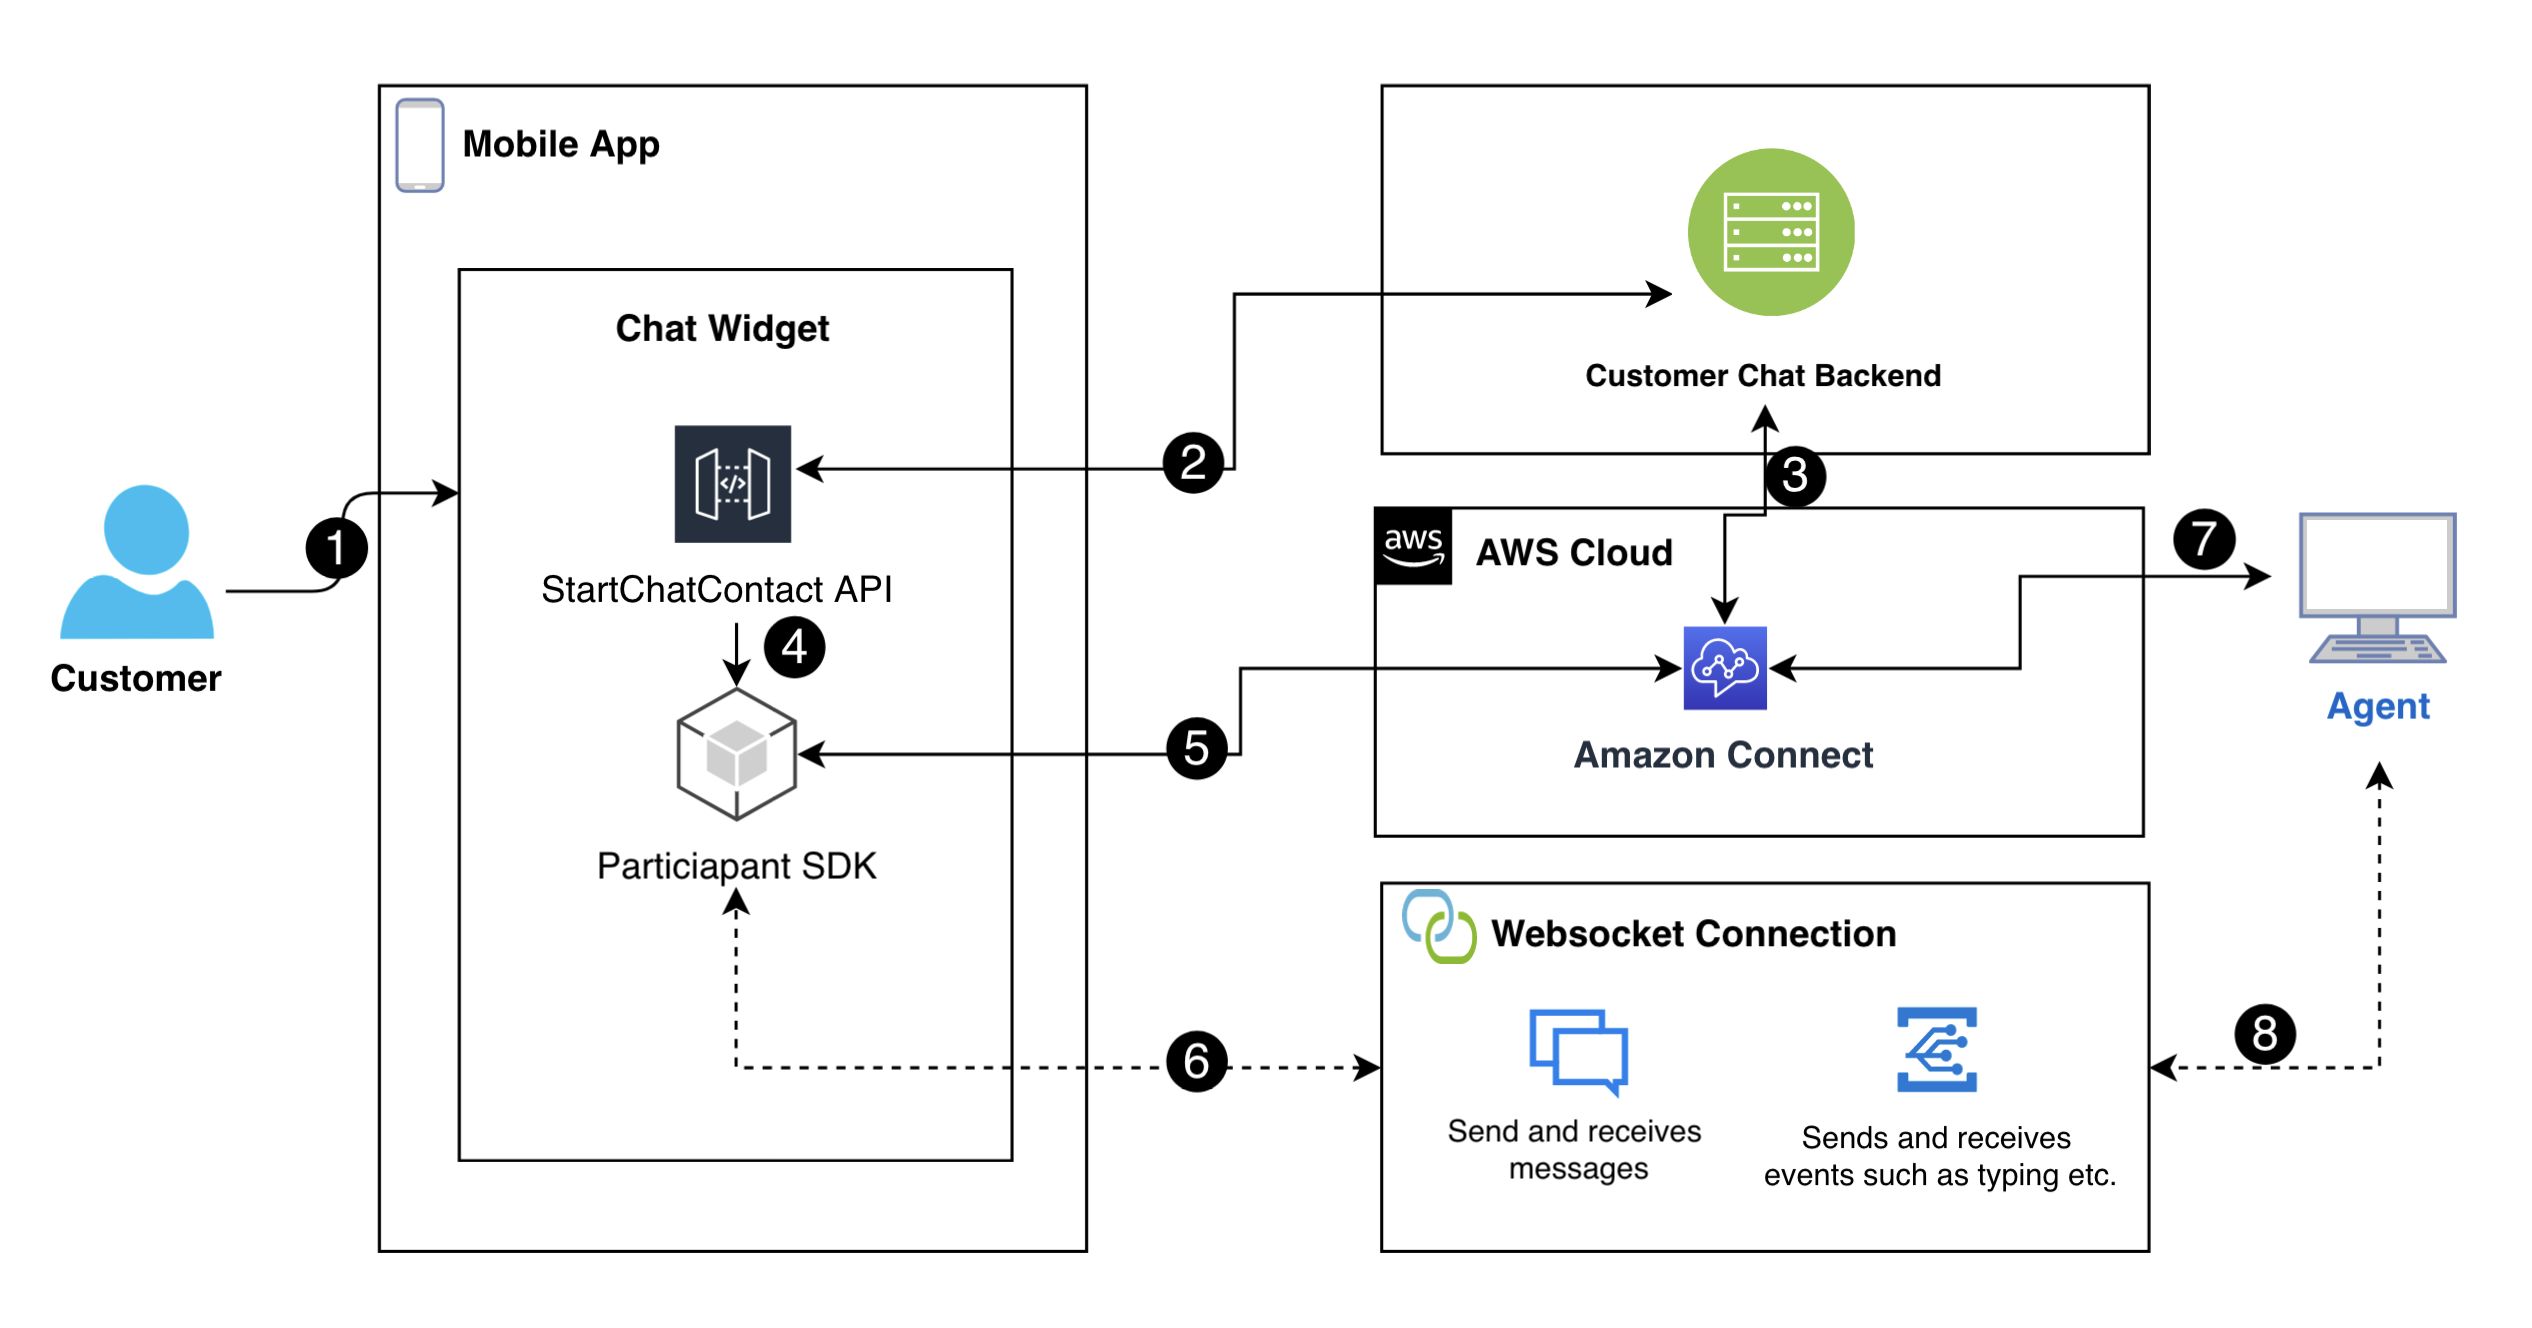
In the diagram
-
When a customer starts a chat in the mobile app, the app should send a request to Amazon Connect using the StartChatContact API. This requires specific parameters, such as the API endpoint and IDs for the instance and contact flow, to authenticate and initiate the chat.
-
The
StartChatContactAPI interacts with your back-end system to obtain a participant token and a contact ID that act as unique identifiers for the chat session. -
The app's UI passes the
StartChatContactresponse to the mobile SDK in order for the SDK to properly communicate with the Amazon Connect Participant Service and set up the customer’s chat session. -
The SDK exposes a chatSession
object to the UI, which contains easily usable methods to interact with the chat session. -
Under the hood, the SDK interacts with the Amazon Connect Participant Service using the AWS SDK
. The communication with the Amazon Connect Participant Service is responsible for all customer interactions with the chat session. This includes actions such as CreateParticipantConnection,SendMessage,GetTranscript, orDisconnectParticipant. -
The SDK also manage the WebSocket connection needed to receive messages, events and attachments from the agent. This will all be handled and parsed by the SDK and surfaced to the UI in an easily consumed structure.
Get started with Amazon Connect chat integration
The following steps and resources will help you get started with integrating Amazon Connect Chat into your native mobile applications:
-
You can quickly set up a CloudFormation stack to provide the necessary back-end to call StartChatContact by looking at our startChatContactAPI
example on GitHub. For examples that show how to build your mobile chat UI powered by the Amazon Connect Chat SDKs, check out our UI Examples
GitHub project. Refer to our sample iOS
and Android chat examples that showcase how to power a chat application using the Amazon Connect Chat SDK for iOS/Android. -
Check out the Amazon Connect Chat SDK for iOS
and Amazon Connect Chat SDK for Android GitHub pages. The GitHub page contains API documentation and an implementation guide that explains any prerequisites and installation steps. -
Set up React Native integration: Leverage the React Native
example for guidance on implementing react native based solution. -
If there are any questions or issues regarding the set up or use of the Amazon Connect Chat SDK on your mobile applications, you can file an issue on either the Amazon Connect Chat SDK for iOS Issues
page or the Amazon Connect Chat SDK for Android Issues page. If there is an issue with the mobile chat UI examples, you can file an issue on the Amazon Connect Chat UI Examples Issues page.
