Create task templates in Amazon Connect
Task templates make it easy for agents to capture the right information to create and complete a task. All the fields they need to create a given type of task are provided for them.
Important things to know before you create your first template
-
When you publish your first template, your agents will be prompted to select a template when they create a new task. Agents must select one of the templates you have published.
-
If you want to return to the standard task experience and not require agents to select a template, on the Task templates page, use the Disable/Enable toggle to disable all templates you published.
-
Verify your Amazon Connect account has permissions to create task templates.
-
Review the list of quotas for task templates, such as the Task templates per instance and Task template customized fields per instance. See Amazon Connect service quotas.
-
You can configure a task template to allow an agent to assign the tasks to themselves. The agent needs the security profile permission Contact Control Panel - Allow self assigning of contacts and the Restrict Task Creation permission must be disabled. The agent will then be able to check a box when they create a task from the CCP and assign it to themselves.
How to create a task template
Step 1: Name the template
-
Log in to the Amazon Connect console with an Admin account, or an account assigned to a security profile that has permissions to create task templates.
-
In the left navigation menu, choose Channels, Task templates.
-
On the Task templates page, choose + New template.
-
On the Create new template page, in the Template name box, enter the name that will be displayed your agents.
-
In the Description box, describe the purpose of the template. This information is not displayed to agents; it's for your own use.
Step 2: Add fields, task assignment, schedule, and expiry
-
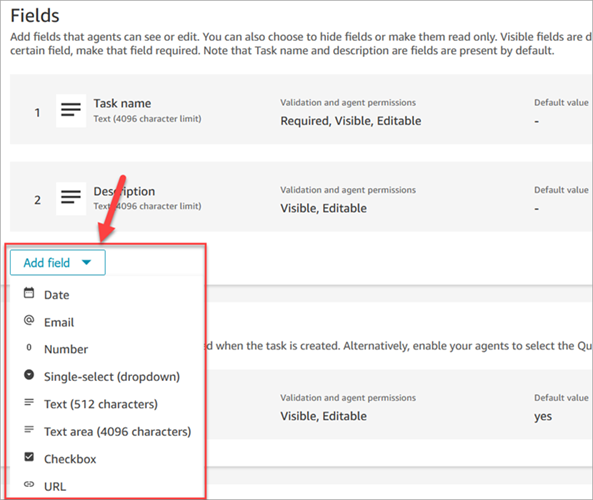
In the Fields section, choose the Add field dropdown, and then select the type of field you want to add to your template.
-
Use the up and down arrows as needed to change the order the field appears on the template.
-
In the Validation and permissions section, choose whether the field is required to be populated by the agent when they create a task, or add a default value to pre-populate the field when the agent opens the template.
The following image shows what this section looks like for a field that is type Email.

Note
It is not possible to use attributes in the task templates page.
-
In the Task assignment section:
-
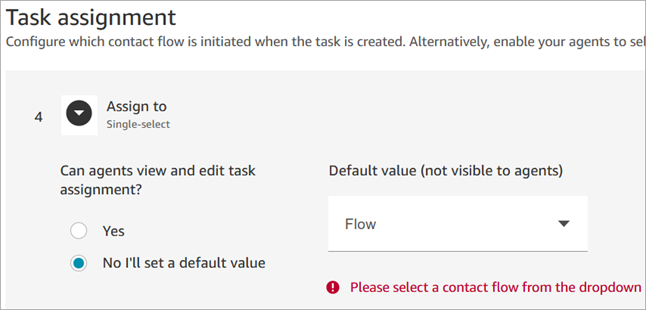
Assign to: Choose Yes to allow agents to view and edit a task assignment when they create the task. Or, assign a default value, as shown in the following image. Choose a published flow that runs after the agent chooses Create to create the task. Agents don't see the name of the flow on the CCP.
Note
Only published flows are listed in the Default value dropdown.
-
Self-assign: Choose Yes to allow agents to assign tasks to themselves on the CCP. For Default state, choose True if you want the self-assigned checkbox selected by default in the CCP.

-
-
In the Task schedule section, choose whether you want agents to be able to schedule a future start date and time for tasks.
-
In the Expiry section, specify how long the task should exist before it expires. The default is 7 days. You can configure it for up to 90 days (129,600 minutes)

Step 3: Publish
After you configure your template, choose Publish to create it and make it visible to your agents.
Important
If this is your first template, when you choose Publish, agents are automatically required to select a task template when they create a task.
If you want to maintain the standard task experience without selectable templates, disable all templates.
What your agents experience
After you publish a template, agents are required to select a template to create a task.
For example, the following image shows two templates have published: Customer Email Template and Billing Dispute.
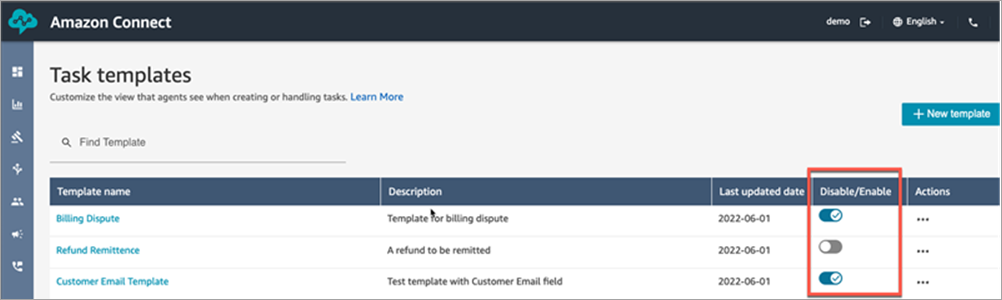
In the Contact Control Panel, when agents choose Create task they must choose one of the templates: Billing Dispute or Customer Email Template.

Let's assume the agent chooses Customer Email Template. The following image shows the fields the agent must complete in order to create a task. Notice that there is no option for the agent to assign the task to others; this template has Task assignment set to a default value. However, the agent can opt to assign the task to themselves.

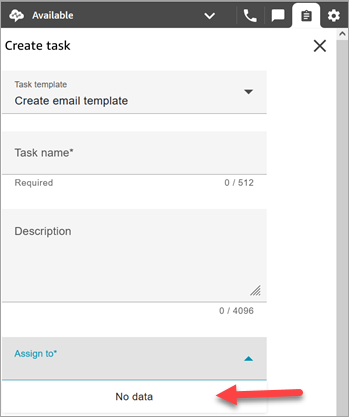
"No data" message in the Assign to dropdown
Let's say that in the Task assignment section, you choose to allow agents to assign the task to another agent. To set up for this scenario, you must create a quick connect for the destination agent so it appears in the dropdown list of choices, as shown in the following image. For instructions about creating a quick connect for an agent, see Test tasks.

If no quick connects exist, then the message No data appears when you choose the Assign to dropdown menu, as shown in the following image.