Row Level Security
Introduction
Cloud Intelligence Dashboards (CID) helps you to visualize and understand AWS cost and usage data in your organization by exploring interactive dashboards. However, in order to maintain least privilege principle, customers who use CID at scale of organization often would like to provide their users access only to the data for linked accounts which they own. Using Row Level Security (RLS) enables you to restrict the data a user can see to just what they are allowed to. This also applicable for customers with Multiple Management (Payer) Accounts .
Last Updated
June 2025
Authors
-
Stephanie Gooch, Sr. Commercial Architect, AWS OPTICS
-
Veaceslav Mindru, Sr. Technical Account Manager, AWS
Contributors
-
Iakov Gan, Cloud Optimization Success SA, AWS
Prerequisite
For this solution you must have the following:
-
Access to your AWS Organizations and ability to tag resources
-
One of the Foundational (CUDOS, CID or KPI) Cloud Intelligence Dashboards deployed
-
A list of users and what level of access they require. This can be member accounts, organizational units (OU) or payers.
Solution
This solution will use tags from your
AWS Organization
The RLS rules can be based on Amazon QuickSight Groups or Individual Users.

-
An Admin of AWS Organization
assigns tags per AWS OU or per Account. -
Tag key:
cid_user/ Tag value: a list of email of user (the same as in QuickSight), with a separator: -
Tag key:
cid_group/ Tag value: a list of QuickSight group names. Tags will be propagated to all children OUs. The more specific tag on children OU or on Account level can override values commit from higher level OUs.
-
-
Amazon EventBridge
rule invokes an AWS Lambda . The Lambda function assumes an IAM Role in Management(Payer) Accounts and retrieves account tags via the AWS Organizations API. Also it retrieves a list of Users of Amazon QuickSight in the local AWS Account. Then the Lambda function generates a CSV file with RLS rules, and uploads the CSV file to an Amazon S3 Bucket. (Existing Bucket defined during CloudFormation deployment). -
Amazon QuickSight
refreshes the RLS dataset every hour. -
The RLS dataset is applied to QuickSight datasets.
-
The QuickSight User can visualize only the data based on RLS rules.
Step by Step Guide
Part 1: Roles
If you are deploying this in a linked account you will need a Role in you Management account to let you access your AWS Organizations Data. If you already deployed the Data Collection Lab you can skip this step.
Login to Management Account and click Launch Stack for deploying
Permission
Stack

-
To ensure full visibility of data across your organization accounts, in the parameters section, we recommend to pass the Organization Root ID as the organizational unit parameter (OrganizationalUnitID). You can check it here: https://console.aws.amazon.com/organizations/v2/home/accounts


-
Make sure to select all modules that you want to allow access to your organization accounts data. You can check the list of the modules on GitHub
.

-
Please make sure you specify Data Collection Account Id correctly. It is not the Management Account Id, its an ID of the dedicated Data Collection Account.
-
Click Next at the bottom of the Specify stack details stage, and then, click Next again at the bottom of the Configure stack options stage to move to the Review stage. Click Submit at the end of the Review stage to initiate the update. This process will take a few minutes until completion.
Part 2: Tag your AWS Organization Resources
You must tag the AWS Organization Resources with the emails of the Quicksight Users that you wish to allow access to see the resources cost data. The below will show you how to tag a resource and this can be repeated. We will be using AWS Quicksight User Emails, see more here. If you have a large list of accounts and want to use a script, please see the section below Use script to tag accounts.
-
Log into your Management account then click on the top right hand corner on your account and select Organization

-
Ensure you are on the AWS accounts tab

You can select different levels of access. Tag one of the following and then use will have access to all data of that resource and any child accounts below it.
-
Tag an Account
-
Tag an Organization Unit
-
Tag the Root
-
-
To tag the resource click its name an scroll down to the tag section and click Manage tags
-
Add the Key cid_users and the Value of any emails you wish to allow access. These are colon delimited. Once added click Save changes

-
Add the Key cid_groups and the Value of any group you wish to allow access. These are colon delimited. Once added click Save changes
-
Repeat on all resources with relevant emails.
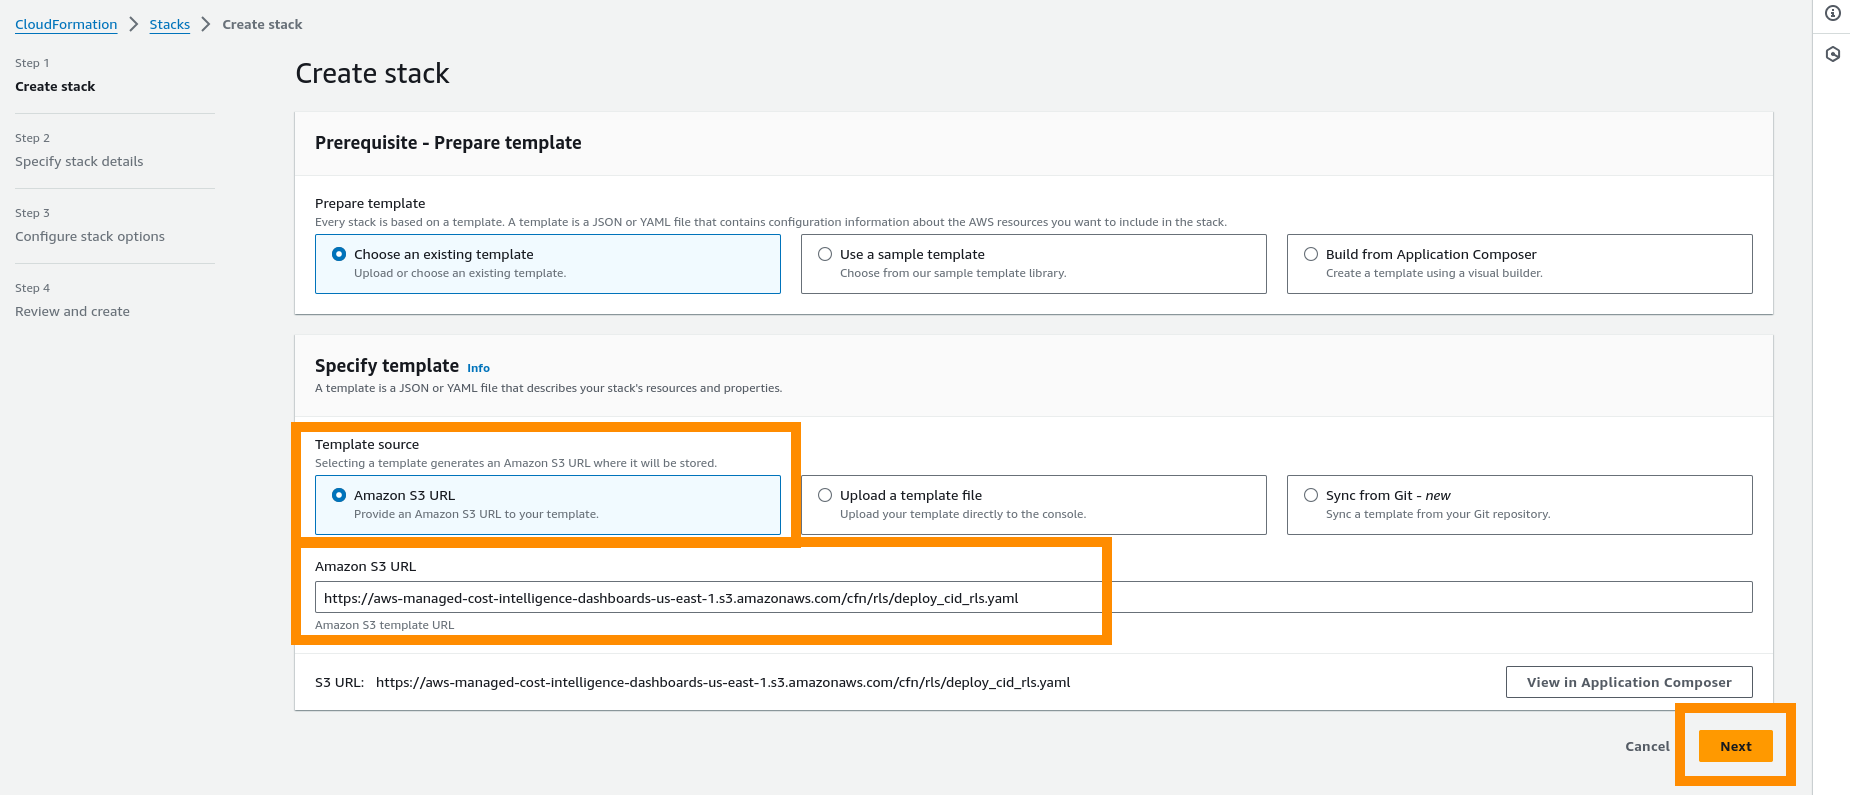
Part 3: Deploy Lambda Function
Using AWS CloudFormation we will deploy the lambda function to collect these tags. This is done in the QuickSight Cloud Intelligence Dashboards Account aka Data Collection Account.
-
Click Next.
-
Fill in the Parameters as seen below.
-
CodeBucket- LEAVE AS DEFAULT -
CodeKey- LEAVE AS DEFAULT -
DestinationBucket- Amazon S3 Bucket in your account in the same region (this can be one from your Optimization data collector where where your CUR is stored). This bucket must have access to Amazon Quicksight -
ManagementAccountID- List of Payer/Management Account IDs you wish to collect data for. Can just be one Accounts(Ex: 111222333,444555666,777888999) -
ManagementAccountRole- The name of the IAM role that will be deployed in the management account which can retrieve AWS Organization data. Default: Lambda-Assume-Role-Management-Account KEEP THE SAME AS WHAT IS DEPLOYED INTO MANAGEMENT ACCOUNT -
RolePrefix- This prefix will be placed in front of all roles created. Note you may wish to add a dash at the end to make more readable. Default: CID-DC- -
Schedule- Cron job to trigger the lambda using cloudwatch event. Default is every hour.
-

-
Tick the boxes and click Create stack.

-
Wait until your CloudFormation has a status of CREATE_COMPLETE.

Part 4: Test Lambda Function
Your lambda functions will run automatically on the schedule you chose at deployment and will be ready within an hour. However, if you would like to test your functions please see the steps below. Once you have deployed your modules you will be able to test your Lambda function to get your first set of data in Amazon S3.
-
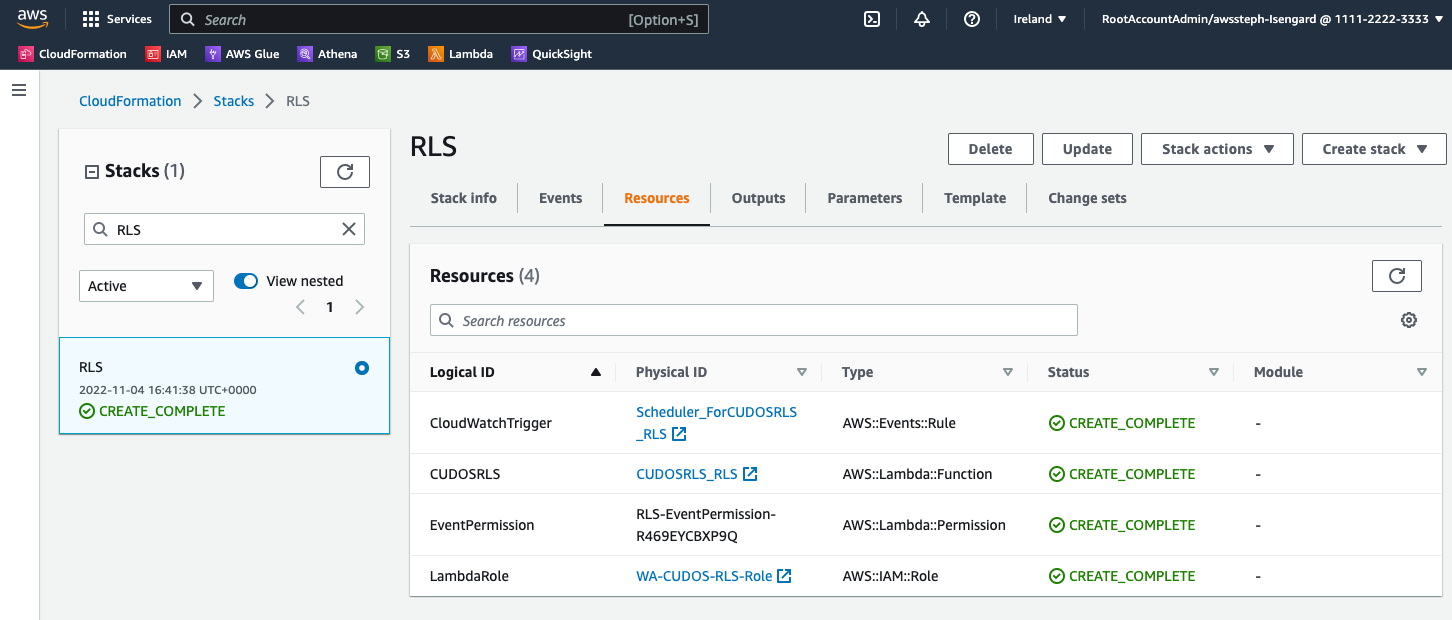
From CloudFormation Click Resources and find the Lambda Function and click the Physical ID
-
To test your Lambda function open respective Lambda in AWS Console and click Test
-
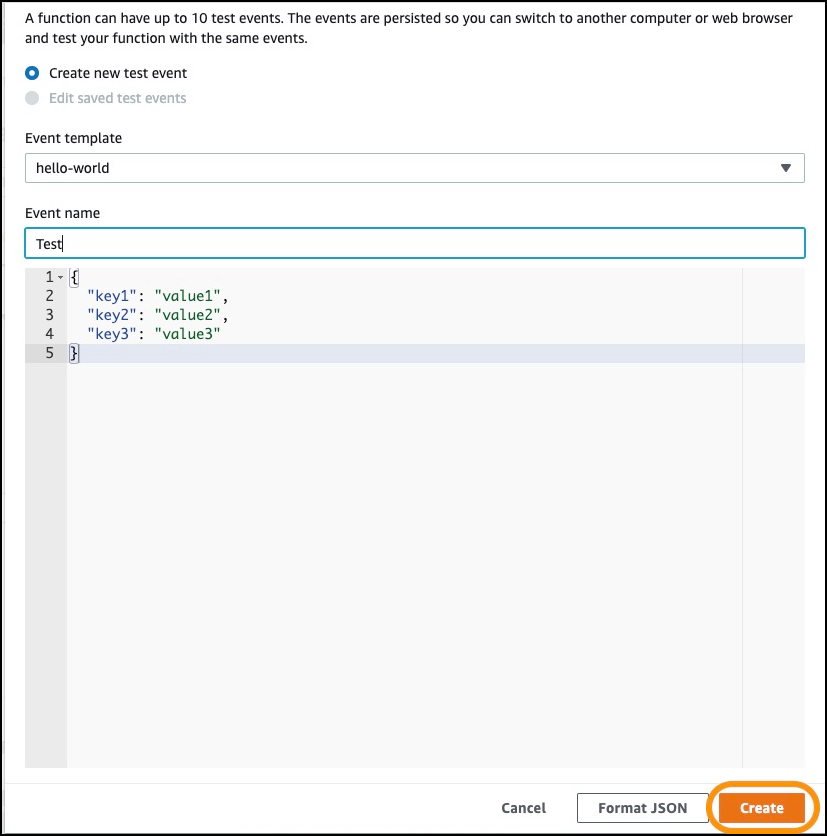
Enter an Event name of Test, click Create:
-
Click Test
-
The function will run, it will take a minute or two given the size of the Organizations files and processing required, then return success. Click Details and view the output.
-
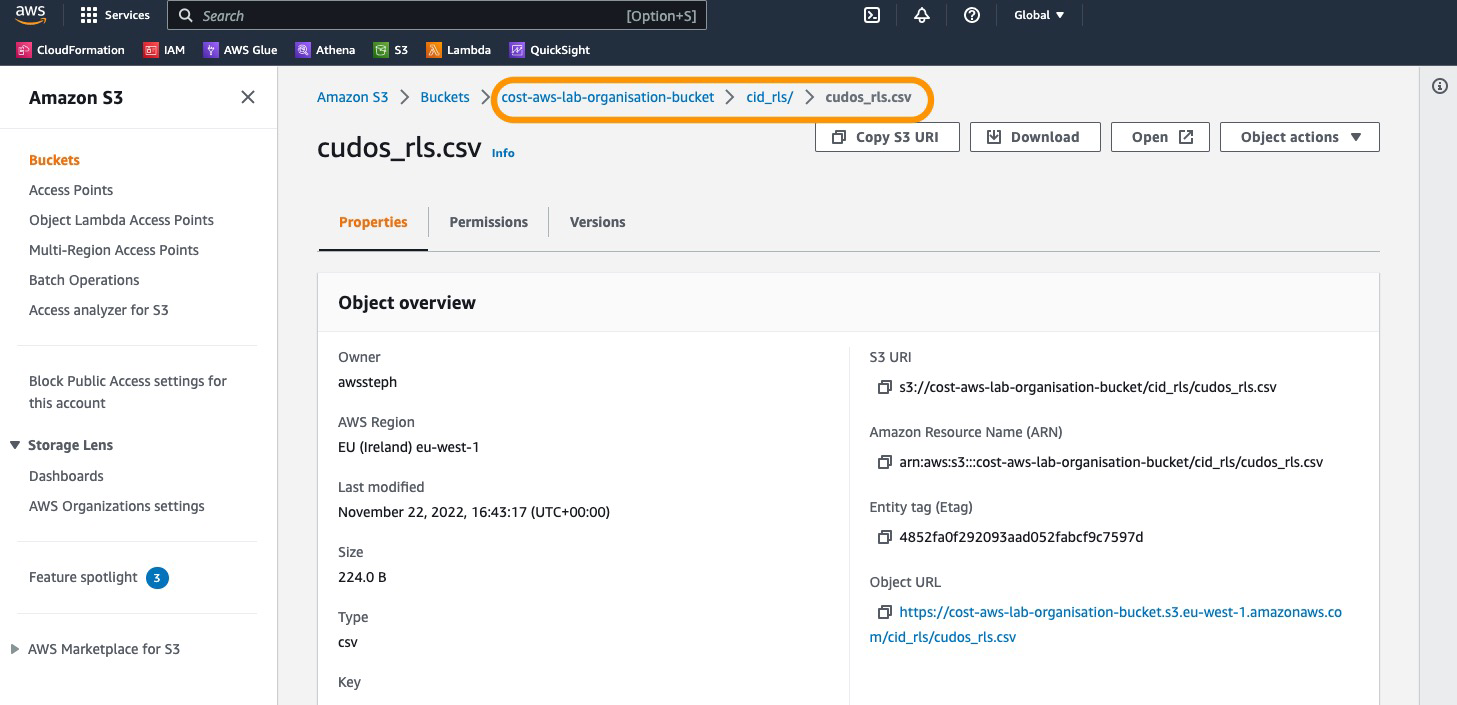
You can go to your bucket in S3 and there should be a csv file in the folder
cid_rls/.
Part 5: Create RLS
We will now create the RLS Dataset in Amazon QuickSight and attach it to your datasets for CID. Please ensure the bucket you have placed the RLS file into has access to Amazon QuickSight, see here
-
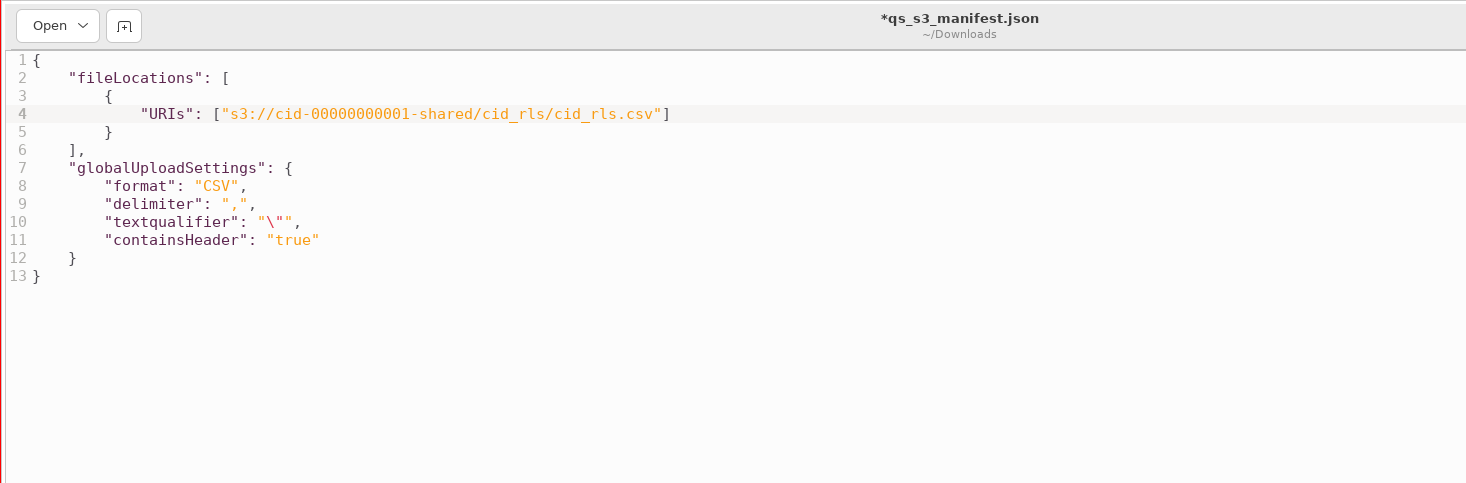
Download and replace
<bucket>with the bucket you can see your data in. If any syntax errors, reference Manifest file format for Amazon QuickSight
-
Go to Amazon QuickSight
-
Go to Datasets and click on New dataset drop down menu, then click on NEW RULES DATASET

-
Create new Dataset by clicking S3

-
Set Data source name as CID RLS and the qs_s3_manifest.json file you edited earlier into the Upload box

-
In the new Dialogue click EDIT/PREVIEW Data

-
Make sure that all Fields on the left are String type, if not change the type to String

-
Find your new dataset by searching CID RLS then click on it

-
Click Refresh tab and click ADD NEW SCHEDULE, select Hourly then click Save

-
Go back to Datasets and select your CID data summary_view. On the Summary tab find Row-level security and click Setup
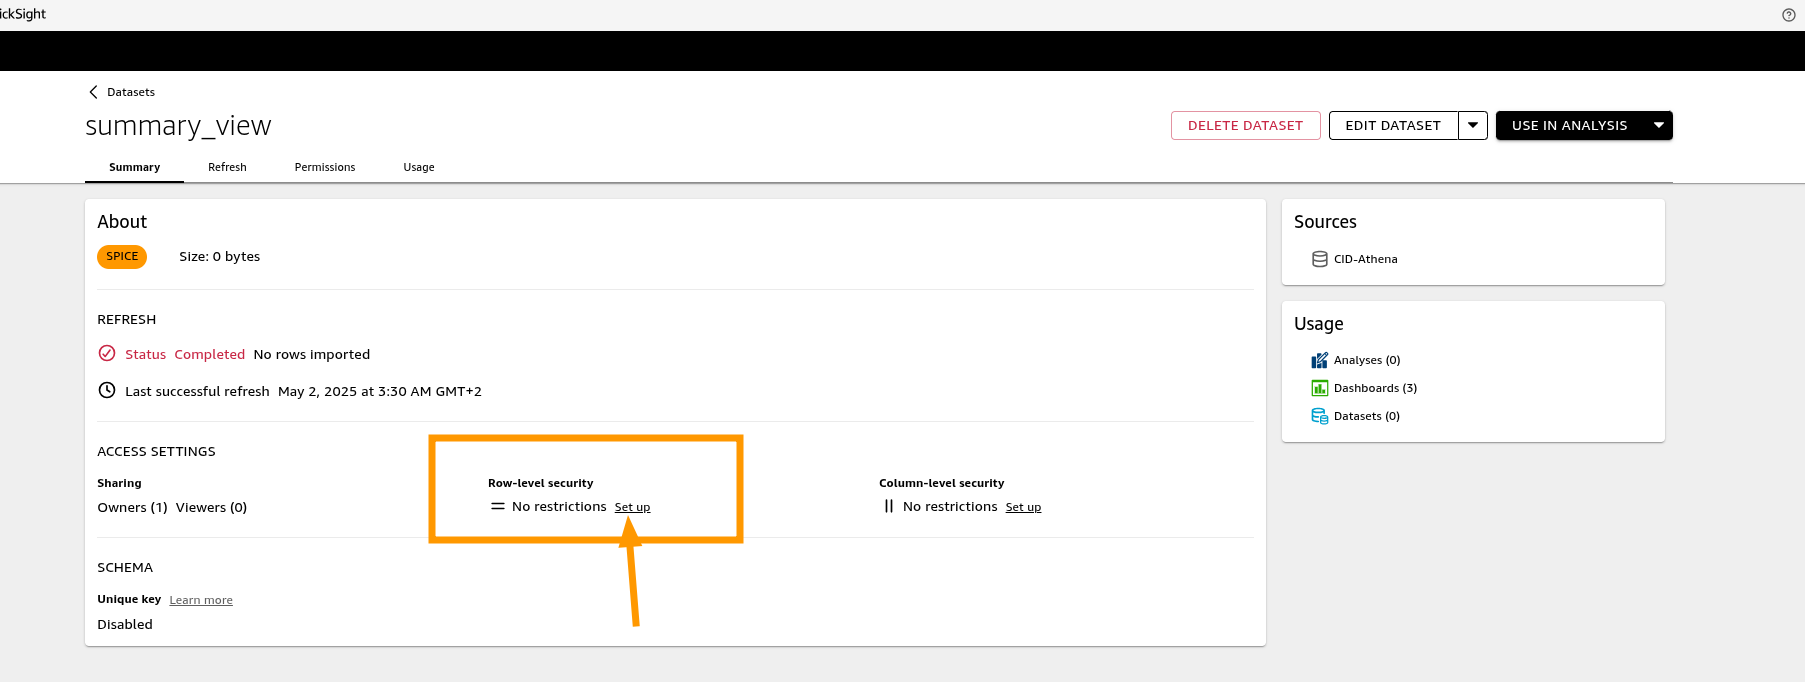
-
Click the toggle User-based rules drop down, in the expanded space select the new dataset and after click APPLY RULES DATASET

-
Repeat for all other CID Datasets and observe the new RLS ENABLED Label on the dataset

Part 6: Verify Result
Acess your CID Dashboards, e.g. CUDOS. Expected result is that users should see only data that they have access to according to your RLS rules.
Warning
Users who are not added to RLS rules will see no data in Dashboards, this is expected
Anex 1: Use script to tag accounts
If you have a large number of accounts that need to be tagged then please use the guide below to do a scripted method to save time.
For this you will need:
-
a list of all of your accounts you wish to tag. If you do not have one, you can export your AWS Organizations using this guide
-
a list of all QuickSight users email which you wish to tag this Organization with. Currently you cannot directly download this data but you can use the following cli command replacing 111122223333 with your Management account
-
cli credentials for your management account or ability to create a lambda function and you will find the file in your tmp folder
aws quicksight list-users --namespace default --output text --aws-account-id 111122223333 > /tmp/quicksight_user.txt
Steps to tag
-
Download this example file and this code file file and save as aws_org_tagger_lambda.py
-
In the file, remove the example line and add your list of account id’s in the first column. Then add the relevant QuickSight users emails that you want to have access to the account. Remember if multiple they need to be separated by :
-
Save this file.
-
You can either run the script using cli or creating a lambda function.
CLI
-
If CLI then ensure your data.csv file and aws_org_tagger_lambda.py are in the same folder
-
Run
python3 aws_org_tagger_lambda.py
Lambda
-
Log into your Management account and go to Lambda
-
Create new Lambda and call it Tag-Organization and use Python 3.9
-
In the lambda, copy the code from the aws_org_tagger_lambda.py file
-
Click on the left hand side of the Environment and click New File
-
In the file paste your data.csv data making sure it has the comers in it
-
Click Deploy
-
Click on Configuration then Permissions. There will be a Role Name in blue, click on that link.
-
This will take you to IAM where you Add permissions > Attach policies
-
Search for AWSOrganizationsFullAccess and add this policy
-
Go back to lambda and click to the Test tab then the orange Test button.
Now your AWS Organization will have new or updated tags with the data from your excel sheet
Note
If you would like to turn off RLS you can just toggle the User-based ON to OFF
