GitHub Enterprise Server connections
Connections allow you to authorize and establish configurations that associate your third-party provider with your AWS resources. To associate your third-party repository as a source for your pipeline, you use a connection.
Note
Instead of creating or using an existing connection in your account, you can use a shared connection between another AWS account. See Use a connection shared with another account.
Note
This feature is not available in the Asia Pacific (Hong Kong), Asia Pacific (Hyderabad), Asia Pacific (Jakarta), Asia Pacific (Melbourne), Asia Pacific (Osaka), Africa (Cape Town), Middle East (Bahrain), Middle East (UAE), Europe (Spain), Europe (Zurich), Israel (Tel Aviv), or AWS GovCloud (US-West) Regions. To reference other available actions, see Product and service integrations with CodePipeline. For considerations with this action in the Europe (Milan) Region, see the note in CodeStarSourceConnection for Bitbucket Cloud, GitHub, GitHub Enterprise Server, GitLab.com, and GitLab self-managed actions.
To add a GitHub Enterprise Server source action in CodePipeline, you can choose either to:
-
Use the CodePipeline console Create pipeline wizard or Edit action page to choose the GitHub Enterprise Server provider option. See Create a connection to GitHub Enterprise Server (console) to add the action. The console helps you create a host resource and a connections resource.
-
Use the CLI to add the action configuration for the
CreateSourceConnectionaction with theGitHubEnterpriseServerprovider and create your resources:-
To create your connections resources, see Create a host and connection to GitHub Enterprise Server (CLI) to create a host resource and a connections resource with the CLI.
-
Use the
CreateSourceConnectionexample action configuration in CodeStarSourceConnection for Bitbucket Cloud, GitHub, GitHub Enterprise Server, GitLab.com, and GitLab self-managed actions to add your action as shown in Create a pipeline (CLI).
-
Note
You can also create a connection using the Developer Tools console under Settings. See Create a Connection.
Before you begin:
-
You must have created an account with GitHub Enterprise Server and installed the GitHub Enterprise Server instance on your infrastructure.
Note
Each VPC can only be associated with one host (GitHub Enterprise Server instance) at a time.
-
You must have already created a code repository with GitHub Enterprise Server.
Topics
Create a connection to GitHub Enterprise Server (console)
Use these steps to use the CodePipeline console to add a connections action for your GitHub Enterprise Server repository.
Note
GitHub Enterprise Server connections only provide access to repositories owned by the GitHub Enterprise Server account that was used to create the connection.
Before you begin:
For a host connection to GitHub Enterprise Server, you must have completed the steps to create a host resource for your connection. See Manage hosts for connections.
Step 1: Create or edit your pipeline
To create or edit your pipeline
-
Sign in to the CodePipeline console.
-
Choose one of the following.
-
Choose to create a pipeline. Follow the steps in Create a Pipeline to complete the first screen and choose Next. On the Source page, under Source provider, choose GitHub Enterprise Server.
-
Choose to edit an existing pipeline. Choose Edit, and then choose Edit stage. Choose to add or edit your source action. On the Edit action page, under Action name, enter the name for your action. In Action provider, choose GitHub Enterprise Server.
-
-
Do one of the following:
-
Under Connection, if you have not already created a connection to your provider, choose Connect to GitHub Enterprise Server. Proceed to Step 2: Create a Connection to GitHub Enterprise Server.
-
Under Connection, if you have already created a connection to your provider, choose the connection. Proceed to Step 3: Save the Source Action for Your Connection.
-
Create a connection to GitHub Enterprise Server
After you choose to create the connection, the Connect to GitHub Enterprise Server page is shown.
Important
AWS CodeConnections does not support GitHub Enterprise Server version 2.22.0 due to a known issue in the release. To connect, upgrade to version 2.22.1 or the latest available version.
To connect to GitHub Enterprise Server
-
In Connection name, enter the name for your connection.
-
In URL, enter the endpoint for your server.
Note
If the provided URL has already been used to set up a GitHub Enterprise Server for a connection, you will be prompted to choose the host resource ARN that was created previously for that endpoint.
-
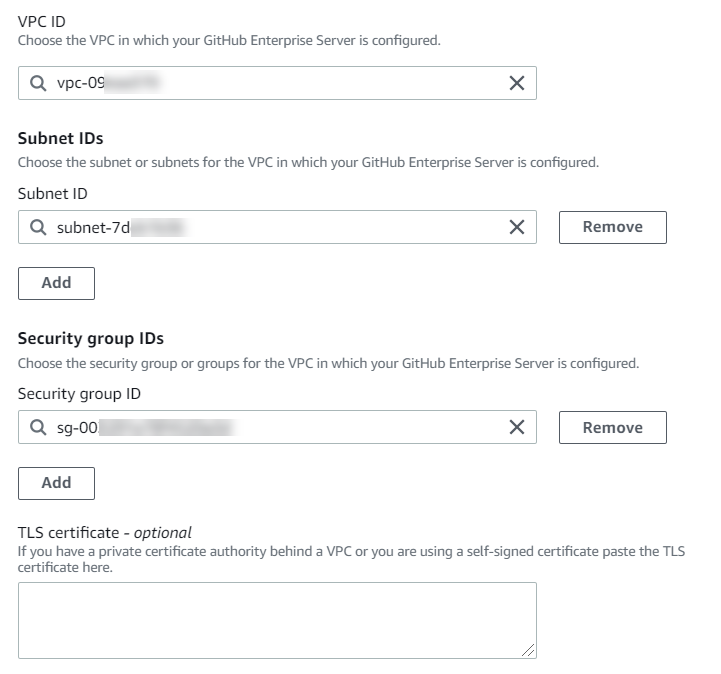
If you have launched your server into an Amazon VPC and you want to connect with your VPC, choose Use a VPC and complete the following.
-
In VPC ID, choose your VPC ID. Make sure to choose the VPC for the infrastructure where your GitHub Enterprise Server instance is installed or a VPC with access to your GitHub Enterprise Server instance through VPN or Direct Connect.
-
Under Subnet ID, choose Add. In the field, choose the subnet ID you want to use for your host. You can choose up to 10 subnets.
Make sure to choose the subnet for the infrastructure where your GitHub Enterprise Server instance is installed or a subnet with access to your installed GitHub Enterprise Server instance through VPN or Direct Connect.
-
Under Security group IDs, choose Add. In the field, choose the security group you want to use for your host. You can choose up to 10 security groups.
Make sure to choose the security group for the infrastructure where your GitHub Enterprise Server instance is installed or a security group with access to your installed GitHub Enterprise Server instance through VPN or Direct Connect.
-
If you have a private VPC configured, and you have configured your GitHub Enterprise Server instance to perform TLS validation using a non-public certificate authority, in TLS certificate, enter your certificate ID. The TLS Certificate value should be the public key of the certificate.
-
-
Choose Connect to GitHub Enterprise Server. The created connection is shown with a Pending status. A host resource is created for the connection with the server information you provided. For the host name, the URL is used.
-
Choose Update pending connection.
-
If prompted, on the GitHub Enterprise login page, sign in with your GitHub Enterprise credentials.
-
On the Create GitHub App page, choose a name for your app.
-
On the GitHub authorization page, choose Authorize <app-name>.
-
On the app installation page, a message shows that the connector app is ready to be installed. If you have multiple organizations, you might be prompted to choose the organization where you want to install the app.
Choose the repository settings where you want to install the app. Choose Install.
-
The connection page shows the created connection in an Available status.
Step 3: Save your GitHub Enterprise Server source action
Use these steps on the wizard or Edit action page to save your source action with your connection information.
To complete and save your source action with your connection
-
In Repository name, choose the name of your third-party repository.
-
Under Pipeline triggers you can add triggers if your action is an CodeConnections action. To configure the pipeline trigger configuration and to optionally filter with triggers, see more details in Add trigger with code push or pull request event types.
-
In Output artifact format, you must choose the format for your artifacts.
-
To store output artifacts from the GitHub Enterprise Server action using the default method, choose CodePipeline default. The action accesses the files from the GitHub Enterprise Server repository and stores the artifacts in a ZIP file in the pipeline artifact store.
-
To store a JSON file that contains a URL reference to the repository so that downstream actions can perform Git commands directly, choose Full clone. This option can only be used by CodeBuild downstream actions.
-
-
Choose Next on the wizard or Save on the Edit action page.
Create a host and connection to GitHub Enterprise Server (CLI)
You can use the AWS Command Line Interface (AWS CLI) to create a connection.
To do this, use the create-connection command.
Important
A connection created through the AWS CLI or AWS CloudFormation is in PENDING
status by default. After you create a connection with the CLI or AWS CloudFormation, use the
console to edit the connection to make its status AVAILABLE.
You can use the AWS Command Line Interface (AWS CLI) to create a host for installed connections.
Note
You only create a host once per GitHub Enterprise Server account. All of your connections to a specific GitHub Enterprise Server account will use the same host.
You use a host to represent the endpoint for the infrastructure where your third-party provider is installed. After you complete the host creation with the CLI, the host is in Pending status. You then set up, or register, the host to move it to an Available status. After the host is available, you complete the steps to create a connection.
To do this, use the create-host command.
Important
A host created through the AWS CLI is in Pending status by default.
After you create a host with the CLI, use the console or the CLI to set up the host
to make its status Available.
To create a host
-
Open a terminal (Linux, macOS, or Unix) or command prompt (Windows). Use the AWS CLI to run the create-host command, specifying the
--name,--provider-type, and--provider-endpointfor your connection. In this example, the third-party provider name isGitHubEnterpriseServerand the endpoint ismy-instance.dev.aws codestar-connections create-host --name MyHost --provider-type GitHubEnterpriseServer --provider-endpoint "https://my-instance.dev"If successful, this command returns the host Amazon Resource Name (ARN) information similar to the following.
{
    "HostArn": "arn:aws:codestar-connections:us-west-2:account_id:host/My-Host-28aef605"
}
After this step, the host is in
PENDINGstatus. -
Use the console to complete the host setup and move the host to an
Availablestatus.
To create a connection to GitHub Enterprise Server
-
Open a terminal (Linux, macOS, or Unix) or command prompt (Windows). Use the AWS CLI to run the create-connection command, specifying the
--host-arnand--connection-namefor your connection.aws codestar-connections create-connection --host-arn arn:aws:codestar-connections:us-west-2:account_id:host/MyHost-234EXAMPLE --connection-name MyConnectionIf successful, this command returns the connection ARN information similar to the following.
{ "ConnectionArn": "arn:aws:codestar-connections:us-west-2:account_id:connection/aEXAMPLE-8aad" } -
Use the console to set up the pending connection.
-
The pipeline defaults to detect changes on code push to the connection source repository. To configure the pipeline trigger configuration for manual release or for Git tags, do one of the following:
-
To configure the pipeline trigger configuration to start with a manual release only, add the following line to the configuration:
"DetectChanges": "false", -
To configure the pipeline trigger configuration to filter with triggers, see more details in Add trigger with code push or pull request event types. For example, the following adds to the pipeline level of the pipeline JSON definition. In this example,
release-v0andrelease-v1are the Git tags to include, andrelease-v2is the Git tag to exclude."triggers": [ { "providerType": "CodeStarSourceConnection", "gitConfiguration": { "sourceActionName": "Source", "push": [ { "tags": { "includes": [ "release-v0", "release-v1" ], "excludes": [ "release-v2" ] } } ] } } ]
-
