Nitro Enclaves Application development on Windows instances
This section provides information for Nitro Enclaves application development on Windows instances.
Topics
Considerations for using Nitro Enclaves on a Windows parent instance
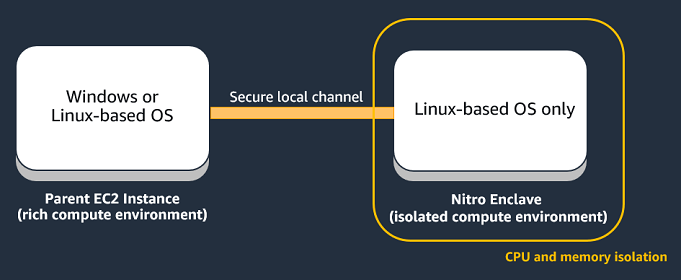
The EC2 parent instance and the enclaves operate as separate virtual machines. This means that each of them (the parent instance and all of its enclaves) must run its own operating system. The parent instance, supports both Linux and Windows (2016 and later) operating systems. However, the enclaves support only operating systems that support the Linux boot protocol. This means that even if you have a Windows parent instance, you must run a Linux environment inside your enclaves.

This also means that you must use a Linux-based instance to build your enclave
image file (.eif).
Topics
Keep the following in mind when using a Windows parent instance.
-
Only Windows 2016 and later is supported on the parent instance.
-
You must run a Linux-based environment inside the enclave.
-
The Hello enclaves sample application is supported on Windows parent instances, but the enclave image file (
.eif) must be built on a Linux instance. For more information, see Getting started with the Hello Enclaves sample application. -
The KMS Tool sample application is supported on Windows parent instances, but the enclave image file (
.eif) must be built on a Linux instance. For more information, see Getting started with cryptographic attestation using the KMS Tool sample application. -
On Windows, the vsock uses the standard Windows sockets (Winsock2) API. For more information, see Working with the vsock socket in Windows.
-
AWS Certificate Manager for Nitro Enclaves is not supported with Windows parent instances.
-
To use the AWS Nitro Enclaves CLI software on your parent instance, you must install the AWSNitroEnclavesWindows package using AWS Systems Manager Distributor. For more information, see Install the Nitro Enclaves CLI on Windows.
-
The
nitro-cli build-enclavecommand is not supported on Windows parent instances. For more information, see nitro-cli build-enclave.
Nitro Enclaves for Windows release notes
This section describes Nitro Enclaves (for Windows) features, improvements, and bug fixes by release date.
| Release date | version | Updates and bug fixes |
|---|---|---|
| July 24, 2024 | 1.2.3 | The release updated the Nitro Enclaves for Windows installer to use WiX Toolset v5. |
| October 18, 2023 | 1.2.2 | The release improved installation of Nitro Enclaves for Windows and deprecated support for Windows Server 2012 R2. |
| March 27, 2023 | 1.2.1 | The release fixed a bug related to terminating multiple enclaves. This is the last version to support Windows Server 2012 R2. |
| May 4, 2022 | 1.2.0 |
The release added the following commands, arguments, and output for Nitro CLI:
The release added the following bug fixes and enhancements:
|
| July 27, 2021 | 1.1.0 |
The release added the following bug fixes and enhancements:
|
| April 27, 2021 | 1.0 | Initial release of Nitro Enclaves for Windows. |
Subscribe to notifications of new versions
Amazon SNS can notify you when new versions of Nitro Enclaves for Windows are released. Use one of the following procedures to subscribe to these notifications.
If you no longer want to receive these notifications, use the following procedure to unsubscribe.
To unsubscribe to notifications using the Amazon SNS console
Open the Amazon SNS console at https://console.aws.amazon.com/sns/v3/home
. -
In the navigation bar, change the Region to US West (Oregon).
-
In the navigation pane, choose Subscriptions.
-
Select the check box for the subscription and then choose Delete. When prompted for confirmation, choose Delete.