End of support notice: On October 7th, 2026, AWS will discontinue support for AWS IoT Greengrass Version 1. After October 7th, 2026, you will no longer be able to access the AWS IoT Greengrass V1 resources. For more information, please visit Migrate from AWS IoT Greengrass Version 1.
Setting up a Raspberry Pi
Follow the steps in this topic to set up a Raspberry Pi to use as an AWS IoT Greengrass core.
Tip
AWS IoT Greengrass also provides other options for installing the AWS IoT Greengrass Core software. For example, you can use Greengrass device setup to configure your environment and install the latest version of the AWS IoT Greengrass Core software. Or, on supported Debian platforms, you can use the APT package manager to install or upgrade the AWS IoT Greengrass Core software. For more information, see Install the AWS IoT Greengrass Core software.
If you are setting up a Raspberry Pi for the first time, you must follow all of these steps. Otherwise, you can skip to step 9. However, we recommend that you re-image your Raspberry Pi with the operating system as recommended in step 2.
-
Download and install an SD card formatter such as SD Memory Card Formatter
. Insert the SD card into your computer. Start the program and choose the drive where you have inserted your SD card. You can perform a quick format of the SD card. -
Download the Raspbian Buster
operating system as a zipfile. -
Using an SD card-writing tool (such as Etcher
), follow the tool's instructions to flash the downloaded zipfile onto the SD card. Because the operating system image is large, this step might take some time. Eject your SD card from your computer, and insert the microSD card into your Raspberry Pi. -
For the first boot, we recommend that you connect the Raspberry Pi to a monitor (through HDMI), a keyboard, and a mouse. Next, connect your Pi to a micro USB power source and the Raspbian operating system should start up.
-
You might want to configure the Pi's keyboard layout before you continue. To do so, choose the Raspberry icon in the upper-right, choose Preferences and then choose Mouse and Keyboard Settings. Next, on the Keyboard tab, choose Keyboard Layout, and then choose an appropriate keyboard variant.
-
Next, connect your Raspberry Pi to the internet through a Wi-Fi network
or an Ethernet cable. Note
Connect your Raspberry Pi to the same network that your computer is connected to, and be sure that both your computer and Raspberry Pi have internet access before you continue. If you're in a work environment or behind a firewall, you might need to connect your Pi and your computer to the guest network to get both devices on the same network. However, this approach might disconnect your computer from local network resources, such as your intranet. One solution is to connect the Pi to the guest Wi-Fi network and to connect your computer to the guest Wi-Fi network and your local network through an Ethernet cable. In this configuration, your computer should be able to connect to the Raspberry Pi through the guest Wi-Fi network and your local network resources through the Ethernet cable.
-
You must set up SSH
on your Pi to remotely connect to it. On your Raspberry Pi, open a terminal window and run the following command: sudo raspi-configYou should see the following:
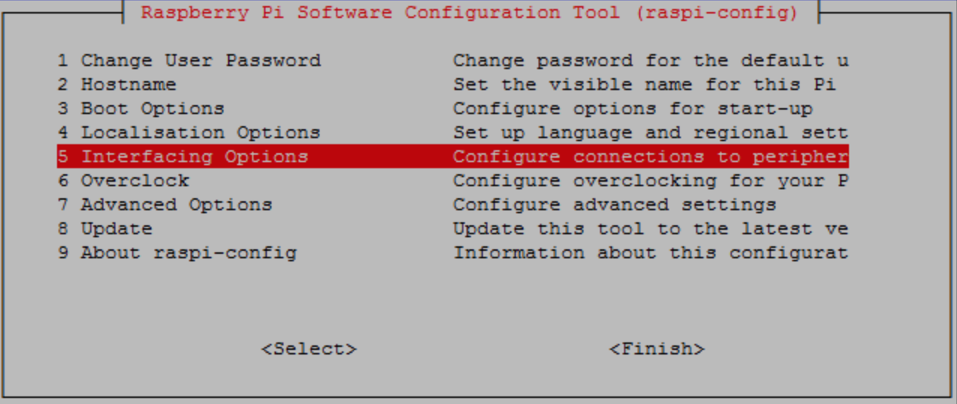
Scroll down and choose Interfacing Options and then choose P2 SSH. When prompted, choose Yes. (Use the Tab key followed by Enter). SSH should now be enabled. Choose OK. Use the Tab key to choose Finish and then press Enter. If the Raspberry Pi doesn't reboot automatically, run the following command:
sudo reboot -
On your Raspberry Pi, run the following command in the terminal:
hostname -IThis returns the IP address of your Raspberry Pi.
Note
For the following, if you receive an ECDSA key fingerprint message (
Are you sure you want to continue connecting
                            (yes/no)?
), enteryes. The default password for the Raspberry Pi israspberry.If you are using macOS, open a terminal window and enter the following:
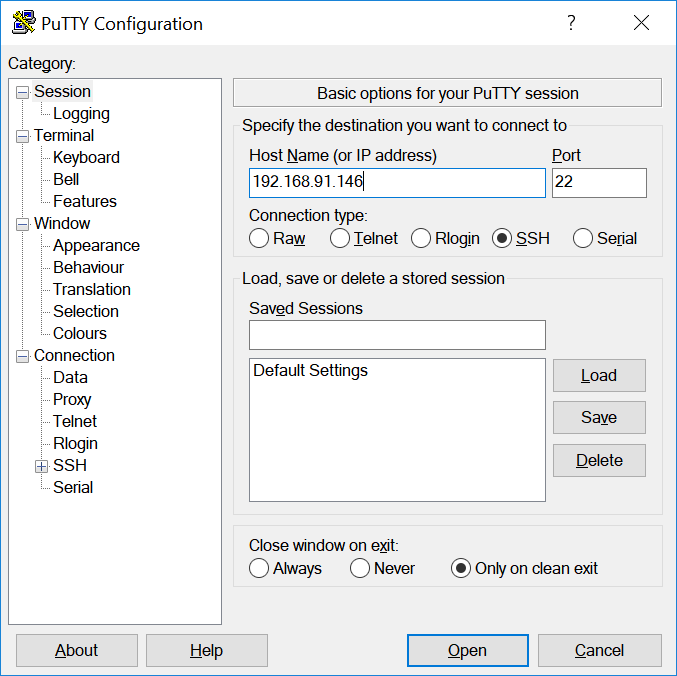
ssh pi@IP-addressIP-addressis the IP address of your Raspberry Pi that you obtained by using thehostname -Icommand.If you are using Windows, you need to install and configure PuTTY
. Expand Connection, choose Data, and make sure that Prompt is selected: 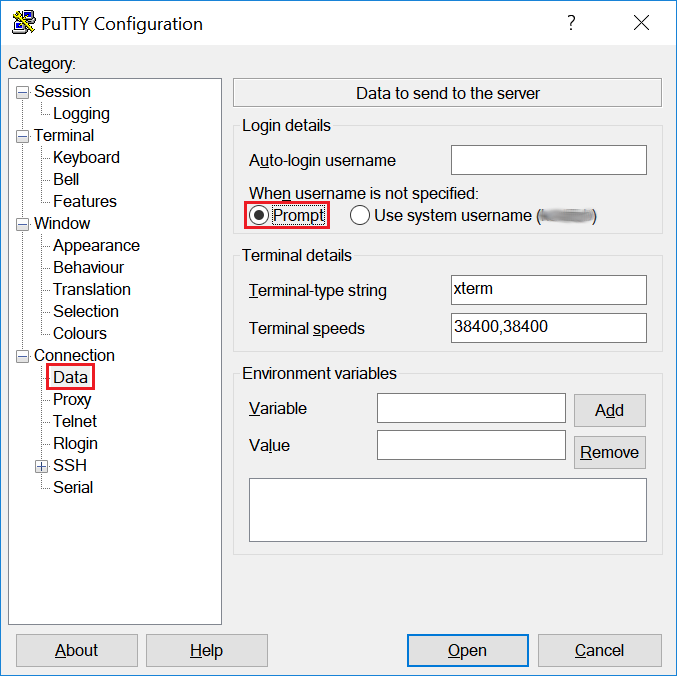
Next, choose Session, enter the IP address of the Raspberry Pi, and then choose Open using default settings.
If a PuTTY security alert is displayed, choose Yes.
The default Raspberry Pi login and password are
piandraspberry, respectively.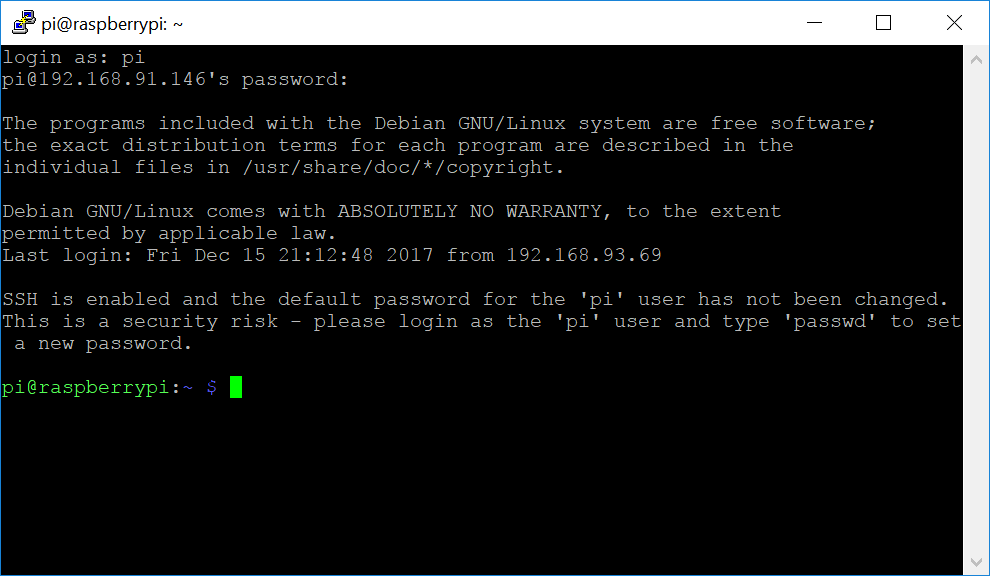
Note
If your computer is connected to a remote network using VPN, you might have difficulty connecting from the computer to the Raspberry Pi using SSH.
-
You are now ready to set up the Raspberry Pi for AWS IoT Greengrass. First, run the following commands from a local Raspberry Pi terminal window or an SSH terminal window:
Tip
AWS IoT Greengrass also provides other options for installing the AWS IoT Greengrass Core software. For example, you can use Greengrass device setup to configure your environment and install the latest version of the AWS IoT Greengrass Core software. Or, on supported Debian platforms, you can use the APT package manager to install or upgrade the AWS IoT Greengrass Core software. For more information, see Install the AWS IoT Greengrass Core software.
sudo adduser --system ggc_user sudo addgroup --system ggc_group -
To improve security on the Pi device, enable hardlink and softlink (symlink) protection on the operating system at startup.
-
Navigate to the
98-rpi.conffile.cd /etc/sysctl.d lsNote
If you don't see the
98-rpi.conffile, follow the instructions in theREADME.sysctlfile. -
Use a text editor (such as Leafpad, GNU nano, or vi) to add the following two lines to the end of the file. You might need to use the
sudocommand to edit as root (for example,sudo nano 98-rpi.conf).fs.protected_hardlinks = 1 fs.protected_symlinks = 1 -
Reboot the Pi.
sudo rebootAfter about a minute, connect to the Pi using SSH and then run the following command to confirm the change:
sudo sysctl -a 2> /dev/null | grep fs.protectedYou should see
fs.protected_hardlinks = 1andfs.protected_symlinks = 1.
-
-
Edit your command line boot file to enable and mount memory cgroups. This allows AWS IoT Greengrass to set the memory limit for Lambda functions. Cgroups are also required to run AWS IoT Greengrass in the default containerization mode.
-
Navigate to your
bootdirectory.cd /boot/ -
Use a text editor to open
cmdline.txt. Append the following to the end of the existing line, not as a new line. You might need to use thesudocommand to edit as root (for example,sudo nano cmdline.txt).cgroup_enable=memory cgroup_memory=1 -
Now reboot the Pi.
sudo reboot
Your Raspberry Pi should now be ready for AWS IoT Greengrass.
-
-
Optional. Install the Java 8 runtime, which is required by stream manager. This tutorial doesn't use stream manager, but it does use the Default Group creation workflow that enables stream manager by default. Use the following commands to install the Java 8 runtime on the core device, or disable stream manager before you deploy your group. Instructions for disabling stream manager are provided in Module 3.
sudo apt install openjdk-8-jdk -
To make sure that you have all required dependencies, download and run the Greengrass dependency checker from the AWS IoT Greengrass Samples
repository on GitHub. These commands unzip and run the dependency checker script in the Downloadsdirectory.Note
The dependency checker might fail if you are running version 5.4.51 of the Raspbian kernel. This version does not mount memory cgroups correctly. This might cause Lambda functions running in container mode to fail.
For more information on updating your kernel, see the Cgroups not loaded after kernel upgrade
in the Raspberry Pi forums. cd /home/pi/Downloads mkdir greengrass-dependency-checker-GGCv1.11.x cd greengrass-dependency-checker-GGCv1.11.x wget https://github.com/aws-samples/aws-greengrass-samples/raw/master/greengrass-dependency-checker-GGCv1.11.x.zip unzip greengrass-dependency-checker-GGCv1.11.x.zip cd greengrass-dependency-checker-GGCv1.11.x sudo modprobe configs sudo ./check_ggc_dependencies | moreWhere
moreappears, press the Spacebar key to display another screen of text.Important
This tutorial requires the Python 3.7 runtime to run local Lambda functions. When stream manager is enabled, it also requires the Java 8 runtime. If the
check_ggc_dependenciesscript produces warnings about these missing runtime prerequisites, make sure to install them before you continue. You can ignore warnings about other missing optional runtime prerequisites.For information about the modprobe command, run man modprobe in the terminal.
Your Raspberry Pi configuration is complete. Continue to Module 2: Installing the AWS IoT Greengrass Core software.
