Tutorial: Creating an Amazon FinSpace environment with Okta SSO
Important
Amazon FinSpace Dataset Browser will be discontinued on March 26,
2025. Starting November 29, 2023, FinSpace will no longer accept the creation of new Dataset Browser
environments. Customers using Amazon FinSpace with Managed Kdb Insights
The following tutorial walks you through how Amazon FinSpace environment can be created using Okta as an Identity provider (IdP).
Prerequisites
Ensure that a user exists in Okta for each person who will need access to FinSpace. When creating users, make sure to include an email address for each user. Email addresses are required to connect the users in Active Directory Federation Services with their corresponding users in FinSpace.
Step 1: Creating an Okta application
Note
You need to have administrator privileges in Okta for this tutorial.
To create an Okta application
-
Sign in to your Okta admin dashboard.
If you don't have an account, you can create a free Okta developer edition
account. -
Choose Applications.
-
Choose Add Application.
-
Choose Create New App.
-
On the Create New Application Integration page, for Platform select Web from the drop down menu.
-
For Sign in method, choose SAML 2.0 and then choose Create.
-
Specify an App name. For example,
FinSpace. -
Choose Next.
-
For the Single sign on URL, use
http://placeholder.okta.com.Note
This is just a placeholder url to generate the SAML meta data document. You will get the actual single sign on URL once FinSpace environment is created.

-
For Audience URI (SP Entity ID), enter
placeholder.Note
This is just a placeholder Uniform Resource Name (URN) to generate the SAML meta data doc. You will get the actual URN once FinSpace environment is created.
-
Under ATTRIBUTE STATEMENTS section, enter the following:
-
Name –
http://schemas.xmlsoap.org/ws/2005/05/identity/claims/emailaddress -
Value –
user.email
-
-
Choose Next.
-
Choose I'm an Okta customer adding an internal app.
-
Choose Finish.
-
Choose Identity Provider metadata and then choose Copy Link Address.
-
Save the link to a notepad. You can also choose to save SAML metadata document instead of the link.
Now that you have the SAML metadata document or its URL, let's create a FinSpace environment.
Step 2: Creating a FinSpace environment
To create a FinSpace environment
-
Sign in to the AWS Management Console and open the Amazon FinSpace console at https://console.aws.amazon.com/finspace
. -
Choose Create Environment.
-
Enter a name for your FinSpace environment under Environment name. For example, enter
finspace-saml-okta -
(Optional) Add Environment description.
-
Select an existing or create a new KMS key to encrypt data in your FinSpace environment. For more information, see Managing keys.
-
For Authentication method, select Single Sign On (SSO).
-
Enter your Identity provider name. For example,
Okta. -
For Metadata document URL, select Provide a metadata document URL and then paste the SAML metadata document URL in the text box.
-
For Attribute mapping, enter the attribute set for email in Okta. Since you set email attribute as
http://schemas.xmlsoap.org/ws/2005/05/identity/claims/emailaddress, the same value should be set in this field. -
Under Initial Superuser, enter the details to setup the first superuser.
-
Choose Create Environment. The environment creation process starts and it will take 50-60 minutes to finish in the background. You can return to other activities while the environment is being created.
-
After the FinSpace environment is ready, copy and save the Redirect / Sign-in URL and URN.
Your FinSpace is now created. Finish configuration in Okta.
Step 3: Finish application configuration in Okta
Finish configuration of your FinSpace Okta app with the Redirect / Sign-in URL and URN.
-
Sign in to your Okta console.
-
Choose Admin on the top-right corner.
-
From the top bar menu bar, choose Applications.
-
Choose the FinSpace app that you had setup with placeholders.
-
Under the General tab, scroll to General Settings and choose Edit on SAML settings.
-
Choose Next.
-
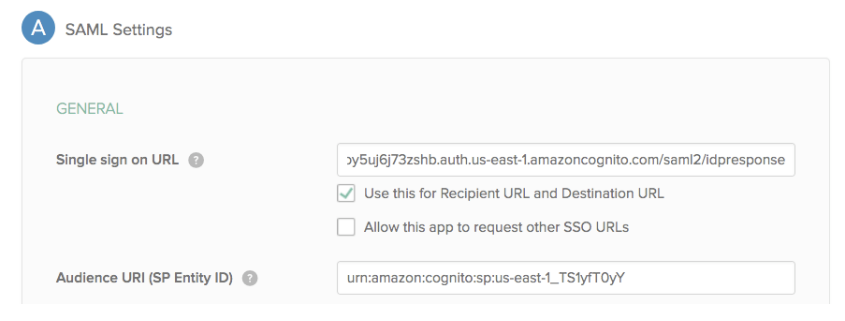
For Single Sign On URL, paste the copied Redirect / Sign-in URL from FinSpace environment.
-
Select the Use this for Recipient URL and Destination URL check box.
-
For Audience URI (SP Entity ID), enter the copied URN from the FinSpace environment.
-
Choose Next.
-
Choose Finish.
Step 4: Assign user to the FinSpace application in Okta
Now that the application is setup. Assign at least one user to the FinSpace app in Okta who can be created as a superuser for FinSpace.
To assign user to the FinSpace application in Okta
-
Sign in to your Okta console.
-
Choose Admin on the top-right corner.
-
From the top bar menu bar, choose Applications.
-
Choose the FinSpace.
-
Choose the Assignments tab.
-
Choose the Assign drop down menu. A list of users appears.
-
Choose Assign next for the user that you want to designate as the superuser in FinSpace. You may add multiple users at this point too.
-
Choose Save and Go back.
Step 5: Create superuser in your FinSpace environment
Now that a user is assigned, they can be created as a superuser in FinSpace.
To create a superuser
-
Sign in to the AWS Management Console and open the Amazon FinSpace console at https://console.aws.amazon.com/finspace
. -
Choose
finspace-saml-oktafrom the list of environments. -
Under Superusers, choose Add Superuser.
-
On Specify Superuser details page, enter the email that was used when assigning the user in Okta.
-
Enter the First name and the Last name.
-
Choose Create and view credentials. You will not receive a password as you will use the Okta Idp credentials for authentication.
Step 6: Sign in to FinSpace with Okta IdP credentials
To sign in with Okta IdP credentials
-
Sign in to the AWS Management Console and open the Amazon FinSpace console at https://console.aws.amazon.com/finspace
. -
Choose
finspace-saml-oktafrom the list of environments. -
Copy the link under Environment domain and paste it in your web browser.
You will be re-directed to your Okta Idp authentication page.
-
Enter your SSO credentials to sign in to FinSpace.
