ML Detect ガイド
注記
ML Detect は、以下のリージョンではご利用いただけません。
-
アジアパシフィック (マレーシア)
この開始方法のガイドでは、機械学習 (ML) を使用して、デバイスからの履歴メトリクスデータに基づいて想定される動作のモデルを作成する ML Detect Security Profile を作成します。ML Detect による ML モデルの作成中に、進捗状況を監視できます。ML モデルの構築後、アラームを継続的に表示および調査し、特定された問題を緩和できます。
ML Detect ならびに API コマンドおよび CLI コマンドの詳細については、「ML 検出」を参照してください。
この章には、以下のセクションが含まれています。
前提条件
-
AWS アカウント。これを持っていない場合は、設定を参照してください。
コンソールで ML Detect を使用する方法
チュートリアル
ML Detect を有効化する
次の手順では、コンソールで ML Detect を設定する方法について説明します。
-
まず、モデルの継続的なトレーニングと更新のために、デバイスが ML Detect の最小要件で定義されているところに従って、必要となる最小データポイントを作成することを確認します。データ収集を進めるには、セキュリティプロファイルがターゲット (モノまたはモノのグループである場合があります) に確実にアタッチされているようにします。
-
AWS IoT コンソール
のナビゲーションペインで、[Defend] (防御) を展開します。[Detect] (検出)、[Security profiles] (セキュリティプロファイル、[Create security profile] (セキュリティプロファイルの作成)、[Create ML anomaly Detect profile] (ML 異常検出プロファイルの作成) の順に選択します。 -
[Set basic configurations] (基本的な設定を編集) ページで、以下を実行します。
-
[Target] (ターゲット) で、ターゲットデバイスグループを選択します。
-
[Security profile name] (セキュリティプロファイル名) で、セキュリティプロファイルの名前を入力します。
(オプション) [Description] (説明) で、ML プロファイルの簡単な説明を記入できます。
-
[Selected metric behaviors in Security Profile] (セキュリティプロファイルでの選択されたメトリクスの動作) で、監視するメトリクスを選択します。
![[登録されたすべてのモノ] がターゲットとして選択され、[認可の失敗] や [接続試行] などのメトリクス動作を一覧表示し、クラウド側またはデバイス側のメトリクスを追加するオプションを指定する、[ML セキュリティプロファイル設定の作成] ページ。](images/dd-ml-set-basic.png)
終了したら、[Next (次へ)] を選択します。
-
-
リポジトリの [Set SNS (optional)] (SNS の設定 (オプション)) ページで、デバイスがプロファイルの動作に違反した場合のアラーム通知の SNS トピックを指定します。選択した SNS トピックで発行するために使用する IAM ロールを選択します。
SNS ロールをまだ持っていない場合は、次の手順に従って、必要となる適切なアクセス許可と信頼関係を持つロールを作成します。
-
[IAM console]
(IAM コンソール) に入ります。ナビゲーションペインで [ロール] を選択した後、[ロールの作成] を選択します。 -
[信頼されたエンティティのタイプを選択] で、[AWS のサービス] を選択します。その後、[Choose a use case] (ユースケースの選択) で [IoT] を選択し、[Select your use case] (ユースケースの選択) で [IoT - Device Defender Mitigation Actions] を選択します。完了したら、[Next: Permissions] (次へ: アクセス許可) を選択します。
-
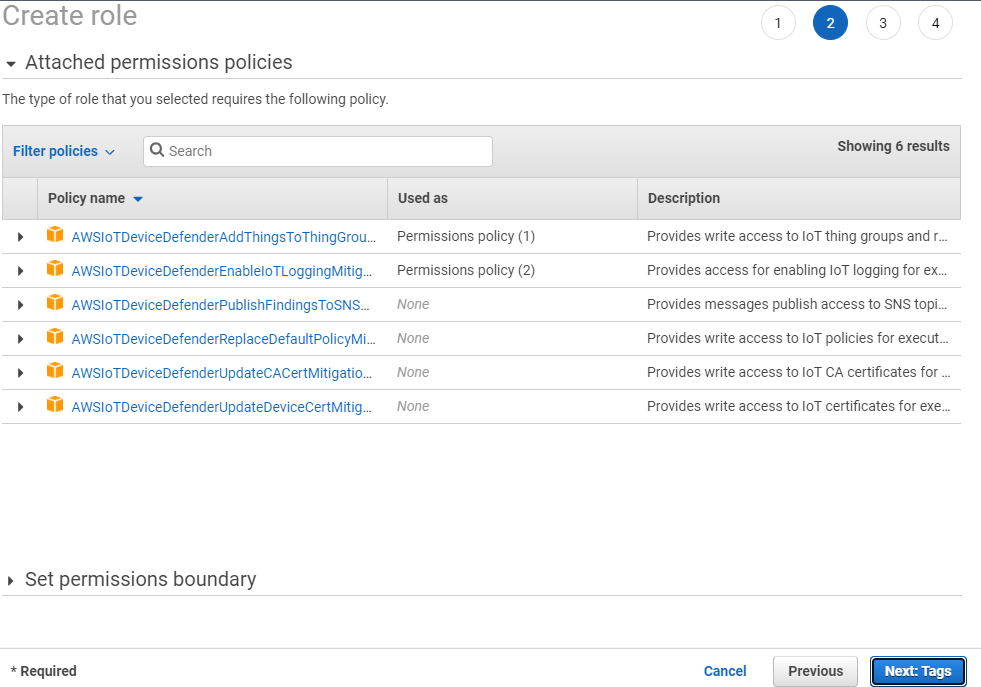
[Attached permissions policies] (アタッチされたアクセス許可ポリシー) で、[AWSIoTDeviceDefenderPublishFindingsToSNSMitigationAction] が選択されていることを確認してから、[Next: Tags] (次へ: タグ) を選択します。
-
[Add tags (optional)] (タグの追加 (オプション)) では、ロールに関連付けるタグを追加できます。終了したら、[Next: Review] を選択します。
-
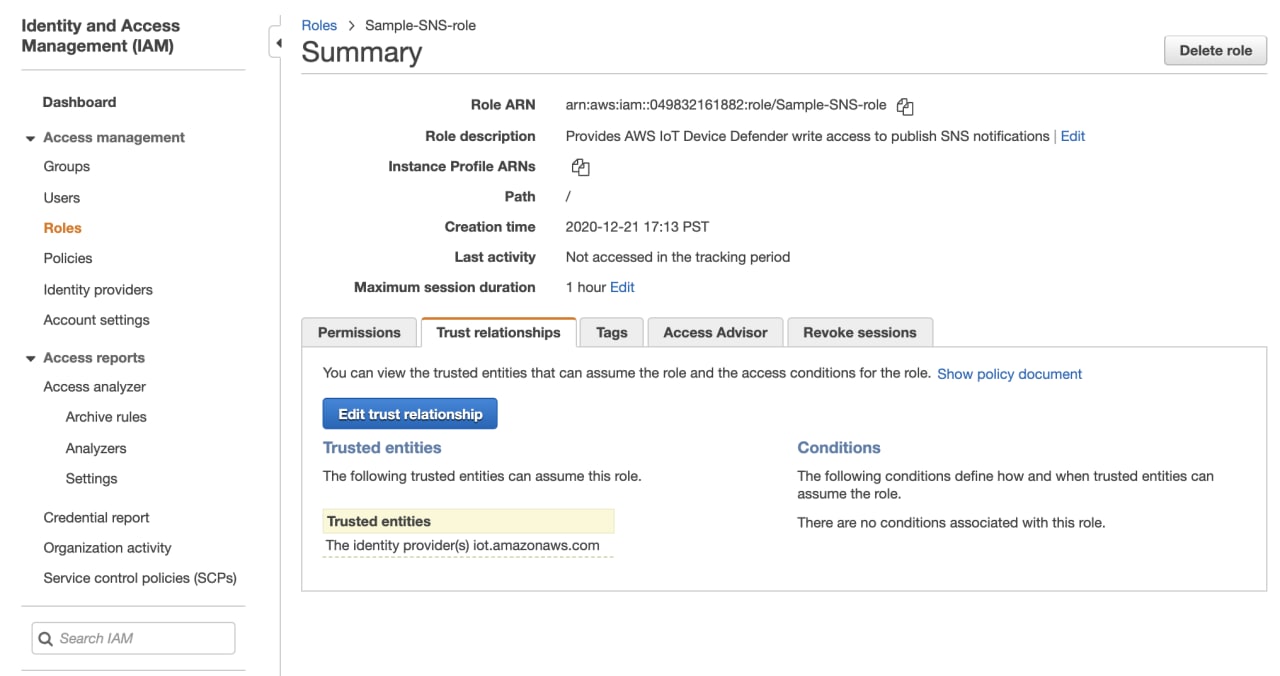
[Review] (レビュー) で、ロールに名前を付け、AWSIoTDeviceDefenderPublishFindingsToSNSMitigationAction が [Permissions] (アクセス許可) の下に表示され、AWS service: iot.amazonaws.com が [Trust relationships] (信頼関係) の下に表示されていることを確認します。終了したら、[Create role] (ロールの作成) を選択します。
![ロール ARN、説明、インスタンスプロファイル ARN、パス、作成時間、最大セッション期間、適用されている AWS IoT Device Defender PublishFindingsToSNSMitigationAction ポリシーなどの Sample-SNS-role の詳細を示す [IAM ロール の概要] ページ。](images/dd-ml-detect-permissions.png)
-
-
[Edit Metric behavior] (メトリクスの動作の編集) ページでは、ML の動作の設定をカスタマイズできます。
![アラームトリガー、通知、ML Detect 信頼レベルのデータポイントを設定できる、[認可の失敗]、[着信バイト]、[接続試行] を含む [メトリクスの動作を編集] セクション。](images/dd-ml-update-config.png)
-
終了したら、[Next (次へ)] を選択します。
-
[Review configuration] (設定の確認) ページで、機械学習で監視する動作を確認し、[Next] (次へ) を選択します。
![[登録されたすべてのモノ] をターゲットに設定した [Smart_lights_ML_Detect_Security_Profile]、および [認可の失敗]、[送信バイト]、[接続試行]、[切断] のメトリクス動作を含む [ML セキュリティプロファイルの編集] ページ。](images/dd-ml-review-config.png)
-
セキュリティプロファイルの作成後は、[Security Profiles] (セキュリティプロファイル) ページにリダイレクトされます。ここでは、新しく作成されたセキュリティプロファイルが表示されます。
注記
ML モデルの初期トレーニングと作成が完了するまでに 14 日間かかります。デバイスに異常なアクティビティがある場合は、完了後にアラームが表示されることが想定されます。
ML モデルのステータスを監視する
ML モデルが初期トレーニング期間内にある間は、次の手順を実行することでいつでも進捗状況を監視できます。
-
AWS IoT コンソール
のナビゲーションペインで、[Defend] (防御) を展開し、[Detect] (検出)、[Security profiles] (セキュリティプロファイル) の順に選択します。 -
[Security Profiles] (セキュリティプロファイル) ページで、確認するセキュリティプロファイルを選択します。その後、[Behaviors and ML training] (動作と ML トレーニング) を選択します。
-
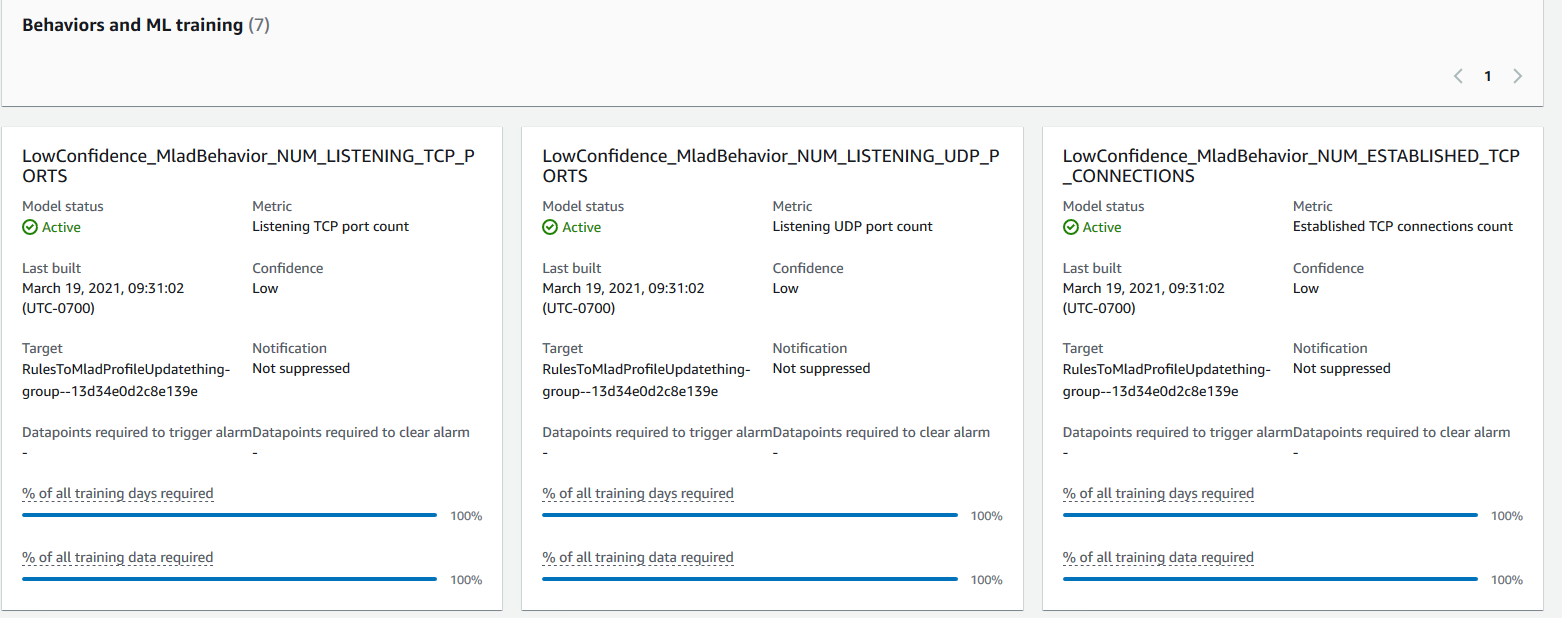
[Behaviors and ML training] (動作と ML トレーニング) ページで、ML モデルのトレーニングの進捗状況を確認します。
モデルのステータスが [Active] (アクティブ) になると、使用状況に基づいて Detect の決定を開始し、毎日プロファイルを更新します。
注記
モデルが想定したとおりに進捗しない場合は、デバイスが 最小要件 を満たしていることを確認してください。
ML Detect アラームを確認する
ML モデルが構築され、データ推論の準備が整ったら、モデルによって識別されるアラームを定期的に表示および調査できます。
-
AWS IoT コンソール
のナビゲーションペインで、[Defend] (防御) を展開し、[Detect] (検出)、[Alarms] (アラーム) の順に選択します。 ![[モノの名前]、[セキュリティプロファイル]、[動作タイプ]、[動作名]、[最終出力時間]、[検証の状態] の各列を含む 5 つのアクティブな認可失敗アラームを示す AWS IoT Device Defender アラームリスト。](images/dd-ml-alarms.png)
-
[History] (履歴) タブに移動すると、アラーム状態ではなくなったデバイスの詳細を表示することもできます。
![[アラーム状態]、[アラーム解除]、[無効化済みのアラーム] のアラームを表示している 2 週間の期間の折れ線グラフ。Y 軸はアラーム数を、X 軸は日付を示す。](images/dd-ml-history-alarm.png)
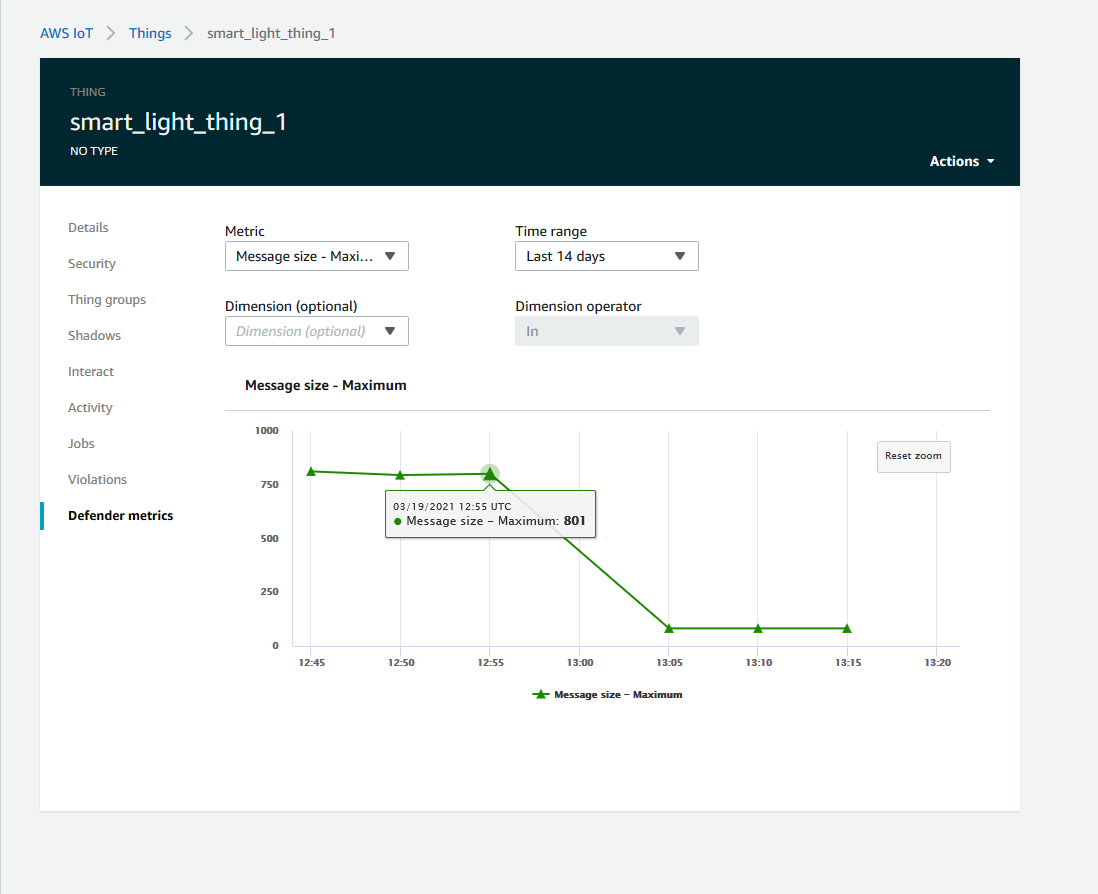
詳細情報を取得するには、[Manage] (管理) で [Things] (モノ) を選択し、詳細を表示するモノを選択して、[Defender metrics] (Defender メトリクス) に移動します。[Active] (アクティブ) タブから、[Defender metrics graph] (Defender メトリクスグラフ) にアクセスして、アラーム状態にあるものすべてに対して調査を実行できます。この場合、グラフにはメッセージサイズのスパイクが表示され、アラームが開始されます。その後、アラームがクリアされたことを確認できます。
ML アラームを微調整する
ML モデルが構築され、データ評価の準備が整ったら、セキュリティプロファイルの ML 動作設定を更新して設定を変更できます。次の手順は、AWS CLI でセキュリティプロファイルの ML 動作設定を更新する方法を示しています。
-
AWS IoT コンソール
のナビゲーションペインで、[Defend] (防御) を展開し、[Detect] (検出)、[Security profiles] (セキュリティプロファイル) の順に選択します。 -
[Security Profiles] (セキュリティプロファイル) ページで、確認するセキュリティプロファイルの横にあるチェックボックスをオンにします。その後、[Actions] (アクション)、[Edit] (編集) の順に選択します。

-
[Set basic configurations] (基本構成の設定) では、セキュリティプロファイルのターゲットのモノのグループを調整したり、監視するメトリクスを変更したりできます。
![[登録されたすべてのモノ] がターゲットとして選択され、[認可の失敗] や [接続試行] などのメトリクス動作を一覧表示し、クラウド側またはデバイス側のメトリクスを追加するオプションを指定する、[ML セキュリティプロファイル設定の作成] ページ。](images/dd-ml-set-basic.png)
-
次のいずれかを更新するには、[Edit metric behaviors] (メトリクスの動作の編集) に移動します。
-
アラームを開始するために必要な ML モデルのデータポイント
-
アラームをクリアするために必要な ML モデルのデータポイント
-
ML Detect 信頼レベル
-
ML Detect 通知 (例えば、抑制されていません,抑制された)
![ML セキュリティプロファイルの [認可の失敗]、[送信バイト]、[接続試行] の各メトリクスを設定するオプションを含む [メトリクスの動作を編集] セクション。](images/dd-ml-update-config-2.png)
-
アラームの確認状態をマークする
検証状態を設定し、その検証状態の説明を入力して、アラームをマークします。これは、自分と自身のチームが応答する必要のないアラームを特定するのに役立ちます。
AWS IoT コンソール
のナビゲーションペインで、[Defend] (防御) を展開し、[Detect] (検出)、[Alarms] (アラーム) の順に選択します。検証状態をマークするアラームを選択します。 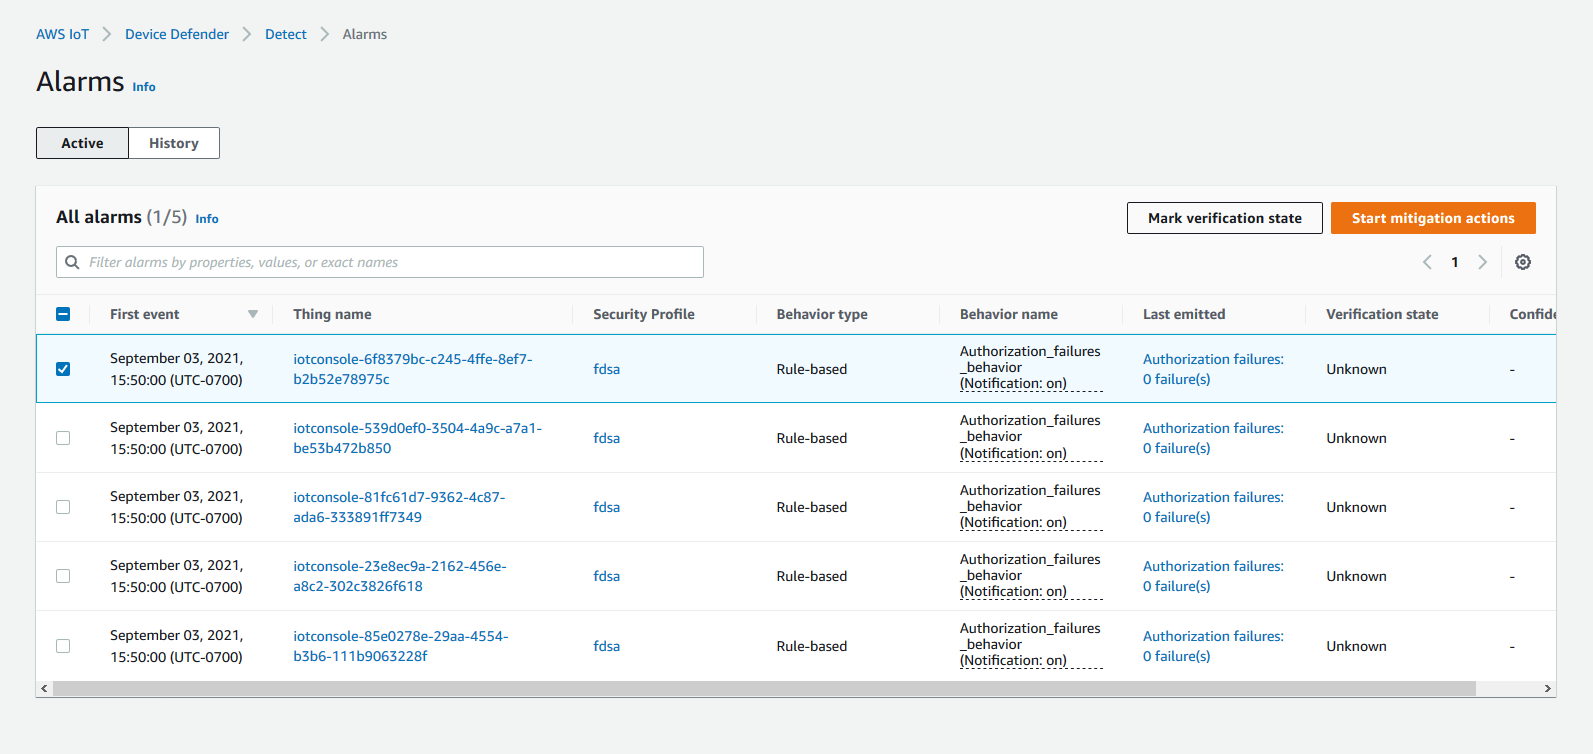
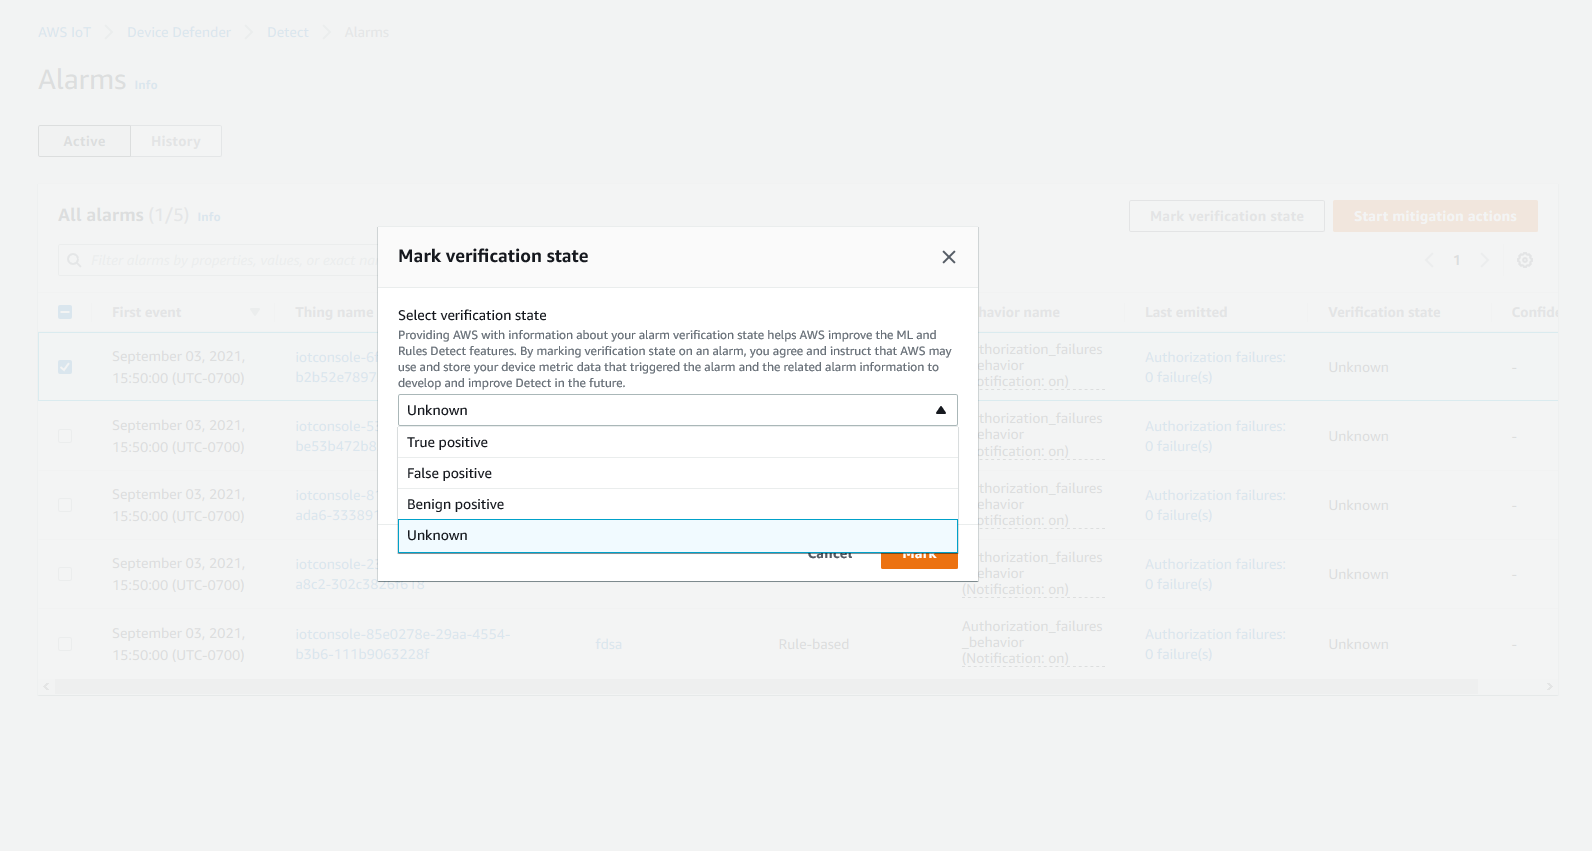
検証状態をマークするを選びます。検証状態モーダルが開きます。
適切な検証状態を選択し、検証の説明(オプション)を入力し、Markを選びます。このアクションは、選択したアラームに検証状態と説明を割り当てます。
特定されたデバイスの問題を緩和する
-
(オプション) 検査結果の緩和アクションを設定する前に、違反しているデバイスを移動する検査グループを設定しましょう。既存のグループを使用することもできます。
-
[Manage] (管理)、[Thing groups] (モノのグループ)、[Create Thing Group] (モノのグループの作成) の順に移動します。モノのグループに名前を付けます。このチュートリアルでは、モノのグループに
Quarantine_groupという名前を付けます。[Thing group] (モノのグループ)、[Security] (セキュリティ) では、モノのグループに次のポリシーを適用します。![[モノのグループを作成] ボタンを含む AWS IoT コンソールの [モノのグループを作成] ページ。](images/dd-create-thing-group.png)
終了したら、[Create thing group] (モノのグループの作成) を選択します。
-
モノのグループを作成したので、アラーム状態のデバイスを
Quarantine_groupに移動する緩和アクションを作成しましょう。[Defend] (防御) の [Mitigation actions] (緩和アクション) で、[Create] (作成) を選択します。
![[アクション名]、[アクションタイプ]、[アクセス許可]、[アクション実行ロール]、[モノのグループ] フィールドを含む AWS IoT Device Defender 緩和アクション設定フォーム。](images/dd-miti-create.png)
-
[Create a new mitigation action] (新しい緩和アクションの作成) ページで、以下の情報を入力します。
-
[Action name] (アクション名): 緩和アクションに名前 (例:
Quarantine_action) を付けます。 -
[Action type] (アクションの種類): アクションの種類を選択します。[Add things to thing group (Audit or Detect mitigation)] (モノのグループにモノを追加 (緩和機能の監査または検出)を選択します。
-
[Action execution role] (アクション実行ロール): ロールを作成するか、事前に作成している場合は既存のロールを選択します。
-
Parameters (パラメータ): モノのグループを選択します。 以前に作成した
Quarantine_groupを使用できます。
![[アクション名]、[アクションタイプ]、[アクセス許可]、[アクション実行ロール]、[モノのグループ] フィールドを含む AWS IoT Device Defender 緩和アクション設定フォーム。](images/dd-miti-create-form.png)
完了したら、[Save ] を選択します。これで、アラーム状態のデバイスを検査対象のモノのグループに移動する緩和アクションと、調査中にデバイスを隔離する緩和アクションが追加されました。
-
-
[Defender]、[Detect] (検出)、[Alarms] (アラーム) の順に移動します。[Active] (アクティブ) の下で、アラーム状態になっているデバイスを確認できます。
![[モノの名前]、[セキュリティプロファイル]、[動作タイプ]、[動作名]、[最終出力時間]、[検証の状態] の各列を含む 5 つのアクティブな認可失敗アラームを示す AWS IoT Device Defender アラームリスト。](images/dd-ml-alarms.png)
検査対象のグループに移動するデバイスを選択し、[Start Mitigation Actions] (緩和アクションの開始) を選択します。
-
[Start Mitigation Actions] (緩和アクションの開始) の [Start Actions] (アクションの開始) で、先ほど作成した緩和アクションを選択します。例えば、[
Quarantine_action] を選択してから、[Start] (開始) を選択します。[Action Tasks] (アクションタスク) ページが開きます。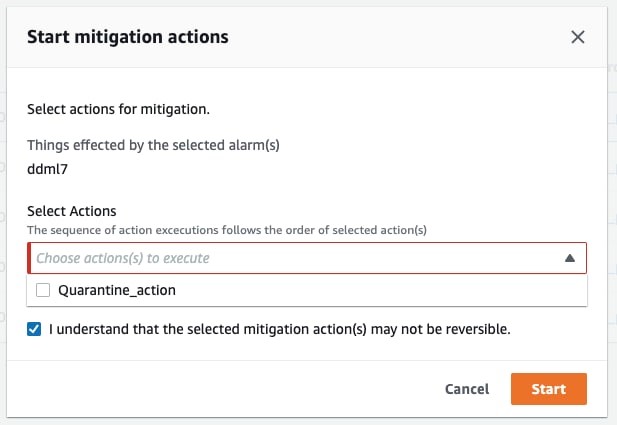
-
これでデバイスが
Quarantine_groupに隔離され、アラームを引き起こした問題の根本原因を調査できます。調査が完了したら、デバイスをモノのグループから移動したり、さらにアクションを実行したりできます。
CLI で ML Detect を使用する方法
CLI を使用して ML Detect を設定する方法を次に示します。
チュートリアル
ML Detect を有効化する
以下の手順では、AWS CLI で ML Detect を有効にする方法を示します。
-
モデルの継続的なトレーニングと更新のために、ML Detect の最小要件で定義されているところに従って必要となる最小データポイントをデバイスが作成することを確認します。データ収集を進めるには、セキュリティプロファイルにアタッチされたモノのグループにモノが確実に存在するようにしてください。
-
create-security-profileコマンドを使用して、ML Detect セキュリティプロファイルを作成します。次の例では、security-profile-for-smart-lightsという名前のセキュリティプロファイルを作成します。このプロファイルは、送信されたメッセージの数、承認の失敗の数、接続の試行の数、および切断の数をチェックします。この例では、メトリクスが ML Detect モデルを使用することを確立するためにmlDetectionConfigを使用します。aws iot create-security-profile \ --security-profile-namesecurity-profile-for-smart-lights\ --behaviors \ '[{ "name": "num-messages-sent-ml-behavior", "metric": "aws:num-messages-sent", "criteria": { "consecutiveDatapointsToAlarm": 1, "consecutiveDatapointsToClear": 1, "mlDetectionConfig": { "confidenceLevel": "HIGH" } }, "suppressAlerts": true }, { "name": "num-authorization-failures-ml-behavior", "metric": "aws:num-authorization-failures", "criteria": { "consecutiveDatapointsToAlarm": 1, "consecutiveDatapointsToClear": 1, "mlDetectionConfig": { "confidenceLevel": "HIGH" } }, "suppressAlerts": true }, { "name": "num-connection-attempts-ml-behavior", "metric": "aws:num-connection-attempts", "criteria": { "consecutiveDatapointsToAlarm": 1, "consecutiveDatapointsToClear": 1, "mlDetectionConfig": { "confidenceLevel": "HIGH" } }, "suppressAlerts": true }, { "name": "num-disconnects-ml-behavior", "metric": "aws:num-disconnects", "criteria": { "consecutiveDatapointsToAlarm": 1, "consecutiveDatapointsToClear": 1, "mlDetectionConfig": { "confidenceLevel": "HIGH" } }, "suppressAlerts": true }]'出力:
{ "securityProfileName": "security-profile-for-smart-lights", "securityProfileArn": "arn:aws:iot:eu-west-1:123456789012:securityprofile/security-profile-for-smart-lights" } -
次に、セキュリティプロファイルを 1 つまたは複数のモノのグループに関連付けます。
attach-security-profileコマンドを使用して、モノのグループをセキュリティプロファイルにアタッチします。次の例では、ML_Detect_beta_static_groupという名前のモノのグループをsecurity-profile-for-smart-lightsセキュリティプロファイルに関連付けます。aws iot attach-security-profile \ --security-profile-namesecurity-profile-for-smart-lights\ --security-profile-target-arn arn:aws:iot:eu-west-1:123456789012:thinggroup/ML_Detect_beta_static_group出力:
なし。
-
完全なセキュリティプロファイルを作成したら、ML モデルがトレーニングを開始します。ML モデルの初期トレーニングと構築が完了するまでに 14 日間かかります。14 日が経過すると、デバイスで異常なアクティビティが発生した場合、アラームが表示されます。
ML モデルのステータスを監視する
以下の手順では、ML モデルの進行中のトレーニングを監視する方法を示しています。
-
get-behavior-model-training-summariesコマンドを使用して、ML モデルの進捗状況を表示します。次の例では、security-profile-for-smart-lightsセキュリティプロファイルの ML モデルトレーニングの進捗状況の概要を取得します。modelStatusは、モデルがトレーニングを完了したか、特定の動作のビルドがまだ保留中であるかを示します。aws iot get-behavior-model-training-summaries \ --security-profile-namesecurity-profile-for-smart-lights出力:
{
    "summaries": [
        {
            "securityProfileName": "security-profile-for-smart-lights",
            "behaviorName": "Messages_sent_ML_behavior",
            "trainingDataCollectionStartDate": "2020-11-30T14:00:00-08:00",
            "modelStatus": "ACTIVE",
            "datapointsCollectionPercentage": 29.408,
            "lastModelRefreshDate": "2020-12-07T14:35:19.237000-08:00"
        },
        {
            "securityProfileName": "security-profile-for-smart-lights",
            "behaviorName": "Messages_received_ML_behavior",
            "modelStatus": "PENDING_BUILD",
            "datapointsCollectionPercentage": 0.0
        },
        {
            "securityProfileName": "security-profile-for-smart-lights",
            "behaviorName": "Authorization_failures_ML_behavior",
            "trainingDataCollectionStartDate": "2020-11-30T14:00:00-08:00",
            "modelStatus": "ACTIVE",
            "datapointsCollectionPercentage": 35.464,
            "lastModelRefreshDate": "2020-12-07T14:29:44.396000-08:00"
        },
        {
            "securityProfileName": "security-profile-for-smart-lights",
            "behaviorName": "Message_size_ML_behavior",
            "trainingDataCollectionStartDate": "2020-11-30T14:00:00-08:00",
            "modelStatus": "ACTIVE",
            "datapointsCollectionPercentage": 29.332,
            "lastModelRefreshDate": "2020-12-07T14:30:44.113000-08:00"
        },
        {
            "securityProfileName": "security-profile-for-smart-lights",
            "behaviorName": "Connection_attempts_ML_behavior",
            "trainingDataCollectionStartDate": "2020-11-30T14:00:00-08:00",
            "modelStatus": "ACTIVE",
            "datapointsCollectionPercentage": 32.891999999999996,
            "lastModelRefreshDate": "2020-12-07T14:29:43.121000-08:00"
        },
        {
            "securityProfileName": "security-profile-for-smart-lights",
            "behaviorName": "Disconnects_ML_behavior",
            "trainingDataCollectionStartDate": "2020-11-30T14:00:00-08:00",
            "modelStatus": "ACTIVE",
            "datapointsCollectionPercentage": 35.46,
            "lastModelRefreshDate": "2020-12-07T14:29:55.556000-08:00"
        }
    ]
}
注記
モデルが想定したとおりに進捗しない場合は、デバイスが 最小要件 を満たしていることを確認してください。
ML Detect アラームを確認する
ML モデルが構築され、データ評価の準備が整ったら、モデルによって推測されるアラームを定期的に表示できます。以下の手順では、AWS CLI でアラームを表示する方法を示します。
-
すべてのアクティブなアラームを表示するには、
list-active-violationsコマンドを使用します。aws iot list-active-violations \ --max-results 2出力:
{
    "activeViolations": []
}
または、
list-violation-eventsコマンドを使用して、特定の期間中に検出されたすべての違反を表示することもできます。次の例では、2020 年 9 月 22 日 5:42:13 GMT から 2020 年 10 月 26 日 5:42:13 GMT までの違反イベントをリストします。aws iot list-violation-events \ --start-time1599500533\ --end-time1600796533\ --max-results2出力:
{
    "violationEvents": [
        {
            "violationId": "1448be98c09c3d4ab7cb9b6f3ece65d6",
            "thingName": "lightbulb-1",
            "securityProfileName": "security-profile-for-smart-lights",
            "behavior": {
                "name": "LowConfidence_MladBehavior_MessagesSent",
                "metric": "aws:num-messages-sent",
                "criteria": {
                    "consecutiveDatapointsToAlarm": 1,
                    "consecutiveDatapointsToClear": 1,
                    "mlDetectionConfig": {
                        "confidenceLevel": "HIGH"
                    }
                },
                "suppressAlerts": true
            },
            "violationEventType": "alarm-invalidated",
            "violationEventTime": 1600780245.29
        },
        {
            "violationId": "df4537569ef23efb1c029a433ae84b52",
            "thingName": "lightbulb-2",
            "securityProfileName": "security-profile-for-smart-lights",
            "behavior": {
                "name": "LowConfidence_MladBehavior_MessagesSent",
                "metric": "aws:num-messages-sent",
                "criteria": {
                    "consecutiveDatapointsToAlarm": 1,
                    "consecutiveDatapointsToClear": 1,
                    "mlDetectionConfig": {
                        "confidenceLevel": "HIGH"
                    }
                },
                "suppressAlerts": true
            },
            "violationEventType": "alarm-invalidated",
            "violationEventTime": 1600780245.281
        }
    ],
    "nextToken": "Amo6XIUrsOohsojuIG6TuwSR3X9iUvH2OCksBZg6bed2j21VSnD1uP1pflxKX1+a3cvBRSosIB0xFv40kM6RYBknZ/vxabMe/ZW31Ps/WiZHlr9Wg7R7eEGli59IJ/U0iBQ1McP/ht0E2XA2TTIvYeMmKQQPsRj/eoV9j7P/wveu7skNGepU/mvpV0O2Ap7hnV5U+Prx/9+iJA/341va+pQww7jpUeHmJN9Hw4MqW0ysw0Ry3w38hOQWEpz2xwFWAxAARxeIxCxt5c37RK/lRZBlhYqoB+w2PZ74730h8pICGY4gktJxkwHyyRabpSM/G/f5DFrD9O5v8idkTZzBxW2jrbzSUIdafPtsZHL/yAMKr3HAKtaABz2nTsOBNre7X2d/jIjjarhon0Dh9l+8I9Y5Ey+DIFBcqFTvhibKAafQt3gs6CUiqHdWiCenfJyb8whmDE2qxvdxGElGmRb+k6kuN5jrZxxw95gzfYDgRHv11iEn8h1qZLD0czkIFBpMppHj9cetHPvM+qffXGAzKi8tL6eQuCdMLXmVE3jbqcJcjk9ItnaYJi5zKDz9FVbrz9qZZPtZJFHp"
}
ML アラームを微調整する
ML モデルが構築され、データ評価の準備が整ったら、セキュリティプロファイルの ML 動作設定を更新して設定を変更できます。次の手順は、AWS CLI でセキュリティプロファイルの ML 動作設定を更新する方法を示しています。
-
セキュリティプロファイルの ML 動作設定を変更するには、
update-security-profileコマンドを使用します。次の例では、いくつかの動作のconfidenceLevelを変更して、security-profile-for-smart-lightsセキュリティプロファイルの動作を更新し、すべての動作の通知を抑制解除します。aws iot update-security-profile \ --security-profile-namesecurity-profile-for-smart-lights\ --behaviors \ '[{ "name": "num-messages-sent-ml-behavior", "metric": "aws:num-messages-sent", "criteria": { "mlDetectionConfig": { "confidenceLevel" : "HIGH" } }, "suppressAlerts": false }, { "name": "num-authorization-failures-ml-behavior", "metric": "aws:num-authorization-failures", "criteria": { "mlDetectionConfig": { "confidenceLevel" : "HIGH" } }, "suppressAlerts": false }, { "name": "num-connection-attempts-ml-behavior", "metric": "aws:num-connection-attempts", "criteria": { "mlDetectionConfig": { "confidenceLevel" : "HIGH" } }, "suppressAlerts": false }, { "name": "num-disconnects-ml-behavior", "metric": "aws:num-disconnects", "criteria": { "mlDetectionConfig": { "confidenceLevel" : "LOW" } }, "suppressAlerts": false }]'出力:
 {
    "securityProfileName": "security-profile-for-smart-lights",
    "securityProfileArn": "arn:aws:iot:eu-west-1:123456789012:securityprofile/security-profile-for-smart-lights",
    "behaviors": [
        {
            "name": "num-messages-sent-ml-behavior",
            "metric": "aws:num-messages-sent",
            "criteria": {
                "mlDetectionConfig": {
                    "confidenceLevel": "HIGH"
                }
            }
        },
        {
            "name": "num-authorization-failures-ml-behavior",
            "metric": "aws:num-authorization-failures",
            "criteria": {
                "mlDetectionConfig": {
                    "confidenceLevel": "HIGH"
                }
            }
        },
        {
            "name": "num-connection-attempts-ml-behavior",
            "metric": "aws:num-connection-attempts",
            "criteria": {
                "mlDetectionConfig": {
                    "confidenceLevel": "HIGH"
                }
            },
            "suppressAlerts": false
        },
        {
            "name": "num-disconnects-ml-behavior",
            "metric": "aws:num-disconnects",
            "criteria": {
                "mlDetectionConfig": {
                    "confidenceLevel": "LOW"
                }
            },
            "suppressAlerts": true
        }
    ],
    "version": 2,
    "creationDate": 1600799559.249,
    "lastModifiedDate": 1600800516.856
}
アラームの確認状態をマークする
アラームに検証ステータスをマークして、アラームの分類や異常の調査に役立てることができます。
アラームに確認状態とその状態の説明をマークします。例えば、アラームの検証状態を False positive に設定するために、次のコマンドを使用します。
aws iot put-verification-state-on-violation --violation-id12345--verification-stateFALSE_POSITIVE--verification-state-description"This is dummy description"--endpointhttps://us-east-1.iot.amazonaws.com--regionus-east-1出力:
なし。
特定されたデバイスの問題を緩和する
-
create-thing-groupコマンドを使用して、緩和アクション用のモノのグループを作成します。次の例では、ThingGroupForDetectMitigationAction というモノのグループを作成します。aws iot create-thing-group —thing-group-nameThingGroupForDetectMitigationAction出力:
{ "thingGroupName": "ThingGroupForDetectMitigationAction", "thingGroupArn": "arn:aws:iot:us-east-1:123456789012:thinggroup/ThingGroupForDetectMitigationAction", "thingGroupId": "4139cd61-10fa-4c40-b867-0fc6209dca4d" } -
次に、
create-mitigation-actionコマンドを使用して、緩和アクションを作成します。次の例では、緩和アクションを適用するために使用される IAM ロールの ARN を使用して、detect_mitigation_action という緩和アクションを作成します。また、アクションのタイプとそのアクションのパラメータを定義します。この場合、緩和アクションにより、ThingGroupForDetectMitigationAction という以前に作成したモノのグループにモノが移動します。aws iot create-mitigation-action --action-namedetect_mitigation_action\ --role-arn arn:aws:iam::123456789012:role/MitigationActionValidRole\ --action-params \ '{ "addThingsToThingGroupParams": { "thingGroupNames": ["ThingGroupForDetectMitigationAction"], "overrideDynamicGroups": false } }'出力:
{ "actionArn": "arn:aws:iot:us-east-1:123456789012:mitigationaction/detect_mitigation_action", "actionId": "5939e3a0-bf4c-44bb-a547-1ab59ffe67c3" } -
start-detect-mitigation-actions-taskコマンドを使用して、緩和アクションタスクを開始します。task-id、target、およびactionsは必須パラメータです。aws iot start-detect-mitigation-actions-task \ --task-idtaskIdForMitigationAction\ --target '{ "violationIds" : [ "violationId-1", "violationId-2" ] }' \ --actions "detect_mitigation_action" \ --include-only-active-violations \ --include-suppressed-alerts出力:
{ "taskId": "taskIdForMitigationAction" } -
(オプション) タスクに含まれる緩和アクションの実行を表示するには、
list-detect-mitigation-actions-executionsコマンドを使用します。aws iot list-detect-mitigation-actions-executions \ --task-idtaskIdForMitigationAction\ --max-items5\ --page-size4出力:
{ "actionsExecutions": [ { "taskId": "e56ee95e - f4e7 - 459 c - b60a - 2701784290 af", "violationId": "214_fe0d92d21ee8112a6cf1724049d80", "actionName": "underTest_MAThingGroup71232127", "thingName": "cancelDetectMitigationActionsTaskd143821b", "executionStartDate": "Thu Jan 07 18: 35: 21 UTC 2021", "executionEndDate": "Thu Jan 07 18: 35: 21 UTC 2021", "status": "SUCCESSFUL", } ] } -
(オプション)
describe-detect-mitigation-actions-taskコマンドを使用すると、緩和アクションタスクに関する情報を取得できます。aws iot describe-detect-mitigation-actions-task \ --task-idtaskIdForMitigationAction出力:
{ "taskSummary": { "taskId": "taskIdForMitigationAction", "taskStatus": "SUCCESSFUL", "taskStartTime": 1609988361.224, "taskEndTime": 1609988362.281, "target": { "securityProfileName": "security-profile-for-smart-lights", "behaviorName": "num-messages-sent-ml-behavior" }, "violationEventOccurrenceRange": { "startTime": 1609986633.0, "endTime": 1609987833.0 }, "onlyActiveViolationsIncluded": true, "suppressedAlertsIncluded": true, "actionsDefinition": [ { "name": "detect_mitigation_action", "id": "5939e3a0-bf4c-44bb-a547-1ab59ffe67c3", "roleArn": "arn:aws:iam::123456789012:role/MitigatioActionValidRole", "actionParams": { "addThingsToThingGroupParams": { "thingGroupNames": [ "ThingGroupForDetectMitigationAction" ], "overrideDynamicGroups": false } } } ], "taskStatistics": { "actionsExecuted": 0, "actionsSkipped": 0, "actionsFailed": 0 } } } -
(オプション) 緩和アクションタスクのリストを取得するには、
list-detect-mitigation-actions-tasksコマンドを使用します。aws iot list-detect-mitigation-actions-tasks \ --start-time1609985315\ --end-time1609988915\ --max-items5\ --page-size4出力:
{ "tasks": [ { "taskId": "taskIdForMitigationAction", "taskStatus": "SUCCESSFUL", "taskStartTime":1609988361.224, "taskEndTime":1609988362.281, "target": { "securityProfileName": "security-profile-for-smart-lights", "behaviorName": "num-messages-sent-ml-behavior" }, "violationEventOccurrenceRange": { "startTime": 1609986633.0, "endTime": 1609987833.0 }, "onlyActiveViolationsIncluded": true, "suppressedAlertsIncluded": true, "actionsDefinition": [ { "name": "detect_mitigation_action", "id": "5939e3a0-bf4c-44bb-a547-1ab59ffe67c3", "roleArn": "arn:aws:iam::123456789012:role/MitigatioActionValidRole", "actionParams": { "addThingsToThingGroupParams": { "thingGroupNames": [ "ThingGroupForDetectMitigationAction" ], "overrideDynamicGroups": false } } } ], "taskStatistics": { "actionsExecuted": 0, "actionsSkipped": 0, "actionsFailed": 0 } } ] } -
(オプション) 緩和アクションタスクをキャンセルするには、
cancel-detect-mitigation-actions-taskコマンドを使用します。aws iot cancel-detect-mitigation-actions-task \ --task-idtaskIdForMitigationAction出力:
なし。