翻訳は機械翻訳により提供されています。提供された翻訳内容と英語版の間で齟齬、不一致または矛盾がある場合、英語版が優先します。
Amazon SageMaker AI 用の独自の推論コンテナを適応させる
構築済みの SageMaker AI Docker イメージ Amazon SageMaker AI にリストされているイメージをユースケースに使用できない場合は、独自の Docker コンテナを構築し、SageMaker AI 内でトレーニングと推論に使用できます。SageMaker AI と互換性を持つには、コンテナに次の特性が必要です。
-
コンテナには、ポート
8080にウェブサーバーのリストが必要です。 -
コンテナは、
/invocationsおよび/pingリアルタイムエンドポイントへのPOSTリクエストを受け入れる必要があります。これらのエンドポイントに送信するリクエストは、通常のレスポンスの場合は 60 秒、ストリーミングレスポンスの場合は 8 分で返される必要があり、最大サイズは 25 MB です。
SageMaker AI でトレーニングと推論を行うために独自の Docker コンテナを構築する方法の詳細と例については、「独自のアルゴリズムコンテナを構築する
次のガイドでは、Amazon SageMaker Studio Classic でJupyterLabスペースを使用して、SageMaker AI ホスティングと連携するように推論コンテナを適応させる方法を示します。この例では、NGINX ウェブサーバーである Gunicorn を Python ウェブサーバーゲートウェイインターフェイスとして使用し、Flask をウェブアプリケーションフレームワークとして使用します。前述の要件を満たしている限り、さまざまなアプリケーションを使用してコンテナを適応させることができます。独自の推論コードの使用の詳細については、「 ホスティングサービスでのカスタム推論コードの使用」を参照してください。
推論コンテナを適応させる
SageMaker AI ホスティングと連携するように独自の推論コンテナを適応させるには、次のステップを使用します。次の手順に示す例では、Python および以下に spaCy
-
NER モデルを含むコンテナを構築するための Dockerfile。
-
NER モデルを提供する推論スクリプト。
この例をユースケースに適応させる場合は、モデルのデプロイと提供に必要な Dockerfile と推論スクリプトを使用する必要があります。
-
Amazon SageMaker Studio Classic を使用して JupyterLab スペースを作成します (オプション)。
任意のノートブックを使用してスクリプトを実行し、SageMaker AI ホスティングで推論コンテナを適応させることができます。この例では、Amazon SageMaker Studio Classic 内のJupyterLabスペースを使用して、SageMaker AI ディストリビューションイメージに付属するJupyterLabアプリケーションを起動する方法を示します。詳細については、「SageMaker JupyterLab」を参照してください。
-
Docker ファイルと推論スクリプトをアップロードします。
-
ホームディレクトリに新しいフォルダを作成します。JupyterLab を使用している場合は、左上隅で [新しいフォルダ] アイコンを選択し、Dockerfile を格納するフォルダ名を入力します。この例では、フォルダは
docker_test_folderという名前です。 -
Dockerfile テキストファイルを新しいフォルダにアップロードします。以下は、spaCy
が提供する事前にトレーニング済みの名前付きエンティティ認識 (NER) モデル を持つ Docker コンテナを作成する Dockerfile の例、この例を実行するために必要なアプリケーションと環境変数の例です。 FROM python:3.8 RUN apt-get -y update && apt-get install -y --no-install-recommends \ wget \ python3 \ nginx \ ca-certificates \ && rm -rf /var/lib/apt/lists/* RUN wget https://bootstrap.pypa.io/get-pip.py && python3 get-pip.py && \ pip install flask gevent gunicorn && \ rm -rf /root/.cache #pre-trained model package installation RUN pip install spacy RUN python -m spacy download en # Set environment variables ENV PYTHONUNBUFFERED=TRUE ENV PYTHONDONTWRITEBYTECODE=TRUE ENV PATH="/opt/program:${PATH}" COPY NER /opt/program WORKDIR /opt/program前のコード例において、環境変数
PYTHONUNBUFFEREDは、Python における、ユーザーへのログの高速配信を可能にする標準出力ストリームのバッファリングを防止します。環境変数PYTHONDONTWRITEBYTECODEは、Python における、このユースケースには不要なコンパイルされたバイトコード.pycファイルの書き込みを防止します。環境変数PATHは、コンテナが呼び出されたときに、trainおよびserveプログラムの場所を識別するために使用されます。 -
新しいフォルダ内に新しいディレクトリを作成し、モデルを提供するスクリプトを含めます。この例では、
NERというディレクトリを使用します。このディレクトリには、この例を実行するために必要な次のスクリプトが含まれています。-
predictor.py– モデルで推論をロードして実行するロジックを含む Python スクリプト。 -
nginx.conf– ウェブサーバーを設定するスクリプト。 -
serve– 推論サーバーを起動するスクリプト。 -
wsgi.py– モデルを提供するヘルパースクリプト。
重要
推論スクリプトを
.ipynbで終わるノートブックにコピーして名前を変更すると、スクリプトに、エンドポイントのデプロイを妨げるフォーマット文字が含まれる可能性があります。代わりに、テキストファイルを作成し、名前を変更してください。 -
-
スクリプトをアップロードして、モデルを推論で使用できるようにします。以下は、Flask を使用して
/pingエンドポイントと/invocationsエンドポイントを提供する、predictor.pyというスクリプトの例です。from flask import Flask import flask import spacy import os import json import logging #Load in model nlp = spacy.load('en_core_web_sm') #If you plan to use a your own model artifacts, #your model artifacts should be stored in /opt/ml/model/ # The flask app for serving predictions app = Flask(__name__) @app.route('/ping', methods=['GET']) def ping(): # Check if the classifier was loaded correctly health = nlp is not None status = 200 if health else 404 return flask.Response(response= '\n', status=status, mimetype='application/json') @app.route('/invocations', methods=['POST']) def transformation(): #Process input input_json = flask.request.get_json() resp = input_json['input'] #NER doc = nlp(resp) entities = [(X.text, X.label_) for X in doc.ents] # Transform predictions to JSON result = { 'output': entities } resultjson = json.dumps(result) return flask.Response(response=resultjson, status=200, mimetype='application/json')前のスクリプト例の
/pingエンドポイントは、モデルが正しくロードされた場合は200、モデルが正しくロードされていない場合は404のステータスコードを返します。/invocationsエンドポイントは、JSON でフォーマットされたリクエストを処理し、入力フィールドを抽出し、NER モデルを使用して可変エンティティ内のエンティティを識別して保存します。Flask アプリケーションは、これらのエンティティを含むレスポンスを返します。これらの必要なヘルスリクエストの詳細については、「コンテナがヘルスチェック (Ping) リクエストに応答する方法」を参照してください。 -
スクリプトをアップロードして推論サーバーを起動します。次のスクリプト例では、Gunicorn をアプリケーションサーバーとして、Nginx をウェブサーバーとして、
serveを呼び出します。#!/usr/bin/env python # This file implements the scoring service shell. You don't necessarily need to modify it for various # algorithms. It starts nginx and gunicorn with the correct configurations and then simply waits until # gunicorn exits. # # The flask server is specified to be the app object in wsgi.py # # We set the following parameters: # # Parameter Environment Variable Default Value # --------- -------------------- ------------- # number of workers MODEL_SERVER_WORKERS the number of CPU cores # timeout MODEL_SERVER_TIMEOUT 60 seconds import multiprocessing import os import signal import subprocess import sys cpu_count = multiprocessing.cpu_count() model_server_timeout = os.environ.get('MODEL_SERVER_TIMEOUT', 60) model_server_workers = int(os.environ.get('MODEL_SERVER_WORKERS', cpu_count)) def sigterm_handler(nginx_pid, gunicorn_pid): try: os.kill(nginx_pid, signal.SIGQUIT) except OSError: pass try: os.kill(gunicorn_pid, signal.SIGTERM) except OSError: pass sys.exit(0) def start_server(): print('Starting the inference server with {} workers.'.format(model_server_workers)) # link the log streams to stdout/err so they will be logged to the container logs subprocess.check_call(['ln', '-sf', '/dev/stdout', '/var/log/nginx/access.log']) subprocess.check_call(['ln', '-sf', '/dev/stderr', '/var/log/nginx/error.log']) nginx = subprocess.Popen(['nginx', '-c', '/opt/program/nginx.conf']) gunicorn = subprocess.Popen(['gunicorn', '--timeout', str(model_server_timeout), '-k', 'sync', '-b', 'unix:/tmp/gunicorn.sock', '-w', str(model_server_workers), 'wsgi:app']) signal.signal(signal.SIGTERM, lambda a, b: sigterm_handler(nginx.pid, gunicorn.pid)) # Exit the inference server upon exit of either subprocess pids = set([nginx.pid, gunicorn.pid]) while True: pid, _ = os.wait() if pid in pids: break sigterm_handler(nginx.pid, gunicorn.pid) print('Inference server exiting') # The main routine to invoke the start function. if __name__ == '__main__': start_server()前のスクリプト例では、シグナルハンドラー関数
sigterm_handlerを定義し、SIGTERMシグナルを受信したときに Nginx と Gunicorn サブプロセスをシャットダウンします。start_server関数は、シグナルハンドラーを起動し、Nginx および Gunicorn サブプロセスを起動してモニタリングし、ログストリームをキャプチャします。 -
スクリプトをアップロードしてウェブサーバーを設定します。
nginx.confという次のスクリプト例では、Gunicorn をアプリケーションサーバーとして使用して Nginx ウェブサーバーを設定し、推論用のモデルを提供します。worker_processes 1; daemon off; # Prevent forking pid /tmp/nginx.pid; error_log /var/log/nginx/error.log; events { # defaults } http { include /etc/nginx/mime.types; default_type application/octet-stream; access_log /var/log/nginx/access.log combined; upstream gunicorn { server unix:/tmp/gunicorn.sock; } server { listen 8080 deferred; client_max_body_size 5m; keepalive_timeout 5; proxy_read_timeout 1200s; location ~ ^/(ping|invocations) { proxy_set_header X-Forwarded-For $proxy_add_x_forwarded_for; proxy_set_header Host $http_host; proxy_redirect off; proxy_pass http://gunicorn; } location / { return 404 "{}"; } } }前のスクリプト例では、Nginx をフォアグラウンドで実行するように設定し、
error_logをキャプチャする場所を設定し、upstreamを Gunicorn サーバーのソケットソックスとして定義します。サーバーは、ポート8080をリッスンするようにサーバーブロックを設定し、クライアントリクエスト本文サイズとタイムアウト値に制限を設定します。サーバーブロックは、/pingまたは/invocationsパスを含むリクエストを Gunicornserver http://gunicornに転送し、他のパスの場合は404エラーを返します。 -
モデルの提供に必要な他のスクリプトをアップロードします。この例では、Gunicorn がアプリケーションを見つけるために、
wsgi.pyという次のスクリプトの例が必要です。import predictor as myapp # This is just a simple wrapper for gunicorn to find your app. # If you want to change the algorithm file, simply change "predictor" above to the # new file. app = myapp.app
フォルダ
docker_test_folderから、ディレクトリ構造に Dockerfile とフォルダ NER が含まれている必要があります。NER フォルダには、次のようにnginx.conf、predictor.py、serve、wsgi.pyファイルが含まれている必要があります。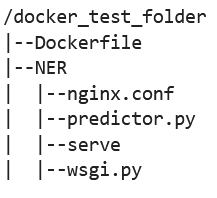
-
-
独自のコンテナを構築します。
フォルダ
docker_test_folderから、Docker コンテナを構築します。次のコマンド例では、Dockerfile で設定された Docker コンテナを構築します。! docker build -t byo-container-test .前のコマンドは、現在の作業ディレクトリに
byo-container-testというコンテナを構築します。Docker ビルドパラメータの詳細については、「Build arguments」を参照してください。 注記
Docker が Dockerfile を見つけられないという次のエラーメッセージが表示された場合は、Dockerfile の名前が正しいこと、およびそのディレクトリに保存されていることを確認してください。
unable to prepare context: unable to evaluate symlinks in Dockerfile path:
lstat /home/ec2-user/SageMaker/docker_test_folder/Dockerfile: no such file or directory
Docker は、現在のディレクトリ内で拡張子を付けずに、Dockerfile と名付けられたファイルを検索します。別の名前を指定した場合は、-f フラグを付けて手動でファイル名を渡すことができます。例えば、Dockerfile を Dockerfile-text.txt として指定した場合は、次のように
-fフラグを使用して Docker コンテナを構築し、その後に次のようにファイルを作成します。! docker build -t byo-container-test -f Dockerfile-text.txt . -
Amazon Elastic Container Registry (Amazon ECR) に Docker イメージをプッシュします
ノートブックセルで、Docker イメージを ECR にプッシュします。次のコード例は、コンテナをローカルで構築し、ログインして ECR にプッシュする方法を示しています。
%%sh
# Name of algo -> ECR
algorithm_name=sm-pretrained-spacy

#make serve executable
chmod +x NER/serve
account=$(aws sts get-caller-identity --query Account --output text)
# Region, defaults to us-west-2
region=$(aws configure get region)
region=${region:-us-east-1}
fullname="${account}.dkr.ecr.${region}.amazonaws.com/${algorithm_name}:latest"
# If the repository doesn't exist in ECR, create it.
aws ecr describe-repositories --repository-names "${algorithm_name}" > /dev/null 2>&1
if [ $? -ne 0 ]
then
    aws ecr create-repository --repository-name "${algorithm_name}" > /dev/nullfi
# Get the login command from ECR and execute it directly
aws ecr get-login-password --region ${region}|docker login --username AWS --password-stdin ${fullname}
# Build the docker image locally with the image name and then push it to ECR
# with the full name.

docker build  -t ${algorithm_name} .
docker tag ${algorithm_name} ${fullname}

docker push ${fullname}
前の例では、サンプル Docker コンテナを ECR にプッシュするために必要な次のステップを実行する方法を示しています。
-
アルゴリズム名を
sm-pretrained-spacyとして定義します。 -
NER フォルダ内の
serveファイルを実行可能にします。 -
を設定します AWS リージョン。
-
ECR がまだ存在しない場合は、作成します。
-
ECR にログインします。
-
Docker コンテナをローカルで構築します。
-
Docker イメージを ECR にプッシュします。
-
-
SageMaker AI クライアントのセットアップ
推論に SageMaker AI ホスティングサービスを使用する場合は、モデルを作成し
、エンドポイント設定 を作成し、エンドポイントを作成 する必要があります。エンドポイントから推論を取得するには、SageMaker AI boto3 ランタイムクライアントを使用してエンドポイントを呼び出します。次のコードは、SageMaker AI boto3 クライアントを使用して SageMaker AI クライアントと SageMaker Runtime クライアントの両方を設定する方法を示しています。 SageMaker import boto3 from sagemaker import get_execution_role sm_client = boto3.client(service_name='sagemaker') runtime_sm_client = boto3.client(service_name='sagemaker-runtime') account_id = boto3.client('sts').get_caller_identity()['Account'] region = boto3.Session().region_name #used to store model artifacts which SageMaker AI will extract to /opt/ml/model in the container, #in this example case we will not be making use of S3 to store the model artifacts #s3_bucket = '<S3Bucket>' role = get_execution_role()前のコード例では、Amazon S3 バケットは使用されませんが、モデルアーティファクトの保存方法を示すコメントとして挿入されています。
前のコード例を実行した後にアクセス許可エラーが表示された場合は、IAM ロールにアクセス許可を追加する必要がある場合があります。IAM ロールの詳細については、「Amazon SageMaker Role Manager」を参照してください。現在のロールにアクセス許可を追加する方法の詳細については、「AWS Amazon SageMaker AI の マネージドポリシー」を参照してください。
-
モデルを作成します。
推論に SageMaker AI ホスティングサービスを使用する場合は、SageMaker AI でモデルを作成する必要があります。次のコード例は、SageMaker AI 内でspaCyNERモデルを作成する方法を示しています。
from time import gmtime, strftime

model_name = 'spacy-nermodel-' + strftime("%Y-%m-%d-%H-%M-%S", gmtime())
# MODEL S3 URL containing model atrifacts as either model.tar.gz or extracted artifacts.
# Here we are not
#model_url = 's3://{}/spacy/'.format(s3_bucket)

container = '{}.dkr.ecr.{}.amazonaws.com/sm-pretrained-spacy:latest'.format(account_id, region)
instance_type = 'ml.c5d.18xlarge'

print('Model name: ' + model_name)
#print('Model data Url: ' + model_url)
print('Container image: ' + container)

container = {
'Image': container
}

create_model_response = sm_client.create_model(
    ModelName = model_name,
    ExecutionRoleArn = role,
    Containers = [container])

print("Model Arn: " + create_model_response['ModelArn'])
前のコード例は、ステップ 5 のコメントから Amazon S3 バケットを使用する場合に、
s3_bucketを使用してmodel_urlを定義する方法を示し、コンテナイメージの ECR URI を定義します。前のコード例では、ml.c5d.18xlargeをインスタンスタイプとして定義しています。また、別のインスタンスタイプを選択することもできます。使用可能なインスタンスタイプの詳しい情報については、「Amazon EC2 インスタンスタイプ」をご参照ください。 前のコード例では、
Imageキーはコンテナイメージ URI を指します。create_model_response定義はcreate_model methodを使用してモデルを作成し、モデル名、ロール、コンテナ情報を含むリストを返します。前のスクリプトからの出力例を次に示します。
Model name: spacy-nermodel-YYYY-MM-DD-HH-MM-SS Model data Url: s3://spacy-sagemaker-us-east-1-bucket/spacy/ Container image: 123456789012.dkr.ecr.us-east-2.amazonaws.com/sm-pretrained-spacy:latest Model Arn: arn:aws:sagemaker:us-east-2:123456789012:model/spacy-nermodel-YYYY-MM-DD-HH-MM-SS -
-
エンドポイントの設定と作成
推論に SageMaker AI ホスティングを使用するには、エンドポイントも設定して作成する必要があります。SageMaker AI はこのエンドポイントを推論に使用します。次の設定例は、以前に定義したインスタンスタイプとモデル名を使用してエンドポイントを生成および設定する方法を示しています。
endpoint_config_name = 'spacy-ner-config' + strftime("%Y-%m-%d-%H-%M-%S", gmtime())
print('Endpoint config name: ' + endpoint_config_name)

create_endpoint_config_response = sm_client.create_endpoint_config(
    EndpointConfigName = endpoint_config_name,
    ProductionVariants=[{
        'InstanceType': instance_type,
        'InitialInstanceCount': 1,
        'InitialVariantWeight': 1,
        'ModelName': model_name,
        'VariantName': 'AllTraffic'}])

print("Endpoint config Arn: " + create_endpoint_config_response['EndpointConfigArn'])
前の設定例では、
create_endpoint_config_responseはmodel_nameを、タイムスタンプで作成されたendpoint_config_nameという一意のエンドポイント設定名に関連付けます。前のスクリプトからの出力例を次に示します。
Endpoint config name: spacy-ner-configYYYY-MM-DD-HH-MM-SS Endpoint config Arn: arn:aws:sagemaker:us-east-2:123456789012:endpoint-config/spacy-ner-config-MM-DD-HH-MM-SSエンドポイントエラーの詳細については、「エンドポイントを作成または更新するときに Amazon SageMaker AI エンドポイントが失敗状態になるのはなぜですか?」を参照してください。
-
エンドポイントを作成し、エンドポイントが稼働するのを待ちます。
次のコード例では、前の設定例の設定を使用してエンドポイントを作成し、モデルをデプロイします。
%%time

import time

endpoint_name = 'spacy-ner-endpoint' + strftime("%Y-%m-%d-%H-%M-%S", gmtime())
print('Endpoint name: ' + endpoint_name)

create_endpoint_response = sm_client.create_endpoint(
    EndpointName=endpoint_name,
    EndpointConfigName=endpoint_config_name)
print('Endpoint Arn: ' + create_endpoint_response['EndpointArn'])

resp = sm_client.describe_endpoint(EndpointName=endpoint_name)
status = resp['EndpointStatus']
print("Endpoint Status: " + status)

print('Waiting for {} endpoint to be in service...'.format(endpoint_name))
waiter = sm_client.get_waiter('endpoint_in_service')
waiter.wait(EndpointName=endpoint_name)
前のコード例では、
create_endpointメソッドは前のコード例で作成した生成されたエンドポイント名を使用してエンドポイントを作成し、エンドポイントの Amazon リソースネームを出力します。describe_endpointメソッドは、エンドポイントとそのステータスに関する情報を返します。SageMaker AI ウェーターは、エンドポイントが稼働するのを待ちます。
-
-
エンドポイントをテストします。
エンドポイントが稼働したら、エンドポイントに呼び出しリクエスト
を送信します。次のコード例は、エンドポイントにテストリクエストを送信する方法を示しています。 import json content_type = "application/json" request_body = {"input": "This is a test with NER in America with \ Amazon and Microsoft in Seattle, writing random stuff."} #Serialize data for endpoint #data = json.loads(json.dumps(request_body)) payload = json.dumps(request_body) #Endpoint invocation response = runtime_sm_client.invoke_endpoint( EndpointName=endpoint_name, ContentType=content_type, Body=payload) #Parse results result = json.loads(response['Body'].read().decode())['output'] result前のコード例では、メソッド
json.dumpsはrequest_bodyを JSON でフォーマットされた文字列にシリアル化し、可変ペイロードに保存します。次に、SageMaker AI Runtime クライアントは、エンドポイントの呼び出しメソッドを使用して、エンドポイントにペイロードを送信します。結果には、出力フィールドを抽出した後のエンドポイントからのレスポンスが含まれます。 前のコード例では、次の出力が返されます。
[['NER', 'ORG'], ['America', 'GPE'], ['Amazon', 'ORG'], ['Microsoft', 'ORG'], ['Seattle', 'GPE']] -
エンドポイントの削除
呼び出しが完了したら、エンドポイントを削除してリソースを節約します。次のコード例は、エンドポイントを削除する方法を示しています。
sm_client.delete_endpoint(EndpointName=endpoint_name) sm_client.delete_endpoint_config(EndpointConfigName=endpoint_config_name) sm_client.delete_model(ModelName=model_name)この例のコードを含む完全なノートブックについては、BYOC-Single-Model
を参照してください。
