Connect to a Lightsail for Research virtual computer using Secure Shell
You can connect to a virtual computer in Amazon Lightsail for Research using the Secure Shell Protocol (SSH). You can use SSH to manage your virtual computer remotely so that you can sign in to your computer over the internet and run commands.
Note
You can also establish a remote display protocol connection to your virtual computer using the browser-based Amazon DCV client. Amazon DCV is available in the Lightsail for Research console. For more information, see Access your Lightsail for Research virtual computer's operating system.
Complete the prerequisites
Complete the following prerequisites before you get started.
-
Create a virtual computer in Lightsail for Research. For more information, see Create a Lightsail for Research virtual computer.
-
Make sure the virtual computer that you want to connect to is in a running state. Also, note the name of the virtual computer and the AWS Region in which it was created. You'll need this information later in this process. For more information, see View Lightsail for Research virtual computer details.
-
Make sure that port 22 is open on the virtual computer that you want to connect to. That is the default port used for SSH. It's open by default. But if you closed it, you must reopen it before continuing. For more information, see Manage firewall ports for Lightsail for Research virtual computers.
-
Get the Lightsail default key pair (DKP) for your virtual computer. For more information, see Get a key pair for a virtual computer.
Tip
If you plan to use AWS CloudShell to connect to your virtual computer, see Connect to a virtual computer using AWS CloudShell in the next section. For more information, see What is AWS CloudShell. Otherwise, continue to the next prerequisite.
-
Download and install the AWS Command Line Interface (AWS CLI). For more information, see Installing or updating the latest version of the AWS CLI in the AWS Command Line Interface User Guide for Version 2.
-
Configure the AWS CLI to access your AWS account. For more information, see Configuration basics in the AWS Command Line Interface User Guide for Version 2.
-
Download and install jq. It's a lightweight and flexible command line JSON processor used in the following procedures to extract key pair details. For more information about downloading and installing jq, see Download jq
on the jq website.
Connect to a virtual computer using SSH
Complete one of the following procedures to establish an SSH connection to your virtual computer in Lightsail for Research.
This procedure applies if you prefer minimal setup to connect to your virtual computer. AWS CloudShell uses a browser-based, pre-authenticated shell that you can launch directly from the AWS Management Console. You can run AWS CLI commands using your preferred shell, such as Bash, PowerShell, or Z shell. You can do this without downloading or installing command line tools. For more information, see Getting started with AWS CloudShell in the AWS CloudShell User Guide.
Important
Before you start, make sure to get the Lightsail default key pair (DKP) for the virtual computer that you're connecting to. For more information, see Get a key pair for a Lightsail for Research virtual computer.
-
From the Lightsail for Research console
, launch CloudShell by choosing one of the following options: -
In the Search box, type "CloudShell", and then choose CloudShell.
-
On the navigation bar, choose the CloudShell icon.
-
Choose CloudShell on the Console Toolbar in the lower left of the console.

When the command prompt displays, the shell is ready for interaction.

-
-
Choose a pre-installed shell to work with. To change the default shell, enter one of the following program names at the command line prompt. Bash is the default shell that's running when you launch AWS CloudShell.
-
To connect to a virtual computer from the CloudShell terminal window, see Connect to a virtual computer using SSH on a Linux, Unix, or a macOS local computer.
For information about the pre-installed software in the CloudShell environment, see AWS CloudShell compute environment in the AWS CloudShell User Guide.
This procedure applies if your local computer uses a Windows operating
system. This procedure uses the get-instance AWS CLI command to
obtain the username and public IP address of the instance you want to
connect to. For more information, see get-instance in the AWS CLI Command
Reference.
Important
Make sure you get the Lightsail default key pair (DKP) for the
virtual computer you're trying to connect to before you start this
procedure. For more information, see Get a key pair for a Lightsail for Research virtual computer. That procedure outputs the private
key of the Lightsail DKP to a dkp_rsa file that is used
in one of the following commands.
-
Open a Command Prompt window.
-
Enter the following command to display the public IP address and username of your virtual computer. In the command, replace
region-codeus-east-2. Replacecomputer-nameaws lightsail get-instance --regionregion-code--instance-namecomputer-name| jq -r ".instance.username" & aws lightsail get-instance --regionregion-code--instance-namecomputer-name| jq -r ".instance.publicIpAddress"Example
aws lightsail get-instance --regionus-east-2--instance-nameMyJupyterComputer| jq -r ".instance.username" & aws lightsail get-instance --regionus-east-2--instance-nameMyJupyterComputer| jq -r ".instance.publicIpAddress"The response will display the username and public IP address of the virtual computer as shown in the following example. Note these values, because you need them in the following step of this procedure.

-
Enter the following command to establish an SSH connection with your virtual computer. In the command, replace
user-namepublic-ip-addressssh -i dkp_rsauser-name@public-ip-addressExample
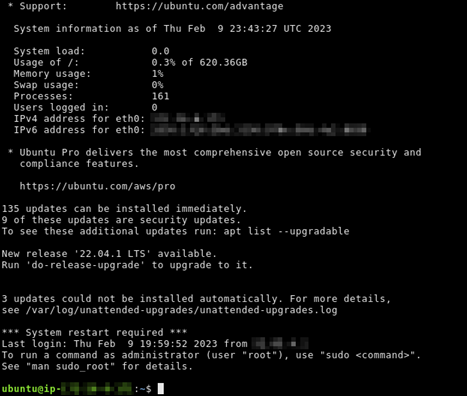
ssh -i dkp_rsaubuntu@192.0.2.0You should see a response similar to the following example, which shows an SSH connection established with an Ubuntu virtual computer in Lightsail for Research.

Now that you've successfully established an SSH connection to your virtual computer, continue to the next section for additional next steps.
This procedure applies if your local computer uses a Linux, Unix, or a
macOS operating system. This procedure uses the get-instance
AWS CLI command to obtain the username and public IP address of the instance
you want to connect to. For more information, see get-instance in the AWS CLI Command
Reference.
Important
Make sure you get the Lightsail default key pair (DKP) for the
virtual computer you're trying to connect to before you start this
procedure. For more information, see Get a key pair for a Lightsail for Research virtual computer. That procedure outputs the private
key of the Lightsail DKP to a dkp_rsa file that is used
in one of the following commands.
-
Open a Terminal window.
-
Enter the following command to display the public IP address and username of your virtual computer. In the command, replace
region-codeus-east-2. Replacecomputer-nameaws lightsail get-instance --regionregion-code--instance-namecomputer-name| jq -r '.instance.username' && aws lightsail get-instance --regionregion-code--instance-namecomputer-name| jq -r '.instance.publicIpAddress'Example
aws lightsail get-instance --regionus-east-2--instance-nameMyJupyterComputer| jq -r '.instance.username' && aws lightsail get-instance --regionus-east-2--instance-nameMyJupyterComputer| jq -r '.instance.publicIpAddress'The response will display the username and public IP address of the virtual computer as shown in the following example. Note these values, because you need them in the following step of this procedure.

-
Enter the following command to establish an SSH connection with your virtual computer. In the command, replace
user-namepublic-ip-addressssh -i dkp_rsauser-name@public-ip-addressExample
ssh -i dkp_rsaubuntu@192.0.2.0You should see a response similar to the following example, which shows an SSH connection established with an Ubuntu virtual computer in Lightsail for Research.
Now that you've successfully established an SSH connection to your virtual computer, continue to the next section for additional next steps.
Continue to the next steps
You can complete the following additional next steps after you've successfully established an SSH connection to your virtual computer:
-
Connect to your virtual computer using SCP to securely transfer files. For more information, see Transfer files to Lightsail for Research virtual computers using Secure Copy.
