Migrate DNS records in bulk to an Amazon Route 53 private hosted zone
Ram Kandaswamy, Amazon Web Services
Summary
Network engineers and cloud administrators need an efficient and simple way to add Domain Name System (DNS) records to private hosted zones in Amazon Route 53. Using a manual approach to copy entries from a Microsoft Excel worksheet to appropriate locations in the Route 53 console is tedious and error prone. This pattern describes an automated approach that reduces the time and effort required to add multiple records. It also provides a repeatable set of steps for multiple hosted zone creation.
This pattern uses Amazon Simple Storage Service (Amazon S3) to store records. To work with data efficiently, the pattern uses the JSON format because of its simplicity and its ability to support a Python dictionary (dict data type).
Note
If you can generate a zone file from your system, consider using the Route 53 import feature instead.
Prerequisites and limitations
Prerequisites
An Excel worksheet that contains private hosted zone records
Familiarity with different types of DNS records such as A record, Name Authority Pointer (NAPTR) record, and SRV record (see Supported DNS record types)
Familiarity with the Python language and its libraries
Limitations
The pattern doesn’t provide extensive coverage for all use case scenarios. For example, the change_resource_record_sets
call doesn’t use all the available properties of the API. In the Excel worksheet, the value in each row is assumed to be unique. Multiple values for each fully qualified domain name (FQDN) are expected to appear in the same row. If that is not true, you should modify the code provided in this pattern to perform the necessary concatenation.
The pattern uses the AWS SDK for Python (Boto3) to call the Route 53 service directly. You can enhance the code to use an AWS CloudFormation wrapper for the
create_stackandupdate_stackcommands, and use the JSON values to populate template resources.
Architecture
Technology stack
Route 53 private hosted zones for routing traffic
Amazon S3 for storing the output JSON file
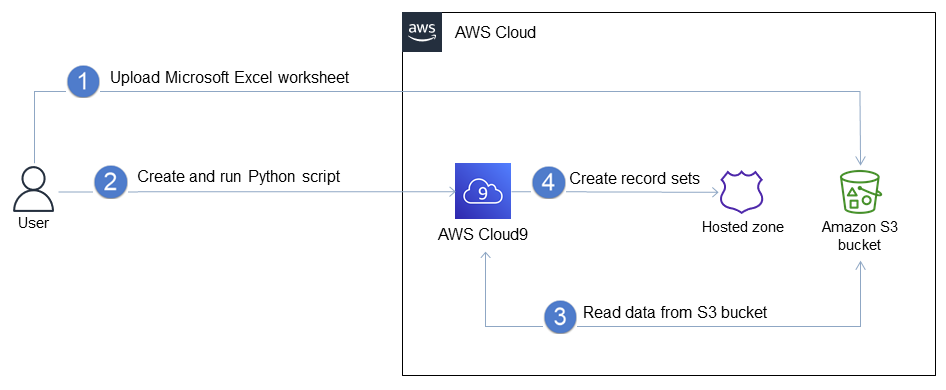
The workflow consists of these steps, as illustrated in the previous diagram and discussed in the Epics section:
Upload an Excel worksheet that has the record set information to an S3 bucket.
Create and run a Python script that converts the Excel data to JSON format.
Read the records from the S3 bucket and clean the data.
Create record sets in your private hosted zone.
Tools
Route 53 – Amazon Route 53 is a highly available and scalable DNS web service that handles domain registration, DNS routing, and health checking.
Amazon S3 – Amazon Simple Storage Service (Amazon S3) is an object storage service. You can use Amazon S3 to store and retrieve any amount of data at any time, from anywhere on the web.
Epics
| Task | Description | Skills required | ||||||||
|---|---|---|---|---|---|---|---|---|---|---|
Create an Excel file for your records. | Use the records you exported from your current system to create an Excel worksheet that has the required columns for a record, such as fully qualified domain name (FQDN), record type, Time to Live (TTL), and value. For NAPTR and SRV records, the value is a combination of multiple properties, so use Excel's
| Data engineer, Excel skills | ||||||||
Verify the working environment. | In your IDE, create a Python file to convert the Excel input worksheet to JSON format. (Instead of an IDE, you can also use an Amazon SageMaker notebook to work with Python code.) Verify that the Python version you’re using is version 3.7 or later.
Install the pandas package.
| General AWS | ||||||||
Convert the Excel worksheet data to JSON. | Create a Python file that contains the following code to convert from Excel to JSON.
where | Data engineer, Python skills | ||||||||
Upload the JSON file to an S3 bucket. | Upload the | App developer |
| Task | Description | Skills required |
|---|---|---|
Create a private hosted zone. | Use the create_hosted_zone
You can also use an infrastructure as code (IaC) tool such as AWS CloudFormation to replace these steps with a template that creates a stack with the appropriate resources and properties. | Cloud architect, Network administrator, Python skills |
Retrieve details as a dictionary from Amazon S3. | Use the following code to read from the S3 bucket and to get the JSON values as a Python dictionary.
where | App developer, Python skills |
Clean data values for spaces and Unicode characters. | As a safety measure to ensure the correctness of data, use the following code to perform a strip operation on the values in
| App developer, Python skills |
Insert records. | Use the following code as part of the previous
Where | App developer, Python skills |
Related resources
References
Creating records by importing a zone file (Amazon Route 53 documentation)
create_hosted_zone method
(Boto3 documentation) change_resource_record_sets method
(Boto3 documentation)
Tutorials and videos
The Python Tutorial
(Python documentation) DNS design using Amazon Route 53
(YouTube video, AWS Online Tech Talks)
