Classifying images
This tutorial shows you how to create the project and datasets for a model that classifies objects, scenes, and concepts found in an image. The model classifies the entire image. For example, by following this tutorial, you can train a model to recognize household locations such as a living room or kitchen. The tutorial also shows you how to use the model to analyze images.
Before starting the tutorial, we recommend that you read Understanding Amazon Rekognition Custom Labels.
In this tutorial, you create the training and test datasets by uploading images from your local computer. Later you assign image-level labels to the images in your training and test datasets.
The model you create classifies images as belonging to the set of image-level labels that
you assign to the training dataset images. For example, if the set of image-level labels in
your training dataset is kitchen, living_room, patio,
and backyard, the model can potentially find all of those image-level labels in
a single image.
Note
You can create models for different purposes such as finding the location of objects on an image. For more information, see Decide your model type.
Step 1: Collect your images
You need two sets of images. One set to add to your training dataset. Another set to add to your test dataset. The images should represent the objects, scenes, and concepts that you want your model to classify. The images must be in PNG or JPEG format. For more information, see Preparing images.
You should have at least 10 images for your training dataset and 10 images for your test dataset.
If you don't yet have images, use the images from the Rooms example classification project. After creating the project, the training and test images are at the following Amazon S3 bucket locations:
Training images —
s3://custom-labels-console-region-numbers/assets/rooms_version number_test_dataset/Test images —
s3://custom-labels-console-region-numbers/assets/rooms_version number_test_dataset/
region is the AWS Region in which you are using the Amazon Rekognition Custom Labels
console. numbers is a value that the console assigns to the bucket name.
Version number is the version number for the example project, starting
at 1.
The following procedure stores images from the Rooms project into local folders on your computer named training and test.
To download the Rooms example project image files
Create the Rooms project. For more information, see Step 1: Choose an example project.
Open the command prompt and enter the following command to download the training images.
aws s3 cp s3://custom-labels-console-region-numbers/assets/rooms_version number_training_dataset/ training --recursiveAt the commend prompt, enter the following command to download the test images.
aws s3 cp s3://custom-labels-console-region-numbers/assets/rooms_version number_test_dataset/ test --recursiveMove two of the images from the training folder to a separate folder of your choosing. You'll use the images to try your trained model in Step 9: Analyze an image with your model.
Step 2: Decide your classes
Make a list of the classes that you want your model to find.
For example, if you're training a model to recognize rooms in a house, you can classify the following image as living_room.

Each class maps to an image-level label. Later you assign image-level labels to the images in your training and test datasets.
If you're using the images from the Rooms example project, the image-level labels are backyard, bathroom, bedroom, closet, entry_way, floor_plan, front_yard, kitchen, living_space, and patio.
Step 3: Create a project
To manage your datasets and models you create a project. Each project should address a single use case, such as recognizing rooms in a house.
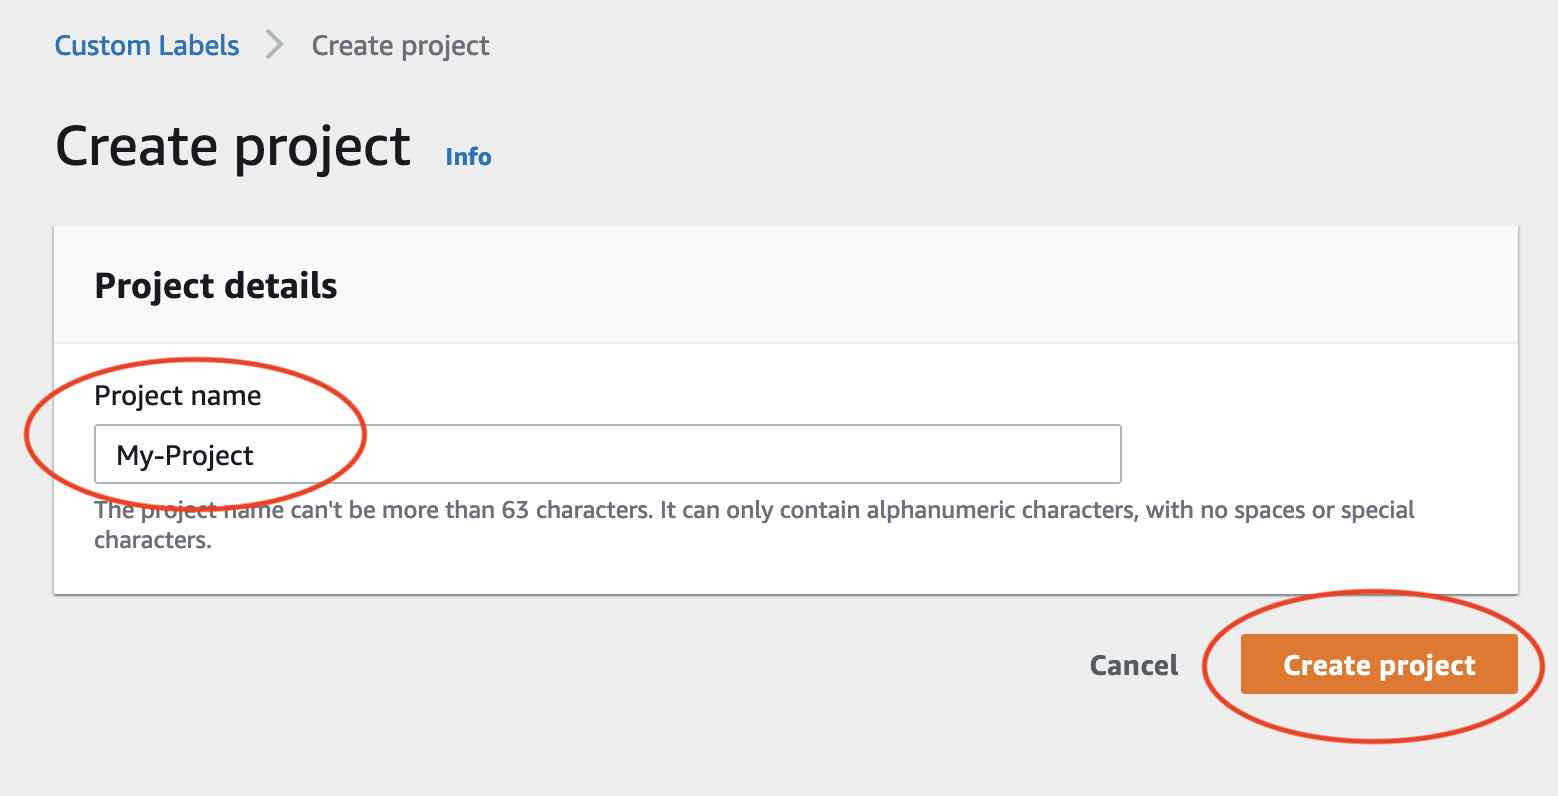
To create a project (console)
If you haven't already, set up the Amazon Rekognition Custom Labels console. For more information, see Setting up Amazon Rekognition Custom Labels.
Sign in to the AWS Management Console and open the Amazon Rekognition console at https://console.aws.amazon.com/rekognition/
. In the left pane, choose Use Custom Labels. The Amazon Rekognition Custom Labels landing page is shown.
The Amazon Rekognition Custom Labels landing page, choose Get started
In the left navigation pane, choose Projects.
On the projects page, choose Create Project.
In Project name, enter a name for your project.
Choose Create project to create your project.
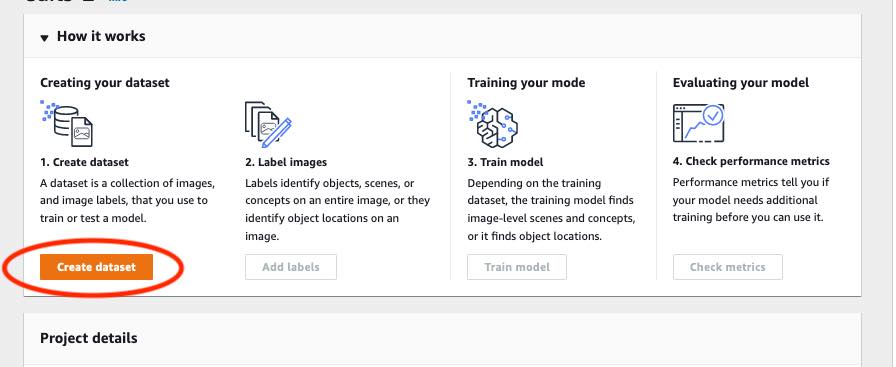
Step 4: Create training and test datasets
In this step you create a training dataset and a test dataset by uploading images from your local computer. You can upload as many as 30 images at a time. If you have a lot of images to upload, consider creating the datasets by importing the images from an Amazon S3 bucket. For more information, see Importing images from an Amazon S3 bucket.
For more information about datasets, see Managing datasets.
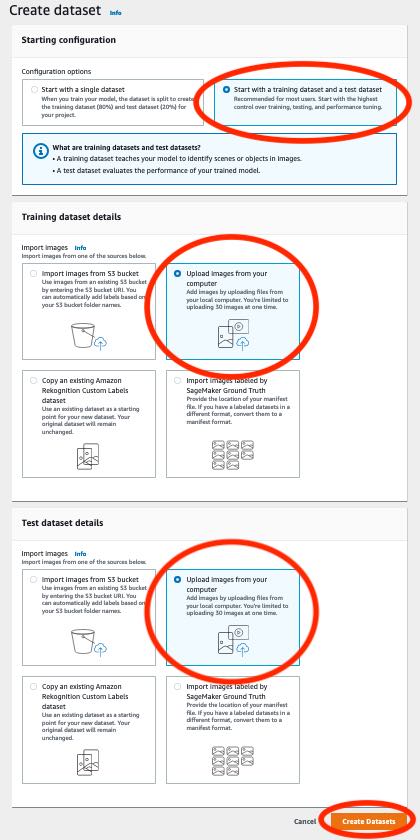
To create a dataset using images on a local computer (console)
-
On the project details page, choose Create dataset.
-
In the Starting configuration section, choose Start with a training dataset and a test dataset.
In the Training dataset details section, choose Upload images from your computer.
-
In the Test dataset details section, choose Upload images from your computer.
Choose Create datasets.
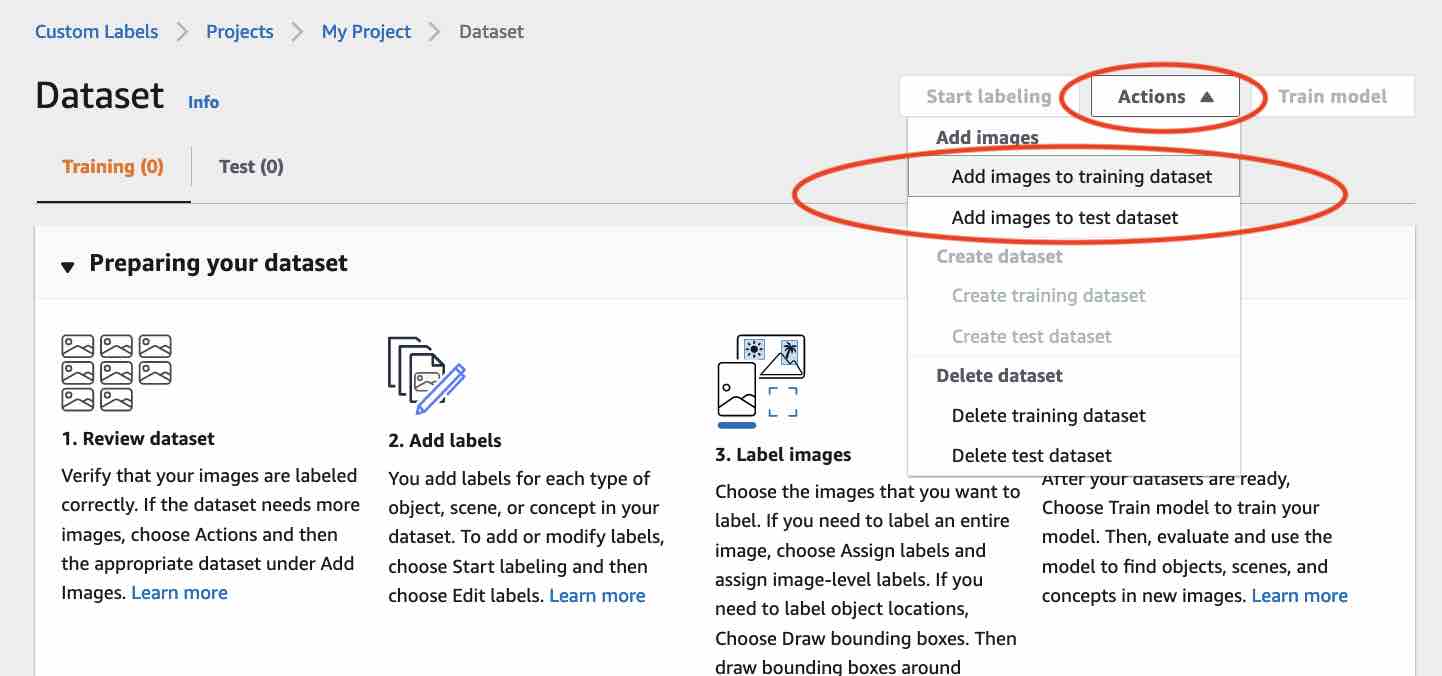
A dataset page appears with a Training tab and a Test tab for the respective datasets.
On the dataset page, choose the Training tab.
Choose Actions and then choose Add images to training dataset.
In the Add images to training dataset dialog box, choose Choose files.
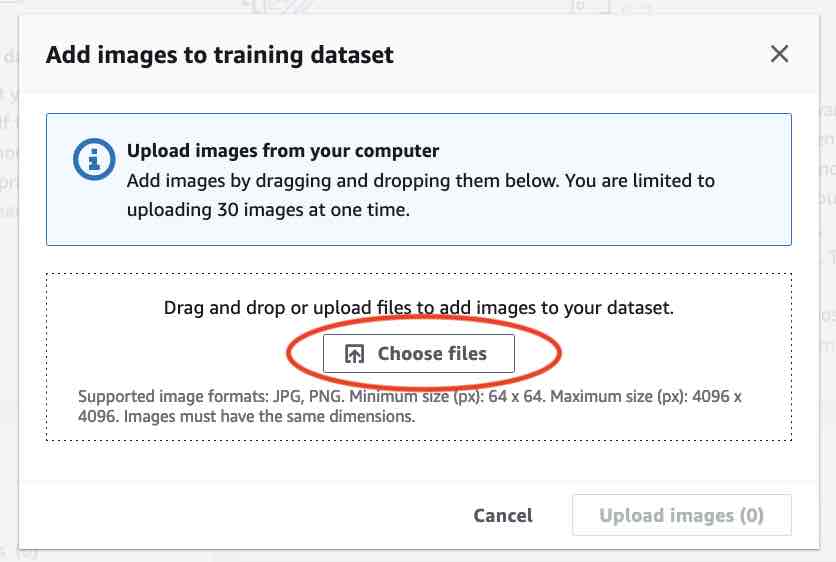
Choose the images you want to upload to the dataset. You can upload as many as 30 images at a time.
Choose Upload images. It might take a few seconds for Amazon Rekognition Custom Labels to add the images to the dataset.
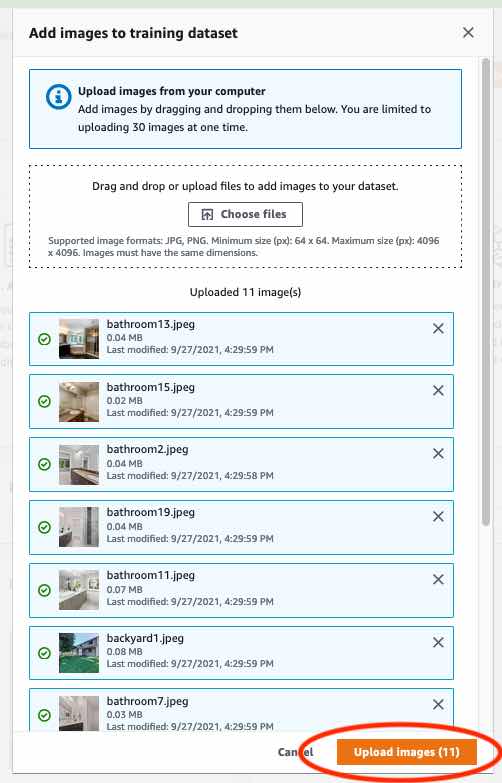
If you have more images to add to the training dataset, repeat steps 9-12.
Choose the Test tab.
-
Repeat steps 8 - 12 to add images to the test dataset. For step 8, choose Actions and then choose Add images to test dataset.
Step 5: Add labels to the project
In this step you add a label to the project for each of the classes you identified in step Step 2: Decide your classes.
To add a new label (console)
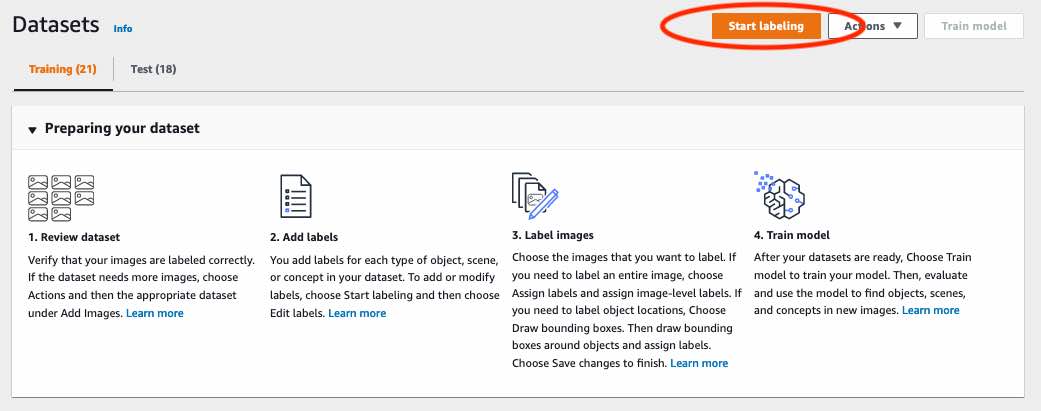
On the dataset gallery page, choose Start labeling to enter labeling mode.
In the Labels section of the dataset gallery, choose Edit labels to open the Manage labels dialog box.
In the edit box, enter a new label name.
Choose Add label.
Repeat steps 3 and 4 until you have created all the labels you need.
Choose Save to save the labels that you added.
Step 6: Assign image-level labels to training and test datasets
In this step you assign a single image level to each image in your training and test datasets. The image-level label is the class that each image represents.
To assign image-level labels to an image (console)
On the Datasets page, choose the Training tab.
Choose Start labeling to enter labeling mode.
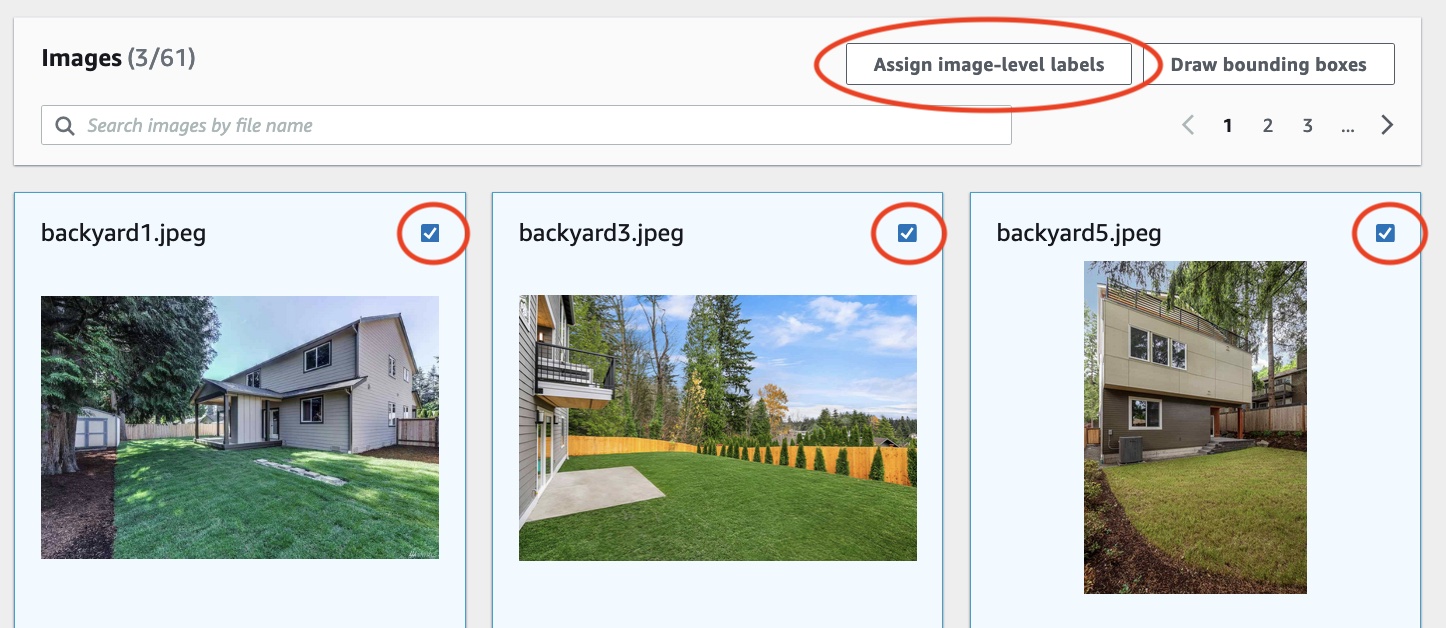
Select one or more images that you want to add labels to. You can only select images on a single page at a time. To select a contiguous range of images on a page:
Select the first image.
Press and hold the shift key.
Select the second image. The images between the first and second image are also selected.
Release the shift key.
Choose Assign image-level labels.
In Assign image-level labels to selected images dialog box, select a label that you want to assign to the image or images.
Choose Assign to assign label to the image.

Repeat labeling until every image is annotated with the required labels.
Choose the Test tab.
Repeat steps to assign image level labels to the test dataset images.
Step 7: Train your model
Use the following steps to train your model. For more information, see Training an Amazon Rekognition Custom Labels model.
To train your model (console)
On the Dataset page, choose Train model.

On the Train model page, choose Train model. The Amazon Resource Name (ARN) for your project is in the Choose project edit box.

In the Do you want to train your model? dialog box, choose Train model.

In the Models section of the project page, you can see that training is in progress. You can check the current status by viewing the
Model
                        Status
column for the model version. Training a model takes a while to complete.
After training completes, choose the model name. Training is finished when the model status is TRAINING_COMPLETED.
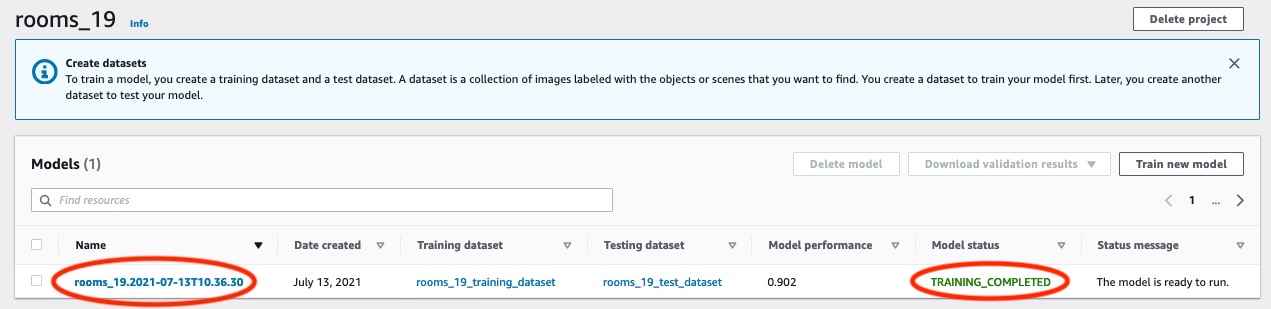
Choose the Evaluate button to see the evaluation results. For information about evaluating a model, see Improving a trained Amazon Rekognition Custom Labels model.
Choose View test results to see the results for individual test images. For more information, see Metrics for evaluating your model.

After viewing the test results, choose the model name to return to the model page.

Step 8: Start your model
In this step you start your model. After your model starts, you can use it to analyze images.
You are charged for the amount of time that your model runs. Stop your model if you don't need to analyze images. You can restart your model at a later time. For more information, see Running a trained Amazon Rekognition Custom Labels model.
To start your model
Choose the Use model tab on the model page.
In the Start or stop model section do the following:
Choose Start.

In the Start model dialog box, choose Start.
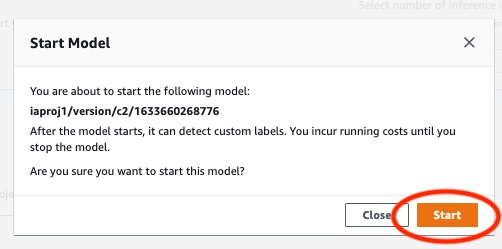
Wait until the model is running. The model is running when the status in the Start or stop model section is Running.

Step 9: Analyze an image with your model
You analyze an image by calling the DetectCustomLabels API. In this step, you use the
detect-custom-labels AWS Command Line Interface (AWS CLI) command to analyze an example
image. You get the AWS CLI command from the Amazon Rekognition Custom Labels console. The console configures
the AWS CLI command to use your model. You only need to supply an image that's stored in
an Amazon S3 bucket.
Note
The console also provides Python example code.
The output from detect-custom-labels includes a list of labels found in
the image, bounding boxes (if the model finds object locations), and the confidence that
the model has in the accuracy of the predictions.
For more information, see Analyzing an image with a trained model.
To analyze an image (console)
-
If you haven't already, set up the AWS CLI. For instructions, see Step 4: Set up the AWS CLI and AWS SDKs.
-
Choose the Use Model tab and then choose API code.

Choose AWS CLI command.
-
In the Analyze image section, copy the AWS CLI command that calls
detect-custom-labels.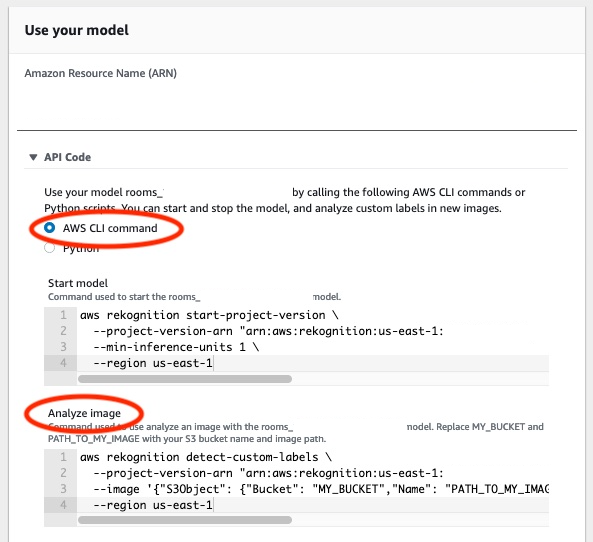
-
Upload an image to an Amazon S3 bucket. For instructions, see Uploading Objects into Amazon S3 in the Amazon Simple Storage Service User Guide. If you're using images from the Rooms project, use one of the images you moved to a separate folder in Step 1: Collect your images.
-
At the command prompt, enter the AWS CLI command that you copied in the previous step. It should look like the following example.
The value of
--project-version-arnshould be Amazon Resource Name (ARN) of your model. The value of--regionshould be the AWS Region in which you created the model.Change
MY_BUCKETandPATH_TO_MY_IMAGEto the Amazon S3 bucket and image that you used in the previous step.If you are using the custom-labels-access profile to get credentials, add the
--profile custom-labels-accessparameter.aws rekognition detect-custom-labels \ --project-version-arn "model_arn" \ --image '{"S3Object": {"Bucket": "MY_BUCKET","Name": "PATH_TO_MY_IMAGE"}}' \ --regionus-east-1\ --profile custom-labels-accessThe JSON output from the AWS CLI command should look similar to the following.
Nameis the name of the image-level label that the model found.Confidence(0-100) is the model's confidence in the accuracy of the prediction.{ "CustomLabels": [ { "Name": "living_space", "Confidence": 83.41299819946289 } ] } -
Continue to use the model to analyze other images. Stop the model if you are no longer using it.
Step 10: Stop your model
In this step you stop running your model. You are charged for the amount of time your model is running. If you have finished using the model, you should stop it.
To stop your model
-
In the Start or stop model section choose Stop.

-
In the Stop model dialog box, enter stop to confirm that you want to stop the model.

-
Choose Stop to stop your model. The model has stopped when the status in the Start or stop model section is Stopped.

