Learn how to get started with Step Functions
With the Step Functions service, you can orchestrate complex application workflows. To get started, you'll use Workflow Studio to create and run a built-in Hello World workflow. You'll review the auto-generated Amazon States Language (ASL) definition in code. Finally, you'll drag-and-drop a service integration to do sentiment analysis.
After you complete this tutorial, you'll know how to use Workflow Studio to create, configure, run, and update a workflow using both the Design and Code modes.
Estimated duration: 20-30 minutes
What you will build
Your first state machine will start with flow states. Flow states are used to direct and control your workflow. After you learn how to run the workflow, you will add an Action to integrate the Amazon Comprehend service with a Task state.
The following diagram shows a visual of the complete state machine that you will build. When you first create the Hello World state machine, it will not need additional resources to run. The Step Functions console will create all the states and an IAM role in a single click. Later, when you add the service integration, you will need to create a role with a custom permission policy.

Step 1 - Create your state machine
In Step Functions, workflows are called state machines. We'll use both terms interchangeably. Your workflows will contain states that either take action or control the flow of your state machines.
-
Go to the Step Functions console.
-
In the Step Functions console, choose "Step Functions" from the upper left navigation, or the breadcrumbs, then choose Get started:

-
From the options, choose Run Hello World:

Tip
We recommend stepping through the short in-console walk through to become familiar with the UI.
Overview of Workflow Studio
With Workflow Studio for Step Functions, you can visually drag-and-drop states onto a canvas to build workflows.
You can add and edit states, configure steps, transform results, and set up error handling. The following screenshot shows four important areas of the interface that you will use to build your state machines.
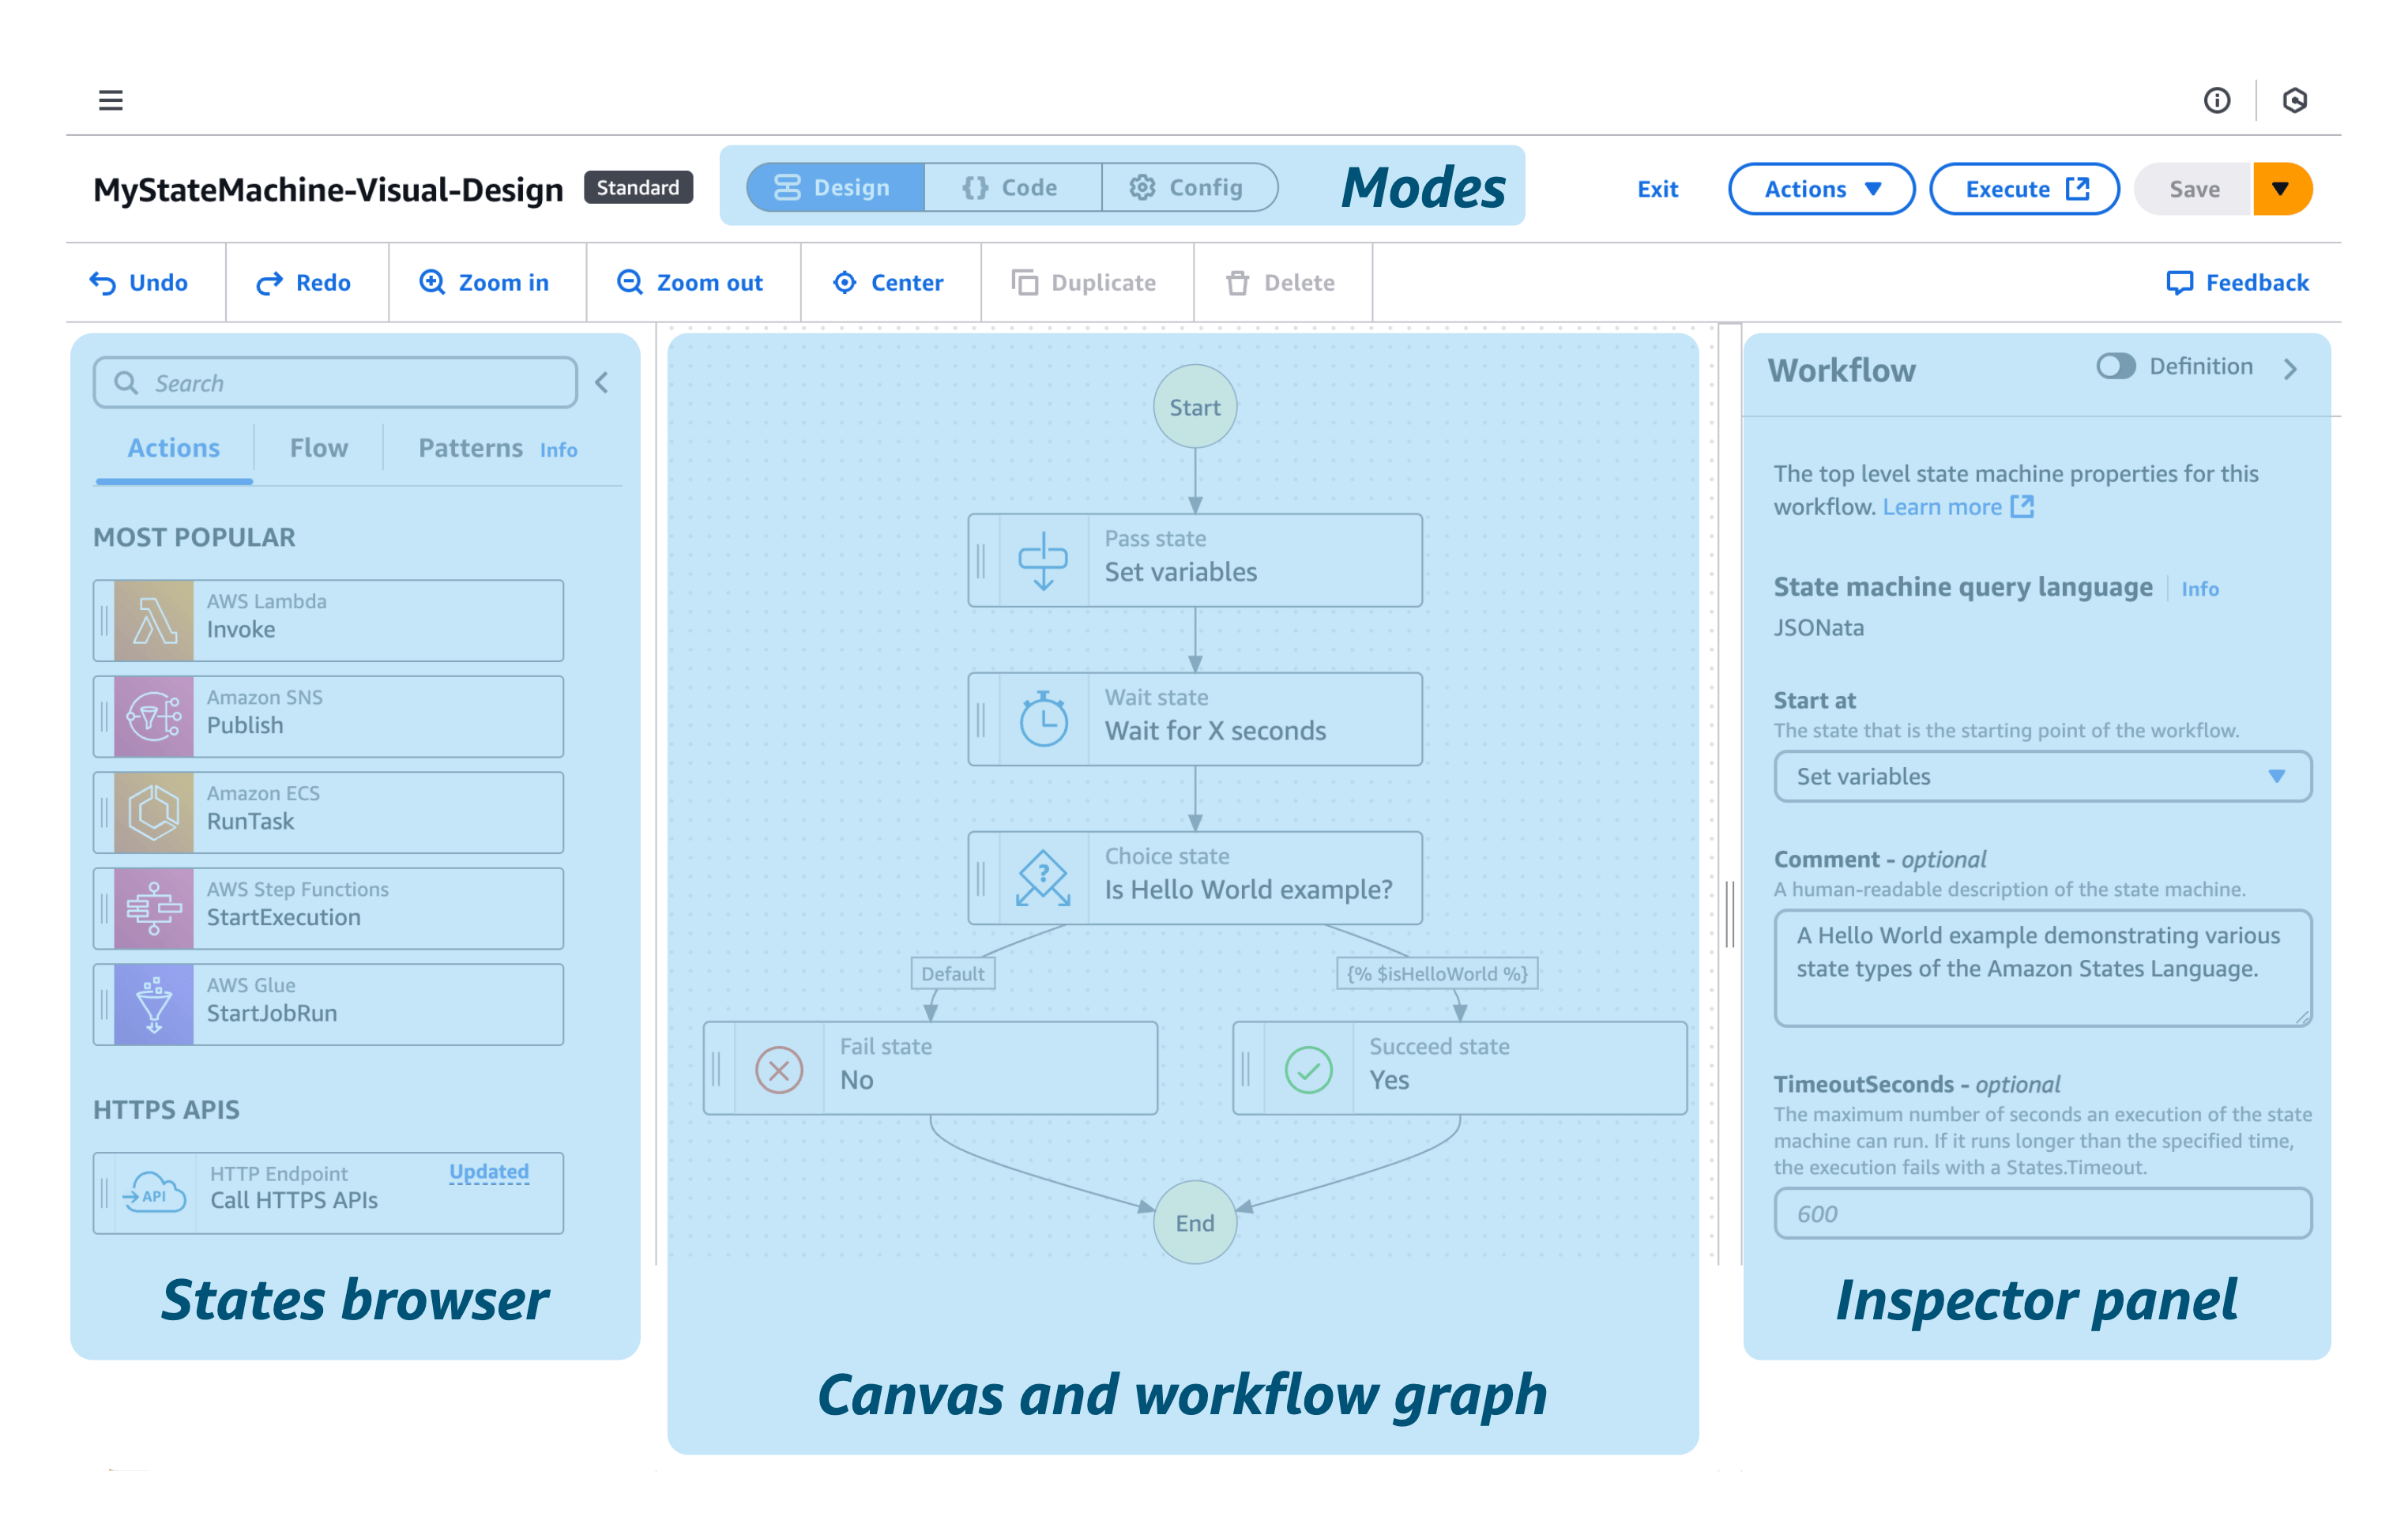
Modes - Workflow Studio provides three modes of operation and defaults to the visual design mode.
-
Design - a visual editing mode, where you can drag-and-drop states into your workflow.
-
Code - a mode that focuses on the Amazon States Language code, also known as ASL code. You can edit ASL code directly and see changes reflected in the visual design.
-
Config - configuration options including the name and type of the state machine (Standard or Express), assigned role when the workflow runs, logging, tracing, versioning, encryption, and tags.
States browser contains the following three tabs:
-
Actions - a list of AWS APIs that you can drag-and-drop into your workflow. Each action represents a Task workflow state.
-
Flow - flow states to control the order of steps in your workflow.
-
Patterns - ready-to-use, reusable building blocks, such as iteratively processing data in an Amazon S3 bucket.
Canvas and workflow graph is where you drag-and-drop states on to your workflow graph, change the order of states, and select states to configure and test.
Inspector panel is where you view and edit the properties of any state selected on the canvas. You can turn on the Definition toggle to show the code for the currently selected state.
Overview of the state machine
The Hello World workflow starts with a Pass state which passes its input to its output, without performing work. Pass states can be used to generate static JSON output or transform JSON input before passing the data to the next state. Pass states are useful when constructing and debugging state machines.
The next state, a Choice state, uses the data in IsHelloWorldExample to choose the next branch of the workflow. If the first rule matches, the workflow pauses in a Wait state, then runs two tasks in a Parallel state, before moving on to a checkpoint and the successful end of the workflow. When there is no match, the workflow defaults to the Fail state before stopping the state machine.
Wait states can be useful when you want to delay before performing more work. Perhaps your workflow will wait 30 seconds after an order entry, so your customer has time to notice and fix an incorrect shipping address.
Parallel states can run multiple processes on your data. Perhaps the workflow will print an order ticket, update inventory, and increase a daily sales report simultaneously.

View the workflow code (ASL)
Your first state machine is in fact quite detailed, so explore further by reviewing the code.
State machines are defined using Amazon States Language (ASL)
To view the entire state machine definition
-
Choose the { } Code button to view the ASL code.
-
View the code on the left and compare with the state machine graph on the right.
-
Select some states on the canvas to review. For example, pick the Choice state.

Did you notice how the state's definition is highlighted in the code view?
To view code in the Inspector
-
Switch back to Design mode.
-
Expand the Inspector panel on the right.
-
Select the Choice state from the workflow graph on the Canvas.
-
In the Inspector panel, choose the Definition toggle.
Try choosing other states. See how the ASL code for each state you select is scrolled into view and highlighted?
(Actually) Create the state machine
Warning: name your state machine now!
You cannot rename a state machine after you create it. Choose a name before you save your state machine.
Until now, you've been working on a draft of your state machine. No resources have been created yet.
To rename and create your state machine
-
Choose Config mode.
-
For state machine name, enter
MyFirstStateMachine -
For permissions, accept the default to Create a new role.
-
Choose the Create button to actually create your state machine.
You should see notifications that your state machine and a new IAM role have been created.
You will be automatically presented with the option to start the state machine. You'll do that in the next step!
Workflow creation achieved!
Step Functions created your workflow and IAM role. Now, you are ready to start your state machine.
Step 2 - Start your state machine
After your state machine has been created, you can start your workflow running.
Workflows optionally take Input that can be used in the state, sent to integrated services, and passed to the next state.
The Hello World state machine is self-contained and does not need input.

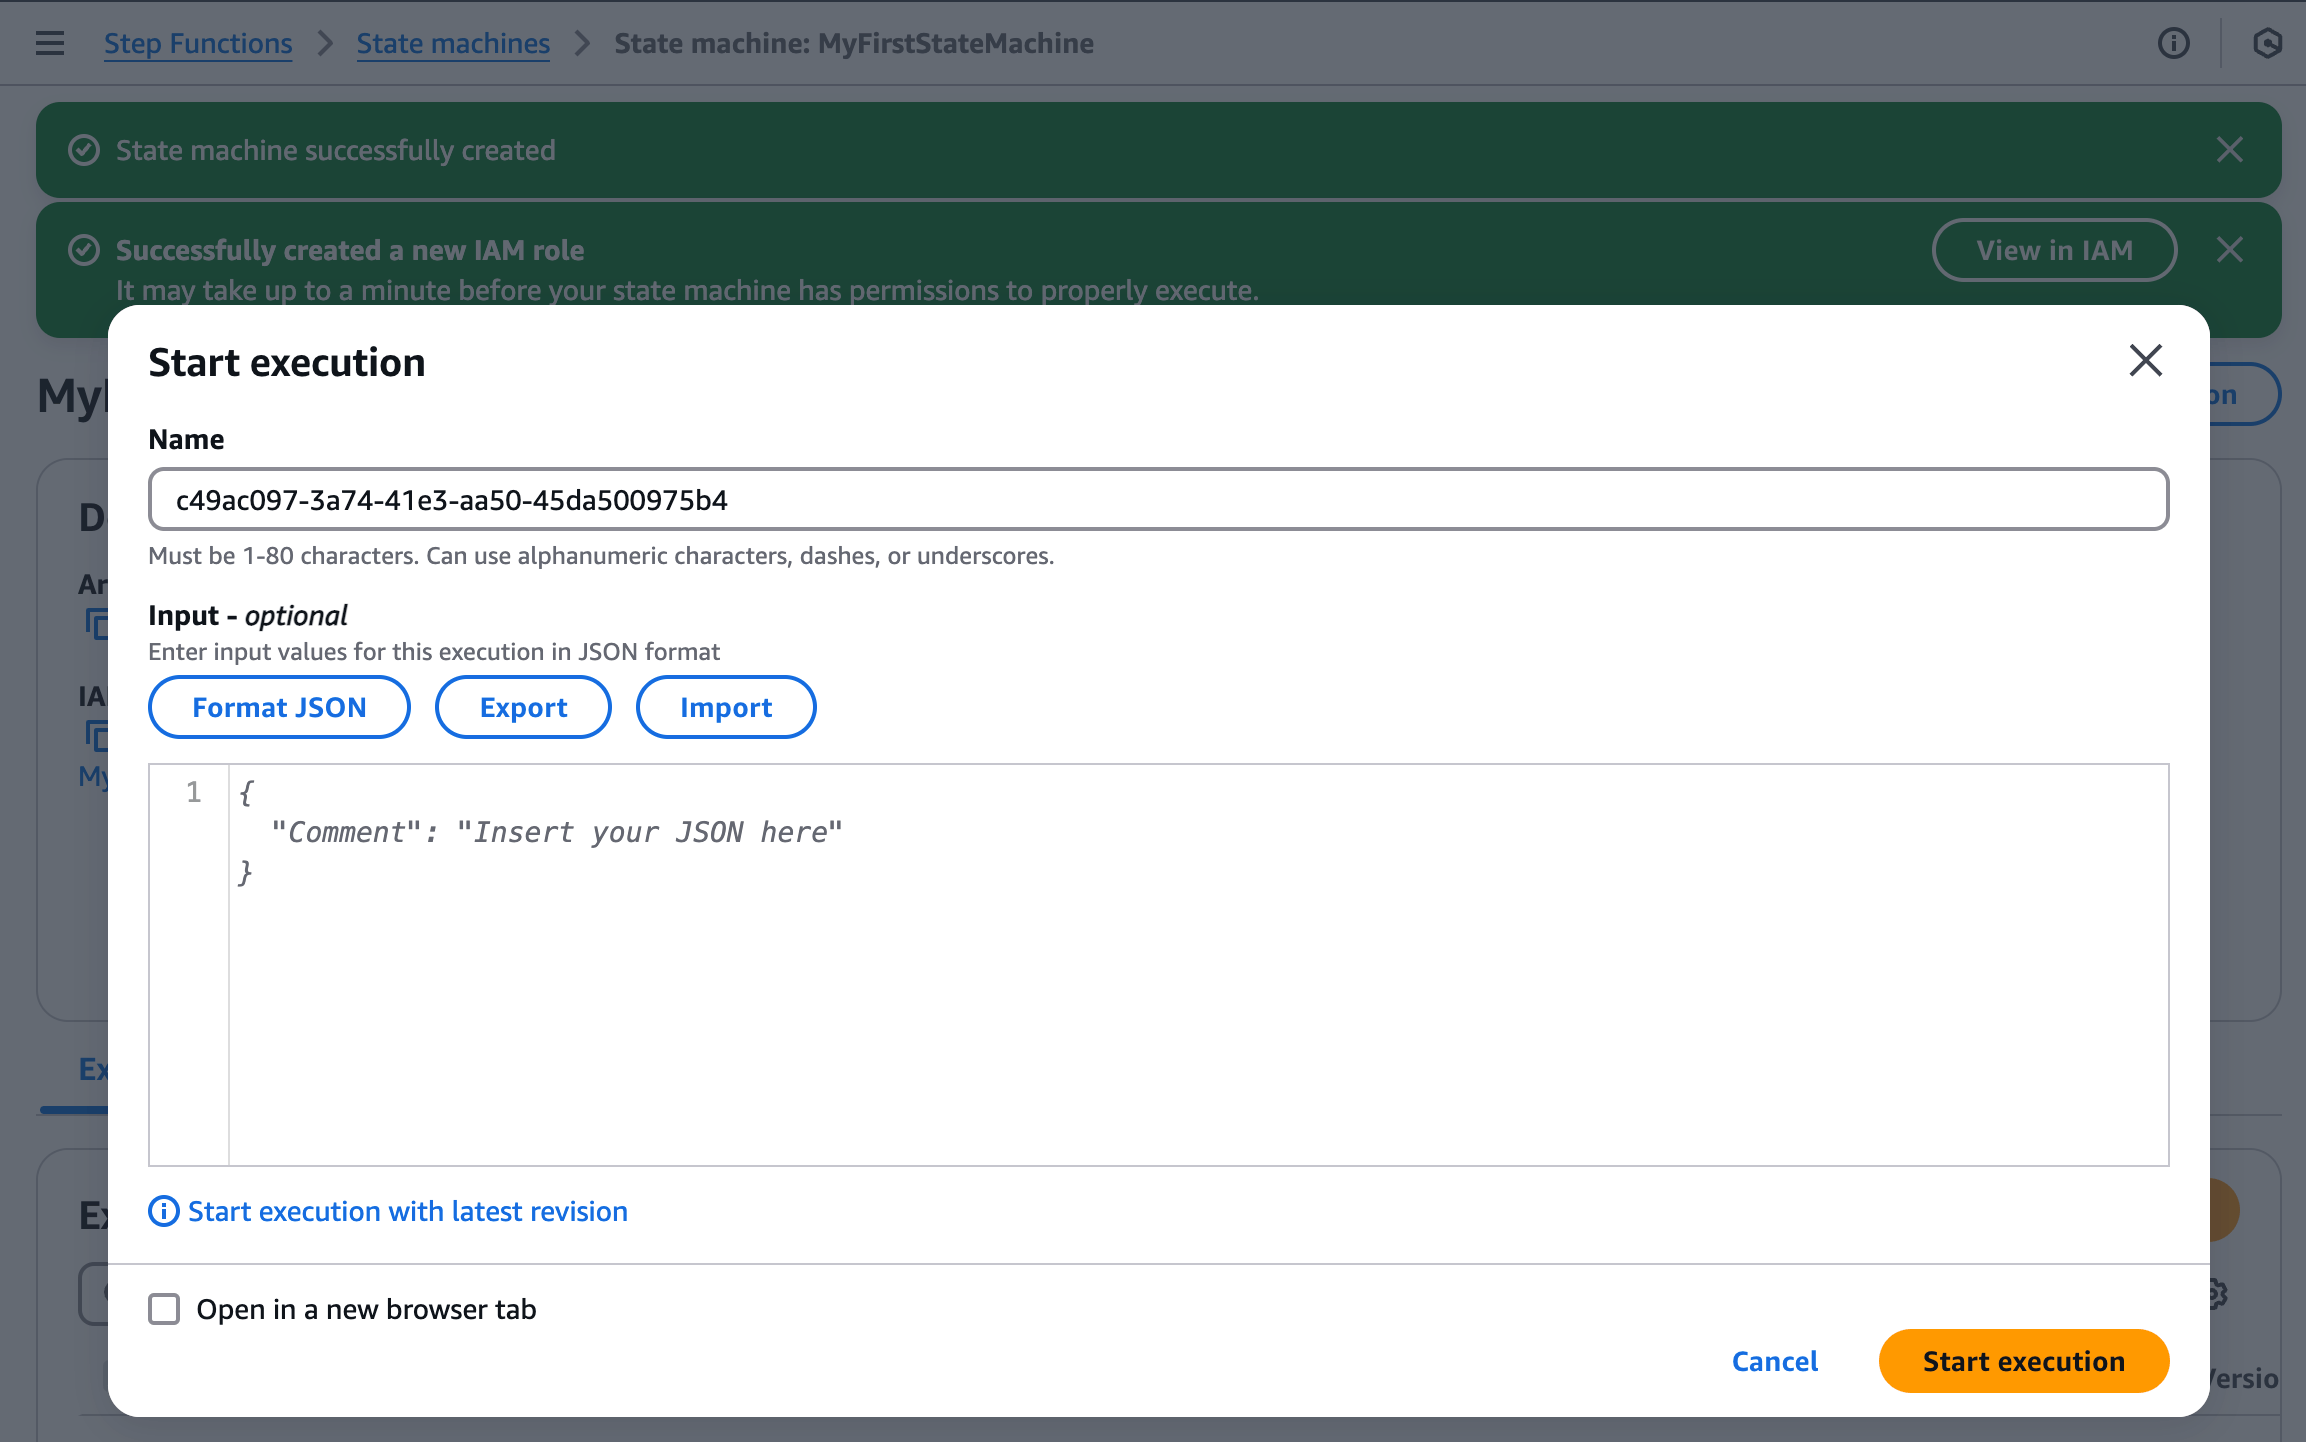
To start the state machine
-
Enter
hello001for the name of the execution. -
Leave the input field empty.
-
Choose the Start execution button.

Review the execution details
Immediately after starting, you should see the first two states have succeeded.
After a short wait, the rest of the state transitions will run to complete the workflow.
Are you wondering how the Choice state (Is Hello World Example?) decided to branch to the Wait for X Seconds state?
-
Hint: the first step in the state machine contains the data needed for the branch decision
-
In the Graph View, you can monitor progress during execution and explore details for each state.
-
Select the first Pass state (named Set Variables and State Output), then review the Input/Output tab.
You should see that State input is blank, but State output contains JSON that sets the value of IsHelloWorldExample to true.

Switch from the Graph view to the Table view to see a list of states by name, type, and status.

Tip
Take note of the Duration and Timeline fields in the previous screenshot. At a glance, you can see which states take more time than others.
There are two more views to explore on this Executions Details page: Event view and State view.
The Event view is a detailed granular view of the flow from state to state.
Expand the first PassStateEntered and PassStateExited events in the Event View table to see how the state takes no input, assigns a variable called CheckpointCount the value of zero, and produces the output you saw previously.

Lastly, you have the State view which is similar to the Table view. In the State view table, you can selectively expand states to see just the Inputs and Outputs for each state:

Congratulations! You've run your first Step Functions state machine!
Using a Pass state to add static data into a workflow is a common pattern, especially for troubleshooting.
In the next step, you'll update the workflow so you can dynamically set your state machine input.
Step 3 - Process external input
Setting the value of IsHelloWorldExample to a constant value inside the workflow is not realistic. You should expect your state machine to respond to varying input data.
In this step, we'll show you how external JSON data can be used as input to your workflow:

Remove the hard-coded input
First, replace the hard-coded value in the Output of the first Pass state.
-
Edit your Hello World state machine by selecting the Edit state machine button located at the top right of the page.
-
Select the first Pass state after Start (named Set Variables and State Output), then select the Output tab.
-
Replace the Output with following JSON:
{ "IsHelloWorldExample": "{% $states.input.hello_world %}", "ExecutionWaitTimeInSeconds": "{% $states.input.wait %}" } -
Save the state machine.
The updated state output will pull input data from the reserved $states variable using a JSONata expression. Those values will be passed to the next state as output to become the input for the next state.
Run the updated workflow, with input data
Next, run the workflow and provide external input data as JSON.
-
Choose the Execute button to run the workflow.
-
For the Name, use the randomly generated ID.
-
Use the following JSON for the input field:
{ "wait" : 20, "hello_world": true } -
Choose the Start execution button.
Your state machine execution should wait a lot longer (20 seconds), but eventually it should succeed using the input you provided.
In the Graph view, review the Input/Output for the first Pass State. Notice how the input you provided was converted into outputs. Also, take a look at the Execution input and output at the top of the execution details page. Both locations show the input that you used to start the execution.
Tip
What do you expect if you run a new execution with hello_world set to false? Try it!
Review workflow executions
Now that you've run your workflow a few times, review the execution details to review runs of your workflow.
To review execution details
-
Choose State machines from the navigation breadcrumbs or left-hand menu.
-
Choose your state machine.
In the Executions tab, you should see a list of executions, similar to the following screenshot:

One final note: workflow execution names must be unique and cannot be reused. Although we suggested a short name (hello001) in this tutorial, we recommend using a naming convention that will always be unique for your production workloads.
Tip
Congratulations! You've modified your workflow to process external input that can vary every time you run your workflow.
Step 4 - Integrate a service
Step Functions state machines can call over 220 AWS services using AWS SDK integrations. AWS services provide over 10,000 potential API actions for your state machines.
In this step, you will integrate an Amazon Comprehend task for sentiment analysis to process your state machine input.
Service integrations use one of three service integration patterns:
-
Request a Response (default) - wait for HTTP response, then immediately proceed to the next state.
-
Run a Job (.sync) - wait for a job to complete before moving to the next step.
-
Wait for Callback (.waitForTaskToken) - pause a workflow until a task token is returned by an external process.

For your first integration, you will use the Request Response (default) integration pattern.
How do integrations work?
A Task state represents a single unit of work performed by a state machine. All work in your state machine is done by tasks.
A task typically performs work by passing input to the API actions of other services which then perform their own work. You can specify how a Task performs, using a number of fields including: Credentials, Retry, Catch, TimeoutSeconds, and more. You can learn more about Tasks in Task workflow state.
To use AWS SDK integrations, you specify the service name and API to call. Some integrations also require parameters.
You can use Amazon States Language to specify an AWS API action in the Resource field of a task state. You may optionally add a service integration type to the service name.
To specify an API action, you will use the following resource name template:
arn:aws:states:::aws-sdk:serviceName:apiAction.[serviceIntegrationPattern]Parameter name case
Note that API actions will be camelCase (lowercase initial), but ParameterNames will be Pascal case (Uppercase initial).
Examples of resource names
-
arn:aws:states:::aws-sdk:ec2:describeInstanceswill return the results from calling the Amazon EC2 describeInstances API. -
arn:aws:states:::aws-sdk:s3:listBucketswill return the results from calling the Amazon S3 listBuckets API. -
arn:aws:states:::aws-sdk:sfn:startExecutionwill start a nested Step Functions state machine execution and return the results of that workflow.
When Step Functions calls another service using the Task state, the default pattern is Request Response. With the Request Response integration pattern, Step Functions calls a service, receives a response, and immediately proceeds to the next state.

Step 4.1 - Add sentiment analysis state
-
Edit your MyFirstStateMachine state machine.
-
From the Actions panel in the States browser, search for
DetectSentiment. -
Drag & drop Comprehend DetectSentiment onto the Default branch of the Choice state.
-
Select and delete the Fail state.
-
From the Flow tab in the States browser, drag the Success state after DetectSentiment.
Step 4.2 - Configure the sentiment analysis state
-
Select the Comprehend step to configure it in the Inspector panel.
-
Select the Arguments & Output tab, then replace the Arguments with the following JSON:
{ "LanguageCode": "en", "Text": "{% %}" } -
Place your cursor between the percent signs:
{% %}and type:$ -
Use auto-complete in the editor to choose
states,then type
.and choosecontext,then type
.and chooseExecution,then type
.and chooseInput,finally, type
.feedback_commentto retrieve initial input from the Context Object.
After choosing those auto-complete options, you should have the following JSON for your states Arguments:
{
    "LanguageCode": "en",
    "Text": "{% $states.context.Execution.Input.feedback_comment %}"
}
Using editor auto-complete
With editor auto-complete, you can explore your options.
Auto-complete will list your variables, the reserved $states variable which contains the context object, and available functions with their definitions!
Step 4.3 - Configure an identity policy
Before you can run the workflow, you need to create a role and policy to allow the state machine to perform API calls to the external service.
To create an IAM role for Step Functions
-
Go to the IAM console in a new tab and select Roles.
-
Choose Create a new role.
-
For Trusted entity type choose
AWS Service. -
For Use case choose
Step Functions. -
For Add permissions choose Next to accept the default policy. You will add a policy for Comprehend after creating the role.
-
For Name, enter
HelloWorldWorkflowRole. -
Choose Create role.
To add a policy to the HelloWorldWorkflowRole for Amazon Comprehend
-
Select and edit the HelloWorldWorkflowRole role.
-
Choose Add permission then Create inline policy.
-
Select Comprehend for the service.
-
In Read choose DetectSentiment, then Next
-
For Policy name enter
DetectSentimentPolicy, then Create policy.
If you review the policy, you'll see it allows all resources to take the Action "comprehend:DetectSentiment".
To attach the IAM role to the Step Functions state machine
-
Return to editing your state machine and select the Config tab.
-
From the Execution role dropdown, choose
HelloWorldWorkflowRole. -
Save your state machine.
Step 4.4 - Run your state machine
Start executing your state machine with the following JSON for input:
{
    "hello_world": false,
    "wait": 42,
    "feedback_comment" : "This getting started with Step Functions workshop is a challenge!"
}
Without the correct policy, you will receive a permissions error, similar to the following:
User: arn:aws:sts::account-id:assumed-role/StepFunctions-MyStateMachine-role is not authorized
to perform: comprehend:DetectSentiment because no identity-based policy allows the comprehend:DetectSentiment
action (Service: Comprehend, Status Code: 400, Request ID: a1b2c3d4-5678-90ab-cdef-EXAMPLE11111)
The previous error message is telling you that your state machine is not authorized to use the external service. Go back a step and make sure you have configured an identity policy.
Practice what you've learned!
Before you dive into more complex workflows, practice what you've learned with the following tasks:
-
Review the DetectSentiment step. Take a look at the input/output in the various views to see the results of sentiment detection.
-
Find the duration of the DetectSentiment state in the table view.
-
Change the comment in the JSON input, then re-run your state machine.
To learn more about sentiment analysis results, see Amazon Comprehend - Sentiment.
One way to think about Request Response integration is the response generally represents only an acknowledgement of the request. However, in some integrations, such as sentiment analysis, the acknowledgement actually represents completion of the task.
The key learning is the Task state does not wait for the underlying job in Request Response integrations. To wait for a response, you'll need to explore the Run a Job (.sync) service integration pattern.
Congratulations!
You created your first state machine and integrated a sentiment analysis task using the Request Response pattern.
We value your feedback!
If you found this getting started tutorial helpful, or you have suggestions to improve the tutorial, let us know by using the feedback options on this page.
Clean up resources
Take the following steps to clean up the resources you created:
-
Navigate to the Step Functions
page in the AWS Console. -
Select State machines from the navigation pane on the left.
-
Choose the MyFirstStateMachine
-
To delete the IAM roles
1 - Follow the link for the IAM role to go to the IAM role page in a new tab. Delete the custom related role.
2 - In IAM Roles, search for the auto-generated role containing
MyFirstStateMachine. Delete the auto-generated role. -
Return to your Step Functions console tab and select the Actions drop down, then select Delete to delete the state machine.
Your state machine and related role should now be deleted successfully.
