Creating change requests
Change Manager availability change
AWS Systems Manager Change Manager will no longer be open to new customers starting November 7, 2025. If you would like to use Change Manager, sign up prior to that date. Existing customers can continue to use the service as normal. For more information, see AWS Systems Manager Change Manager availability change.
When you create a change request in Change Manager, a tool in AWS Systems Manager, the change template you select typically does the following:
-
Designates approvers for the change request or specifies how many approvals are required
-
Specifies the Amazon Simple Notification Service (Amazon SNS) topic to use to notify approvers about your change request
-
Specifies an Amazon CloudWatch alarm to monitor the runbook workflow for the change request
-
Identifies which Automation runbooks you can choose from to make the requested change
In some cases, a change template might be configured so you specify your own Automation runbook to use, and to specify who should review and approve the request.
Important
If you use Change Manager across an organization, we recommend always making changes from the delegated administrator account. Although you can make changes from other accounts in the organization, those changes won't be reported in or viewable from the delegated administrator account.
Topics
About change request approvals
Depending on the requirements specified in a change template, change requests that you create from it can require approvals from up to five levels before the runbook workflow for the request can occur. For each of those levels, the template creator could specify up to five potential approvers. An approver isn't limited to a single user. An approver in this sense can also be an IAM group or IAM role. For IAM groups and IAM roles, one or more users belonging to the group or role can provide approvals toward receiving the total number of approvals required for a change request. Template creators can also specify more approvers than the change template requires.
Original approval workflows and updated and/or approvals
Using change templates created before January 23, 2023, an approval must be received from each specified approver for the change request to be approved at that level. For example, in the approval level setup shown in the following image, four approvers are specified. Specified approvers include two users (John Stiles and Ana Carolina Silva), a user group that contains three members (GroupOfThree), and a user role that represents ten users (RoleOfTen).
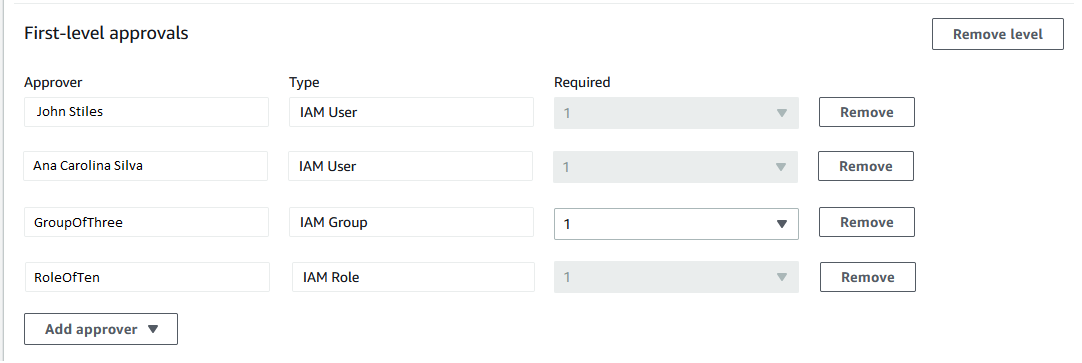
For the change request to be approved at this level, it must be approved
by John Stiles, Ana Carolina Silva, one member of the
GroupOfThree group, and one member of the
RoleOfTen role.
Using change templates created on or after January 23, 2023, for each approval level, template creators can specify an overall total number of required approvals. Those approvals can come from any combination of users, groups, and roles that have been specified as approvers. A change template could require only one approval for a level but specify, for example, two individual users, two groups, and one role as potential approvers.
For example, in the approval level area shown in the following image,
three approvals are required. The template-specified approvers include two
users (John Stiles and Ana Carolina Silva), a user group that contains three
members (GroupOfThree), and a user role that represents ten
users (RoleOfTen).
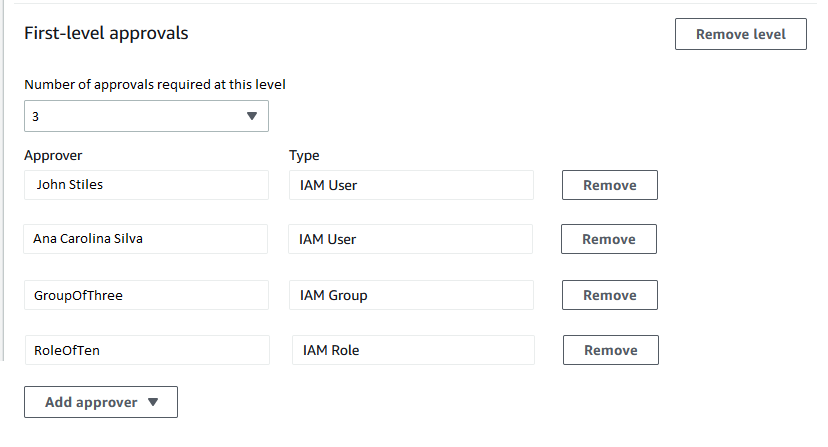
If all three users in the GroupOfThree group approve your
change request, it is approved for that level. It's not necessary to
receive an approval from each user, group, or role. The minimum number of
approvals can come from any combination of potential approvers.
When your change request is created, notifications are sent to subscribers of the Amazon SNS topic that has been specified for approval notifications at that level. The change template creator might have specified the notification topic that must be used or allowed you to specify one.
After the minimum number of required approvals is received at one level, notifications are sent to approvers that are subscribed to the Amazon SNS topic for the next level, and so on.
No matter how many approval levels and approvers are specified, only one rejection to a change request is required to prevent the runbook workflow for that request from occurring.
Creating change requests (console)
The following procedure describes how to create a change request by using the Systems Manager console.
To create a change request (console)
Open the AWS Systems Manager console at https://console.aws.amazon.com/systems-manager/
. In the navigation pane, choose Change Manager.
-
Choose Create request.
-
Search for and select a change template that you want to use for this change request.
-
Choose Next.
-
For Name, enter a name for the change request that makes its purpose easy to identify, such as
UpdateEC2LinuxAMI-us-east-2. -
For Runbook, select the runbook you want to use to make your requested change.
Note
If the option to select a runbook isn't available, the change template author has specified which runbook must be used.
-
For Change request information, use Markdown to provide additional information about the change request to help reviewers decide whether to approve or reject the change request. The author of the template you're using might have provided instructions or questions for you to answer.
Note
Markdown is a markup language that allows you to add wiki-style descriptions to documents and individual steps within the document. For more information about using Markdown, see Using Markdown in AWS.
-
In the Workflow start time section, choose one of the following:
-
Run the operation at a scheduled time – For Requested start time, enter the date and time you propose for running the runbook workflow for this request. For Estimated end time, enter the date and time that you expect the runbook workflow to complete. (This time is an estimate only that you're providing for reviewers.)
Tip
Choose View Change Calendar to check for any blocking events for the time you specify.
-
Run the operation as soon as possible after approval – If the change request is approved, the runbook workflow runs as soon as there is a non-restricted period when changes can be made.
-
-
In the Change request approvals section, do the following:
-
If Approval type options are presented, choose one of the following:
-
Automatic approval – The change template you selected is configured to allow change requests to run automatically without review by any approvers. Continue to Step 11.
Note
The permissions specified in the IAM policies that govern your use of Systems Manager must not restrict you from submitting auto-approval change requests in order for them to run automatically.
-
Specify approvers – You must add one or more users, groups, or IAM roles to review and approve this change request.
Note
You can choose to specify reviewers even if the permissions specified in the IAM policies that govern your use of Systems Manager allow you to run auto-approval change requests.
-
-
Choose Add approver, and then select one or more users, groups, or AWS Identity and Access Management (IAM) roles from the lists of available reviewers.
Note
One or more approvers might already be specified. This means that mandatory approvers are already specified in the change template you have selected. These approvers can't be removed from the request. If the Add approver button isn't available, the template you have chosen doesn't allow additional reviewers to be added to requests.
For more information about approvals for change requests, see About change request approvals.
-
Under SNS topic to notify approvers, choose one of the following to specify the Amazon SNS topic in your account to use for sending notifications to the approvers you are adding to this change request.
Note
If the option to specify an Amazon SNS topic isn't available, the change template you selected already specifies the Amazon SNS topic to use.
-
Enter an SNS Amazon Resource Name (ARN) – For Topic ARN, enter the ARN of an existing Amazon SNS topic. This topic can be in any of your organization's accounts.
-
Select an existing SNS topic – For Target notification topic, select the ARN of an existing Amazon SNS topic in your current account. (This option isn't available if you haven't yet created any Amazon SNS topics in your current AWS account and AWS Region.)
Note
The Amazon SNS topic you select must be configured to specify the notifications it sends and the subscribers they're sent to. Its access policy must also grant permissions to Systems Manager so Change Manager can send notifications. For information, see Configuring Amazon SNS topics for Change Manager notifications.
-
-
Choose Add notification.
-
-
Choose Next.
-
For IAM role, select an IAM role in your current account that has the permissions needed to run the runbooks that are specified for this change request.
This role is also referred to as the service role, or assume role, for Automation. For more information about this role, see Setting up Automation.
-
In the Deployment location section, choose one of the following:
Note
If you're using Change Manager with a single AWS account only and not with an organization set up in AWS Organizations, you don't need to specify a deployment location.
-
Apply change to this account – The runbook workflow runs in the current account only. For an organization, this means the delegated administrator account.
-
Apply change to multiple organizational units (OUs) – Do the following:
-
For Accounts and organizational units (OUs), enter the ID of a member account in your organization, in the format
123456789012, or the ID of an organizational unit, in the formato-o96EXAMPLE. -
(Optional) For Execution role name, enter the name of the IAM role in the target account or OU that has the permissions needed to run the runbooks that are specified for this change request. All accounts in any OU you specify should use the same name for this role.
-
(Optional) Choose Add another target location for each additional account or OU you want to specify and repeat steps a and b.
-
For Target AWS Region, select the Region to make the change in, such as
Ohio (us-east-2)for the US East (Ohio) Region. -
Expand Rate control.
For Concurrency, enter a number, then from the list select whether this represents the number or percentage of accounts the runbook workflow can run in at the same time.
For Error threshold, enter a number, then from the list select whether this represents the number or percentage of accounts where runbook workflow can fail before the operation is stopped.
-
-
-
In the Deployment targets section, do the following:
-
Choose one of the following:
-
Single resource – The change is to be made for just one resource. For example, a single node or a single Amazon Machine Image (AMI), depending on the operation defined in the runbooks for this change request.
-
Multiple resources – For Parameter, select from the available parameters from the runbooks for this change request. This selection reflects the type of resource being updated.
For example, if the runbook for this change request is
AWS-RetartEC2Instance, you might chooseInstanceId, and then define which instances are updated by selecting from the following:-
Specify tags – Enter a key-value pair that all resources to be updated are tagged with.
-
Choose a resource group – Choose the name of the resource group that all resources to be updated belong to.
-
Specify parameter values – Identify the resources to update in the Runbook parameters section.
-
Target all instances – Make the change on all managed nodes in the target locations.
-
-
-
If you chose Multiple resources, expand Rate control.
For Concurrency, enter a number, then from the list select whether this represents the number or percentage of targets the runbook workflow can update at the same time.
For Error threshold, enter a number, then from the list select whether this represents the number or percentage of targets where the update can fail before the operation is stopped.
-
-
If you chose Specify parameter values to update multiple resources in the previous step: In the Runbook parameters section, specify values for the required input parameters. The parameter values you must supply are based on the contents of the Automation runbooks associated with the change template you chose.
For example, if the change template uses the
AWS-RetartEC2Instancerunbook, then you must enter one or more instance IDs for the InstanceId parameter. Alternatively, choose Show interactive instance picker and select available instances one by one. -
Choose Next.
-
In the Review and submit page, double-check the resources and options you have specified for this change request.
Choose the Edit button for any section you want to make changes to.
When you're satisfied with the change request details, choose Submit for approval.
If an Amazon SNS topic has been specified in the change template you chose for the request, notifications are sent when the request is rejected or approved. If you don't receive notifications for the request, you can return to Change Manager to check the status of your request.
Creating change requests (AWS CLI)
You can create a change request using the AWS Command Line Interface (AWS CLI) by specifying
options and parameters for the change request in a JSON file and using the
--cli-input-json option to include it in your
command.
To create a change request (AWS CLI)
Install and configure the AWS CLI or the AWS Tools for PowerShell, if you haven't already.
For information, see Installing or updating the latest version of the AWS CLI and Installing the AWS Tools for PowerShell.
-
Create a JSON file on your local machine with a name such as
MyChangeRequest.jsonand paste the following content into it.Replace
placeholderswith values for your change request.Note
This sample JSON creates a change request using the
AWS-HelloWorldChangeTemplatechange template andAWS-HelloWorldrunbook. To help you adapt this sample for your own change requests, see StartChangeRequestExecution in the AWS Systems Manager API Reference for information about all available parametersFor more information about approvals for change requests, see About change request approvals.
{ "ChangeRequestName": "MyChangeRequest", "DocumentName": "AWS-HelloWorldChangeTemplate", "DocumentVersion": "$DEFAULT", "ScheduledTime": "2021-12-30T03:00:00", "ScheduledEndTime": "2021-12-30T03:05:00", "Tags": [ { "Key": "Purpose", "Value": "Testing" } ], "Parameters": { "Approver": [ "JohnDoe" ], "ApproverType": [ "IamUser" ], "ApproverSnsTopicArn": [ "arn:aws:sns:us-east-2:123456789012:MyNotificationTopic" ] }, "Runbooks": [ { "DocumentName": "AWS-HelloWorld", "DocumentVersion": "1", "MaxConcurrency": "1", "MaxErrors": "1", "Parameters": { "AutomationAssumeRole": [ "arn:aws:iam::123456789012:role/MyChangeManagerAssumeRole" ] } } ], "ChangeDetails": "### Document Name: HelloWorldChangeTemplate\n\n## What does this document do?\nThis change template demonstrates the feature set available for creating change templates for Change Manager. This template starts a Runbook workflow for the Automation document called AWS-HelloWorld.\n\n## Input Parameters\n* ApproverSnsTopicArn: (Required) Amazon Simple Notification Service ARN for approvers.\n* Approver: (Required) The name of the approver to send this request to.\n* ApproverType: (Required) The type of reviewer.\n * Allowed Values: IamUser, IamGroup, IamRole, SSOGroup, SSOUser\n\n## Output Parameters\nThis document has no outputs \n" } -
In the directory where you created the JSON file, run the following command.
aws ssm start-change-request-execution --cli-input-json file://MyChangeRequest.jsonThe system returns information like the following.
{
    "AutomationExecutionId": "b3c1357a-5756-4839-8617-2d2a4EXAMPLE"
}
