NAT instances
NAT AMI is built on the last version of Amazon Linux, 2018.03, which reached the end of
standard support on December 31, 2020. For more information, see the following blog post:
Amazon Linux
AMI end of life
If you use an existing NAT AMI, AWS recommends that you migrate to a NAT gateway. NAT gateways provide better availability, higher bandwidth, and requires less administrative effort. If NAT instances are a better match for your use case, you can create your own NAT AMI. For more information, see Compare NAT gateways and NAT instances.
You can create your own AMI that provides network address translation and use your AMI to launch an EC2 instance as a NAT instance. You launch a NAT instance in a public subnet to enable instances in the private subnet to initiate outbound IPv4 traffic to the internet or other AWS services, but prevent the instances from receiving inbound traffic initiated on the internet.
Your NAT instance quota depends on your instance quota for the Region. For more information, see Amazon EC2 service quotas in the Amazon EC2 User Guide for Linux Instances.
Contents
NAT instance basics
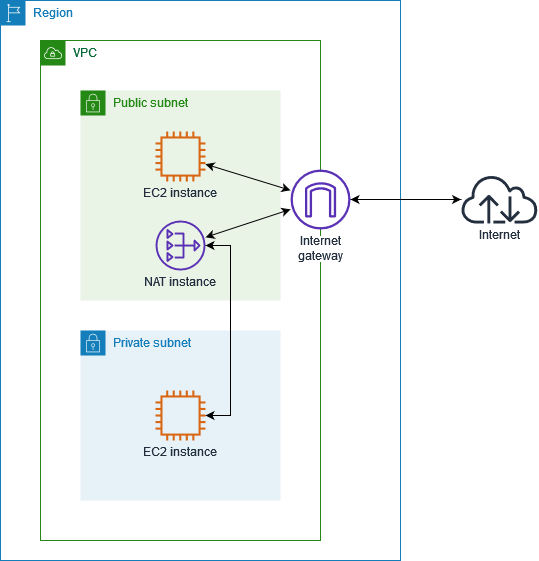
The following figure illustrates the NAT instance basics. The main route table is associated with the private subnet and sends the traffic from the instances in the private subnet to the NAT instance in the public subnet. The NAT instance then sends the traffic to the internet gateway for the VPC. The traffic is attributed to the Elastic IP address of the NAT instance. The NAT instance specifies a high port number for the response; if a response comes back, the NAT instance sends it to an instance in the private subnet based on the port number for the response.
Internet traffic from the instances in the private subnet is routed to the NAT instance, which then communicates with the internet. Therefore, the NAT instance must have internet access. It must be in a public subnet (a subnet that has a route table with a route to the internet gateway), and it must have a public IP address or an Elastic IP address.

Set up the NAT instance
Use the following procedure to set up a VPC and a NAT instance.
Requirement
Before you begin, create an AMI that's configured to run NAT on your instance. Be sure to save these settings so that they persist even after an instance reboot. Refer to the documentation for the specific operating system you're using on your instance to learn how to configure NAT.
To set up a NAT instance
-
Create a VPC with two subnets.
-
Create a VPC (see Create a VPC).
-
Create two subnets (see Create a subnet).
-
Attach an internet gateway to the VPC (see Create and attach an internet gateway).
-
Create a custom route table that sends traffic destined outside the VPC to the internet gateway, and then associate it with one subnet, making it a public subnet (see Create a custom route table).
-
-
Create the NATSG security group (see Create the NATSG security group). You'll specify this security group when you launch the NAT instance.
-
Launch an instance into your public subnet from an AMI that's been configured to run as a NAT instance.
-
Open the Amazon EC2 console.
-
On the dashboard, choose the Launch Instance button, and complete the wizard as follows:
-
On the Choose an Amazon Machine Image (AMI) page, set the filter to Owned by me, and then select your AMI.
-
On the Choose an Instance Type page, select the instance type, then choose Next: Configure Instance Details.
-
On the Configure Instance Details page, select the VPC you created from the Network list, and select your public subnet from the Subnet list.
-
(Optional) Select the Public IP check box to request that your NAT instance receives a public IP address. If you choose not to assign a public IP address now, you can allocate an Elastic IP address and assign it to your instance after it's launched. Choose Next: Add Storage.
You can choose to add storage to your instance, and on the next page, you can add tags. Choose Next: Configure Security Group when you are done.
-
On the Configure Security Group page, select the Select an existing security group option, and select the NATSG security group that you created. Choose Review and Launch.
-
Review the settings that you've chosen. Make any changes that you need, and then choose Launch to choose a key pair and launch your instance.
-
-
-
Disable the
SrcDestCheck
attribute for the NAT instance (see Disable source/destination checks) -
If you did not assign a public IP address to your NAT instance during launch (step 3), you need to associate an Elastic IP address with it.
Open the Amazon VPC console at https://console.aws.amazon.com/vpc/
. In the navigation pane, choose Elastic IPs, and then choose Allocate new address.
-
Choose Allocate.
-
Select the Elastic IP address from the list, and then choose Actions, Associate address.
Select the network interface resource, then select the network interface for the NAT instance. Select the address to associate the Elastic IP with from the Private IP list, and then choose Associate.
-
Update the main route table to send traffic to the NAT instance. For more information, see Update the main route table.
Launch a NAT instance using the command line
To launch a NAT instance into your subnet, use one of the following commands. For more information, see Working with Amazon VPC. You can use the AMI ID of the AMI that you configured to run as a NAT instance. For information about how to create an AMI on Amazon Linux 2, see Creating Amazon EBS-backed AMIs in the Amazon EC2 User Guide for Linux Instances.
run-instances (AWS CLI)
New-EC2Instance (AWS Tools for Windows PowerShell)
Create the NATSG security group
Define the NATSG security group as described in the following table to enable your NAT instance to receive internet-bound traffic from instances in a private subnet, as well as SSH traffic from your network. The NAT instance can also send traffic to the internet, which enables the instances in the private subnet to get software updates.
The following are the recommended rules.
Inbound | |||
---|---|---|---|
Source | Protocol | Port range | Comments |
Private subnet CIDR |
TCP | 80 | Allow inbound HTTP traffic from servers in the private subnet |
Private subnet CIDR |
TCP | 443 | Allow inbound HTTPS traffic from servers in the private subnet |
Public IP address range of your network |
TCP | 22 | Allow inbound SSH access to the NAT instance from your network (over the internet gateway) |
Outbound | |||
Destination | Protocol | Port range | Comments |
0.0.0.0/0 | TCP | 80 | Allow outbound HTTP access to the internet |
0.0.0.0/0 | TCP | 443 | Allow outbound HTTPS access to the internet |
To create the NATSG security group
-
Open the Amazon VPC console at https://console.aws.amazon.com/vpc/
. -
In the navigation pane, choose Security Groups, and then choose Create Security Group.
-
In the Create Security Group dialog box, specify
NATSG
as the name of the security group, and provide a description. Select the ID of your VPC from the VPC list, and then choose Yes, Create. -
Select the NATSG security group that you just created. The details pane displays the details for the security group, plus tabs for working with its inbound and outbound rules.
-
Add rules for inbound traffic using the Inbound Rules tab as follows:
-
Choose Edit.
-
Choose Add another rule, and select HTTP from the Type list. In the Source field, specify the IP address range of your private subnet.
-
Choose Add another rule, and select HTTPS from the Type list. In the Source field, specify the IP address range of your private subnet.
-
Choose Add another rule, and select SSH from the Type list. In the Source field, specify the public IP address range of your network.
-
Choose Save.
-
-
Add rules for outbound traffic using the Outbound Rules tab as follows:
-
Choose Edit.
-
Choose Add another rule, and select HTTP from the Type list. In the Destination field, specify
0.0.0.0/0
-
Choose Add another rule, and select HTTPS from the Type list. In the Destination field, specify
0.0.0.0/0
-
Choose Save.
-
For more information, see Security groups.
Disable source/destination checks
Each EC2 instance performs source/destination checks by default. This means that the instance must be the source or destination of any traffic it sends or receives. However, a NAT instance must be able to send and receive traffic when the source or destination is not itself. Therefore, you must disable source/destination checks on the NAT instance.
You can disable the SrcDestCheck
attribute for a NAT instance that's either running or stopped using the console or the command line.
To disable source/destination checking using the console
-
Open the Amazon EC2 console at https://console.aws.amazon.com/ec2/
. -
In the navigation pane, choose Instances.
-
Select the NAT instance, choose Actions, Networking, Change source/destination check.
-
Verify that source/destination checking is stopped. Otherwise, choose Stop.
-
Choose Save.
-
If the NAT instance has a secondary network interface, choose it from Network interfaces on the Networking tab. Choose the interface ID to go to the network interfaces page. Choose Actions, Change source/dest. check, clear Enable, and choose Save.
To disable source/destination checking using the command line
You can use one of the following commands. For more information, see Working with Amazon VPC.
modify-instance-attribute (AWS CLI)
Edit-EC2InstanceAttribute (AWS Tools for Windows PowerShell)
Update the main route table
The private subnet in your VPC is not associated with a custom route table, therefore it uses the main route table. By default, the main route table enables the instances in your VPC to communicate with each other. You must add a route that sends all other subnet traffic to the NAT instance.
To update the main route table
-
Open the Amazon VPC console at https://console.aws.amazon.com/vpc/
. -
In the navigation pane, choose Route Tables.
-
Select the main route table for your VPC (the Main column displays Yes). The details pane displays tabs for working with its routes, associations, and route propagation.
-
On the Routes tab, do the following:
Choose Edit routes and then choose Add route.
Specify
0.0.0.0/0
for Destination and the instance ID of the NAT instance for Target.Choose Save changes.
-
On the Subnet associations tab, choose Edit subnet associations. Select the check box for the private subnet, and then choose Save associations.
For more information, see Configure route tables.
Test your NAT instance configuration
After you have launched a NAT instance and completed the configuration steps above, you can perform a test to check if an instance in your private subnet can access the internet through the NAT instance by using the NAT instance as a bastion server. To do this, update the NATSG security group rules to allow inbound and outbound ICMP traffic and allow outbound SSH traffic, launch an instance into your private subnet, configure SSH agent forwarding to access instances in your private subnet, connect to your instance, and then test the internet connectivity.
To update your NAT instance's security group
Open the Amazon EC2 console at https://console.aws.amazon.com/ec2/
. In the navigation pane, choose Security Groups.
Select the checkbox for the NATSG security group associated with your NAT instance.
Choose Edit inbound rules on the Inbound rules tab.
Choose Add rule. Choose All ICMP - IPv4 for Type. Choose Custom for Source and enter the IP address range of your private subnet (for example,
10.0.1.0/24
). Choose Save rules.-
Choose Edit outbound rules on the Outbound rules tab.
-
Choose Add rule. Choose SSH for Type. Choose Custom for Destination and enter the IP address range of your private subnet (for example,
10.0.1.0/24
). -
Choose Add rule. Choose All ICMP - IPv4 for Type. Choose Anywhere - IPv4 for Destination. Choose Save rules.
To launch an instance into your private subnet
Open the Amazon EC2 console at https://console.aws.amazon.com/ec2/
. In the navigation pane, choose Instances.
Launch an instance into your private subnet. Ensure that you configure the following options in the launch wizard, and then choose Launch:
-
On the Choose an Amazon Machine Image (AMI) page, select an Amazon Linux AMI from the Quick Start category.
-
On the Configure Instance Details page, select your private subnet from the Subnet list, and do not assign a public IP address to your instance.
-
On the Configure Security Group page, ensure that your security group includes an inbound rule that allows SSH access from your NAT instance's private IP address, or from the IP address range of your public subnet, and ensure that you have an outbound rule that allows outbound ICMP traffic.
-
In the Select an existing key pair or create a new key pair dialog box, select the same key pair you used to launch the NAT instance.
-
To configure SSH agent forwarding for Linux or OS X
From your local machine, add your private key to the authentication agent.
For Linux, use the following command:
ssh-add -c
mykeypair
.pemFor OS X, use the following command:
ssh-add -K
mykeypair
.pemConnect to your NAT instance using the
-A
option to enable SSH agent forwarding, for example:ssh -A ec2-user@
54.0.0.123
To configure SSH agent forwarding for Windows (PuTTY)
Download and install Pageant from the PuTTY download page
, if not already installed. -
Convert your private key to .ppk format. For more information, see Converting your private key using PuTTYgen.
-
Start Pageant, right-click the Pageant icon on the taskbar (it may be hidden), and choose Add Key. Select the .ppk file you created, enter the passphrase if required, and choose Open.
-
Start a PuTTY session to connect to your NAT instance. In the Auth category, ensure that you select the Allow agent forwarding option, and leave the Private key file for authentication field blank.
To test the internet connection
Test that your NAT instance can communicate with the internet by running the
ping
command for a website that has ICMP enabled; for example:ping ietf.org
PING ietf.org (4.31.198.44) 56(84) bytes of data. 64 bytes from mail.ietf.org (4.31.198.44): icmp_seq=1 ttl=48 time=74.9 ms 64 bytes from mail.ietf.org (4.31.198.44): icmp_seq=2 ttl=48 time=75.1 ms ...
Press Ctrl+C on your keyboard to cancel the
ping
command.From your NAT instance, connect to your instance in your private subnet by using its private IP address, for example:
ssh ec2-user@
10.0.1.123
From your private instance, test that you can connect to the internet by running the
ping
command:ping ietf.org
PING ietf.org (4.31.198.44) 56(84) bytes of data. 64 bytes from mail.ietf.org (4.31.198.44): icmp_seq=1 ttl=47 time=86.0 ms 64 bytes from mail.ietf.org (4.31.198.44): icmp_seq=2 ttl=47 time=75.6 ms ...
Press Ctrl+C on your keyboard to cancel the
ping
command.If the
ping
command fails, check the following information:-
Check that your NAT instance's security group rules allow inbound ICMP traffic from your private subnet. If not, your NAT instance cannot receive the
ping
command from your private instance. -
Check that you've configured your route tables correctly. For more information, see Update the main route table.
-
Ensure that you've disabled source/destination checking for your NAT instance. For more information, see Disable source/destination checks.
-
Ensure that you are pinging a website that has ICMP enabled. If not, you will not receive reply packets. To test this, perform the same
ping
command from the command line terminal on your own computer.
-
(Optional) Terminate your private instance if you no longer require it. For more information, see Terminate your instance in the Amazon EC2 User Guide for Linux Instances.