Create an Amazon S3-backed AMI
The AMI that you specify when you launch your instance determines the type of root volume.
To create an Amazon S3-backed Linux AMI, start from an instance that you've launched from an existing Amazon S3-backed Linux AMI. After you've customized the instance to suit your needs, bundle the volume and register a new AMI, which you can use to launch new instances with these customizations.
You can't create an Amazon S3-backed Windows AMI because Windows AMIs don't support instance store for the root volume.
Important
Only the following instance types support an instance store volume as the root volume and require an Amazon S3-backed AMI: C1, C3, D2, I2, M1, M2, M3, R3, and X1.
The AMI creation process is different for Amazon EBS-backed AMIs. For more information, see Create an Amazon EBS-backed AMI.
Contents
Overview of AMI creation
The following diagram summarizes the process of creating an AMI from an instance with an instance store root volume.
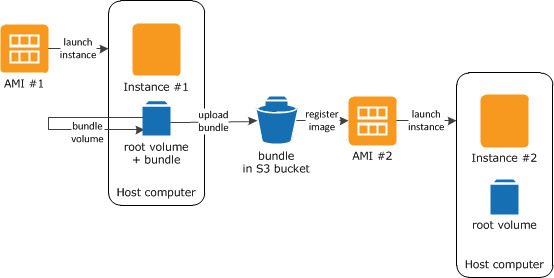
First, launch an instance from an AMI that's similar to the AMI that you'd like to
create. You can connect to your instance and customize it. When the instance is set up
the way you want it, you can bundle it. It takes several minutes for the bundling
process to complete. After the process completes, you have a bundle, which consists of
an image manifest (image.manifest.xml) and files
(image.part.xx) that contain a template
for the root volume. Next you upload the bundle to your Amazon S3 bucket and then register
your AMI.
Note
To upload objects to an S3 bucket for your Amazon S3-backed Linux AMI, ACLs must be enabled for the bucket. Otherwise, Amazon EC2 will not be able to set ACLs on the objects to upload. If your destination bucket uses the bucket owner enforced setting for S3 Object Ownership, this won’t work because ACLs are disabled. For more information, see Controlling ownership of objects and disabling ACLs for your bucket.
When you launch an instance using the new AMI, we create the root volume for the instance using the bundle that you uploaded to Amazon S3. The storage space used by the bundle in Amazon S3 incurs charges to your account until you delete it. For more information, see Deregister an Amazon EC2 AMI.
If you add instance store volumes to your instance in addition to the root volume, the block device mapping for the new AMI contains information for these volumes, and the block device mappings for instances that you launch from the new AMI automatically contain information for these volumes. For more information, see Block device mappings for volumes on Amazon EC2 instances.
Prerequisites
Before you can create an AMI, you must complete the following tasks:
-
Install the AMI tools. For more information, see Set up the Amazon EC2 AMI tools.
-
Install the AWS CLI. For more information, see Getting started with the AWS CLI.
-
Ensure that you have an S3 bucket for the bundle, and that your bucket has ACLs enabled. For more information on configuring ACLs, see Configuring ACLs.
-
To create an S3 bucket using the AWS Management Console, open the Amazon S3 console at https://console.aws.amazon.com/s3/
and choose Create Bucket. -
To create an S3 bucket with the AWS CLI, you can use the mb command. If your installed version of the AMI tools is 1.5.18 or later, you can also use the
ec2-upload-bundlecommand to create the S3 bucket. For more information, see ec2-upload-bundle.
-
-
Ensure that the files in your bundle aren't encrypted in the S3 bucket. If you require encryption for your AMI, you can use an EBS-backed AMI instead. For more information, see Use encryption with EBS-backed AMIs.
-
Ensure that you have your AWS account ID. For more information, see View AWS account identifiers in the AWS Account Management Reference Guide.
-
Ensure that you have credentials to use the AWS CLI. For more information, see Authentication and access credentials for the AWS CLI in the AWS Command Line Interface User Guide.
-
Ensure that you have an X.509 certificate and corresponding private key.
-
If you need to create an X.509 certificate, see Manage signing certificates. The X.509 certificate and private key are used to encrypt and decrypt your AMI.
-
[China (Beijing)] Use the
$EC2_AMITOOL_HOME/etc/ec2/amitools/cert-ec2-cn-north-1.pemcertificate. -
[AWS GovCloud (US-West)] Use the
$EC2_AMITOOL_HOME/etc/ec2/amitools/cert-ec2-gov.pemcertificate.
-
-
Connect to your instance and customize it. For example, you can install software and applications, copy data, delete temporary files, and modify the Linux configuration.
Create an AMI from an Amazon Linux instance
The following procedures describe how to create an AMI from an instance with an instance store root volume running Amazon Linux 1. They might not work for instances running other Linux distributions.
To prepare to use the AMI tools (HVM instances only)
-
The AMI tools require GRUB Legacy to boot properly. Use the following command to install GRUB:
[ec2-user ~]$sudo yum install -y grub -
Install the partition management packages with the following command:
[ec2-user ~]$sudo yum install -y gdisk kpartx parted
To create an AMI from an Amazon Linux instance with an instance store root volume
This procedure assumes that you have satisfied the prerequisites in Prerequisites.
In the following commands, replace each user input placeholder
with your own information.
-
Upload your credentials to your instance. We use these credentials to ensure that only you and Amazon EC2 can access your AMI.
-
Create a temporary directory on your instance for your credentials as follows:
[ec2-user ~]$mkdir /tmp/certThis enables you to exclude your credentials from the created image.
-
Copy your X.509 certificate and corresponding private key from your computer to the
/tmp/certdirectory on your instance using a secure copy tool such as scp. The-ioption in the following scp command is the private key you use to connect to your instance with SSH, not the X.509 private key. For example:my-private-key.pemyou@your_computer:~ $scp -imy-private-key.pem/path/to/pk-HKZYKTAIG2ECMXYIBH3HXV4ZBEXAMPLE.pem/path/to/cert-HKZYKTAIG2ECMXYIBH3HXV4ZBEXAMPLE.pemec2-user@ec2-203-0-113-25.compute-1.amazonaws.com:/tmp/cert/pk-HKZYKTAIG2ECMXYIBH3HXV4ZBEXAMPLE.pem 100% 717 0.7KB/s 00:00 cert-HKZYKTAIG2ECMXYIBH3HXV4ZBEXAMPLE.pem 100% 685 0.7KB/s 00:00
Alternatively, because these are plain text files, you can open the certificate and key in a text editor and copy their contents into new files in
/tmp/cert. -
-
Prepare the bundle to upload to Amazon S3 by running the ec2-bundle-vol command from inside your instance. Be sure to specify the
-eoption to exclude the directory where your credentials are stored. By default, the bundle process excludes files that might contain sensitive information. These files include*.sw,*.swo,*.swp,*.pem,*.priv,*id_rsa*,*id_dsa**.gpg,*.jks,*/.ssh/authorized_keys, and*/.bash_history. To include all of these files, use the--no-filteroption. To include some of these files, use the--includeoption.Important
By default, the AMI bundling process creates a compressed, encrypted collection of files in the
/tmpdirectory that represents your root volume. If you do not have enough free disk space in/tmpto store the bundle, you need to specify a different location for the bundle to be stored with the-doption. Some instances have ephemeral storage mounted at/path/to/bundle/storage/mntor/media/ephemeral0that you can use, or you can also create, attach, and mount a new Amazon EBS) volume to store the bundle. For more information, see Create an Amazon EBS volume in the Amazon EBS User Guide.-
You must run the ec2-bundle-vol command as root. For most commands, you can use sudo to gain elevated permissions, but in this case, you should run sudo -E su to keep your environment variables.
[ec2-user ~]$sudo -E suNote that bash prompt now identifies you as the root user, and that the dollar sign has been replaced by a hash tag, signalling that you are in a root shell:
[root ec2-user]#
-
To create the AMI bundle, run the ec2-bundle-vol command as follows:
[root ec2-user]#ec2-bundle-vol -k /tmp/cert/pk-HKZYKTAIG2ECMXYIBH3HXV4ZBEXAMPLE.pem-c /tmp/cert/cert-HKZYKTAIG2ECMXYIBH3HXV4ZBEXAMPLE.pem-u123456789012-r x86_64 -e /tmp/cert --partitiongptNote
For the China (Beijing) and AWS GovCloud (US-West) Regions, use the
--ec2certparameter and specify the certificates as per the prerequisites.It can take a few minutes to create the image. When this command completes, your
/tmp(or non-default) directory contains the bundle (image.manifest.xml, plus multipleimage.part.xxfiles). -
Exit from the root shell.
[root ec2-user]#exit
-
-
(Optional) To add more instance store volumes, edit the block device mappings in the
image.manifest.xmlfile for your AMI. For more information, see Block device mappings for volumes on Amazon EC2 instances.-
Create a backup of your
image.manifest.xmlfile.[ec2-user ~]$sudo cp /tmp/image.manifest.xml /tmp/image.manifest.xml.bak -
Reformat the
image.manifest.xmlfile so that it is easier to read and edit.[ec2-user ~]$sudo xmllint --format /tmp/image.manifest.xml.bak > /tmp/image.manifest.xml -
Edit the block device mappings in
image.manifest.xmlwith a text editor. The example below shows a new entry for theephemeral1instance store volume.Note
For a list of excluded files, see ec2-bundle-vol.
<block_device_mapping> <mapping> <virtual>ami</virtual> <device>sda</device> </mapping> <mapping> <virtual>ephemeral0</virtual> <device>sdb</device> </mapping><mapping> <virtual>ephemeral1</virtual> <device>sdc</device> </mapping><mapping> <virtual>root</virtual> <device>/dev/sda1</device> </mapping> </block_device_mapping> -
Save the
image.manifest.xmlfile and exit your text editor.
-
-
To upload your bundle to Amazon S3, run the ec2-upload-bundle command as follows.
[ec2-user ~]$ec2-upload-bundle -bamzn-s3-demo-bucket/bundle_folder/bundle_name-m /tmp/image.manifest.xml -ayour_access_key_id-syour_secret_access_keyImportant
To register your AMI in a Region other than US East (N. Virginia), you must specify both the target Region with the
--regionoption and a bucket path that already exists in the target Region or a unique bucket path that can be created in the target Region. -
(Optional) After the bundle is uploaded to Amazon S3, you can remove the bundle from the
/tmpdirectory on the instance using the following rm command:[ec2-user ~]$sudo rm /tmp/image.manifest.xml /tmp/image.part.* /tmp/imageImportant
If you specified a path with the
-doption in Step 2, use that path instead of/path/to/bundle/storage/tmp. -
To register your AMI, run the register-image command as follows.
[ec2-user ~]$aws ec2 register-image --image-locationamzn-s3-demo-bucket/bundle_folder/bundle_name/image.manifest.xml --nameAMI_name--virtualization-typehvmImportant
If you previously specified a Region for the ec2-upload-bundle command, specify that Region again for this command.
