Tutorial: Getting started with Amazon EMR
Walk through a workflow to quickly set up an Amazon EMR cluster and run a Spark application.
Setting up your Amazon EMR cluster
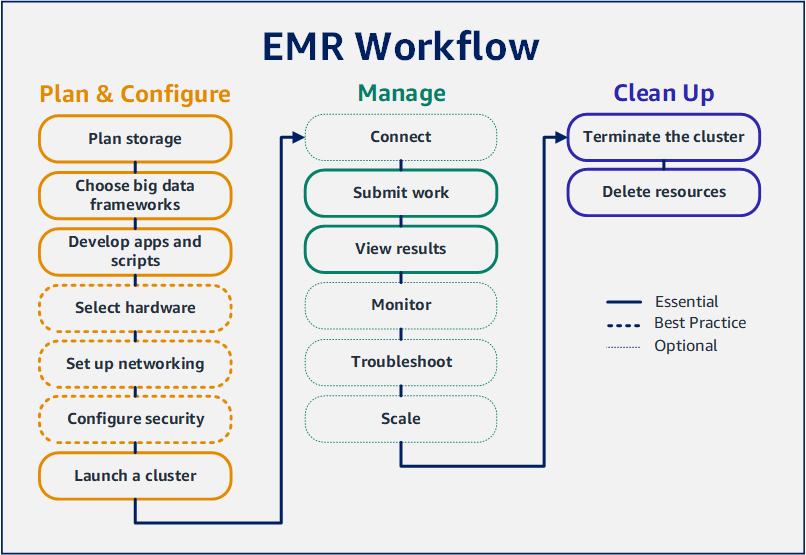
With Amazon EMR you can set up a cluster to process and analyze data with big data frameworks in just a few minutes. This tutorial shows you how to launch a sample cluster using Spark, and how to run a simple PySpark script stored in an Amazon S3 bucket. It covers essential Amazon EMR tasks in three main workflow categories: Plan and Configure, Manage, and Clean Up.
You'll find links to more detailed topics as you work through the tutorial, and ideas
for additional steps in the Next steps section. If you have questions or get stuck,
contact the Amazon EMR team on our Discussion
forum
Prerequisites
-
Before you launch an Amazon EMR cluster, make sure you complete the tasks in Before you set up Amazon EMR.
Cost
-
The sample cluster that you create runs in a live environment. The cluster accrues minimal charges. To avoid additional charges, make sure you complete the cleanup tasks in the last step of this tutorial. Charges accrue at the per-second rate according to Amazon EMR pricing. Charges also vary by Region. For more information, see Amazon EMR pricing
. -
Minimal charges might accrue for small files that you store in Amazon S3. Some or all of the charges for Amazon S3 might be waived if you are within the usage limits of the AWS Free Tier. For more information, see Amazon S3 pricing
and AWS Free Tier .
Step 1: Configure data resources and launch an Amazon EMR cluster
Prepare storage for Amazon EMR
When you use Amazon EMR, you can choose from a variety of file systems to store input data, output data, and log files. In this tutorial, you use EMRFS to store data in an S3 bucket. EMRFS is an implementation of the Hadoop file system that lets you read and write regular files to Amazon S3. For more information, see Working with storage and file systems with Amazon EMR.
To create a bucket for this tutorial, follow the instructions in How do I create an S3 bucket? in the Amazon Simple Storage Service Console User Guide. Create the bucket in the same AWS Region where you plan to launch your Amazon EMR cluster. For example, US West (Oregon) us-west-2.
Buckets and folders that you use with Amazon EMR have the following limitations:
-
Names can consist of lowercase letters, numbers, periods (.), and hyphens (-).
-
Names cannot end in numbers.
-
A bucket name must be unique across all AWS accounts.
-
An output folder must be empty.
Prepare an application with input data for Amazon EMR
The most common way to prepare an application for Amazon EMR is to upload the application and its input data to Amazon S3. Then, when you submit work to your cluster you specify the Amazon S3 locations for your script and data.
In this step, you upload a sample PySpark script to your Amazon S3 bucket. We've provided a PySpark script for you to use. The script processes food establishment inspection data and returns a results file in your S3 bucket. The results file lists the top ten establishments with the most "Red" type violations.
You also upload sample input data to Amazon S3 for the PySpark script to
process. The input data is a modified version of Health Department inspection
results in King County, Washington, from 2006 to 2020. For more information, see
King County Open Data: Food Establishment Inspection Data
name,inspection_result,inspection_closed_business,violation_type,violation_points
100 LB CLAM,Unsatisfactory,FALSE,BLUE,5
100 PERCENT NUTRICION,Unsatisfactory,FALSE,BLUE,5
7-ELEVEN #2361-39423A,Complete,FALSE,,0
To prepare the example PySpark script for EMR
-
Copy the example code below into a new file in your editor of choice.
import argparse from pyspark.sql import SparkSession def calculate_red_violations(data_source, output_uri): """ Processes sample food establishment inspection data and queries the data to find the top 10 establishments with the most Red violations from 2006 to 2020. :param data_source: The URI of your food establishment data CSV, such as 's3://amzn-s3-demo-bucket/food-establishment-data.csv'. :param output_uri: The URI where output is written, such as 's3://amzn-s3-demo-bucket/restaurant_violation_results'. """ with SparkSession.builder.appName("Calculate Red Health Violations").getOrCreate() as spark: # Load the restaurant violation CSV data if data_source is not None: restaurants_df = spark.read.option("header", "true").csv(data_source) # Create an in-memory DataFrame to query restaurants_df.createOrReplaceTempView("restaurant_violations") # Create a DataFrame of the top 10 restaurants with the most Red violations top_red_violation_restaurants = spark.sql("""SELECT name, count(*) AS total_red_violations FROM restaurant_violations WHERE violation_type = 'RED' GROUP BY name ORDER BY total_red_violations DESC LIMIT 10""") # Write the results to the specified output URI top_red_violation_restaurants.write.option("header", "true").mode("overwrite").csv(output_uri) if __name__ == "__main__": parser = argparse.ArgumentParser() parser.add_argument( '--data_source', help="The URI for you CSV restaurant data, like an S3 bucket location.") parser.add_argument( '--output_uri', help="The URI where output is saved, like an S3 bucket location.") args = parser.parse_args() calculate_red_violations(args.data_source, args.output_uri) -
Save the file as
health_violations.py. -
Upload
health_violations.pyto Amazon S3 into the bucket you created for this tutorial. For instructions, see Uploading an object to a bucket in the Amazon Simple Storage Service Getting Started Guide.
To prepare the sample input data for EMR
-
Download the zip file, food_establishment_data.zip.
-
Unzip and save
food_establishment_data.zipasfood_establishment_data.csvon your machine. -
Upload the CSV file to the S3 bucket that you created for this tutorial. For instructions, see Uploading an object to a bucket in the Amazon Simple Storage Service Getting Started Guide.
For more information about setting up data for EMR, see Prepare input data for processing with Amazon EMR.
Launch an Amazon EMR cluster
After you prepare a storage location and your application, you can launch a sample Amazon EMR cluster. In this step, you launch an Apache Spark cluster using the latest Amazon EMR release version.
Step 2: Submit work to your Amazon EMR cluster
Submit work and view results
After you launch a cluster, you can submit work to the running cluster to process
and analyze data. You submit work to an Amazon EMR cluster as a
step. A step is a unit of work made up of one or more actions.
For example, you might submit a step to compute values, or to transfer and process
data. You can submit steps when you create a cluster, or to a running cluster. In
this part of the tutorial, you submit health_violations.py as a
step to your running cluster. To learn more about steps, see Submit work to an Amazon EMR cluster.
For more information about the step lifecycle, see Running steps to process data.
View results
After a step runs successfully, you can view its output results in your Amazon S3 output folder.
To view the results of health_violations.py
Open the Amazon S3 console at https://console.aws.amazon.com/s3/
. -
Choose the Bucket name and then the output folder that you specified when you submitted the step. For example,
amzn-s3-demo-bucketand thenmyOutputFolder. -
Verify that the following items appear in your output folder:
-
A small-sized object called
_SUCCESS. -
A CSV file starting with the prefix
part-that contains your results.
-
-
Choose the object with your results, then choose Download to save the results to your local file system.
-
Open the results in your editor of choice. The output file lists the top ten food establishments with the most red violations. The output file also shows the total number of red violations for each establishment.
The following is an example of
health_violations.pyresults.name, total_red_violations SUBWAY, 322 T-MOBILE PARK, 315 WHOLE FOODS MARKET, 299 PCC COMMUNITY MARKETS, 251 TACO TIME, 240 MCDONALD'S, 177 THAI GINGER, 153 SAFEWAY INC #1508, 143 TAQUERIA EL RINCONSITO, 134 HIMITSU TERIYAKI, 128
For more information about Amazon EMR cluster output, see Configure a location for Amazon EMR cluster output.
When you use Amazon EMR, you may want to connect to a running cluster to read log files, debug the cluster, or use CLI tools like the Spark shell. Amazon EMR lets you connect to a cluster using the Secure Shell (SSH) protocol. This section covers how to configure SSH, connect to your cluster, and view log files for Spark. For more information about connecting to a cluster, see Authenticate to Amazon EMR cluster nodes.
Authorize SSH connections to your cluster
Before you connect to your cluster, you need to modify your cluster security groups to authorize inbound SSH connections. Amazon EC2 security groups act as virtual firewalls to control inbound and outbound traffic to your cluster. When you created your cluster for this tutorial, Amazon EMR created the following security groups on your behalf:
- ElasticMapReduce-master
-
The default Amazon EMR managed security group associated with the primary node. In an Amazon EMR cluster, the primary node is an Amazon EC2 instance that manages the cluster.
- ElasticMapReduce-slave
-
The default security group associated with core and task nodes.
Connect to your cluster using the AWS CLI
Regardless of your operating system, you can create an SSH connection to your cluster using the AWS CLI.
To connect to your cluster and view log files using the AWS CLI
-
Use the following command to open an SSH connection to your cluster. Replace
<mykeypair.key>with the full path and file name of your key pair file. For example,C:\Users\<username>\.ssh\mykeypair.pem.aws emr ssh --cluster-id<j-2AL4XXXXXX5T9>--key-pair-file<~/mykeypair.key> -
Navigate to
/mnt/var/log/sparkto access the Spark logs on your cluster's master node. Then view the files in that location. For a list of additional log files on the master node, see View log files on the primary node.cd /mnt/var/log/spark ls
Amazon EMR on EC2 is also a supported compute type for Amazon SageMaker AI Unified Studio. Refer to Managing Amazon EMR on EC2 for how to use and manage EMR on EC2 resources in Amazon SageMaker AI Unified Studio.
Step 3: Clean up your Amazon EMR resources
Terminate your cluster
Now that you've submitted work to your cluster and viewed the results of your PySpark application, you can terminate the cluster. Terminating a cluster stops all of the cluster's associated Amazon EMR charges and Amazon EC2 instances.
When you terminate a cluster, Amazon EMR retains metadata about the cluster for two months at no charge. Archived metadata helps you clone the cluster for a new job or revisit the cluster configuration for reference purposes. Metadata does not include data that the cluster writes to S3, or data stored in HDFS on the cluster.
Note
The Amazon EMR console does not let you delete a cluster from the list view after you terminate the cluster. A terminated cluster disappears from the console when Amazon EMR clears its metadata.
Delete S3 resources
To avoid additional charges, you should delete your Amazon S3 bucket. Deleting the bucket removes all of the Amazon S3 resources for this tutorial. Your bucket should contain:
-
The PySpark script
-
The input dataset
-
Your output results folder
-
Your log files folder
You might need to take extra steps to delete stored files if you saved your PySpark script or output in a different location.
Note
Your cluster must be terminated before you delete your bucket. Otherwise, you may not be allowed to empty the bucket.
To delete your bucket, follow the instructions in How do I delete an S3 bucket? in the Amazon Simple Storage Service User Guide.
Next steps
You have now launched your first Amazon EMR cluster from start to finish. You have also completed essential EMR tasks like preparing and submitting big data applications, viewing results, and terminating a cluster.
Use the following topics to learn more about how you can customize your Amazon EMR workflow.
Explore big data applications for Amazon EMR
Discover and compare the big data applications you can install on a cluster in the Amazon EMR Release Guide. The Release Guide details each EMR release version and includes tips for using frameworks such as Spark and Hadoop on Amazon EMR.
Plan cluster hardware, networking, and security
In this tutorial, you created a simple EMR cluster without configuring advanced options. Advanced options let you specify Amazon EC2 instance types, cluster networking, and cluster security. For more information about planning and launching a cluster that meets your requirements, see Plan, configure and launch Amazon EMR clusters and Security in Amazon EMR.
Manage clusters
Dive deeper into working with running clusters in Manage Amazon EMR clusters. To manage a cluster, you can connect to the cluster, debug steps, and track cluster activities and health. You can also adjust cluster resources in response to workload demands with EMR managed scaling.
Use a different interface
In addition to the Amazon EMR console, you can manage Amazon EMR using the AWS Command Line Interface, the web service API, or one of the many supported AWS SDKs. For more information, see Management interfaces.
You can also interact with applications installed on Amazon EMR clusters in many ways. Some applications like Apache Hadoop publish web interfaces that you can view. For more information, see View web interfaces hosted on Amazon EMR clusters.
Browse the EMR technical blog
For sample walkthroughs and in-depth technical discussion of new Amazon EMR features,
see the AWS big data
blog
