Amazon Redshift will no longer support the use of Python UDFs after June 30, 2026.
We will start enforcing it in phases. For more information on the details of Python end of life
and migration options, see the
blog post
Tutorial: Loading data from Amazon S3
In this tutorial, you walk through the process of loading data into your Amazon Redshift database tables from data files in an Amazon S3 bucket from beginning to end.
In this tutorial, you do the following:
-
Download data files that use comma-separated value (CSV), character-delimited, and fixed width formats.
-
Create an Amazon S3 bucket and then upload the data files to the bucket.
-
Launch an Amazon Redshift cluster and create database tables.
-
Use COPY commands to load the tables from the data files on Amazon S3.
-
Troubleshoot load errors and modify your COPY commands to correct the errors.
Prerequisites
You need the following prerequisites:
-
An AWS account to launch an Amazon Redshift cluster and to create a bucket in Amazon S3.
-
Your AWS credentials (IAM role) to load test data from Amazon S3. If you need a new IAM role, go to Creating IAM roles.
-
An SQL client such as the Amazon Redshift console query editor.
This tutorial is designed so that it can be taken by itself. In addition to this tutorial, we recommend completing the following tutorials to gain a more complete understanding of how to design and use Amazon Redshift databases:
-
Amazon Redshift Getting Started Guide walks you through the process of creating an Amazon Redshift cluster and loading sample data.
Overview
You can add data to your Amazon Redshift tables either by using an INSERT command or by using a COPY command. At the scale and speed of an Amazon Redshift data warehouse, the COPY command is many times faster and more efficient than INSERT commands.
The COPY command uses the Amazon Redshift massively parallel processing (MPP) architecture to read and load data in parallel from multiple data sources. You can load from data files on Amazon S3, Amazon EMR, or any remote host accessible through a Secure Shell (SSH) connection. Or you can load directly from an Amazon DynamoDB table.
In this tutorial, you use the COPY command to load data from Amazon S3. Many of the principles presented here apply to loading from other data sources as well.
To learn more about using the COPY command, see these resources:
Step 1: Create a cluster
If you already have a cluster that you want to use, you can skip this step.
For the exercises in this tutorial, use a four-node cluster.
To create a cluster
-
Sign in to the AWS Management Console and open the Amazon Redshift console at https://console.aws.amazon.com/redshiftv2/
. Using the navigation menu, choose the Provisioned clusters dashboard.
Important
Make sure that you have the necessary permissions to perform the cluster operations. For information on granting the necessary permissions, see Authorizing Amazon Redshift to access AWS services.
-
At top right, choose the AWS Region in which you want to create the cluster. For the purposes of this tutorial, choose US West (Oregon).
-
On the navigation menu, choose Clusters, then choose Create cluster. The Create cluster page appears.
-
On the Create cluster page enter parameters for your cluster. Choose your own values for the parameters, except change the following values:
Choose
dc2.largefor the node type.Choose
4for the Number of nodes.In the Cluster permissions section, choose an IAM role from Available IAM roles. This role should be one that you previously created and that has access to Amazon S3. Then choose Associate IAM role to add it to the list of Associated IAM roles for the cluster.
-
Choose Create cluster.
Follow the Amazon Redshift Getting Started Guide steps to connect to your cluster from a SQL client and test a connection. You don't need to complete the remaining Getting Started steps to create tables, upload data, and try example queries.
Step 2: Download the data files
In this step, you download a set of sample data files to your computer. In the next step, you upload the files to an Amazon S3 bucket.
To download the data files
-
Download the zipped file: LoadingDataSampleFiles.zip.
-
Extract the files to a folder on your computer.
-
Verify that your folder contains the following files.
customer-fw-manifest
customer-fw.tbl-000
customer-fw.tbl-000.bak
customer-fw.tbl-001
customer-fw.tbl-002
customer-fw.tbl-003
customer-fw.tbl-004
customer-fw.tbl-005
customer-fw.tbl-006
customer-fw.tbl-007
customer-fw.tbl.log
dwdate-tab.tbl-000
dwdate-tab.tbl-001
dwdate-tab.tbl-002
dwdate-tab.tbl-003
dwdate-tab.tbl-004
dwdate-tab.tbl-005
dwdate-tab.tbl-006
dwdate-tab.tbl-007
part-csv.tbl-000
part-csv.tbl-001
part-csv.tbl-002
part-csv.tbl-003
part-csv.tbl-004
part-csv.tbl-005
part-csv.tbl-006
part-csv.tbl-007
Step 3: Upload the files to an Amazon S3 bucket
In this step, you create an Amazon S3 bucket and upload the data files to the bucket.
To upload the files to an Amazon S3 bucket
-
Create a bucket in Amazon S3.
For more information about creating a bucket, see Creating a bucket in the Amazon Simple Storage Service User Guide.
-
Sign in to the AWS Management Console and open the Amazon S3 console at https://console.aws.amazon.com/s3/
. -
Choose Create bucket.
-
Choose an AWS Region.
Create the bucket in the same Region as your cluster. If your cluster is in the US West (Oregon) Region, choose US West (Oregon) Region (us-west-2).
-
In the Bucket Name box of the Create bucket dialog box, enter a bucket name.
The bucket name you choose must be unique among all existing bucket names in Amazon S3. One way to help ensure uniqueness is to prefix your bucket names with the name of your organization. Bucket names must comply with certain rules. For more information, go to Bucket restrictions and limitations in the Amazon Simple Storage Service User Guide.
-
Choose the recommended defaults for the rest of the options.
-
Choose Create bucket.
When Amazon S3 successfully creates your bucket, the console displays your empty bucket in the Buckets panel.
-
-
Create a folder.
-
Choose the name of the new bucket.
-
Choose the Create Folder button.
-
Name the new folder
load.Note
The bucket that you created is not in a sandbox. In this exercise, you add objects to a real bucket. You're charged a nominal amount for the time that you store the objects in the bucket. For more information about Amazon S3 pricing, go to the Amazon S3 pricing
page.
-
-
Upload the data files to the new Amazon S3 bucket.
-
Choose the name of the data folder.
-
In the Upload wizard, choose Add files.
Follow the Amazon S3 console instructions to upload all of the files you downloaded and extracted,
-
Choose Upload.
-
User Credentials
The Amazon Redshift COPY command must have access to read the file objects in the Amazon S3 bucket. If you use the same user credentials to create the Amazon S3 bucket and to run the Amazon Redshift COPY command, the COPY command has all necessary permissions. If you want to use different user credentials, you can grant access by using the Amazon S3 access controls. The Amazon Redshift COPY command requires at least ListBucket and GetObject permissions to access the file objects in the Amazon S3 bucket. For more information about controlling access to Amazon S3 resources, go to Managing access permissions to your Amazon S3 resources.
Step 4: Create the sample tables
For this tutorial, you use a set of tables based on the Star Schema Benchmark (SSB) schema. The following diagram shows the SSB data model.
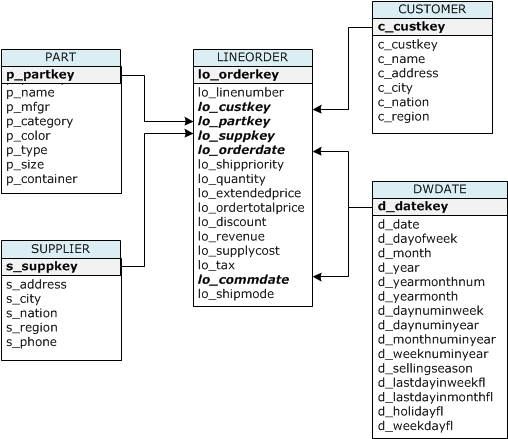
The SSB tables might already exist in the current database. If so, drop the tables to remove them from the database before you create them using the CREATE TABLE commands in the next step. The tables used in this tutorial might have different attributes than the existing tables.
To create the sample tables
-
To drop the SSB tables, run the following commands in your SQL client.
drop table part cascade; drop table supplier; drop table customer; drop table dwdate; drop table lineorder; -
Run the following CREATE TABLE commands in your SQL client.
CREATE TABLE part
(
  p_partkey     INTEGER NOT NULL,
  p_name        VARCHAR(22) NOT NULL,
  p_mfgr        VARCHAR(6),
  p_category    VARCHAR(7) NOT NULL,
  p_brand1      VARCHAR(9) NOT NULL,
  p_color       VARCHAR(11) NOT NULL,
  p_type        VARCHAR(25) NOT NULL,
  p_size        INTEGER NOT NULL,
  p_container   VARCHAR(10) NOT NULL
);

CREATE TABLE supplier
(
  s_suppkey   INTEGER NOT NULL,
  s_name      VARCHAR(25) NOT NULL,
  s_address   VARCHAR(25) NOT NULL,
  s_city      VARCHAR(10) NOT NULL,
  s_nation    VARCHAR(15) NOT NULL,
  s_region    VARCHAR(12) NOT NULL,
  s_phone     VARCHAR(15) NOT NULL
);

CREATE TABLE customer
(
  c_custkey      INTEGER NOT NULL,
  c_name         VARCHAR(25) NOT NULL,
  c_address      VARCHAR(25) NOT NULL,
  c_city         VARCHAR(10) NOT NULL,
  c_nation       VARCHAR(15) NOT NULL,
  c_region       VARCHAR(12) NOT NULL,
  c_phone        VARCHAR(15) NOT NULL,
  c_mktsegment   VARCHAR(10) NOT NULL
);

CREATE TABLE dwdate
(
  d_datekey            INTEGER NOT NULL,
  d_date               VARCHAR(19) NOT NULL,
  d_dayofweek          VARCHAR(10) NOT NULL,
  d_month              VARCHAR(10) NOT NULL,
  d_year               INTEGER NOT NULL,
  d_yearmonthnum       INTEGER NOT NULL,
  d_yearmonth          VARCHAR(8) NOT NULL,
  d_daynuminweek       INTEGER NOT NULL,
  d_daynuminmonth      INTEGER NOT NULL,
  d_daynuminyear       INTEGER NOT NULL,
  d_monthnuminyear     INTEGER NOT NULL,
  d_weeknuminyear      INTEGER NOT NULL,
  d_sellingseason      VARCHAR(13) NOT NULL,
  d_lastdayinweekfl    VARCHAR(1) NOT NULL,
  d_lastdayinmonthfl   VARCHAR(1) NOT NULL,
  d_holidayfl          VARCHAR(1) NOT NULL,
  d_weekdayfl          VARCHAR(1) NOT NULL
);
CREATE TABLE lineorder
(
  lo_orderkey          INTEGER NOT NULL,
  lo_linenumber        INTEGER NOT NULL,
  lo_custkey           INTEGER NOT NULL,
  lo_partkey           INTEGER NOT NULL,
  lo_suppkey           INTEGER NOT NULL,
  lo_orderdate         INTEGER NOT NULL,
  lo_orderpriority     VARCHAR(15) NOT NULL,
  lo_shippriority      VARCHAR(1) NOT NULL,
  lo_quantity          INTEGER NOT NULL,
  lo_extendedprice     INTEGER NOT NULL,
  lo_ordertotalprice   INTEGER NOT NULL,
  lo_discount          INTEGER NOT NULL,
  lo_revenue           INTEGER NOT NULL,
  lo_supplycost        INTEGER NOT NULL,
  lo_tax               INTEGER NOT NULL,
  lo_commitdate        INTEGER NOT NULL,
  lo_shipmode          VARCHAR(10) NOT NULL
);
Step 5: Run the COPY commands
You run COPY commands to load each of the tables in the SSB schema. The COPY command examples demonstrate loading from different file formats, using several COPY command options, and troubleshooting load errors.
COPY command syntax
The basic COPY command syntax is as follows.
COPY table_name [ column_list ] FROM data_source CREDENTIALS access_credentials [options]
To run a COPY command, you provide the following values.
Table name
The target table for the COPY command. The table must already exist in the database. The table can be temporary or persistent. The COPY command appends the new input data to any existing rows in the table.
Column list
By default, COPY loads fields from the source data to the table columns in order. You can optionally specify a column list, that is a comma-separated list of column names, to map data fields to specific columns. You don't use column lists in this tutorial. For more information, see Column List in the COPY command reference.
Data source
You can use the COPY command to load data from an Amazon S3 bucket, an Amazon EMR cluster, a remote host using an SSH connection, or an Amazon DynamoDB table. For this tutorial, you load from data files in an Amazon S3 bucket. When loading from Amazon S3, you must provide the name of the bucket and the location of the data files. To do this, provide either an object path for the data files or the location of a manifest file that explicitly lists each data file and its location.
-
Key prefix
An object stored in Amazon S3 is uniquely identified by an object key, which includes the bucket name, folder names, if any, and the object name. A key prefix refers to a set of objects with the same prefix. The object path is a key prefix that the COPY command uses to load all objects that share the key prefix. For example, the key prefix
custdata.txtcan refer to a single file or to a set of files, includingcustdata.txt.001,custdata.txt.002, and so on. -
Manifest file
In some cases, you might need to load files with different prefixes, for example from multiple buckets or folders. In others, you might need to exclude files that share a prefix. In these cases, you can use a manifest file. A manifest file explicitly lists each load file and its unique object key. You use a manifest file to load the PART table later in this tutorial.
Credentials
To access the AWS resources that contain the data to load, you must provide AWS access credentials for a user with sufficient privileges. These credentials include an IAM role Amazon Resource Name (ARN). To load data from Amazon S3, the credentials must include ListBucket and GetObject permissions. Additional credentials are required if your data is encrypted. For more information, see Authorization parameters in the COPY command reference. For more information about managing access, go to Managing access permissions to your Amazon S3 resources.
Options
You can specify a number of parameters with the COPY command to specify file formats, manage data formats, manage errors, and control other features. In this tutorial, you use the following COPY command options and features:
-
Key prefix
For information on how to load from multiple files by specifying a key prefix, see Load the PART table using NULL AS.
-
CSV format
For information on how to load data that is in CSV format, see Load the PART table using NULL AS.
-
NULL AS
For information on how to load PART using the NULL AS option, see Load the PART table using NULL AS.
-
Character-delimited format
For information on how to use the DELIMITER option, see The DELIMITER and REGION options.
-
REGION
For information on how to use the REGION option, see The DELIMITER and REGION options.
-
Fixed-format width
For information on how to load the CUSTOMER table from fixed-width data, see Load the CUSTOMER table using MANIFEST.
-
MAXERROR
For information on how to use the MAXERROR option, see Load the CUSTOMER table using MANIFEST.
-
ACCEPTINVCHARS
For information on how to use the ACCEPTINVCHARS option, see Load the CUSTOMER table using MANIFEST.
-
MANIFEST
For information on how to use the MANIFEST option, see Load the CUSTOMER table using MANIFEST.
-
DATEFORMAT
For information on how to use the DATEFORMAT option, see Load the DWDATE table using DATEFORMAT.
-
GZIP, LZOP and BZIP2
For information on how to compress your files, see Load multiple data files.
-
COMPUPDATE
For information on how to use the COMPUPDATE option, see Load multiple data files.
-
Multiple files
For information on how to load multiple files, see Load multiple data files.
Loading the SSB tables
You use the following COPY commands to load each of the tables in the SSB schema. The command to each table demonstrates different COPY options and troubleshooting techniques.
To load the SSB tables, follow these steps:
Replace the bucket name and AWS credentials
The COPY commands in this tutorial are presented in the following format.
copy table from 's3://<your-bucket-name>/load/key_prefix'
credentials 'aws_iam_role=arn:aws:iam::<aws-account-id>:role/<role-name>'
options;
For each COPY command, do the following:
-
Replace
<your-bucket-name>with the name of a bucket in the same region as your cluster.This step assumes the bucket and the cluster are in the same region. Alternatively, you can specify the region using the REGION option with the COPY command.
-
Replace
<aws-account-id>and<role-name>with your own AWS account and IAM role. The segment of the credentials string that is enclosed in single quotation marks must not contain any spaces or line breaks. Note that the ARN might differ slightly in format than the sample. It's best to copy the ARN for the role from the IAM console, to ensure that it's accurate, when you run the COPY commands.
Load the PART table using NULL AS
In this step, you use the CSV and NULL AS options to load the PART table.
The COPY command can load data from multiple files in parallel, which is much faster than loading from a single file. To demonstrate this principle, the data for each table in this tutorial is split into eight files, even though the files are very small. In a later step, you compare the time difference between loading from a single file and loading from multiple files. For more information, see Loading data files.
Key prefix
You can load from multiple files by specifying a key prefix for the file
set, or by explicitly listing the files in a manifest file. In this step,
you use a key prefix. In a later step, you use a manifest file. The key
prefix 's3://amzn-s3-demo-bucket/load/part-csv.tbl' loads the following
set of the files in the load folder.
part-csv.tbl-000
part-csv.tbl-001
part-csv.tbl-002
part-csv.tbl-003
part-csv.tbl-004
part-csv.tbl-005
part-csv.tbl-006
part-csv.tbl-007
CSV format
CSV, which stands for comma separated values, is a common format used for importing and exporting spreadsheet data. CSV is more flexible than comma-delimited format because it enables you to include quoted strings within fields. The default quotation mark character for COPY from CSV format is a double quotation mark ( " ), but you can specify another quotation mark character by using the QUOTE AS option. When you use the quotation mark character within the field, escape the character with an additional quotation mark character.
The following excerpt from a CSV-formatted data file for the PART table shows
strings enclosed in double quotation marks ("LARGE ANODIZED
BRASS"). It also shows a string enclosed in two double quotation marks
within a quoted string ("MEDIUM ""BURNISHED"" TIN").
15,dark sky,MFGR#3,MFGR#47,MFGR#3438,indigo,"LARGE ANODIZED BRASS",45,LG CASE
22,floral beige,MFGR#4,MFGR#44,MFGR#4421,medium,"PROMO, POLISHED BRASS",19,LG DRUM
23,bisque slate,MFGR#4,MFGR#41,MFGR#4137,firebrick,"MEDIUM ""BURNISHED"" TIN",42,JUMBO JAR
The data for the PART table contains characters that cause COPY to fail. In this exercise, you troubleshoot the errors and correct them.
To load data that is in CSV format, add csv to your COPY command.
Run the following command to load the PART table.
copy part from 's3://<your-bucket-name>/load/part-csv.tbl'
credentials 'aws_iam_role=arn:aws:iam::<aws-account-id>:role/<role-name>'
csv;
You might get an error message similar to the following.
An error occurred when executing the SQL command:
copy part from 's3://amzn-s3-demo-bucket/load/part-csv.tbl'
credentials' ...

ERROR: Load into table 'part' failed.  Check 'stl_load_errors' system table for details. [SQL State=XX000]

Execution time: 1.46s

1 statement(s) failed.
1 statement(s) failed.
To get more information about the error, query the STL_LOAD_ERRORS table. The
following query uses the SUBSTRING function to shorten columns for readability
and uses LIMIT 10 to reduce the number of rows returned. You can adjust the
values in substring(filename,22,25) to allow for the length of your
bucket name.
select query, substring(filename,22,25) as filename,line_number as line,
substring(colname,0,12) as column, type, position as pos, substring(raw_line,0,30) as line_text,
substring(raw_field_value,0,15) as field_text,
substring(err_reason,0,45) as reason
from stl_load_errors
order by query desc
limit 10;
 query  |    filename      | line |  column   |    type    | pos |
--------+-------------------------+-----------+------------+------------+-----+----
 333765 | part-csv.tbl-000 |    1 |           |            |   0 |

 line_text        | field_text |                    reason
------------------+------------+----------------------------------------------
 15,NUL next,     |            | Missing newline: Unexpected character 0x2c f
NULL AS
The part-csv.tbl data files use the NUL terminator character
(\x000 or \x0) to indicate NULL values.
Note
Despite very similar spelling, NUL and NULL are not the same. NUL is a
UTF-8 character with codepoint x000 that is often used to
indicate end of record (EOR). NULL is a SQL value that represents an absence
of data.
By default, COPY treats a NUL terminator character as an EOR character and terminates the record, which often results in unexpected results or an error. There is no single standard method of indicating NULL in text data. Thus, the NULL AS COPY command option enables you to specify which character to substitute with NULL when loading the table. In this example, you want COPY to treat the NUL terminator character as a NULL value.
Note
The table column that receives the NULL value must be configured as nullable. That is, it must not include the NOT NULL constraint in the CREATE TABLE specification.
To load PART using the NULL AS option, run the following COPY command.
copy part from 's3://<your-bucket-name>/load/part-csv.tbl'
credentials 'aws_iam_role=arn:aws:iam::<aws-account-id>:role/<role-name>'
csv
null as '\000';
To verify that COPY loaded NULL values, run the following command to select only the rows that contain NULL.
select p_partkey, p_name, p_mfgr, p_category from part where p_mfgr is null;
 p_partkey |  p_name  | p_mfgr | p_category
-----------+----------+--------+------------
        15 | NUL next |        | MFGR#47
        81 | NUL next |        | MFGR#23
       133 | NUL next |        | MFGR#44
(2 rows)
The DELIMITER and REGION options
The DELIMITER and REGION options are important to understand how load data.
Character-delimited format
The fields in a character-delimited file are separated by a specific character, such as a pipe character ( | ), a comma ( , ) or a tab ( \t ). Character-delimited files can use any single ASCII character, including one of the nonprinting ASCII characters, as the delimiter. You specify the delimiter character by using the DELIMITER option. The default delimiter is a pipe character ( | ).
The following excerpt from the data for the SUPPLIER table uses pipe-delimited format.
1|1|257368|465569|41365|19950218|2-HIGH|0|17|2608718|9783671|4|2504369|92072|2|19950331|TRUCK
1|2|257368|201928|8146|19950218|2-HIGH|0|36|6587676|9783671|9|5994785|109794|6|19950416|MAIL
REGION
Whenever possible, you should locate your load data in the same AWS region as your Amazon Redshift cluster. If your data and your cluster are in the same region, you reduce latency and avoid cross-region data transfer costs. For more information, see Amazon Redshift best practices for loading data.
If you must load data from a different AWS region, use the REGION option to specify the AWS region in which the load data is located. If you specify a region, all of the load data, including manifest files, must be in the named region. For more information, see REGION.
For example, if your cluster is in the US East (N. Virginia) Region, and your Amazon S3 bucket is located in the US West (Oregon) Region, the following COPY command shows how to load the SUPPLIER table from pipe-delimited data.
copy supplier from 's3://amzn-s3-demo-bucket/ssb/supplier.tbl'
credentials 'aws_iam_role=arn:aws:iam::<aws-account-id>:role/<role-name>'
delimiter '|'
gzip
region 'us-west-2';
Load the CUSTOMER table using MANIFEST
In this step, you use the FIXEDWIDTH, MAXERROR, ACCEPTINVCHARS, and MANIFEST options to load the CUSTOMER table.
The sample data for this exercise contains characters that cause errors when COPY attempts to load them. You use the MAXERRORS option and the STL_LOAD_ERRORS system table to troubleshoot the load errors and then use the ACCEPTINVCHARS and MANIFEST options to eliminate the errors.
Fixed-Width Format
Fixed-width format defines each field as a fixed number of characters, rather than separating fields with a delimiter. The following excerpt from the data for the CUSTOMER table uses fixed-width format.
1   Customer#000000001   IVhzIApeRb           MOROCCO  0MOROCCO  AFRICA      25-705
2   Customer#000000002   XSTf4,NCwDVaWNe6tE   JORDAN   6JORDAN   MIDDLE EAST 23-453
3   Customer#000000003   MG9kdTD              ARGENTINA5ARGENTINAAMERICA     11-783
The order of the label/width pairs must match the order of the table columns exactly. For more information, see FIXEDWIDTH.
The fixed-width specification string for the CUSTOMER table data is as follows.
fixedwidth 'c_custkey:10, c_name:25, c_address:25, c_city:10, c_nation:15,
c_region :12, c_phone:15,c_mktsegment:10'
To load the CUSTOMER table from fixed-width data, run the following command.
copy customer
from 's3://<your-bucket-name>/load/customer-fw.tbl'
credentials 'aws_iam_role=arn:aws:iam::<aws-account-id>:role/<role-name>'
fixedwidth 'c_custkey:10, c_name:25, c_address:25, c_city:10, c_nation:15, c_region :12, c_phone:15,c_mktsegment:10';
You should get an error message, similar to the following.
An error occurred when executing the SQL command:
copy customer
from 's3://amzn-s3-demo-bucket/load/customer-fw.tbl'
credentials'...

ERROR: Load into table 'customer' failed.  Check 'stl_load_errors' system table for details. [SQL State=XX000]

Execution time: 2.95s

1 statement(s) failed.
MAXERROR
By default, the first time COPY encounters an error, the command fails and
returns an error message. To save time during testing, you can use the
MAXERROR option to instruct COPY to skip a specified number of errors before
it fails. Because we expect errors the first time we test loading the
CUSTOMER table data, add maxerror 10 to the COPY command.
To test using the FIXEDWIDTH and MAXERROR options, run the following command.
copy customer
from 's3://<your-bucket-name>/load/customer-fw.tbl'
credentials 'aws_iam_role=arn:aws:iam::<aws-account-id>:role/<role-name>'
fixedwidth 'c_custkey:10, c_name:25, c_address:25, c_city:10, c_nation:15, c_region :12, c_phone:15,c_mktsegment:10'
maxerror 10;
This time, instead of an error message, you get a warning message similar to the following.
Warnings:
Load into table 'customer' completed, 112497 record(s) loaded successfully.
Load into table 'customer' completed, 7 record(s) could not be loaded.  Check 'stl_load_errors' system table for details.
The warning indicates that COPY encountered seven errors. To check the errors, query the STL_LOAD_ERRORS table, as shown in the following example.
select query, substring(filename,22,25) as filename,line_number as line,
substring(colname,0,12) as column, type, position as pos, substring(raw_line,0,30) as line_text,
substring(raw_field_value,0,15) as field_text,
substring(err_reason,0,45) as error_reason
from stl_load_errors
order by query desc, filename
limit 7;
The results of the STL_LOAD_ERRORS query should look similar to the following.
 query  |         filename          | line |  column   |    type    | pos |           line_text           | field_text |              error_reason
--------+---------------------------+------+-----------+------------+-----+-------------------------------+------------+----------------------------------------------
 334489 | customer-fw.tbl.log       |    2 | c_custkey | int4       |  -1 | customer-fw.tbl               | customer-f | Invalid digit, Value 'c', Pos 0, Type: Integ
 334489 | customer-fw.tbl.log       |    6 | c_custkey | int4       |  -1 | Complete                      | Complete   | Invalid digit, Value 'C', Pos 0, Type: Integ
 334489 | customer-fw.tbl.log       |    3 | c_custkey | int4       |  -1 | #Total rows                   | #Total row | Invalid digit, Value '#', Pos 0, Type: Integ
 334489 | customer-fw.tbl.log       |    5 | c_custkey | int4       |  -1 | #Status                       | #Status    | Invalid digit, Value '#', Pos 0, Type: Integ
 334489 | customer-fw.tbl.log       |    1 | c_custkey | int4       |  -1 | #Load file                    | #Load file | Invalid digit, Value '#', Pos 0, Type: Integ
 334489 | customer-fw.tbl000        |    1 | c_address | varchar    |  34 | 1         Customer#000000001  | .Mayag.ezR | String contains invalid or unsupported UTF8
 334489 | customer-fw.tbl000        |    1 | c_address | varchar    |  34 | 1         Customer#000000001  | .Mayag.ezR | String contains invalid or unsupported UTF8
(7 rows)
By examining the results, you can see that there are two messages in the
error_reasons column:
-
Invalid digit, Value '#', Pos 0, Type: IntegThese errors are caused by the
customer-fw.tbl.logfile. The problem is that it is a log file, not a data file, and should not be loaded. You can use a manifest file to avoid loading the wrong file. -
String contains invalid or unsupported UTF8The VARCHAR data type supports multibyte UTF-8 characters up to three bytes. If the load data contains unsupported or invalid characters, you can use the ACCEPTINVCHARS option to replace each invalid character with a specified alternative character.
Another problem with the load is more difficult to detect—the load produced unexpected results. To investigate this problem, run the following command to query the CUSTOMER table.
select c_custkey, c_name, c_address
from customer
order by c_custkey
limit 10;
 c_custkey |          c_name           |         c_address
-----------+---------------------------+---------------------------
         2 | Customer#000000002        | XSTf4,NCwDVaWNe6tE
         2 | Customer#000000002        | XSTf4,NCwDVaWNe6tE
         3 | Customer#000000003        | MG9kdTD
         3 | Customer#000000003        | MG9kdTD
         4 | Customer#000000004        | XxVSJsL
         4 | Customer#000000004        | XxVSJsL
         5 | Customer#000000005        | KvpyuHCplrB84WgAi
         5 | Customer#000000005        | KvpyuHCplrB84WgAi
         6 | Customer#000000006        | sKZz0CsnMD7mp4Xd0YrBvx
         6 | Customer#000000006        | sKZz0CsnMD7mp4Xd0YrBvx
(10 rows)
The rows should be unique, but there are duplicates.
Another way to check for unexpected results is to verify the number of rows
that were loaded. In our case, 100000 rows should have been loaded, but the load
message reported loading 112497 records. The extra rows were loaded because the
COPY loaded an extraneous file, customer-fw.tbl0000.bak.
In this exercise, you use a manifest file to avoid loading the wrong files.
ACCEPTINVCHARS
By default, when COPY encounters a character that is not supported by the column's data type, it skips the row and returns an error. For information about invalid UTF-8 characters, see Multibyte character load errors.
You could use the MAXERRORS option to ignore errors and continue loading, then query STL_LOAD_ERRORS to locate the invalid characters, and then fix the data files. However, MAXERRORS is best used for troubleshooting load problems and should generally not be used in a production environment.
The ACCEPTINVCHARS option is usually a better choice for managing invalid
characters. ACCEPTINVCHARS instructs COPY to replace each invalid character with
a specified valid character and continue with the load operation. You can
specify any valid ASCII character, except NULL, as the replacement character.
The default replacement character is a question mark ( ? ). COPY replaces
multibyte characters with a replacement string of equal length. For example, a
4-byte character would be replaced with '????'.
COPY returns the number of rows that contained invalid UTF-8 characters. It also adds an entry to the STL_REPLACEMENTS system table for each affected row, up to a maximum of 100 rows per node slice. Additional invalid UTF-8 characters are also replaced, but those replacement events are not recorded.
ACCEPTINVCHARS is valid only for VARCHAR columns.
For this step, you add the ACCEPTINVCHARS with the replacement character
'^'.
MANIFEST
When you COPY from Amazon S3 using a key prefix, there is a risk that you might
load unwanted tables. For example, the 's3://amzn-s3-demo-bucket/load/
folder contains eight data files that share the key prefix
customer-fw.tbl: customer-fw.tbl0000,
customer-fw.tbl0001, and so on. However, the same folder
also contains the extraneous files customer-fw.tbl.log and
customer-fw.tbl-0001.bak.
To ensure that you load all of the correct files, and only the correct files, use a manifest file. The manifest is a text file in JSON format that explicitly lists the unique object key for each source file to be loaded. The file objects can be in different folders or different buckets, but they must be in the same region. For more information, see MANIFEST.
The following shows the customer-fw-manifest text.
{
  "entries": [
    {"url":"s3://<your-bucket-name>/load/customer-fw.tbl-000"},
    {"url":"s3://<your-bucket-name>/load/customer-fw.tbl-001"},
    {"url":"s3://<your-bucket-name>/load/customer-fw.tbl-002"},
    {"url":"s3://<your-bucket-name>/load/customer-fw.tbl-003"},
    {"url":"s3://<your-bucket-name>/load/customer-fw.tbl-004"},
    {"url":"s3://<your-bucket-name>/load/customer-fw.tbl-005"},
    {"url":"s3://<your-bucket-name>/load/customer-fw.tbl-006"},
    {"url":"s3://<your-bucket-name>/load/customer-fw.tbl-007"}
    ]
}
To load the data for the CUSTOMER table using the manifest file
-
Open the file
customer-fw-manifestin a text editor. -
Replace
<your-bucket-name>with the name of your bucket. -
Save the file.
-
Upload the file to the load folder on your bucket.
-
Run the following COPY command.
copy customer from 's3://<your-bucket-name>/load/customer-fw-manifest'
credentials 'aws_iam_role=arn:aws:iam::<aws-account-id>:role/<role-name>'
fixedwidth 'c_custkey:10, c_name:25, c_address:25, c_city:10, c_nation:15, c_region :12, c_phone:15,c_mktsegment:10'
maxerror 10
acceptinvchars as '^'
manifest;
Load the DWDATE table using DATEFORMAT
In this step, you use the DELIMITER and DATEFORMAT options to load the DWDATE table.
When loading DATE and TIMESTAMP columns, COPY expects the default format, which is YYYY-MM-DD for dates and YYYY-MM-DD HH:MI:SS for timestamps. If the load data does not use a default format, you can use DATEFORMAT and TIMEFORMAT to specify the format.
The following excerpt shows date formats in the DWDATE table. Notice that the date formats in column two are inconsistent.
19920104	1992-01-04          Sunday		January	1992	199201	Jan1992	1	4	4	1...
19920112	January 12, 1992	Monday		January	1992	199201	Jan1992	2	12	12	1...
19920120	January 20, 1992	Tuesday	    January	1992	199201	Jan1992	3	20	20	1...
DATEFORMAT
You can specify only one date format. If the load data contains
inconsistent formats, possibly in different columns, or if the format is not
known at load time, you use DATEFORMAT with the 'auto'
argument. When 'auto' is specified, COPY recognizes any valid
date or time format and convert it to the default format. The
'auto' option recognizes several formats that are not
supported when using a DATEFORMAT and TIMEFORMAT string. For more
information, see Using automatic recognition with DATEFORMAT and TIMEFORMAT.
To load the DWDATE table, run the following COPY command.
copy dwdate from 's3://<your-bucket-name>/load/dwdate-tab.tbl'
credentials 'aws_iam_role=arn:aws:iam::<aws-account-id>:role/<role-name>'
delimiter '\t'
dateformat 'auto';
Load multiple data files
You can use the GZIP and COMPUPDATE options to load a table.
You can load a table from a single data file or multiple files. Do this to compare the load times for the two methods.
GZIP, LZOP and BZIP2
You can compress your files using either gzip, lzop, or bzip2 compression formats. When loading from compressed files, COPY uncompresses the files during the load process. Compressing your files saves storage space and shortens upload times.
COMPUPDATE
When COPY loads an empty table with no compression encodings, it analyzes the load data to determine the optimal encodings. It then alters the table to use those encodings before beginning the load. This analysis process takes time, but it occurs, at most, once per table. To save time, you can skip this step by turning COMPUPDATE off. To enable an accurate evaluation of COPY times, you turn COMPUPDATE off for this step.
Multiple Files
The COPY command can load data very efficiently when it loads from multiple files in parallel instead of from a single file. You can split your data into files so that the number of files is a multiple of the number of slices in your cluster. If you do, Amazon Redshift divides the workload and distributes the data evenly among the slices. The number of slices per node depends on the node size of the cluster. For more information about the number of slices that each node size has, see About clusters and nodes in the Amazon Redshift Management Guide.
For example, the compute nodes in your cluster in this tutorial can have two slices each, so a four-node cluster has eight slices. In previous steps, the load data was contained in eight files, even though the files are very small. You can compare the time difference between loading from a single large file and loading from multiple files.
Even files that contain 15 million records and occupy about 1.2 GB are very small in Amazon Redshift scale. But they are sufficient to demonstrate the performance advantage of loading from multiple files.
The following image shows the data files for LINEORDER.

To evaluate the performance of COPY with multiple files
-
In a lab test, the following command was run to COPY from a single file. This command shows a fictitious bucket.
copy lineorder from 's3://amzn-s3-demo-bucket/load/lo/lineorder-single.tbl' credentials 'aws_iam_role=arn:aws:iam::<aws-account-id>:role/<role-name>' gzip compupdate off region 'us-east-1'; -
The results were as follows. Note the execution time.
Warnings: Load into table 'lineorder' completed, 14996734 record(s) loaded successfully. 0 row(s) affected. copy executed successfully Execution time: 51.56s -
Then the following command to COPY from multiple files was run.
copy lineorder from 's3://amzn-s3-demo-bucket/load/lo/lineorder-multi.tbl' credentials 'aws_iam_role=arn:aws:iam::<aws-account-id>:role/<role-name>' gzip compupdate off region 'us-east-1'; -
The results were as follows. Note the execution time.
Warnings: Load into table 'lineorder' completed, 14996734 record(s) loaded successfully. 0 row(s) affected. copy executed successfully Execution time: 17.7s -
Compare execution times.
In our experiment, the time to load 15 million records decreased from 51.56 seconds to 17.7 seconds, a reduction of 65.7 percent.
These results are based on using a four-node cluster. If your cluster has more nodes, the time savings is multiplied. For typical Amazon Redshift clusters, with tens to hundreds of nodes, the difference is even more dramatic. If you have a single node cluster, there is little difference between the execution times.
Step 6: Vacuum and analyze the database
Whenever you add, delete, or modify a significant number of rows, you should run a VACUUM command and then an ANALYZE command. A vacuum recovers the space from deleted rows and restores the sort order. The ANALYZE command updates the statistics metadata, which enables the query optimizer to generate more accurate query plans. For more information, see Vacuuming tables.
If you load the data in sort key order, a vacuum is fast. In this tutorial, you added a significant number of rows, but you added them to empty tables. That being the case, there is no need to resort, and you didn't delete any rows. COPY automatically updates statistics after loading an empty table, so your statistics should be up-to-date. However, as a matter of good housekeeping, you complete this tutorial by vacuuming and analyzing your database.
To vacuum and analyze the database, run the following commands.
vacuum;
analyze;
Step 7: Clean up your resources
Your cluster continues to accrue charges as long as it is running. When you have completed this tutorial, you should return your environment to the previous state by following the steps in Step 5: Revoke access and delete your sample cluster in the Amazon Redshift Getting Started Guide.
If you want to keep the cluster, but recover the storage used by the SSB tables, run the following commands.
drop table part;
drop table supplier;
drop table customer;
drop table dwdate;
drop table lineorder;
Next
Summary
In this tutorial, you uploaded data files to Amazon S3 and then used COPY commands to load the data from the files into Amazon Redshift tables.
You loaded data using the following formats:
-
Character-delimited
-
CSV
-
Fixed-width
You used the STL_LOAD_ERRORS system table to troubleshoot load errors, and then used the REGION, MANIFEST, MAXERROR, ACCEPTINVCHARS, DATEFORMAT, and NULL AS options to resolve the errors.
You applied the following best practices for loading data:
For more information about Amazon Redshift best practices, see the following links:
