翻訳は機械翻訳により提供されています。提供された翻訳内容と英語版の間で齟齬、不一致または矛盾がある場合、英語版が優先します。
Amazon Connect チャットをモバイルアプリケーションに統合する
このセクションのトピックでは、モバイルアプリケーションで Amazon Connect チャットのカスタム UI を構築する方法について説明します。これには、独自のチャットのバックエンドを使用する必要があります。また、コンタクトを開始するには Amazon Connect StartChatContact API を使用し、チャットへの参加を管理するには Participant Service API を使用する必要があります。
注記
StartChatContact
API には、AWS Signature Version 4 の署名が必要です。そのため、最初のリクエストはパーソナルチャットのバックエンドを経由する必要があります。Amazon Connect Participant Service (ACPS) への後続の API コールは、モバイルアプリケーションから直接処理できます。
トピック
ワークフロー統合
次の図は、モバイルアプリケーションを使用する顧客とエージェント間のプログラミングフローを示しています。図の番号付きのテキストは、画像の下にある番号付きのテキストに対応しています。
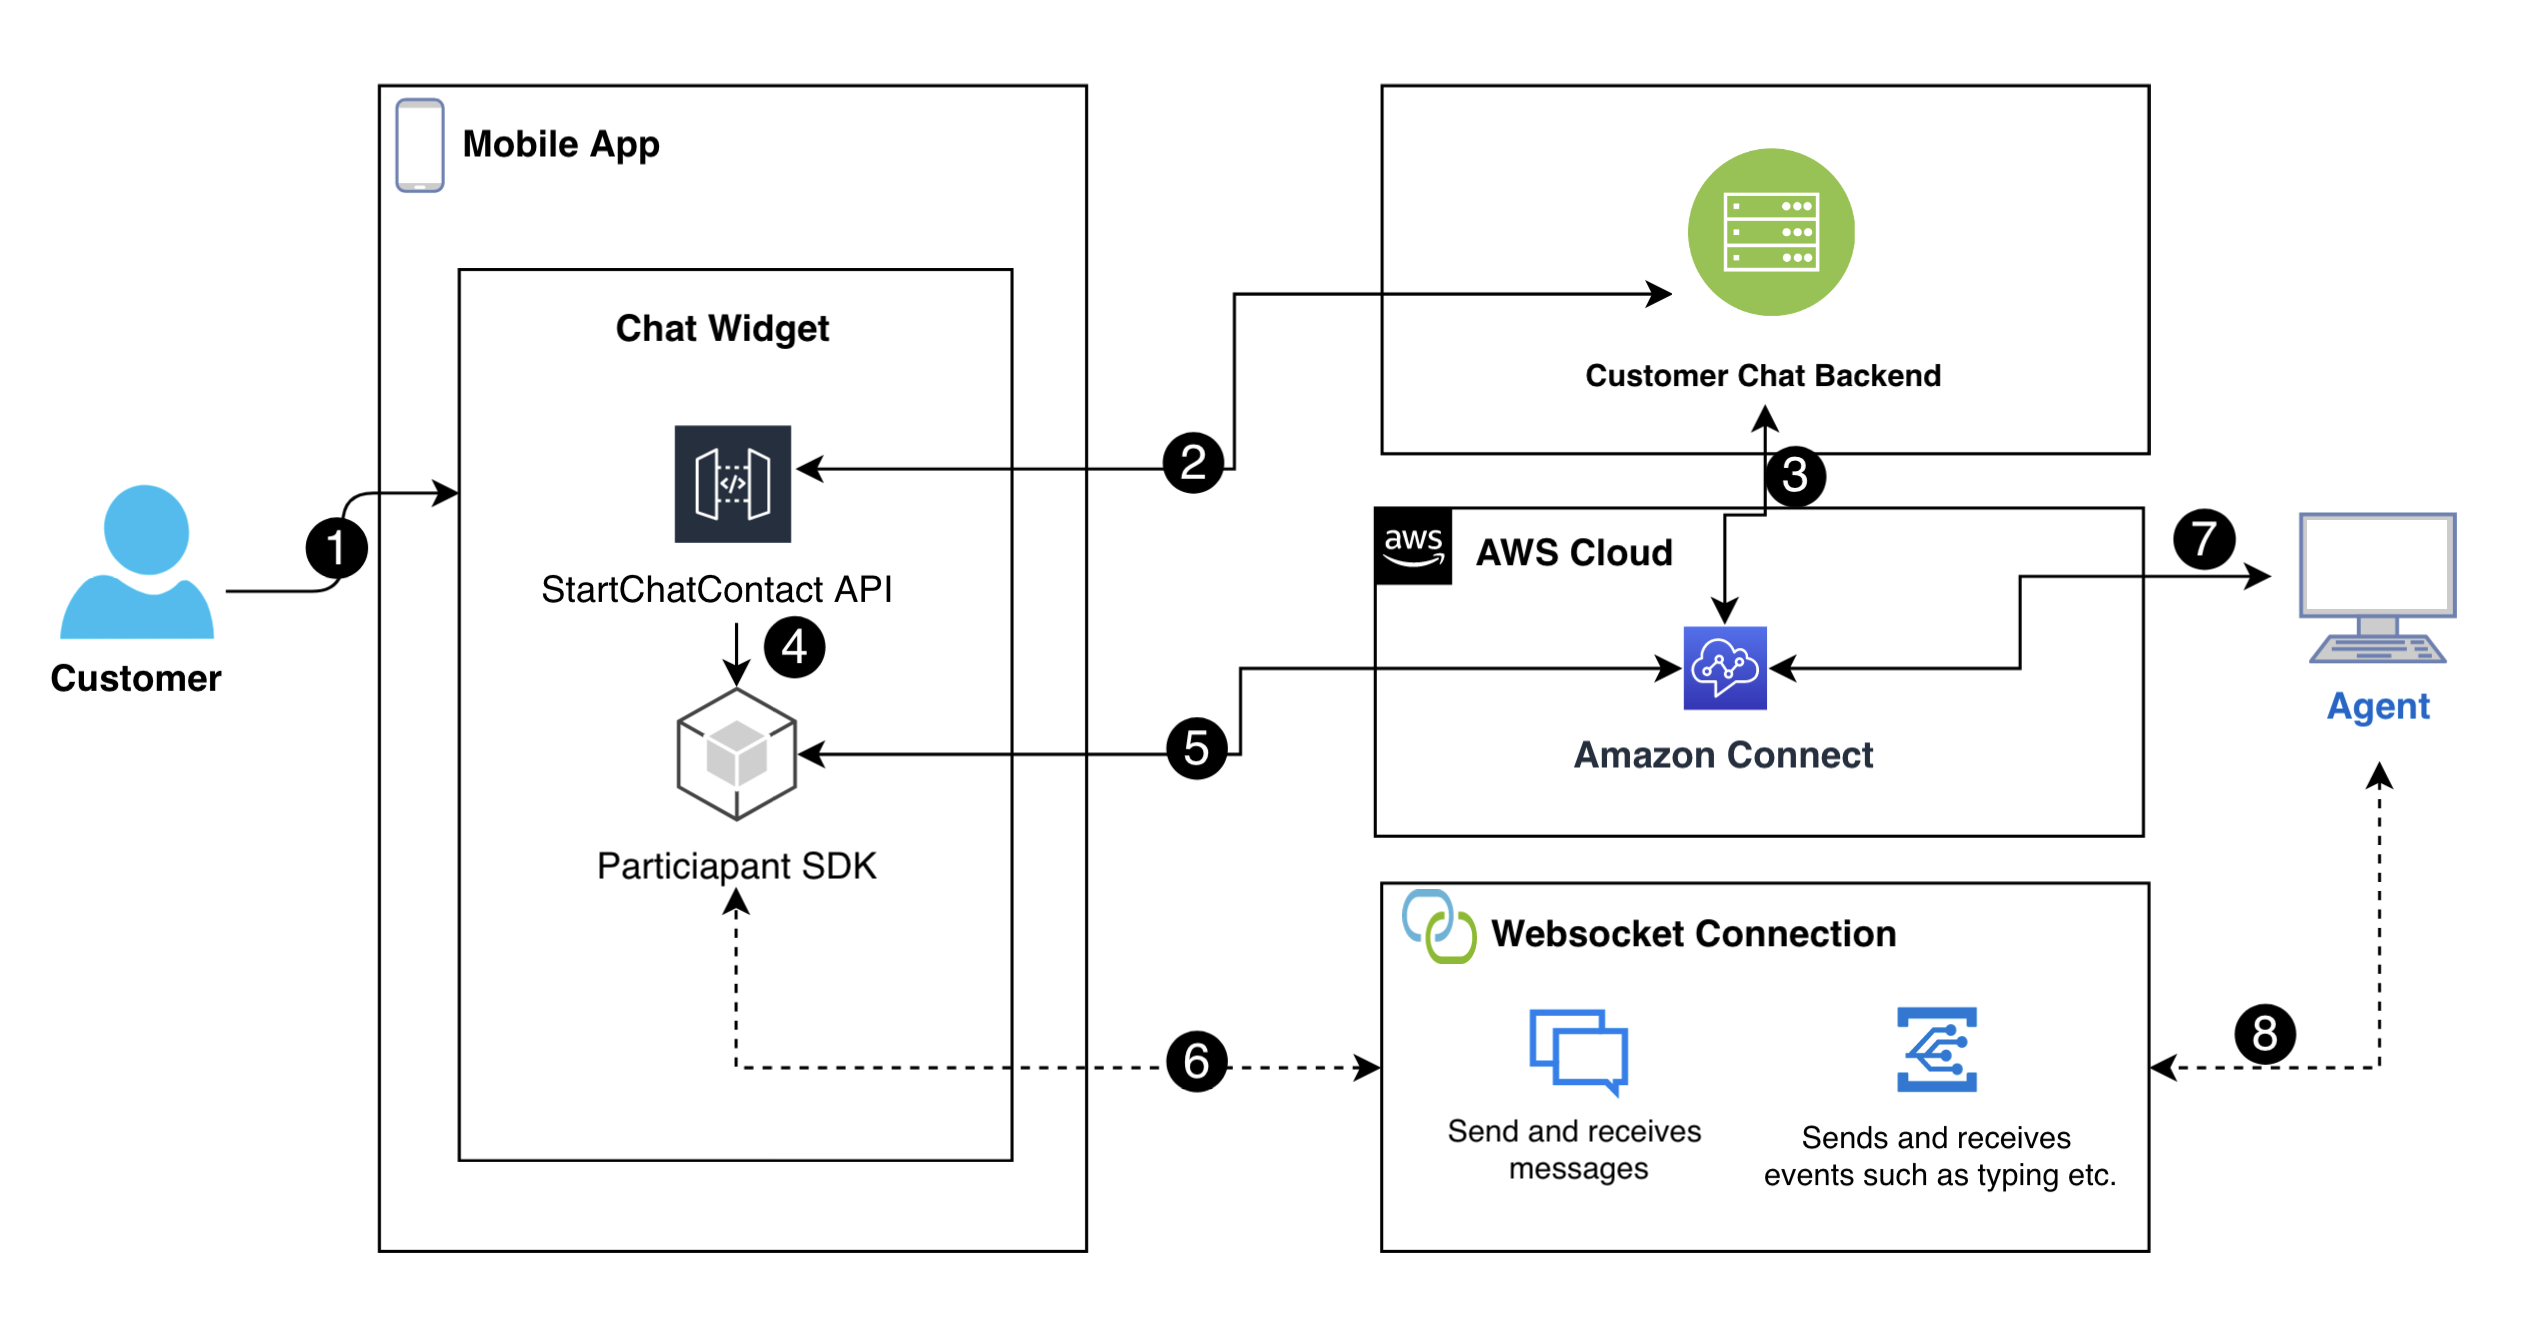
図中の手順を説明します。
顧客がモバイルアプリでチャットを開始すると、アプリは StartChatContact API を使用して Amazon Connect にリクエストを送信します。これには、チャットを認証して開始するためのインスタンスおよびコンタクトフローの API エンドポイントや ID などの特定のパラメータが必要です。
StartChatContact
API はバックエンドシステムとやり取りして、チャットセッションの一意の識別子として機能する参加者トークンとコンタクト ID を取得します。アプリのバックエンドは、参加者トークンとコンタクト ID を使用し、顧客のチャットセッションを設定して、Amazon Connect と通信します。
Amazon Connect Participant SDK は参加者トークンを使用してアクティベートされ、チャット用のアプリを準備します。
Participant SDK はセッションの詳細を使用して、Amazon Connect との安全な通信回線を確立します。
Amazon Connect は、Participant SDK を通じて WebSocket URL を提供することで応答します。アプリは、この URL を使用して、リアルタイムメッセージング用の WebSocket 接続を作成します。
Amazon Connect は、コンタクトフローとルーティングプロファイルに基づいてチャットにサポートエージェントを割り当てます。
エージェントからのメッセージは WebSocket 接続を介して送信されます。モバイルアプリは WebSocket をリッスンして、エージェントからのメッセージを受信して表示し、顧客からのメッセージを送り返します。
前提条件
Amazon Connect チャットをモバイルアプリと統合するには、次の前提条件を満たす必要があります。
-
-または-
Connect インスタンスが作成されている場合は、GitHub で次の手順に従って、このインスタンスのチャットを有効にします
。 -
Amazon Connect コンタクトフローを作成して、チャットコンタクトを受け取る準備を整えます。
インスタンス ID を書き留めます。
サンプルインバウンドフロー (初回問い合わせエクスペリエンス) の contactFlowId を検索します。
-
カスタム Amazon Connect チャットのバックエンドをデプロイします。GitHub で startChatContactAPI テンプレート
を参照します。 startChatContact
Lambda 関数 CloudFront テンプレートをデプロイします。 region
、API_GATEWAY_ID
、contactFlowId
、instanceID
をテンプレートの Config ファイルに追加します。
ライブラリをインストールする
iOS と Android 用のライブラリをインストールして、統合プロセスを開始します。両方のライブラリセットをインストールする必要があります。
-
iOS: GitHub で aws-sdk-ios
リポジトリにアクセスして、以下をインストールします。 pod 'AWSCore' pod 'AWSConnectParticipant' pod 'Starscream', '~> 4.0'
-
Android: GitHub で aws-sdk-android
リポジトリにアクセスして、以下をインストールします。 implementation("com.amazonaws:aws-android-sdk-core:2.73.0") implementation("com.amazonaws:aws-android-sdk-connectparticipant:2.73.0")
AWS 認証情報の設定
両方のライブラリセットをインストールしたら、Amazon Connect サービスと Amazon Connect Participant Service に登録します。そのためには、各オペレーティングシステムの Config ファイルで、以下の例に示すように、AWS 認証情報を使用して、accessKey
および secretKey
の値を空の文字列 (“”
) に置き換えます。
重要
テストするリージョンを指定する必要があります。
-
iOS: Amazon Connect サービスと Participant Service の登録に
AWSStaticCredentialsProvider
を使用します。private let config = Config() let credentials = AWSStaticCredentialsProvider(accessKey: "", secretKey: "") let participantService = AWSServiceConfiguration(region: config.region, credentialsProvider: credentials)! AWSConnectParticipant.register(with: participantService, forKey: "") connectParticipantClient = AWSConnectParticipant.init(forKey: "")
-
Android:
AmazonConnectParticipantAsyncClient
を初期化して、リージョンを設定します。private var connectParticipantClient: AmazonConnectParticipantAsyncClient = AmazonConnectParticipantAsyncClient() private val chatConfiguration = Config init { connectParticipantClient.setRegion(Region.getRegion(chatConfiguration.
region
)) }
注記
Config ファイルは、GitHub からダウンロードできます。両方の Config ファイルを編集する必要があります。
チャットを開始する
次に、Amazon Connect によって提供される StartChatContact API を統合する必要があります。この API は、エージェントとチャットすることを希望する顧客の意図を登録することによって、会話を開始します。
注記
StartChatContact
Lambda 関数をデプロイするには、GitHub の CloudFront テンプレート
iOS と Android の場合、StartChatContact
API コールには以下の情報が必要です。
InstanceId
: Amazon Connect インスタンスの識別子。ContactFlowId
: チャットを処理するコンタクトフローの識別子。ParticipantDetails
: 顧客の表示名など、参加者に関する情報。Attributes
: Amazon Connect 内でのチャットのルーティングや処理に役立つ、コンタクトに関する追加情報。
重要
API コールに署名するには、AWS Signature Version 4 (SigV4) を使用する必要があります。SigV4 プロセスによって、HTTP 経由で送信される AWS API リクエストに認証情報が追加されます。モバイルクライアントの場合は、サーバー側で署名プロセスを実行することをお勧めします。モバイルアプリはサーバーにリクエストを送信し、サーバーはそのリクエストに署名して Amazon Connect に転送します。この機能は、AWS 認証情報を保護するのに役立ちます。
iOS の場合:
func startChatSession(displayName: String, completion: @escaping (Result<StartChatResponse, Error>) -> Void) { // Your back end server will handle SigV4 signing and make the API call to Amazon Connect // Use the completion handler to process the response or error }
[Android] の場合。
// Make a network call to your back end server suspend fun startChatSession(displayName: String): StartChatResponse { // Your back end server will handle SigV4 signing if needed and make the // API call to Amazon Connect // Handle the response or error accordingly }
参加者の接続を作成する
StartChatContact API コールから受け取った詳細情報を使用して、参加者の接続を作成します。次に、AWS Connect Participant SDK を呼び出します。これにより、接続の確立に必要な WebSocket URL が返されます。
次の例では、iOS 用の接続を確立する方法を示しています。
// Swift code snippet for iOS participant connection setup /// Creates the participant's connection. https://docs.aws.amazon.com/connect-participant/latest/APIReference/API_CreateParticipantConnection.html /// - Parameter: participantToken: The ParticipantToken as obtained from StartChatContact API response. func createParticipantConnection() { let createParticipantConnectionRequest = AWSConnectParticipantCreateParticipantConnectionRequest() createParticipantConnectionRequest?.participantToken = self.participantToken createParticipantConnectionRequest?.types = ["WEBSOCKET", "CONNECTION_CREDENTIALS"] connectParticipantClient? .createParticipantConnection (createParticipantConnectionRequest!) .continueWith(block: { (task) -> Any? in self.connectionToken = task.result!.connectionCredentials!.connectionToken self.websocketUrl = task.result!.websocket!.url return nil } ).waitUntilFinished() }
次の例では、Android 用の接続を確立する方法を示しています。
// Kotlin code snippet for Android participant connection setup /// Creates the participant's connection. https://docs.aws.amazon.com/connect-participant/latest/APIReference/API_CreateParticipantConnection.html /// - Parameter: participantToken: The ParticipantToken as obtained from StartChatContact API response. fun createParticipantConnection( _participantToken: String, handler: AsyncHandler<CreateParticipantConnectionRequest, CreateParticipantConnectionResult> ) { val createParticipantConnectionRequest = CreateParticipantConnectionRequest().apply { setType(listOf("WEBSOCKET", "CONNECTION_CREDENTIALS")) participantToken = _participantToken } connectParticipantClient.createParticipantConnectionAsync( createParticipantConnectionRequest, handler ) }
WebSocket 接続を使用する
Participant SDK を使用して、チャット接続用の WebSocket URL を取得します。
WebSocket の管理を実装するには、既存のソリューションを使用するか、独自のソリューションを実装します。
Websocket のメッセージとイベントを処理するには、独自のソリューションを実装するか、iOS 用
および Android 用 のソリューションを使用します。 -
すべてのメッセージとイベントタイプに対応していることを確認します。
case
typing = "application/vnd.amazonaws.connect.event.typing"
case
messageDelivered = "application/vnd.amazonaws.connect.event.message.delivered"
case
messageRead = "application/vnd.amazonaws.connect.event.message.read"
case
metaData = "application/vnd.amazonaws.connect.event.message.metadata"
case
joined = "application/vnd.amazonaws.connect.event.participant.joined"
case
left = "application/vnd.amazonaws.connect.event.participant.left"
case
ended = "application/vnd.amazonaws.connect.event.chat.ended"
case
plainText = "text/plain"
case
richText = "text/markdown"
case
interactiveText = "application/vnd.amazonaws.connect.message.interactive"
以下の画像は、Connect チャットのデフォルトのインスタンスを示しています。画像内の数字は、以下の番号付きテキストに対応しています。
この画像は、上部から順に次の内容を示しています。
入力インジケータには、メッセージの入力者が示されます。
この例では、プレーンテキストのメッセージが使用されています。必要に応じて、マークダウンの使用を有効にできます。
インタラクティブリストコントロールには、カスタマーサービスや請求などの選択肢のリストがユーザーに表示されます。
インタラクティブなクイック返信には、よくある質問やフレーズに対して、あらかじめプログラムされた回答が表示されます。
メッセージを送信する
SendMessage
関数を使用してチャットメッセージを送信します。
/// To send a message using the Participant SDK. /// - Parameters: /// - messageContent: The content of the message. /// - connectionToken: The authentication token associated with the connection - Received from Participant Connection /// - contentType: text/plain, text/markdown, application/json, and application/vnd.amazonaws.connect.message.interactive.response func sendChatMessage(messageContent: String) { let sendMessageRequest = AWSConnectParticipantSendMessageRequest() sendMessageRequest?.connectionToken = self.connectionToken sendMessageRequest?.content = messageContent sendMessageRequest?.contentType = "text/plain" connectParticipantClient? .sendMessage(sendMessageRequest!) .continueWith(block: { (task) -> Any? in return nil }) }
イベントを処理する
入力や開封確認などのイベントに対しては、Participant SDK の SendEvent
関数を使用します。
/// Sends an event such as typing, joined, left etc. /// - Parameters: /// - contentType: The content type of the request /// - content: The content of the event to be sent (for example, message text). For content related to message receipts, this is supported in the form of a JSON string. func sendEvent(contentType: ContentType, content: String = "") { let sendEventRequest = AWSConnectParticipantSendEventRequest() sendEventRequest?.connectionToken = self.connectionToken sendEventRequest?.contentType = contentType.rawValue sendEventRequest?.content = content // Set the content here connectParticipantClient? .sendEvent(sendEventRequest!) .continueWith(block: { (task) -> Any? in return nil }) }
チャットを終了する
チャットを終了するには、Participant SDK の disconnectParticipant
関数を使用します。
/// Disconnects a participant. /// - Parameter: connectionToken: The authentication token associated with the connection - Received from Participant Connection func endChat() { let disconnectParticipantRequest = AWSConnectParticipantDisconnectParticipantRequest() disconnectParticipantRequest?.connectionToken = self.connectionToken connectParticipantClient?.disconnectParticipant(disconnectParticipantRequest!) .continueWith(block: { (task) -> Any? in return nil }).waitUntilFinished() self.websocketUrl = nil }
ソースコード
次の GitHub のサンプルプロジェクトは、Connect チャットを実装する方法を示しています。
iOS: iOS ネイティブのチャットのデモ
。 Android: Android ネイティブのチャットのデモ
。