本文為英文版的機器翻譯版本,如內容有任何歧義或不一致之處,概以英文版為準。
搭配 AWS CDK 使用 AWS AppSync API
提示
在使用 CDK 之前,我們建議您檢閱 CDK 的官方文件以及 CDK AWS AppSync參考。 https://docs.aws.amazon.com/cdk/api/v2/docs/aws-cdk-lib.aws_appsync-readme.html
在本節中,我們將建立簡單的 CDK 應用程式,可從 DynamoDB 資料表新增和擷取項目。這是使用設計結構描述、連接資料來源和設定解析程式 (JavaScript) 區段中一些程式碼的快速入門範例。
設定 CDK 專案
警告
視您的環境而定,這些步驟可能不完全準確。我們假設您的系統已安裝必要的公用程式、與服務的界面方式 AWS ,以及適當的組態。
第一步是安裝 AWS CDK。在 CLI 中,您可以輸入下列命令:
npm install -g aws-cdk
接著,您需要建立專案目錄,然後導覽至該目錄。建立和導覽至目錄的一組命令範例如下:
mkdir example-cdk-app
cd example-cdk-app
接著,您需要建立應用程式。我們的服務主要使用 TypeScript。在您的專案目錄中,輸入下列命令:
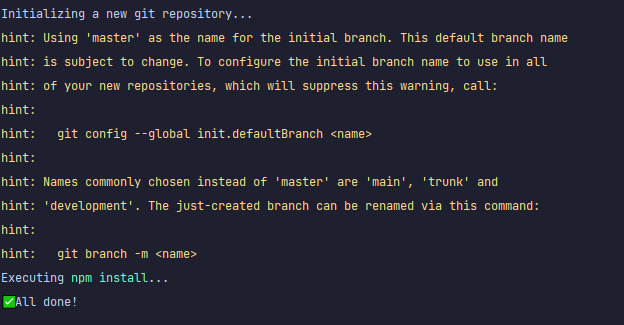
cdk init app --language typescript
當您執行此操作時,將會安裝 CDK 應用程式及其初始化檔案:
您的專案結構可能如下所示:
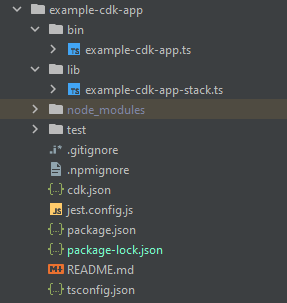
您會注意到我們有幾個重要的目錄:
-
bin:初始 bin 檔案將建立應用程式。我們不會在本指南中碰觸到此項目。 -
lib:lib 目錄包含您的堆疊檔案。您可以將堆疊檔案視為個別的執行單位。建構將位於我們的堆疊檔案中。基本上,這些是服務的資源,會在應用程式部署 CloudFormation 時在其中啟動。這就是我們大部分編碼都會發生的地方。 -
node_modules:此目錄是由 NPM 建立,並包含您使用npm命令安裝的所有套件相依性。
我們的初始堆疊檔案可能包含如下內容:
import * as cdk from 'aws-cdk-lib';
import { Construct } from 'constructs';
// import * as sqs from 'aws-cdk-lib/aws-sqs';

export class ExampleCdkAppStack extends cdk.Stack {
  constructor(scope: Construct, id: string, props?: cdk.StackProps) {
    super(scope, id, props);

    // The code that defines your stack goes here

    // example resource
    // const queue = new sqs.Queue(this, 'ExampleCdkAppQueue', {
    //   visibilityTimeout: cdk.Duration.seconds(300)
    // });
  }
}
這是在我們的應用程式中建立堆疊的樣板程式碼。我們在此範例中的大部分程式碼都會進入此類別的範圍內。
若要驗證您的堆疊檔案是否在應用程式中,請在應用程式的 目錄中,在終端機中執行下列命令:
cdk ls
應該會出現堆疊的清單。如果沒有,則您可能需要再次執行這些步驟,或查看官方文件以取得協助。
如果您想要在部署之前建置程式碼變更,您可以隨時在終端機中執行下列命令:
npm run build
此外,若要在部署之前查看變更:
cdk diff
將程式碼新增至堆疊檔案之前,我們會執行引導。引導允許我們在應用程式部署之前佈建 CDK 的資源。如需此程序的詳細資訊,請參閱此處。若要建立引導,命令為:
cdk bootstrap aws://ACCOUNT-NUMBER/REGION
提示
此步驟需要您帳戶中的數個 IAM 許可。如果您沒有引導,您的引導會被拒絕。如果發生這種情況,您可能需要刪除由引導造成的不完整資源,例如它產生的 S3 儲存貯體。
Bootstrap 將啟動數個資源。最終訊息會如下所示:

每個區域每個帳戶會執行一次此操作,因此您不必經常執行此操作。引導的主要資源是 CloudFormation 堆疊和 Amazon S3 儲存貯體。
Amazon S3 儲存貯體用於存放授予執行部署所需許可的檔案和 IAM 角色。所需的資源是在 CloudFormation 堆疊中定義,稱為引導堆疊,通常命名為 CDKToolkit。與任何 CloudFormation 堆疊一樣,它在部署之後會出現在 CloudFormation 主控台中:

您可以針對儲存貯體說出相同的 :

若要匯入堆疊檔案中所需的服務,可以使用下列命令:
npm install aws-cdk-lib # V2 command
提示
如果 V2 發生問題,您可以使用 V1 命令安裝個別程式庫:
npm install @aws-cdk/aws-appsync @aws-cdk/aws-dynamodb
我們不建議這麼做,因為 V1 已棄用。
實作 CDK 專案 - 結構描述
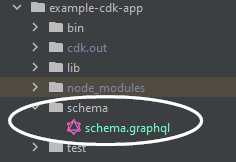
我們現在可以開始實作程式碼。首先,我們必須建立結構描述。您可以直接在應用程式中建立.graphql檔案:
mkdir schema
touch schema.graphql
在我們的範例中,我們包含了一個名為 的頂層目錄,schema其中包含我們的 schema.graphql:
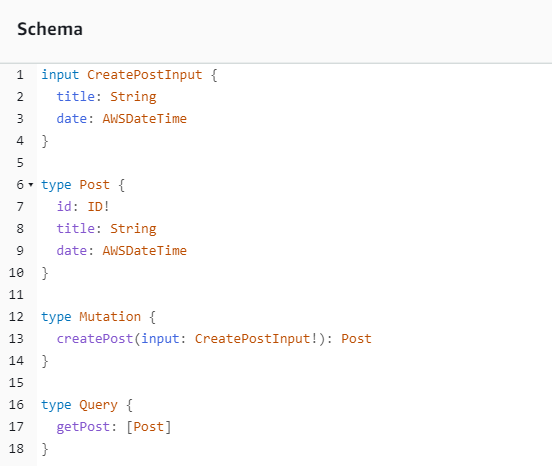
在我們的結構描述中,讓我們包含一個簡單的範例:
input CreatePostInput {
    title: String
    content: String
}

type Post {
    id: ID!
    title: String
    content: String
}

type Mutation {
    createPost(input: CreatePostInput!): Post
}

type Query {
    getPost: [Post]
}
回到堆疊檔案中,我們需要確定已定義下列匯入指令:
import * as cdk from 'aws-cdk-lib';
import * as appsync from 'aws-cdk-lib/aws-appsync';
import * as dynamodb from 'aws-cdk-lib/aws-dynamodb';
import { Construct } from 'constructs';
在 類別中,我們將新增程式碼來製作 GraphQL API,並將其連接到我們的schema.graphql檔案:
export class ExampleCdkAppStack extends cdk.Stack {
  constructor(scope: Construct, id: string, props?: cdk.StackProps) {
    super(scope, id, props);

    // makes a GraphQL API
    const api = new appsync.GraphqlApi(this, 'post-apis', {
      name: 'api-to-process-posts',
      schema: appsync.SchemaFile.fromAsset('schema/schema.graphql'),
    });
  }
}
我們也會新增一些程式碼來列印 GraphQL URL、API 金鑰和區域:
export class ExampleCdkAppStack extends cdk.Stack {
  constructor(scope: Construct, id: string, props?: cdk.StackProps) {
    super(scope, id, props);

    // Makes a GraphQL API construct
    const api = new appsync.GraphqlApi(this, 'post-apis', {
      name: 'api-to-process-posts',
      schema: appsync.SchemaFile.fromAsset('schema/schema.graphql'),
    });

    // Prints out URL
    new cdk.CfnOutput(this, "GraphQLAPIURL", {
      value: api.graphqlUrl
    });

    // Prints out the AppSync GraphQL API key to the terminal
    new cdk.CfnOutput(this, "GraphQLAPIKey", {
      value: api.apiKey || ''
    });

    // Prints out the stack region to the terminal
    new cdk.CfnOutput(this, "Stack Region", {
      value: this.region
    });
  }
}
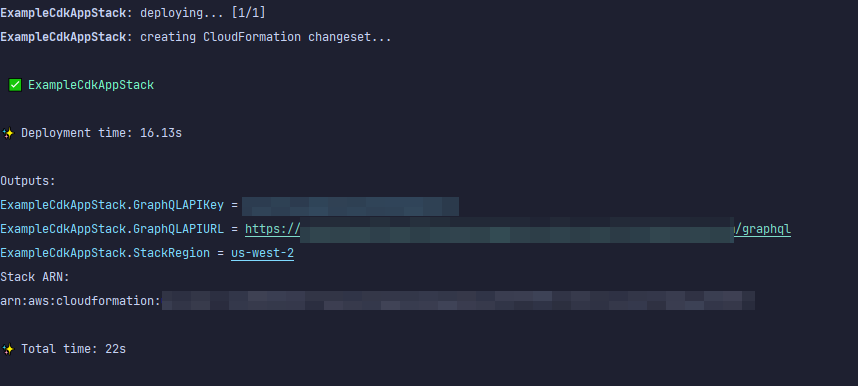
此時,我們將再次使用部署應用程式:
cdk deploy
這是結果:
顯示我們的範例成功,但讓我們檢查 AWS AppSync 主控台以確認:

我們的 API 似乎已建立。現在,我們將檢查連接到 API 的結構描述:
這似乎符合我們的結構描述程式碼,因此成功。從中繼資料觀點確認這一點的另一種方法是查看 CloudFormation 堆疊:

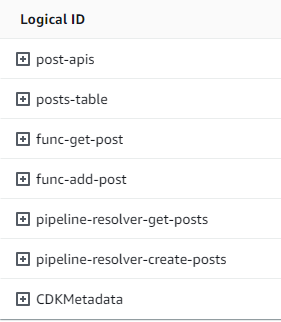
當我們部署 CDK 應用程式時,它會逐步 CloudFormation 啟動引導等資源。我們應用程式內的每個堆疊都會以 1:1 與 CloudFormation 堆疊映射。如果您返回堆疊程式碼,堆疊名稱會從類別名稱 中擷取ExampleCdkAppStack。您可以在 GraphQL API 建構中查看其建立的資源,這也符合我們的命名慣例:
實作 CDK 專案 - 資料來源
接下來,我們需要新增資料來源。我們的範例將使用 DynamoDB 資料表。在堆疊類別中,我們會新增一些程式碼來建立新的資料表:
export class ExampleCdkAppStack extends cdk.Stack {
  constructor(scope: Construct, id: string, props?: cdk.StackProps) {
    super(scope, id, props);

    // Makes a GraphQL API construct
    const api = new appsync.GraphqlApi(this, 'post-apis', {
      name: 'api-to-process-posts',
      schema: appsync.SchemaFile.fromAsset('schema/schema.graphql'),
    });

    //creates a DDB table
    const add_ddb_table = new dynamodb.Table(this, 'posts-table', {
      partitionKey: {
        name: 'id',
        type: dynamodb.AttributeType.STRING,
      },
    });

    // Prints out URL
    new cdk.CfnOutput(this, "GraphQLAPIURL", {
      value: api.graphqlUrl
    });

    // Prints out the AppSync GraphQL API key to the terminal
    new cdk.CfnOutput(this, "GraphQLAPIKey", {
      value: api.apiKey || ''
    });

    // Prints out the stack region to the terminal
    new cdk.CfnOutput(this, "Stack Region", {
      value: this.region
    });
  }
}
此時,讓我們再次部署:
cdk deploy
我們應該檢查 DynamoDB 主控台是否有新的資料表:

我們的堆疊名稱正確,且資料表名稱符合我們的程式碼。如果我們再次檢查 CloudFormation 堆疊,現在將會看到新的資料表:

實作 CDK 專案 - Resolver
此範例將使用兩個解析程式:一個用於查詢資料表,另一個用於新增資料表。由於我們使用管道解析程式,因此我們需要宣告兩個管道解析程式,每個都包含一個函數。在查詢中,我們將新增下列程式碼:
export class ExampleCdkAppStack extends cdk.Stack {
  constructor(scope: Construct, id: string, props?: cdk.StackProps) {
    super(scope, id, props);

    // Makes a GraphQL API construct
    const api = new appsync.GraphqlApi(this, 'post-apis', {
      name: 'api-to-process-posts',
      schema: appsync.SchemaFile.fromAsset('schema/schema.graphql'),
    });

    //creates a DDB table
    const add_ddb_table = new dynamodb.Table(this, 'posts-table', {
      partitionKey: {
        name: 'id',
        type: dynamodb.AttributeType.STRING,
      },
    });

    // Creates a function for query
    const add_func = new appsync.AppsyncFunction(this, 'func-get-post', {
      name: 'get_posts_func_1',
      api,
      dataSource: api.addDynamoDbDataSource('table-for-posts', add_ddb_table),
      code: appsync.Code.fromInline(`
          export function request(ctx) {
          return { operation: 'Scan' };
          }

          export function response(ctx) {
          return ctx.result.items;
          }
  `),
      runtime: appsync.FunctionRuntime.JS_1_0_0,
    });

    // Creates a function for mutation
    const add_func_2 = new appsync.AppsyncFunction(this, 'func-add-post', {
      name: 'add_posts_func_1',
      api,
      dataSource: api.addDynamoDbDataSource('table-for-posts-2', add_ddb_table),
      code: appsync.Code.fromInline(`
          export function request(ctx) {
            return {
            operation: 'PutItem',
            key: util.dynamodb.toMapValues({id: util.autoId()}),
            attributeValues: util.dynamodb.toMapValues(ctx.args.input),
            };
          }

          export function response(ctx) {
            return ctx.result;
          }
      `),
      runtime: appsync.FunctionRuntime.JS_1_0_0,
    });

    // Adds a pipeline resolver with the get function
    new appsync.Resolver(this, 'pipeline-resolver-get-posts', {
      api,
      typeName: 'Query',
      fieldName: 'getPost',
      code: appsync.Code.fromInline(`
          export function request(ctx) {
          return {};
          }

          export function response(ctx) {
          return ctx.prev.result;
          }
  `),
      runtime: appsync.FunctionRuntime.JS_1_0_0,
      pipelineConfig: [add_func],
    });

    // Adds a pipeline resolver with the create function
    new appsync.Resolver(this, 'pipeline-resolver-create-posts', {
      api,
      typeName: 'Mutation',
      fieldName: 'createPost',
      code: appsync.Code.fromInline(`
          export function request(ctx) {
          return {};
          }

          export function response(ctx) {
          return ctx.prev.result;
          }
  `),
      runtime: appsync.FunctionRuntime.JS_1_0_0,
      pipelineConfig: [add_func_2],
    });

    // Prints out URL
    new cdk.CfnOutput(this, "GraphQLAPIURL", {
      value: api.graphqlUrl
    });

    // Prints out the AppSync GraphQL API key to the terminal
    new cdk.CfnOutput(this, "GraphQLAPIKey", {
      value: api.apiKey || ''
    });

    // Prints out the stack region to the terminal
    new cdk.CfnOutput(this, "Stack Region", {
      value: this.region
    });
  }
}
在此程式碼片段中,我們新增了名為 的管道解析程式,pipeline-resolver-create-posts並func-add-post附加了名為 的函數。這是將Posts新增至資料表的程式碼。另一個管道解析程式使用名為 pipeline-resolver-get-posts的函數呼叫func-get-post,該函數會擷取Posts新增至資料表的 。
我們將部署此項目以將其新增至 AWS AppSync 服務:
cdk deploy
讓我們檢查 AWS AppSync 主控台,看看它們是否已連接到我們的 GraphQL API:
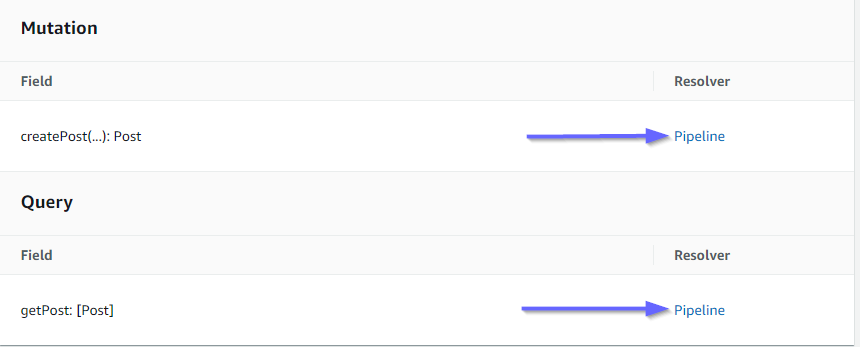
它看起來是正確的。在程式碼中,這兩個解析程式都連接到我們製作的 GraphQL API (由解析程式和函數中存在的 props api 值表示)。在 GraphQL API 中,我們連接解析程式的欄位也在 props 中指定 (由每個解析程式中的 typename和 fieldname props 定義)。
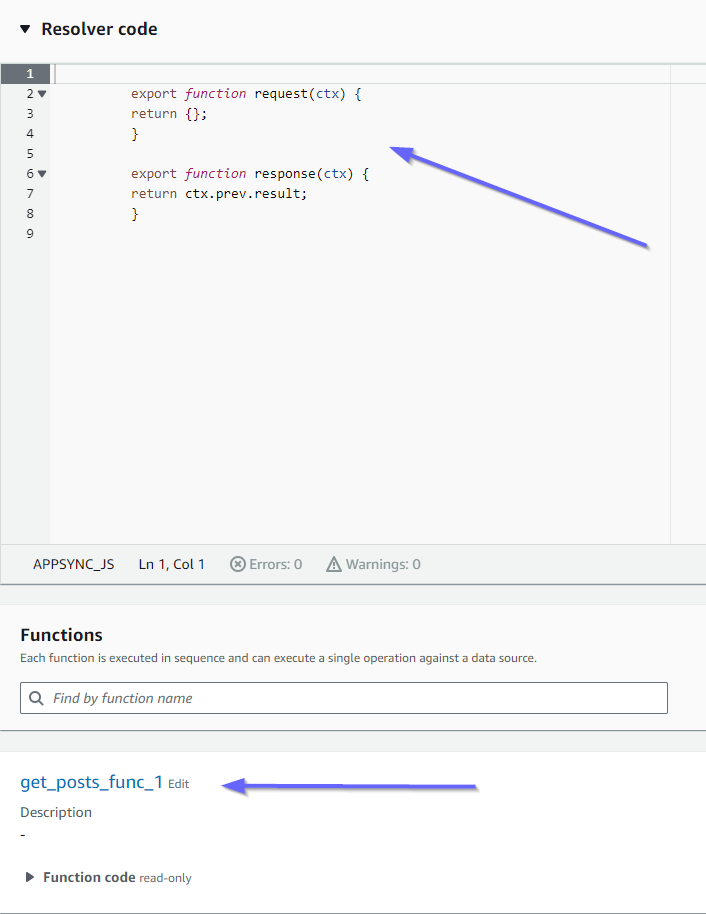
讓我們看看解析程式的內容從 開始是否正確pipeline-resolver-get-posts:

前後處理常式符合我們的code道具值。我們也可以看到名為 的函數add_posts_func_1,其符合我們在解析程式中附加的函數名稱。
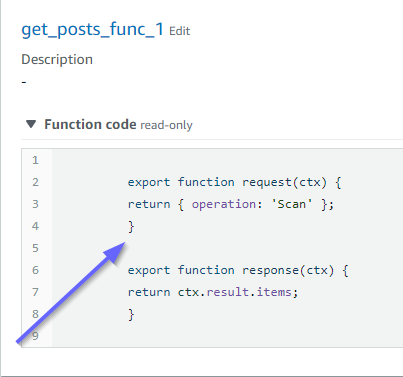
讓我們看看該函數的程式碼內容:

這符合add_posts_func_1函數的code道具。我們的查詢已成功上傳,因此我們檢查查詢:
這些也符合程式碼。如果我們查看 get_posts_func_1:
一切似乎都就位。為了從中繼資料的角度確認這一點,我們可以再次檢查 中的 CloudFormation 堆疊:
現在,我們需要執行一些請求來測試此程式碼。
實作 CDK 專案 - 請求
為了在 AWS AppSync 主控台測試我們的應用程式,我們提出了一個查詢和一個變動:
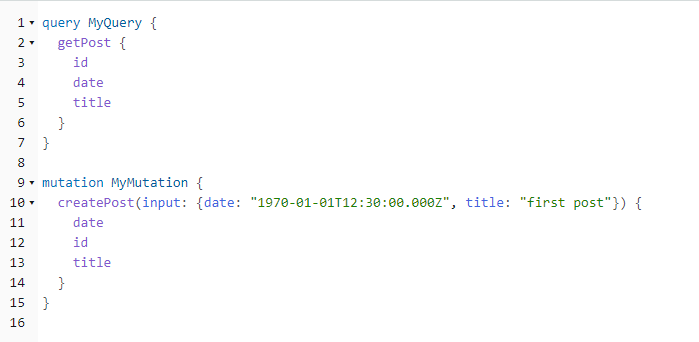
MyMutation 包含具有引數 1970-01-01T12:30:00.000Z和 createPost的操作first post。它會傳回我們傳入title的 date和 ,以及自動產生的id值。執行變動會產生結果:
{
  "data": {
    "createPost": {
      "date": "1970-01-01T12:30:00.000Z",
      "id": "4dc1c2dd-0aa3-4055-9eca-7c140062ada2",
      "title": "first post"
    }
  }
}
如果我們快速檢查 DynamoDB 資料表,我們可以在掃描時在資料表中看到我們的項目:

返回 AWS AppSync 主控台,如果我們執行查詢來擷取此 Post,我們會取得下列結果:
{
  "data": {
    "getPost": [
      {
        "id": "9f62c4dd-49d5-48d5-b835-143284c72fe0",
        "date": "1970-01-01T12:30:00.000Z",
        "title": "first post"
      }
    ]
  }
}
