本文為英文版的機器翻譯版本,如內容有任何歧義或不一致之處,概以英文版為準。
將 Amazon Connect 聊天整合至行動應用程式
本主題說明如何將 Amazon Connect Chat 整合到您的行動應用程式。您可以使用下列其中一個選項:
使用 Amazon Connect StartChatContact API 啟動聯絡。
要使用的整合選項
本節提供每個整合選項的描述,以協助您決定要用於解決方案的整合選項。
WebView 整合
Amazon Connect Chat WebView 整合可讓您以最少的開發工作,將完整的聊天體驗嵌入行動應用程式。此方法WebView在 Android 和 iOS WKWebView 上使用 ,以提供無縫且全面的聊天介面。它非常適合尋求快速、out-of-the-box解決方案的團隊,無需大量自訂即可整合聊天功能。
此方法可確保安全通訊,並利用 Web 型 Amazon Connect 聊天介面。不過,您需要設定應用程式以正確處理 Cookie 和 JavaScript。
如需實作 WebView 整合的詳細資訊,請參閱 Amazon Connect 聊天 UI 範例
建議:WebView 型整合非常適合快速開發和最少維護,同時確保全面的聊天功能。
Amazon Connect 適用於 Mobile SDKs
適用於 iOS 和 Android 的 Amazon Connect 聊天開發套件可簡化原生行動應用程式的 Amazon Connect 聊天整合。 SDKs SDKs有助於處理用戶端聊天邏輯,以及類似 Amazon Connect ChatJS Library 的後端通訊。
Amazon Connect 聊天SDKs會包裝 Amazon Connect 參與者服務 APIs,並抽象化聊天工作階段和 WebSocket 的管理。這可讓您專注於使用者介面和體驗,同時依賴 Amazon Connect 聊天開發套件與所有後端服務互動。此方法仍要求您使用自己的聊天後端來呼叫 StartChatContact API Amazon Connect 以啟動聯絡。
如需 Swift 型 iOS 開發套件的詳細資訊,請參閱Amazon Connect 適用於 iOS GitHub 的聊天開發套件
頁面。 GitHub 如需 Kotlin 型 Android 開發套件的詳細資訊,請參閱適用於 Amazon Connect Android GitHub 的聊天開發套件
頁面。 GitHub
優點: 原生 SDKs 支援強大的功能和高效能,因此非常適合需要深度自訂和無縫使用者體驗的應用程式。
React 原生整合
Amazon Connect Chat React Native 整合提供跨平台解決方案。它可讓團隊使用共用的程式碼庫為 Android 和 iOS 建置聊天功能。此方法會平衡自訂和開發效率,同時利用 React Native 的功能來建立強大的行動應用程式。
此整合使用原生橋接器來存取進階功能,並確保跨平台的一致效能和一致的使用者體驗。使用 react-native-websocket和 API 呼叫等程式庫搭配 ,更輕鬆地實作 WebSocket 通訊等重要功能axios。
最適合:想要將程式碼重複使用最大化,同時維持功能彈性的團隊。
Amazon Connect 聊天整合工作流程
下圖顯示客戶使用行動應用程式和客服人員之間的程式設計流程。圖表中的編號文字對應至影像下方的編號文字。
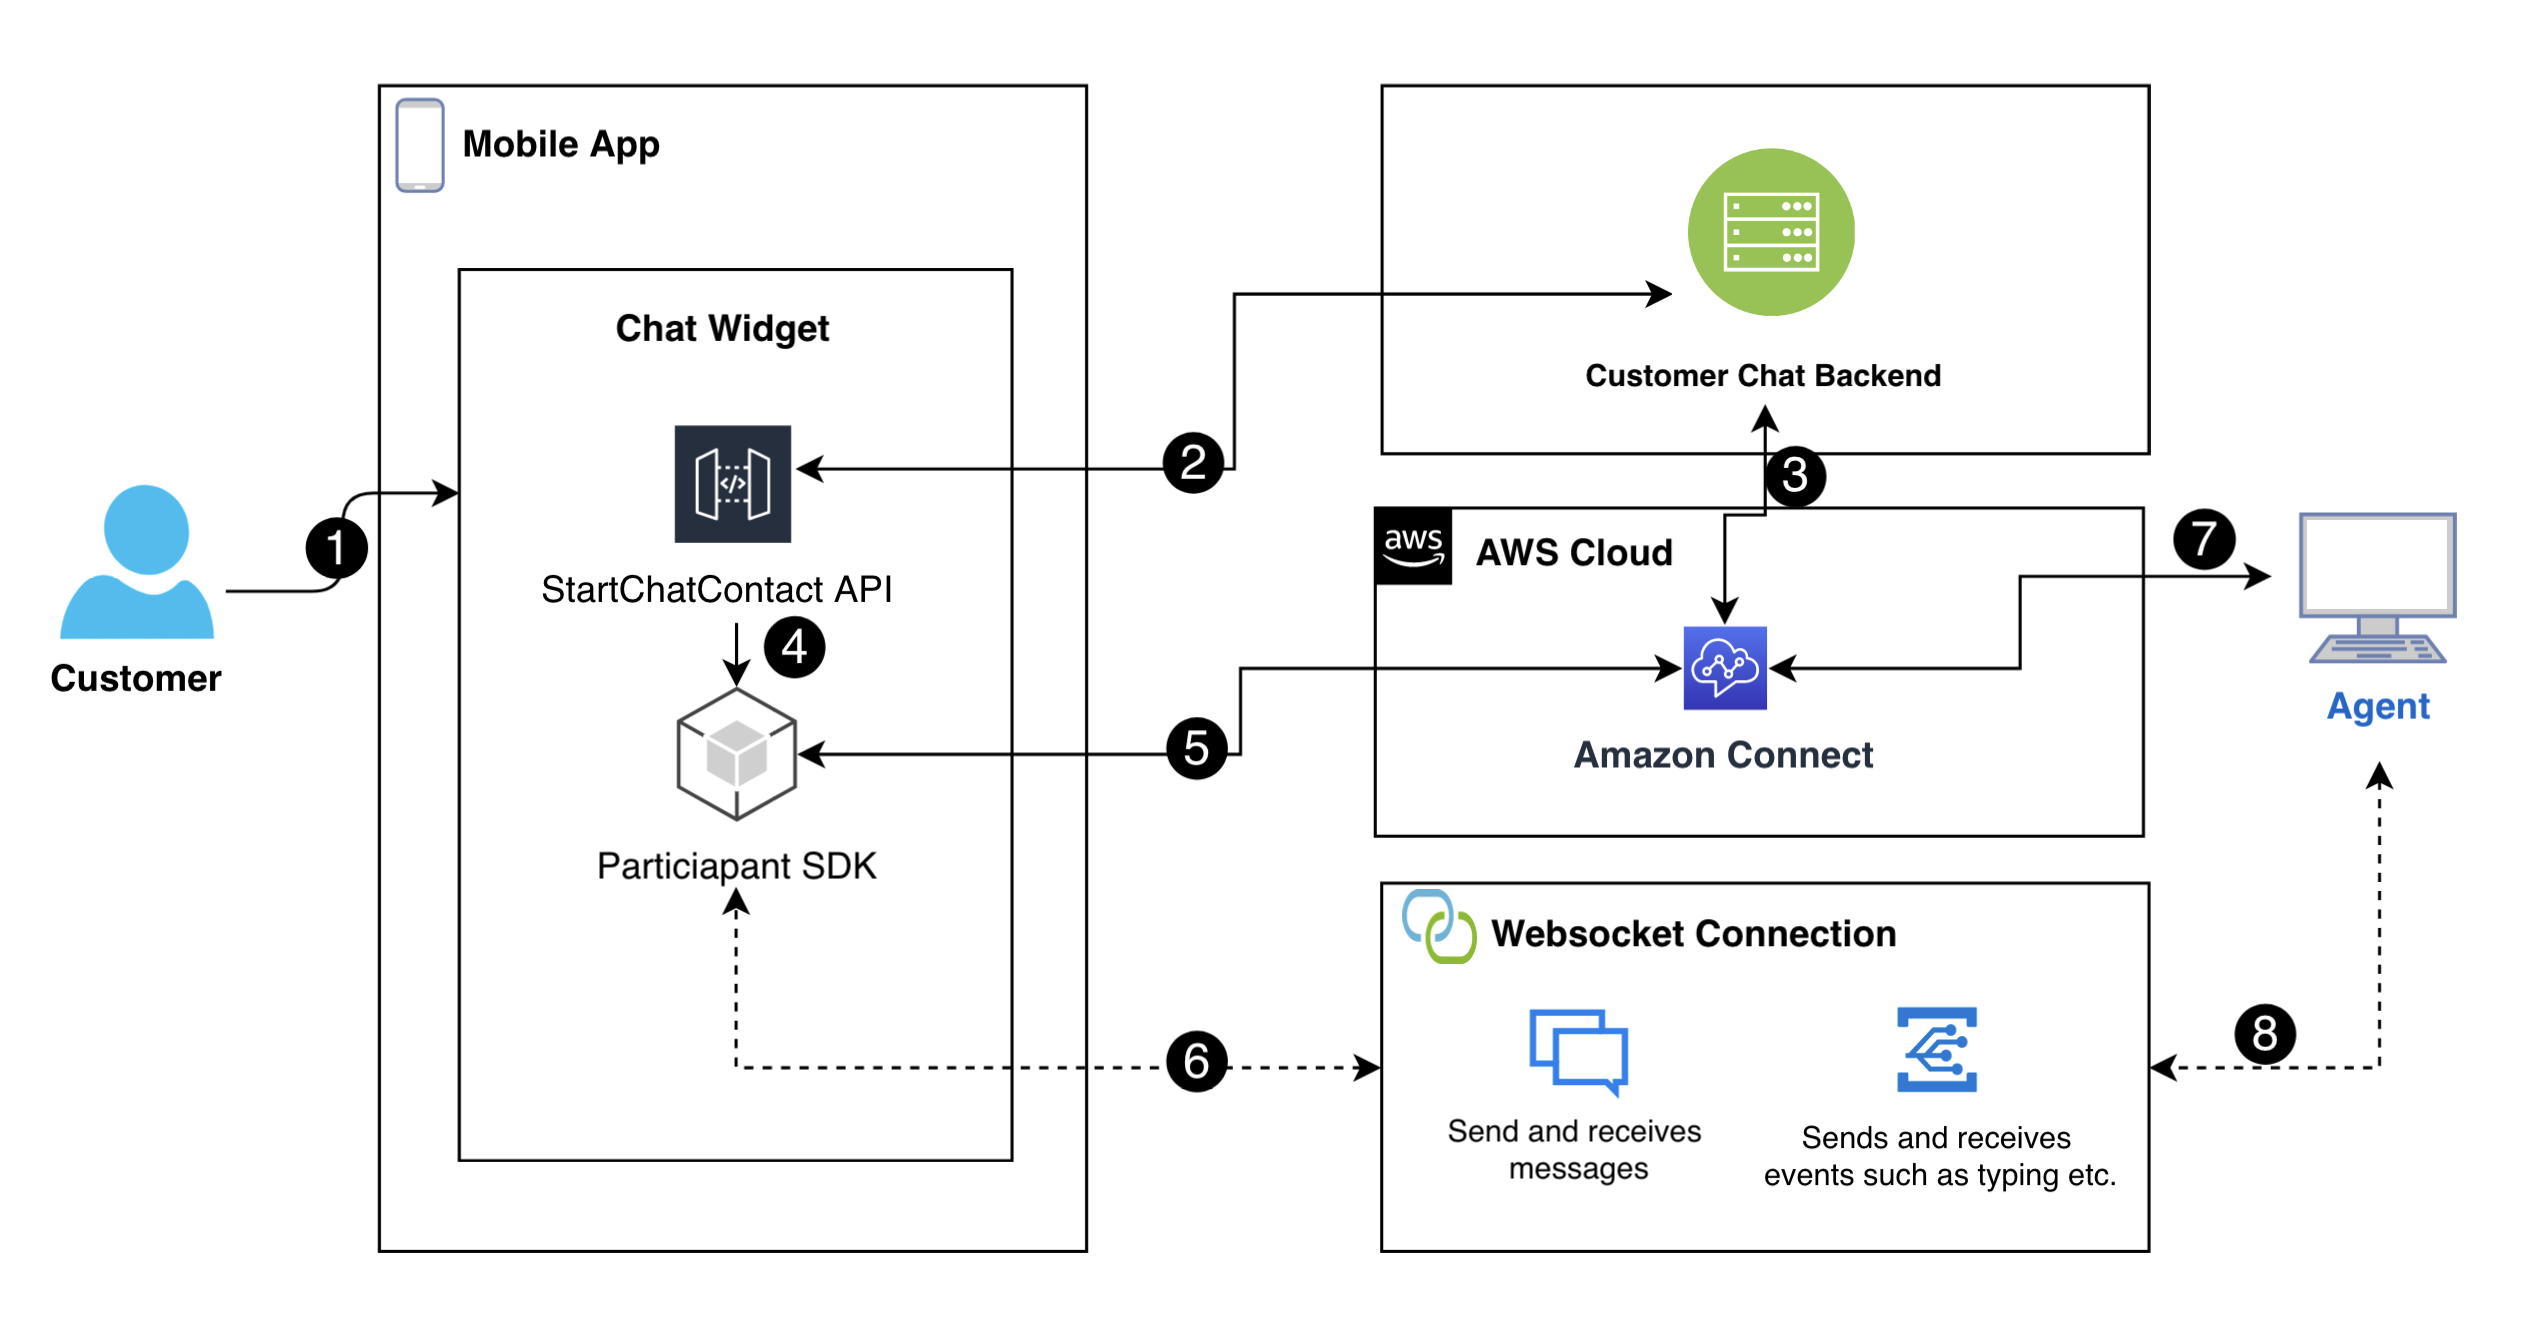
在圖表中
-
當客戶在行動應用程式中開始聊天時,應用程式應該 Amazon Connect 使用 StartChatContact API 傳送請求至 。這需要特定參數,例如執行個體的 API 端點和 IDs 和聯絡流程,才能驗證和啟動聊天。
-
StartChatContactAPI 會與您的後端系統互動,以取得參與者字符和聯絡人 ID,做為聊天工作階段的唯一識別符。 -
應用程式 UI 會將
StartChatContact回應傳遞至行動軟體開發套件,以便軟體開發套件與Amazon Connect 參與者服務正確通訊,並設定客戶的聊天工作階段。 -
SDK 向 UI 公開 chatSession
物件,其中包含可輕鬆使用的方法來與聊天工作階段互動。 -
在幕後,軟體開發套件會使用AWS 軟體開發套件
與Amazon Connect 參與者服務互動。與 Amazon Connect 參與者服務的通訊負責所有客戶與聊天工作階段的互動。這包括 CreateParticipantConnection、SendMessage、GetTranscript或 等動作DisconnectParticipant。 -
軟體開發套件也會管理從代理程式接收訊息、事件和附件所需的 WebSocket 連線。這都會由 SDK 處理和剖析,並以易於使用的結構呈現至 UI。
Amazon Connect 聊天整合入門
下列步驟和資源將協助您開始將 Amazon Connect 聊天整合到原生行動應用程式:
-
您可以透過查看 GitHub 上的 StartChatContact,快速設定AWS CloudFormation堆疊以提供呼叫 StartChatContact 所需的後端。 startChatContactAPI
如需示範如何建置由 Amazon Connect Chat SDKs 提供支援之行動聊天 UI 的範例,請參閱我們的 UI 範例
GitHub 專案。 請參閱我們的 iOS
和 Android 聊天範例,示範如何使用適用於 iOS/Android 的 Amazon Connect 聊天開發套件為聊天應用程式提供動力。 -
查看適用於 Amazon Connect iOS 的聊天開發套件
和Amazon Connect 適用於 Android GitHub 的聊天開發套件 頁面。 GitHub GitHub 頁面包含 API 文件和實作指南,說明任何先決條件和安裝步驟。 -
設定 React Native 整合:利用 React Native
範例,取得實作反應型原生解決方案的指引。 -
如果對於在行動應用程式上設定或使用 Amazon Connect 聊天開發套件有任何疑問或問題,您可以在Amazon Connect 適用於 iOS 的聊天開發套件問題
頁面或Amazon Connect 適用於 Android 的聊天開發套件問題 頁面上提出問題。如果行動聊天 UI 範例發生問題,您可以在Amazon Connect 聊天 UI 範例 問題頁面上提出問題。
