本文為英文版的機器翻譯版本,如內容有任何歧義或不一致之處,概以英文版為準。
在 Service Catalog 中設定 Amazon EMR CloudFormation 範本
本主題假設管理員熟悉 AWS CloudFormation、產品組合和產品 AWS Service Catalog,以及 Amazon EMR。
為了簡化從 Studio 建立 Amazon EMR 叢集的過程,管理員可以將 Amazon EMR CloudFormation 範本註冊為AWS Service Catalog產品組合中的產品。為了讓資料科學家可以使用範本,他們必須將產品組合與 Studio 或 Studio Classic 中使用的 SageMaker AI 執行角色建立關聯。最後,若要允許使用者探索範本、佈建叢集,以及從 Studio 或 Studio Classic 連線至 Amazon EMR 叢集,管理員需要設定適當的存取許可。
Amazon EMR AWS CloudFormation 範本可讓最終使用者自訂各種叢集層面。例如,管理員可以定義核准的執行個體類型清單,使用者可以在建立叢集時從中選擇。
下列指示使用end-to-end CloudFormation 堆疊
注意
GitHub 儲存庫 aws-samples/sagemaker-studio-emr
sagemaker-studio-emr/cloudformation/emr_servicecatalog_templates
如需可用來連線至 從 SageMaker Studio 或 Studio Classic 連線至 Amazon EMR 叢集 Amazon EMR 叢集之身分驗證方法的詳細資訊,請參閱 。
若要讓資料科學家探索 Amazon EMR CloudFormation 範本,並從 Studio 或 Studio Classic 佈建叢集,請遵循下列步驟。
步驟 0:檢查您的聯網並準備 CloudFormation 堆疊
開始之前:
-
請確定您已檢閱 中的聯網和安全需求設定 Amazon EMR 叢集的網路存取。
-
您必須擁有支援您選擇的身分驗證方法的現有end-to-end CloudFormation 堆疊。您可以在 aws-samples/sagemaker-studio-emr
GitHub 儲存庫中找到這類 CloudFormation 範本的範例。下列步驟會反白顯示end-to-end堆疊中的特定組態,以便在 Studio 或 Studio Classic 中使用 Amazon EMR 範本。
步驟 1:將您的 Service Catalog 產品組合與 SageMaker AI 建立關聯
在您的 Service Catalog 產品組合中,將您的產品組合 ID 與存取叢集的 SageMaker AI 執行角色建立關聯。
若要這麼做,請將以下區段 (此處為 YAML 格式) 新增至您的堆疊。這會授予 SageMaker AI 執行角色存取指定 Service Catalog 產品組合的權限,其中包含 Amazon EMR 範本等產品。它允許 SageMaker AI 擔任的角色啟動這些產品。
將 SageMakerExecutionRole.Arn 和 SageMakerStudioEMRProductPortfolio.ID 取代為其實際值。
SageMakerStudioEMRProductPortfolioPrincipalAssociation: Type: AWS::ServiceCatalog::PortfolioPrincipalAssociation Properties: PrincipalARN:SageMakerExecutionRole.ArnPortfolioId:SageMakerStudioEMRProductPortfolio.IDPrincipalType: IAM
如需所需 IAM 許可集的詳細資訊,請參閱許可區段。
步驟 2:參考 Service Catalog 產品中的 Amazon EMR 範本
在產品組合的 Service Catalog 產品中,參考 Amazon EMR 範本資源,並確保其在 Studio 或 Studio Classic 中的可見性。
若要這樣做,請參閱 Service Catalog 產品定義中的 Amazon EMR 範本資源,然後將下列標籤金鑰"sagemaker:studio-visibility:emr"集新增至 值 "true"(請參閱 YAML 格式的範例)。
在 Service Catalog 產品定義中,透過 URL 參考叢集的 AWS CloudFormation 範本。設定為 true 的其他標籤可確保 Studio 或 Studio Classic 中 Amazon EMR 範本的可見性。
注意
範例中所提供 URL 參考的 Amazon EMR 範本在啟動時不會強制執行任何身分驗證要求。此選項適用於示範和學習目的。不建議在生產環境中使用。
SMStudioEMRNoAuthProduct: Type: AWS::ServiceCatalog::CloudFormationProduct Properties: Owner: AWS Name: SageMaker Studio Domain No Auth EMR ProvisioningArtifactParameters: - Name: SageMaker Studio Domain No Auth EMR Description: Provisions a SageMaker domain and No Auth EMR Cluster Info: LoadTemplateFromURL:Link to your CloudFormation template. For example, https://aws-blogs-artifacts-public.s3.amazonaws.com/artifacts/astra-m4-sagemaker/end-to-end/CFN-EMR-NoStudioNoAuthTemplate-v3.yamlTags: - Key: "sagemaker:studio-visibility:emr" Value: "true"
步驟 3:參數化 Amazon EMR CloudFormation 範本
用於在 Service Catalog 產品中定義 Amazon EMR 叢集的 CloudFormation 範本可讓管理員指定可設定的參數。管理員可以在範本的 Parameters區段中定義這些參數Default的值和AllowedValues範圍。在叢集啟動過程中,資料科學家可以提供自訂輸入或從這些預先定義的選項中進行選擇,以自訂其 Amazon EMR 叢集的某些層面。
下列範例說明管理員在建立 Amazon EMR 範本時可設定的其他輸入參數。
"Parameters": {
    "EmrClusterName": {
      "Type": "String",
      "Description": "EMR cluster Name."
    },
    "MasterInstanceType": {
      "Type": "String",
      "Description": "Instance type of the EMR master node.",
      "Default": "m5.xlarge",
      "AllowedValues": [
        "m5.xlarge",
        "m5.2xlarge",
        "m5.4xlarge"
      ]
    },
    "CoreInstanceType": {
      "Type": "String",
      "Description": "Instance type of the EMR core nodes.",
      "Default": "m5.xlarge",
      "AllowedValues": [
        "m5.xlarge",
        "m5.2xlarge",
        "m5.4xlarge",
        "m3.medium",
        "m3.large",
        "m3.xlarge",
        "m3.2xlarge"
      ]
    },
    "CoreInstanceCount": {
      "Type": "String",
      "Description": "Number of core instances in the EMR cluster.",
      "Default": "2",
      "AllowedValues": [
        "2",
        "5",
        "10"
      ]
    },
    "EmrReleaseVersion": {
      "Type": "String",
      "Description": "The release version of EMR to launch.",
      "Default": "emr-5.33.1",
      "AllowedValues": [
        "emr-5.33.1",
        "emr-6.4.0"
      ]
    }
  }
在管理員在 Studio 中提供 Amazon EMR CloudFormation 範本之後,資料科學家可以使用它們來自行佈建 Amazon EMR 叢集。範本中定義的Parameters區段會轉譯為 Studio 或 Studio Classic 內叢集建立表單上的輸入欄位。對於每個參數,資料科學家可以在輸入方塊中輸入自訂值,或從下拉式功能表中列出的預先定義選項中選取,該選項對應於範本中AllowedValues指定的 。
下圖顯示從 CloudFormation Amazon EMR 範本組合的動態表單,以在 Studio 或 Studio Classic 中建立 Amazon EMR 叢集。
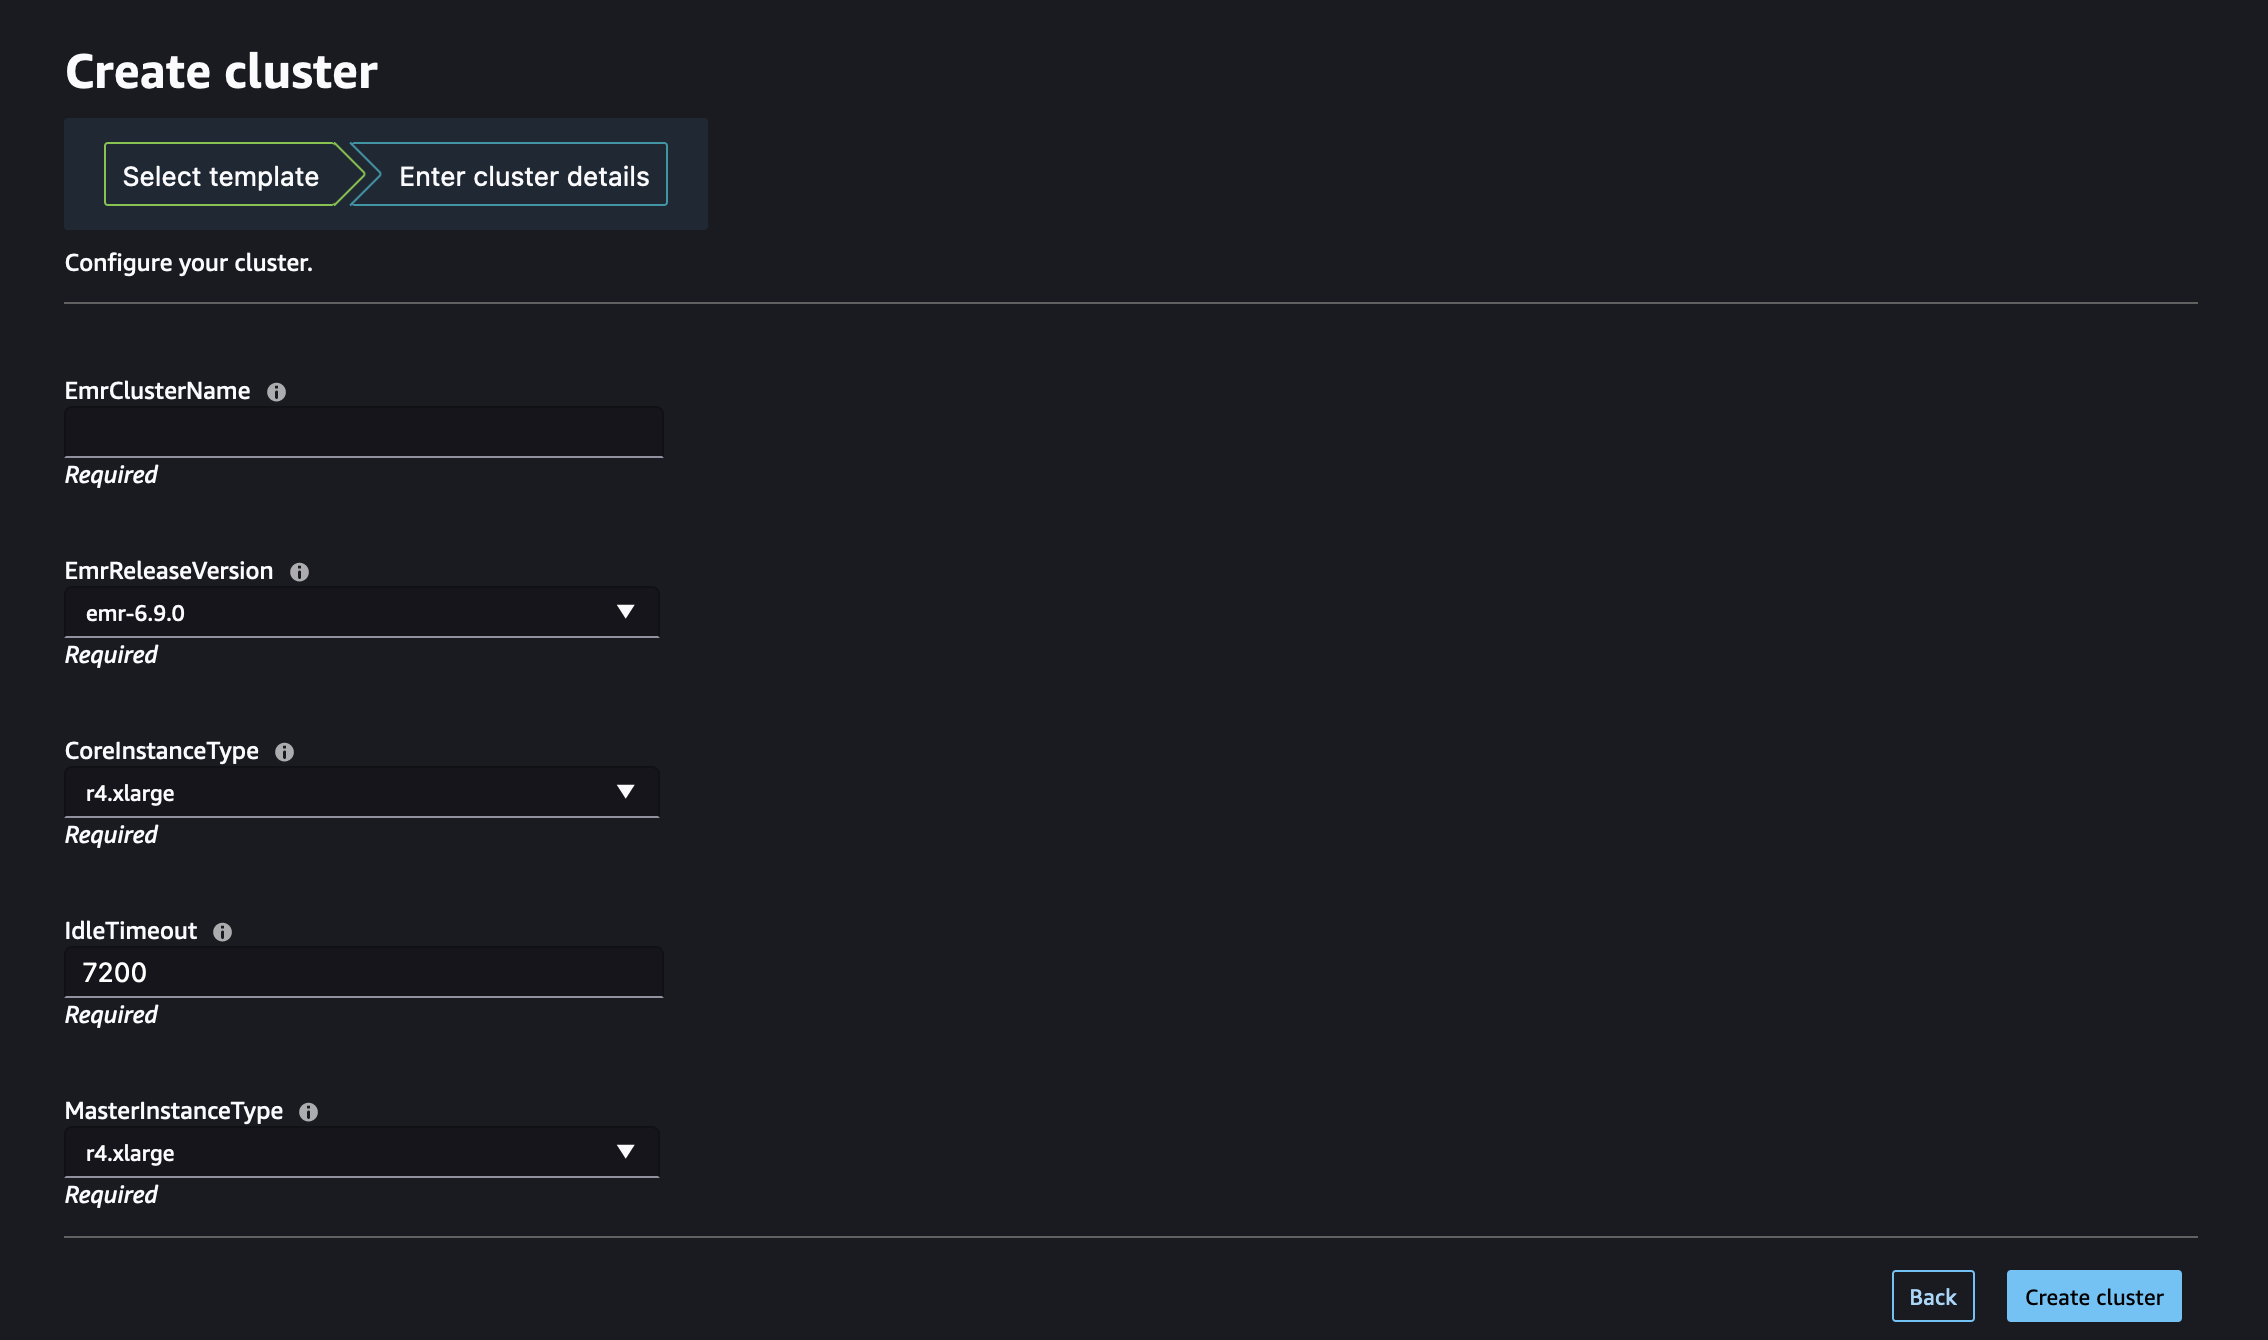
請造訪 從 Studio 或 Studio Classic 啟動 Amazon EMR 叢集 ,了解如何使用這些 Amazon EMR 範本從 Studio 或 Studio Classic 啟動叢集。
步驟 4:設定許可,以啟用從 Studio 列出和啟動 Amazon EMR 叢集
最後,連接必要的 IAM 許可,以啟用列出現有執行中的 Amazon EMR 叢集,並從 Studio 或 Studio Classic 自行佈建新叢集。
您必須新增這些許可的角色取決於 Studio 或 Studio Classic 和 Amazon EMR 是部署在相同的帳戶 (選擇單一帳戶) 還是不同帳戶 (選擇跨帳戶)。
重要
您只能探索並連線至從私有空間啟動的 JupyterLab 和 Studio Classic 應用程式的 Amazon EMR 叢集。確保 Amazon EMR 叢集與您的 Studio 環境位於相同的 AWS 區域。
如果您的 Amazon EMR 叢集和 Studio 或 Studio Classic 部署在同一個 AWS 帳戶中,請將下列許可連接到存取叢集的 SageMaker AI 執行角色。
-
步驟 1:擷取私有空間所使用的 SageMaker AI 執行角色 ARN。
如需 SageMaker AI 中空間和執行角色的資訊,請參閱 了解網域空間許可和執行角色。
如需如何擷取 SageMaker AI 執行角色 ARN 的詳細資訊,請參閱 取得您的執行角色。
-
步驟 2:將下列許可連接至存取 Amazon EMR 叢集的 SageMaker AI 執行角色。
-
導覽至 IAM 主控台
。 -
選擇角色,然後在搜尋欄位中依名稱搜尋執行角色。角色名稱是 ARN 的最後一部分,在最後一個正斜線 (/) 之後。
-
遵循您的角色連結。
-
選擇新增許可,然後選擇建立內嵌政策。
-
在 JSON 索引標籤中,新增允許 Amazon EMR 存取和操作的 Amazon EMR 許可。如需政策文件的詳細資訊,請參閱在 中列出 Amazon EMR 政策參考政策。將陳述式清單複製到角色的內嵌政策之前
region,請將 、 和accountID取代為實際值。 -
選擇下一步,然後提供政策名稱。
-
選擇建立政策。
-
重複建立內嵌政策步驟,以新增另一個政策,授予執行角色使用 AWS CloudFormation 範本佈建新 Amazon EMR 叢集的許可。如需政策文件的詳細資訊,請參閱在 中建立 Amazon EMRclusters 政策參考政策。將陳述式清單複製到角色的內嵌政策之前,請將
region和 取代accountID為實際值。
-
注意
角色型存取控制 (RBAC) 連線至 Amazon EMR 叢集的使用者也應該參閱 當您的 Amazon EMR 叢集和 Studio 位於相同帳戶時,設定執行期的角色身分驗證。
開始使用之前,請先擷取私有空間所使用的 SageMaker AI 執行角色 ARN。
如需 SageMaker AI 中空間和執行角色的資訊,請參閱 了解網域空間許可和執行角色。
如需如何擷取 SageMaker AI 執行角色 ARN 的詳細資訊,請參閱 取得您的執行角色。
如果您的 Amazon EMR 叢集和 Studio 或 Studio Classic 部署在不同的 AWS 帳戶中,您可以在這兩個帳戶上設定許可。
注意
角色型存取控制 (RBAC) 連線至 Amazon EMR 叢集的使用者也應該參閱 當叢集和 Studio 位於不同帳戶時,設定執行期角色驗證。
在 Amazon EMR 叢集帳戶上
請依照下列步驟,在部署 Amazon EMR 的帳戶上建立必要的角色和政策,也稱為信任帳戶:
-
步驟 1:擷取 Amazon EMR 叢集之服務角色的 ARN。
若要了解如何尋找叢集服務角色的 ARN,請參閱設定 Amazon EMR 服務角色對 AWS 服務和資源的許可。
-
步驟 2:使用下列組態建立名為
AssumableRole的自訂 IAM 角色:-
許可:將必要的許可授予
AssumableRole,以允許存取 Amazon EMR 資源。在涉及跨帳戶存取的案例中,此角色也稱為存取角色。 -
信任關係:設定 的信任政策
AssumableRole,以允許從需要存取的 Studio 帳戶擔任執行角色 (跨帳戶圖表SageMakerExecutionRole中的 )。
透過擔任角色,Studio 或 Studio Classic 可以暫時存取其在 Amazon EMR 中所需的許可。
如需如何在
AssumableRoleAmazon EMR AWS 帳戶中建立新 的詳細說明,請遵循下列步驟:-
導覽至 IAM 主控台
。 -
在左側導覽窗格中,選擇政策,然後選擇建立政策。
-
在 JSON 索引標籤中,新增允許 Amazon EMR 存取和操作的 Amazon EMR 許可。如需政策文件的詳細資訊,請參閱在 中列出 Amazon EMR 政策參考政策。將陳述式清單複製到角色的內嵌政策之前
region,請將 、 和accountID取代為實際值。 -
選擇下一步,然後提供政策名稱。
-
選擇建立政策。
-
在左側導覽窗格中,選擇角色,然後選擇建立角色。
-
在建立角色頁面上,選擇自訂信任政策作為信任的實體。
-
在自訂信任政策區段中貼上下列 JSON 文件,然後選擇下一步。
-
在新增許可頁面中,新增您剛建立的許可,然後選擇下一步。
-
在檢閱頁面上,輸入角色的名稱,例如
AssumableRole和選用的描述。 -
檢閱角色詳細資訊,並選擇 Create role (建立角色)。
如需在 AWS 帳戶上建立角色的詳細資訊,請參閱建立 IAM 角色 (主控台)。
-
在 Studio 帳戶上
在部署 Studio 的帳戶中,也稱為信任帳戶,請使用存取信任帳戶中資源所需的許可,更新存取叢集的 SageMaker AI 執行角色。
-
步驟 1:擷取私有空間所使用的 SageMaker AI 執行角色 ARN。
如需 SageMaker AI 中空間和執行角色的資訊,請參閱 了解網域空間許可和執行角色。
如需如何擷取 SageMaker AI 執行角色 ARN 的詳細資訊,請參閱 取得您的執行角色。
-
步驟 2:將下列許可連接至存取 Amazon EMR 叢集的 SageMaker AI 執行角色。
-
導覽至 IAM 主控台
。 -
選擇角色,然後在搜尋欄位中依名稱搜尋執行角色。角色名稱是 ARN 的最後一部分,在最後一個正斜線 (/) 之後。
-
遵循您的角色連結。
-
選擇新增許可,然後選擇建立內嵌政策。
-
在 JSON 索引標籤中,新增內嵌政策,授予角色更新網域、使用者設定檔和空格的許可。如需政策文件的詳細資訊,請參閱 中的網域、使用者設定檔和空間更新動作政策參考政策。將陳述式清單複製到角色的內嵌政策之前,請將
region和accountID取代為實際值。 -
選擇下一步,然後提供政策名稱。
-
選擇建立政策。
-
重複建立內嵌政策步驟,以新增另一個政策,授予執行角色擔任 的許可,
AssumableRole然後執行角色存取政策允許的動作。emr-account將 取代為 Amazon EMR 帳戶 ID,並將AssumableRole取代為在 Amazon EMR 帳戶中建立的可擔任角色名稱。 -
重複建立內嵌政策步驟,以新增另一個政策,授予執行角色使用 AWS CloudFormation 範本佈建新 Amazon EMR 叢集的許可。如需政策文件的詳細資訊,請參閱在 中建立 Amazon EMRclusters 政策參考政策。將陳述式清單複製到角色的內嵌政策之前,請將
region和 取代accountID為實際值。 -
(選用) 若要允許列出部署在與 Studio 相同帳戶中的 Amazon EMR 叢集,請將額外的內嵌政策新增至 Studio 執行角色,如 中的列出 Amazon EMR 政策所定義參考政策。
-
-
步驟 3:將您的可擔任角色 (存取角色) 與您的網域或使用者設定檔建立關聯。Studio 中的 JupyterLab 使用者可以使用 SageMaker AI 主控台或提供的指令碼。
選擇與您的使用案例對應的索引標籤。
