Setting up Kerberos authentication for PostgreSQL DB clusters
You use AWS Directory Service for Microsoft Active Directory (AWS Managed Microsoft AD) to set up Kerberos authentication for a PostgreSQL DB cluster. To set up Kerberos authentication, take the following steps.
Topics
Step 1: Create a directory using AWS Managed Microsoft AD
Directory Service creates a fully managed Active Directory in the AWS Cloud. When you create an AWS Managed Microsoft AD directory, Directory Service creates two domain controllers and DNS servers for you. The directory servers are created in different subnets in a VPC. This redundancy helps make sure that your directory remains accessible even if a failure occurs.
When you create an AWS Managed Microsoft AD directory, AWS Directory Service performs the following tasks on your behalf:
-
Sets up an Active Directory within your VPC.
-
Creates a directory administrator account with the user name
Adminand the specified password. You use this account to manage your directory.Important
Make sure to save this password. Directory Service doesn't store this password, and it can't be retrieved or reset.
-
Creates a security group for the directory controllers. The security group must permit communication with the PostgreSQL DB cluster.
When you launch AWS Directory Service for Microsoft Active Directory, AWS creates an Organizational Unit (OU) that contains all of your directory's objects. This OU, which has the NetBIOS name that you entered when you created your directory, is located in the domain root. The domain root is owned and managed by AWS.
The Admin account that was created with your AWS Managed Microsoft AD directory
has permissions for the most common administrative activities for your OU:
-
Create, update, or delete users
-
Add resources to your domain such as file or print servers, and then assign permissions for those resources to users in your OU
-
Create additional OUs and containers
-
Delegate authority
-
Restore deleted objects from the Active Directory Recycle Bin
-
Run Active Directory and Domain Name Service (DNS) modules for Windows PowerShell on the Active Directory Web Service
The Admin account also has rights to perform the following
domain-wide activities:
-
Manage DNS configurations (add, remove, or update records, zones, and forwarders)
-
View DNS event logs
-
View security event logs
To create a directory with AWS Managed Microsoft AD
-
In the Directory Service console
navigation pane, choose Directories, and then choose Set up directory. -
Choose AWS Managed Microsoft AD. AWS Managed Microsoft AD is the only option currently supported for use with Amazon Aurora.
-
Choose Next.
-
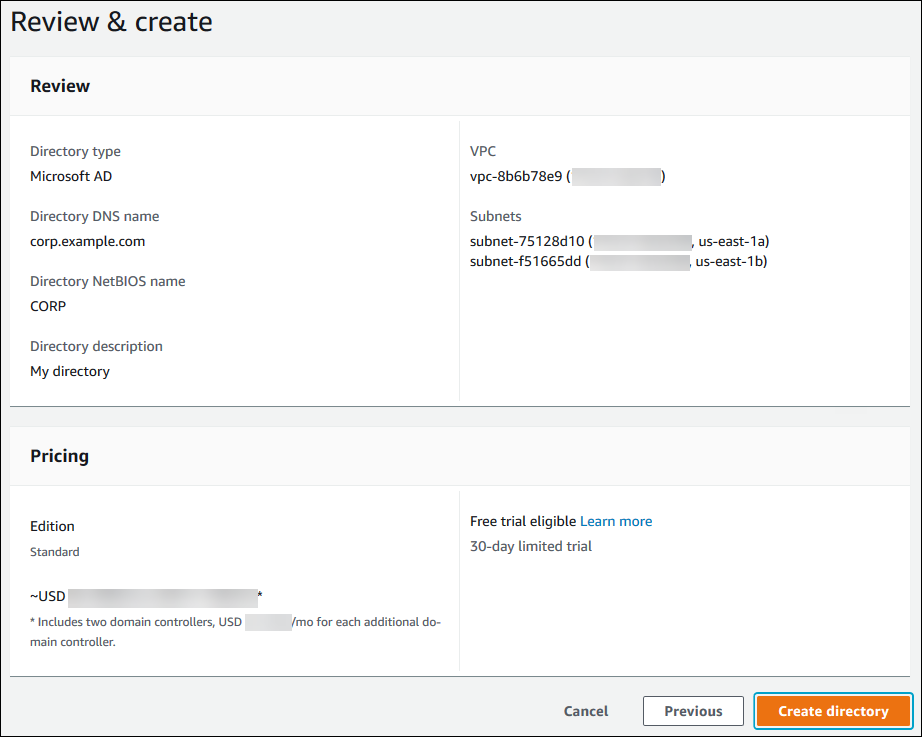
On the Enter directory information page, provide the following information:
- Edition
-
Choose the edition that meets your requirements.
- Directory DNS name
-
The fully qualified name for the directory, such as
corp.example.com. - Directory NetBIOS name
-
An optional short name for the directory, such as
CORP. - Directory description
-
An optional description for the directory.
- Admin password
-
The password for the directory administrator. The directory creation process creates an administrator account with the user name
Adminand this password.The directory administrator password can't include the word "admin." The password is case-sensitive and must be 8–64 characters in length. It must also contain at least one character from three of the following four categories:
-
Lowercase letters (a–z)
-
Uppercase letters (A–Z)
-
Numbers (0–9)
-
Nonalphanumeric characters (~!@#$%^&*_-+=`|\(){}[]:;"'<>,.?/)
-
- Confirm password
-
Retype the administrator password.
Important
Make sure that you save this password. Directory Service doesn't store this password, and it can't be retrieved or reset.
-
Choose Next.
-
On the Choose VPC and subnets page, provide the following information:
- VPC
-
Choose the VPC for the directory. You can create the PostgreSQL DB cluster in this same VPC or in a different VPC.
- Subnets
-
Choose the subnets for the directory servers. The two subnets must be in different Availability Zones.
-
Choose Next.
-
Review the directory information. If changes are needed, choose Previous and make the changes. When the information is correct, choose Create directory.
It takes several minutes for the directory to be created. When it has been successfully created, the Status value changes to Active.
To see information about your directory, choose the directory ID in the directory listing. Make a note of the Directory ID value. You need this value when you create or modify your PostgreSQL DB instance.

Step 2: (Optional) Create a trust relationship between your on-premises Active Directory and Directory Service
If you don't plan to use your own on-premises Microsoft Active Directory, skip to Step 3: Create an IAM role for Amazon Aurora to access the Directory Service.
To get Kerberos authentication using your on-premises Active Directory, you need to create a trusting domain relationship using a forest trust between your on-premises Microsoft Active Directory and the AWS Managed Microsoft AD directory (created in Step 1: Create a directory using AWS Managed Microsoft AD). The trust can be one-way, where the AWS Managed Microsoft AD directory trusts the on-premises Microsoft Active Directory. The trust can also be two-way, where both Active Directories trust each other. For more information about setting up trusts using Directory Service, see When to create a trust relationship in the AWS Directory Service Administration Guide.
Note
If you use an on-premises Microsoft Active Directory:
-
Windows clients must connect using the domain name of the Directory Service in the endpoint rather than rds.amazonaws.com. For more information, see Connecting to PostgreSQL with Kerberos authentication.
-
Windows clients can't connect using Aurora custom endpoints. To learn more, see Amazon Aurora endpoint connections.
-
For global databases:
-
Windows clients can connect using instance endpoints or cluster endpoints in the primary AWS Region of the global database only.
-
Windows clients can't connect using cluster endpoints in secondary AWS Regions.
-
Make sure that your on-premises Microsoft Active Directory domain name includes a DNS suffix routing that corresponds to the newly created trust relationship. The following screenshot shows an example.

Step 3: Create an IAM role for Amazon Aurora to access the Directory Service
For Amazon Aurora to call Directory Service for you, your AWS account needs an IAM role
that uses the managed IAM policy AmazonRDSDirectoryServiceAccess.
This role allows Amazon Aurora to make calls to Directory Service. (Note that this IAM role to access the Directory Service is different
than the IAM role used for IAM database authentication.)
When you create a DB instance using the AWS Management Console and your console user account
has the iam:CreateRole permission, the console creates the needed IAM
role automatically. In this case, the role name is
rds-directoryservice-kerberos-access-role. Otherwise, you must
create the IAM role manually. When you create this IAM role, choose
Directory Service, and attach the AWS managed policy
AmazonRDSDirectoryServiceAccess to it.
For more information about creating IAM roles for a service, see Creating a role to delegate permissions to an AWS service in the IAM User Guide.
Note
The IAM role used for Windows Authentication for RDS for Microsoft SQL Server can't be used for Amazon Aurora.
As an alternative to using the AmazonRDSDirectoryServiceAccess
managed policy, you can create policies with the required permissions. In this case,
the IAM role must have the following IAM trust policy.
The role must also have the following IAM role policy.
For opt-in AWS Regions, use Region-specific service principals in IAM role trust policies. When you create a trust policy for services in these Regions, specify the Region code in the service principal.
The following example shows a trust policy that includes Region-specific service principals:
Replace REGION-CODE with the code for your specific Region. For example, use the following service principals for the Asia Pacific (Melbourne) Region:
"Service": [
  "directoryservice.rds.ap-southeast-4.amazonaws.com",
  "rds.ap-southeast-4.amazonaws.com"
]
Step 4: Create and configure users
You can create users by using the Active Directory Users and Computers tool. This
is one of the Active Directory Domain Services and Active Directory Lightweight
Directory Services tools. For more information, see Add Users and Computers to the Active Directory domain
To create users in an Directory Service directory, you must be connected to a Windows-based Amazon EC2 instance that's a member of the Directory Service directory. At the same time, you must be logged in as a user that has privileges to create users. For more information, see Create a user in the AWS Directory Service Administration Guide.
Step 5: Enable cross-VPC traffic between the directory and the DB instance
If you plan to locate the directory and the DB cluster in the same VPC, skip this step and move on to Step 6: Create or modify a PostgreSQL DB cluster.
If you plan to locate the directory and the DB instance in different VPCs, configure cross-VPC traffic using VPC peering or AWS Transit Gateway.
The following procedure enables traffic between VPCs using VPC peering. Follow the instructions in What is VPC peering? in the Amazon Virtual Private Cloud Peering Guide.
To enable cross-VPC traffic using VPC peering
-
Set up appropriate VPC routing rules to ensure that network traffic can flow both ways.
-
Ensure that the DB instance security group can receive inbound traffic from the directory security group.
-
Ensure that there is no network access control list (ACL) rule to block traffic.
If a different AWS account owns the directory, you must share the directory.
To share the directory between AWS accounts
-
Start sharing the directory with the AWS account that the DB instance will be created in by following the instructions in Tutorial: Sharing your AWS Managed Microsoft AD directory for seamless EC2 Domain-join in the Directory Service Administration Guide.
-
Sign in to the Directory Service console using the account for the DB instance, and ensure that the domain has the
SHAREDstatus before proceeding. -
While signed into the Directory Service console using the account for the DB instance, note the Directory ID value. You use this directory ID to join the DB instance to the domain.
Step 6: Create or modify a PostgreSQL DB cluster
Create or modify a PostgreSQL DB cluster for use with your directory. You can use the console, CLI, or RDS API to associate a DB cluster with a directory. You can do this in one of the following ways:
-
Create a new PostgreSQL DB cluster using the console, the create-db-cluster CLI command, or the CreateDBCluster RDS API operation. For instructions, see Creating and connecting to an Aurora PostgreSQL DB cluster.
-
Modify an existing PostgreSQL DB cluster using the console, the modify-db-cluster CLI command, or the ModifyDBCluster RDS API operation. For instructions, see Modifying an Amazon Aurora DB cluster.
-
Restore a PostgreSQL DB cluster from a DB snapshot using the console, the restore-db-cluster-from-db-snapshot CLI command, or the RestoreDBClusterFromDBSnapshot RDS API operation. For instructions, see Restoring from a DB cluster snapshot.
-
Restore a PostgreSQL DB cluster to a point-in-time using the console, the restore-db-instance-to-point-in-time CLI command, or the RestoreDBClusterToPointInTime RDS API operation. For instructions, see Restoring a DB cluster to a specified time.
Kerberos authentication is only supported for PostgreSQL DB clusters in a VPC. The DB cluster can be in the same VPC as the directory, or in a different VPC. The DB cluster must use a security group that allows ingress and egress within the directory's VPC so the DB cluster can communicate with the directory.
Note
Enabling Kerberos authentication isn't currently supported on Aurora PostgreSQL DB cluster during migration from RDS for PostgreSQL. You can enable Kerberos authentication only on a standalone Aurora PostgreSQL DB cluster.
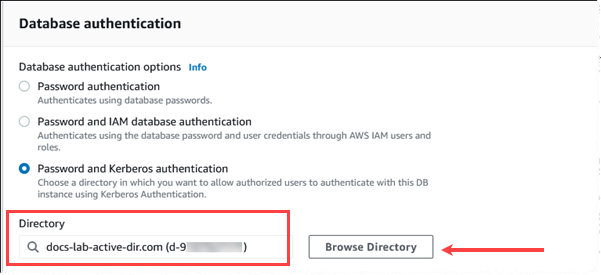
When you use the console to create, modify, or restore a DB cluster, choose Kerberos authentication in the Database authentication section. Then choose Browse Directory. Select the directory or choose Create a new directory to use the Directory Service.
When you use the AWS CLI, the following parameters are required for the DB cluster to be able to use the directory that you created:
-
For the
--domainparameter, use the domain identifier ("d-*" identifier) generated when you created the directory. -
For the
--domain-iam-role-nameparameter, use the role you created that uses the managed IAM policyAmazonRDSDirectoryServiceAccess.
For example, the following CLI command modifies a DB cluster to use a directory.
aws rds modify-db-cluster --db-cluster-identifiermydbinstance--domain d-Directory-ID--domain-iam-role-namerole-name
Important
If you modify a DB cluster to enable Kerberos authentication, reboot the DB cluster after making the change.
Step 7: Create PostgreSQL users for your Kerberos principals
At this point, your Aurora PostgreSQL DB cluster
is joined to the
AWS Managed Microsoft AD domain. The users that you created in the directory in Step 4: Create and
configure users need to be set up
as PostgreSQL database users and granted privileges to login to the database. You do
that by signing in as the database user with rds_superuser privileges.
For example, if you accepted the defaults when you created your Aurora PostgreSQL DB cluster,
you use
postgres, as shown in the following steps.
To create PostgreSQL database users for Kerberos principals
-
Use
psqlto connect to your Aurora PostgreSQL DB cluster's DB instance endpoint usingpsql. The following example uses the defaultpostgresaccount for therds_superuserrole.psql --host=cluster-instance-1.111122223333.aws-region.rds.amazonaws.com --port=5432 --username=postgres --password -
Create a database user name for each Kerberos principal (Active Directory username) that you want to have access to the database. Use the canonical username (identity) as defined in the Active Directory instance, that is, a lower-case
alias(username in Active Directory) and the upper-case name of the Active Directory domain for that user name. The Active Directory user name is an externally authenticated user, so use quotes around the name as shown following.postgres=>CREATE USER "username@CORP.EXAMPLE.COM" WITH LOGIN;CREATE ROLE -
Grant the
rds_adrole to the database user.postgres=>GRANT rds_ad TO "username@CORP.EXAMPLE.COM";GRANT ROLE
After you finish creating all the PostgreSQL users for your Active Directory user identities, users can access the Aurora PostgreSQL DB cluster by using their Kerberos credentials.
It's required that the database users who authenticate using Kerberos are doing so from client machines that are members of the Active Directory domain.
Database users that have been granted the rds_ad role can't also
have the rds_iam role. This also applies to nested memberships. For
more information, see IAM database authentication.
Configuring your Aurora PostgreSQL DB cluster for case-insensitive user names
Aurora PostgreSQL versions 14.5, 13.8, 12.12, and 11.17 support the
krb_caseins_users PostgreSQL parameter. This parameter supports
case-insensitive Active Directory user names. By default, this parameter is set
to false, so user names are interpreted case-sensitively by Aurora PostgreSQL.
That's the default behavior in all older versions of Aurora PostgreSQL.
However, you can set this parameter to true in your custom DB
cluster parameter group and allow your Aurora PostgreSQL DB cluster to interpret
user names, case-insensitively. Consider doing this as a convenience for your
database users, who might sometimes mis-type the casing of their user name when
authenticating using Active Directory.
To change the krb_caseins_users parameter, your Aurora PostgreSQL DB
cluster must be using a custom DB cluster parameter group. For information about
working with a custom DB cluster parameter group, see Parameter groups for Amazon Aurora.
You can use the AWS CLI or the AWS Management Console to change the setting. For more information, see Modifying parameters in a DB cluster parameter group in Amazon Aurora.
Step 8: Configure a PostgreSQL client
To configure a PostgreSQL client, take the following steps:
-
Create a krb5.conf file (or equivalent) to point to the domain.
-
Verify that traffic can flow between the client host and Directory Service. Use a network utility such as Netcat for the following:
-
Verify traffic over DNS for port 53.
-
Verify traffic over TCP/UDP for port 53 and for Kerberos, which includes ports 88 and 464 for Directory Service.
-
-
Verify that traffic can flow between the client host and the DB instance over the database port. For example, use psql to connect and access the database.
The following is sample krb5.conf content for AWS Managed Microsoft AD.
[libdefaults]
 default_realm = EXAMPLE.COM
[realms]
 EXAMPLE.COM = {
  kdc = example.com
  admin_server = example.com
 }
[domain_realm]
 .example.com = EXAMPLE.COM
 example.com = EXAMPLE.COM
The following is sample krb5.conf content for an on-premises Microsoft Active Directory.
[libdefaults]
 default_realm = EXAMPLE.COM
[realms]
 EXAMPLE.COM = {
  kdc = example.com
  admin_server = example.com
 }
 ONPREM.COM = {
  kdc = onprem.com
  admin_server = onprem.com
 }
[domain_realm]
 .example.com = EXAMPLE.COM
 example.com = EXAMPLE.COM
 .onprem.com = ONPREM.COM
 onprem.com = ONPREM.COM
 .rds.amazonaws.com = EXAMPLE.COM
 .amazonaws.com.cn = EXAMPLE.COM
 .amazon.com = EXAMPLE.COM
