Tutorial: Hosting on-demand streaming video with Amazon S3, Amazon CloudFront, and Amazon Route 53
You can use Amazon S3 with Amazon CloudFront to host videos for on-demand viewing in a secure and scalable way. Video on demand (VOD) streaming means that your video content is stored on a server and viewers can watch it at any time.
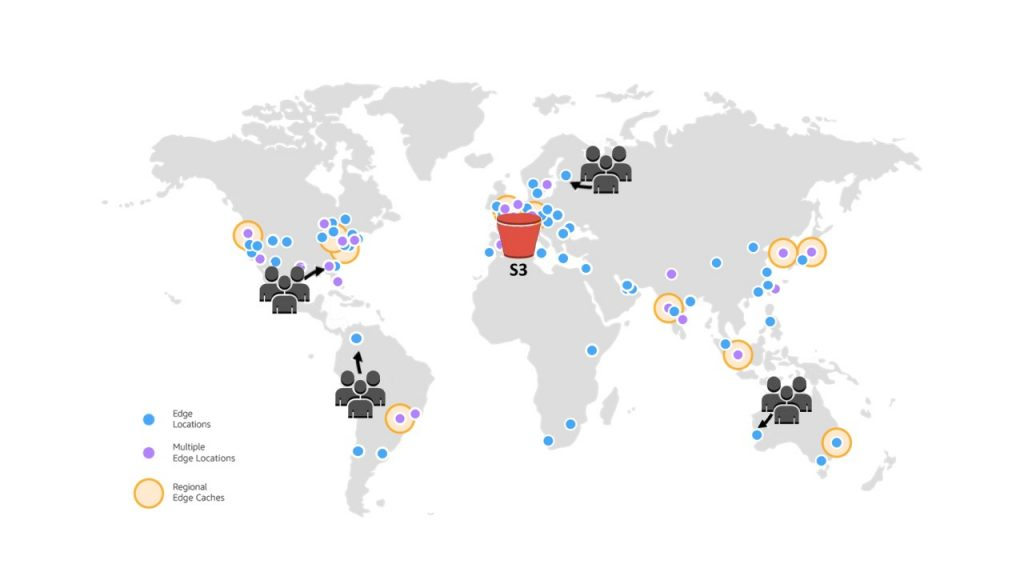
CloudFront is a fast, highly secure, and programmable content delivery network (CDN) service. CloudFront can deliver your content securely over HTTPS from all of the CloudFront edge locations around the globe. For more information about CloudFront, see What is Amazon CloudFront? in the Amazon CloudFront Developer Guide.
CloudFront caching reduces the number of requests that your origin server must respond to directly. When a viewer (end user) requests a video that you serve with CloudFront, the request is routed to a nearby edge location closer to where the viewer is located. CloudFront serves the video from its cache, retrieving it from the S3 bucket only if it is not already cached. This caching management feature accelerates the delivery of your video to viewers globally with low latency, high throughput, and high transfer speeds. For more information about CloudFront caching management, see Optimizing caching and availability in the Amazon CloudFront Developer Guide.
Objective
In this tutorial, you configure an S3 bucket to host on-demand video streaming using CloudFront for delivery and Amazon Route 53 for Domain Name System (DNS) and custom domain management.
Topics
Prerequisites: Register and configure a custom domain with Route 53
Step 5: Access the video through the CloudFront distribution
Step 6: Configure your CloudFront distribution to use your custom domain name
Step 7: Access the S3 video through the CloudFront distribution with the custom domain name
(Optional) Step 8: View data about requests received by your CloudFront distribution
Prerequisites: Register and configure a custom domain with Route 53
Before you start this tutorial, you must register and configure a custom domain (for
example, example.com) with Route 53 so that you can configure your
CloudFront distribution to use a custom domain name later.
Without a custom domain name, your S3 video is publicly accessible and hosted through CloudFront at a URL that looks similar to the following:
https://CloudFront distribution domain name/Path to an S3 video
For example,
https://d111111abcdef8.cloudfront.net/sample.mp4.
After you configure your CloudFront distribution to use a custom domain name configured with Route 53, your S3 video is publicly accessible and hosted through CloudFront at a URL that looks similar to the following:
https://CloudFront distribution alternate domain name/Path to an S3 video
For example, https://www.example.com/sample.mp4. A custom
domain name is simpler and more intuitive for your viewers to use.
To register a custom domain, see Registering a new domain using Route 53 in the Amazon Route 53 Developer Guide.
When you register a domain name with Route 53, Route 53 creates the hosted zone for you, which you will use later in this tutorial. This hosted zone is where you store information about how to route traffic for your domain, for example, to an Amazon EC2 instance or a CloudFront distribution.
There are fees associated with domain registration, your hosted zone, and DNS queries
received by your domain. For more information, see Amazon Route 53 Pricing
Note
When you register a domain, it costs money immediately and it's irreversible. You can choose not to auto-renew the domain, but you pay up front and own it for the year. For more information, see Registering a new domain in the Amazon Route 53 Developer Guide.
Step 1: Create an S3 bucket
Create a bucket to store the original video that you plan to stream.
To create a bucket
Sign in to the AWS Management Console and open the Amazon S3 console at https://console.aws.amazon.com/s3/
. -
In the navigation bar on the top of the page, choose the name of the currently displayed AWS Region. Next, choose the Region in which you want to create a bucket.
Note
To minimize latency and costs and address regulatory requirements, choose a Region close to you. Objects stored in a Region never leave that Region unless you explicitly transfer them to another Region. For a list of Amazon S3 AWS Regions, see AWS service endpoints in the Amazon Web Services General Reference.
-
In the left navigation pane, choose General purpose buckets.
-
Choose Create bucket. The Create bucket page opens.
-
For Bucket name, enter a name for your bucket (for example,
tutorial-bucket).For more information about naming buckets in Amazon S3, see General purpose bucket naming rules.
-
For Region, choose the AWS Region where you want the bucket to reside.
If possible, you should pick the Region that is closest to the majority of your viewers. For more information about the bucket Region, see General purpose buckets overview.
-
For Block Public Access settings for this bucket, keep the default settings (Block all public access is enabled).
Even with Block all public access enabled, viewers can still access the uploaded video through CloudFront. This feature is a major advantage of using CloudFront to host a video stored in S3.
We recommend that you keep all settings enabled unless you need to turn off one or more of them for your use case. For more information about blocking public access, see Blocking public access to your Amazon S3 storage.
-
For the remaining settings, keep the defaults.
(Optional) If you want to configure additional bucket settings for your specific use case, see Creating a general purpose bucket.
-
Choose Create bucket.
Step 2: Upload a video to the S3 bucket
The following procedure describes how to upload a video file to an S3 bucket by using
the console. If you're uploading many large video files to S3, you might want to use
Amazon S3 Transfer Acceleration
To upload a file to the bucket
Sign in to the AWS Management Console and open the Amazon S3 console at https://console.aws.amazon.com/s3/
. -
In the left navigation pane, choose General purpose buckets.
-
In the General purpose buckets list, choose the name of the bucket that you created in Step 1 (for example,
tutorial-bucket) to upload your file to. -
On the Objects tab for your bucket, choose Upload.
-
On the Upload page, under Files and folders, choose Add files.
-
Choose a file to upload, and then choose Open.
For example, you can upload a video file named
sample.mp4. -
Choose Upload.
Step 3: Create a CloudFront origin access identity
To restrict direct access to the video from your S3 bucket, create a special CloudFront user called an origin access identity (OAI). You will associate the OAI with your distribution later in this tutorial. By using an OAI, you make sure that viewers can't bypass CloudFront and get the video directly from the S3 bucket. Only the CloudFront OAI can access the file in the S3 bucket. For more information, see Restrict access to an Amazon S3 origin in the Amazon CloudFront Developer Guide.
Important
If the bucket that you're using to host your static website has been encrypted using server-side encryption with AWS Key Management Service (AWS KMS) keys (SSE-KMS), you must use origin access control (OAC) instead of origin access identity (OAI) to secure the origin. OAI doesn't support SSE-KMS, so you must use OAC instead. For more information about OAC, see Restrict access to an Amazon S3 origin in the Amazon CloudFront Developer Guide.
To create a CloudFront OAI
Sign in to the AWS Management Console and open the CloudFront console at https://console.aws.amazon.com/cloudfront/v4/home
. -
In the left navigation pane, under the Security section, choose Origin access.
-
Under the Identities tab, choose Create origin access identity.
-
Enter a name (for example,
S3-OAI) for the new origin access identity. -
Choose Create.
Step 4: Create a CloudFront distribution
To use CloudFront to serve and distribute the video in your S3 bucket, you must create a CloudFront distribution.
Create a CloudFront distribution
Sign in to the AWS Management Console and open the CloudFront console at https://console.aws.amazon.com/cloudfront/v4/home
. -
In the left navigation pane, choose Distributions.
-
Choose Create distribution.
-
In the Origin section, for Origin domain, choose the domain name of your S3 origin, which starts with the name of the S3 bucket that you created in Step 1 (for example,
tutorial-bucket). -
For Origin access, choose Legacy access identities.
-
Under Origin access identity, choose the origin access identity that you created in Step 3 (for example,
S3-OAI). -
Under Bucket policy, choose Yes, update the bucket policy.
-
In the Default cache behavior section, under Viewer protocol policy, choose Redirect HTTP to HTTPS.
When you choose this feature, HTTP requests are automatically redirected to HTTPS to secure your website and protect your viewers' data.
-
For the other settings in the Default cache behaviors section, keep the default values.
(Optional) You can control how long your file stays in a CloudFront cache before CloudFront forwards another request to your origin. Reducing the duration allows you to serve dynamic content. Increasing the duration means that your viewers get better performance because your files are more likely to be served directly from the edge cache. A longer duration also reduces the load on your origin. For more information, see Managing how long content stays in the cache (expiration) in the Amazon CloudFront Developer Guide.
-
For the other sections, keep the remaining settings set to the defaults.
For more information about the different settings options, see Values That You Specify When You Create or Update a Distribution in the Amazon CloudFront Developer Guide.
-
At the bottom of the page, choose Create distribution.
-
On the General tab for your CloudFront distribution, under Details, the value of the Last modified column for your distribution changes from Deploying to the timestamp when the distribution was last modified. This process typically takes a few minutes.
Review the bucket policy
Sign in to the AWS Management Console and open the Amazon S3 console at https://console.aws.amazon.com/s3/
. -
In the left navigation pane, choose Buckets.
-
In the Buckets list, choose the name of the bucket that you used earlier as the origin of your CloudFront distribution (for example,
tutorial-bucket). -
Choose the Permissions tab.
-
In the Bucket policy section, confirm that you see a statement similar to the following in the bucket policy text:
{ "Version": "2008-10-17", "Id": "PolicyForCloudFrontPrivateContent", "Statement": [ { "Sid": "1", "Effect": "Allow", "Principal": { "AWS": "arn:aws:iam::cloudfront:user/CloudFront Origin Access IdentityEH1HDMB1FH2TC" }, "Action": "s3:GetObject", "Resource": "arn:aws:s3:::tutorial-bucket/*" } ] }This is the statement that your CloudFront distribution added to your bucket policy when you chose Yes, update the bucket policy earlier.
This bucket policy update indicates that you successfully configured the CloudFront distribution to restrict access to the S3 bucket. Because of this restriction, objects in the bucket can be accessed only through your CloudFront distribution.
Step 5: Access the video through the CloudFront distribution
Now, CloudFront can serve the video stored in your S3 bucket. To access your video through CloudFront, you must combine your CloudFront distribution domain name with the path to the video in the S3 bucket.
To create a URL to the S3 video using the CloudFront distribution domain name
Sign in to the AWS Management Console and open the CloudFront console at https://console.aws.amazon.com/cloudfront/v4/home
. -
In the left navigation pane, choose Distributions.
-
To get the distribution domain name, do the following:
-
In the Origins column, find the correct CloudFront distribution by looking for its origin name, which starts with the S3 bucket that you created in Step 1 (for example,
tutorial-bucket). -
After finding the distribution in the list, widen the Domain name column to copy the domain name value for your CloudFront distribution.
-
-
In a new browser tab, paste the distribution domain name that you copied.
-
Return to the previous browser tab, and open the S3 console at https://console.aws.amazon.com/s3/
. -
In the left navigation pane, choose Buckets.
-
In the Buckets list, choose the name of the bucket that you created in Step 1 (for example,
tutorial-bucket). -
In the Objects list, choose the name of the video that you uploaded in Step 2 (for example,
sample.mp4). -
On the object detail page, in the Object overview section, copy the value of the Key. This value is the path to the uploaded video object in the S3 bucket.
-
Return to the browser tab where you previously pasted the distribution domain name, enter a forward slash (
/) after the distribution domain name, and then paste the path to the video that you copied earlier (for example,sample.mp4).Now, your S3 video is publicly accessible and hosted through CloudFront at a URL that looks similar to the following:
https://CloudFront distribution domain name/Path to the S3 videoReplace
CloudFront distribution domain nameandPath to the S3 videowith the appropriate values. An example URL ishttps://d111111abcdef8.cloudfront.net/sample.mp4.
Step 6: Configure your CloudFront distribution to use your custom domain name
To use your own domain name instead of the CloudFront domain name in the URL to access the S3 video, add an alternate domain name to your CloudFront distribution.
Substeps
Request an SSL certificate
To allow your viewers to use HTTPS and your custom domain name in the URL for your video streaming, use AWS Certificate Manager (ACM) to request a Secure Sockets Layer (SSL) certificate. The SSL certificate establishes an encrypted network connection to the website.
Sign in to the AWS Management Console and open the ACM console at https://console.aws.amazon.com/acm/
. -
If the introductory page appears, under Provision certificates, choose Get Started.
-
On the Request a certificate page, choose Request a public certificate, and then choose Request a certificate.
-
On the Add domain names page, enter the fully qualified domain name (FQDN) of the site that you want to secure with an SSL/TLS certificate. You can use an asterisk (
*) to request a wildcard certificate to protect several site names in the same domain. For this tutorial, enter*and the custom domain name that you configured in Prerequisites. For example, enter*.example.com, and then choose Next.For more information, see To request an ACM public certificate (console) in the AWS Certificate Manager User Guide.
-
On the Select validation method page, choose DNS validation. Then, choose Next.
If you are able to edit your DNS configuration, we recommend that you use DNS domain validation rather than email validation. DNS validation has multiple benefits over email validation. For more information, see Option 1: DNS validation in the AWS Certificate Manager User Guide.
-
(Optional) On the Add tags page, tag your certificate with metadata.
-
Choose Review.
-
On the Review page, verify that the information under Domain name and Validation method are correct. Then, choose Confirm and request.
The Validation page shows that your request is being processed and that the certificate domain is being validated. The certificate awaiting validation is in the Pending validation status.
-
On the Validation page, choose the down arrow to the left of your custom domain name, and then choose Create record in Route 53 to validate your domain ownership through DNS.
Doing this adds a CNAME record provided by AWS Certificate Manager to your DNS configuration.
-
In the Create record in Route 53 dialog box, choose Create.
The Validation page should display a status notification of Success at the bottom.
-
Choose Continue to view the Certificates list page.
The Status for your new certificate changes from Pending validation to Issued within 30 minutes.
Add the alternate domain name to your CloudFront distribution
Sign in to the AWS Management Console and open the CloudFront console at https://console.aws.amazon.com/cloudfront/v4/home
. -
In the left navigation pane, choose Distributions.
-
Choose the ID for the distribution that you created in Step 4.
-
On the General tab, go to the Settings section, and choose Edit.
-
On the Edit settings page, for Alternate domain name (CNAME) - optional, choose Add item to add the custom domain names that you want to use in the URL for the S3 video served by this CloudFront distribution.
In this tutorial, for example, if you want to route traffic for a subdomain, such as
www.example.com, enter the subdomain name (www) with the domain name (example.com). Specifically, enterwww.example.com.Note
The alternate domain name (CNAME) that you add must be covered by the SSL certificate that you previously attached to your CloudFront distribution.
-
For Custom SSL certificate - optional, choose the SSL certificate that you requested earlier (for example,
*.example.com).Note
If you don't see the SSL certificate immediately after you request it, wait 30 minutes, and then refresh the list until the SSL certificate is available for you to select.
-
Keep the remaining settings set to the defaults. Choose Save changes.
-
On the General tab for the distribution, wait for the value of Last modified to change from Deploying to the timestamp when the distribution was last modified.
Create a DNS record to route traffic from your alternate domain name to your CloudFront distribution's domain name
Sign in to the AWS Management Console and open the Route 53 console at https://console.aws.amazon.com/route53/
. -
In the left navigation pane, choose Hosted zones.
-
On the Hosted zones page, choose the name of the hosted zone that Route 53 created for you in Prerequisites (for example,
example.com). -
Choose Create record, and then use the Quick create record method.
-
For Record name, keep the value for the record name the same as the alternate domain name of the CloudFront distribution that you added earlier.
In this tutorial, to route traffic to a subdomain, such as
www.example.com, enter the subdomain name without the domain name. For example, enter onlywwwin the text field before your custom domain name. -
For Record type, choose A - Routes traffic to an IPv4 address and some AWS resources.
-
For Value, choose the Alias toggle to enable the alias resource.
-
Under Route traffic to, choose Alias to CloudFront distribution from the dropdown list.
-
In the search box that says Choose distribution, choose the domain name of the CloudFront distribution that you created in Step 4.
To find the domain name of your CloudFront distribution, do the following:
-
In a new browser tab, sign in to the AWS Management Console and open the CloudFront console at https://console.aws.amazon.com/cloudfront/v3/home
. -
In the left navigation pane, choose Distributions.
-
In the Origins column, find the correct CloudFront distribution by looking for its origin name, which starts with the S3 bucket that you created in Step 1 (for example,
tutorial-bucket). -
After finding the distribution in the list, widen the Domain name column to see the domain name value for your CloudFront distribution.
-
-
On the Create record page in the Route 53 console, for the remaining settings, keep the defaults.
-
Choose Create records.
Check whether IPv6 is enabled for your distribution and create another DNS record if needed
If IPv6 is enabled for your distribution, you must create another DNS record.
-
To check whether IPv6 is enabled for your distribution, do the following:
Sign in to the AWS Management Console and open the CloudFront console at https://console.aws.amazon.com/cloudfront/v4/home
. -
In the left navigation pane, choose Distributions.
-
Choose the ID of the CloudFront distribution that you created in Step 4.
-
On the General tab, under Settings, check whether IPv6 is set to Enabled.
If IPv6 is enabled for your distribution, you must create another DNS record.
-
If IPv6 is enabled for your distribution, do the following to create a DNS record:
Sign in to the AWS Management Console and open the Route 53 console at https://console.aws.amazon.com/route53/
. -
In the left navigation pane, choose Hosted zones.
-
On the Hosted zones page, choose the name of the hosted zone that Route 53 created for you in Prerequisites (for example,
example.com). -
Choose Create record, and then use the Quick create record method.
-
For Record name, in the text field before your custom domain name, type the same value that you typed when you created the IPv4 DNS record earlier. For example, in this tutorial, to route traffic for the subdomain
www.example.com, enter onlywww. -
For Record type, choose AAAA - Routes traffic to an IPv6 address and some AWS resources.
-
For Value, choose the Alias toggle to enable the alias resource.
-
Under Route traffic to, choose Alias to CloudFront distribution from the dropdown list.
-
In the search box that says Choose distribution, choose the domain name of the CloudFront distribution that you created in Step 4.
-
For the remaining settings, keep the defaults.
-
Choose Create records.
Step 7: Access the S3 video through the CloudFront distribution with the custom domain name
To access the S3 video using the custom URL, you must combine your alternate domain name with the path to the video in the S3 bucket.
To create a custom URL to access the S3 video through the CloudFront distribution
Sign in to the AWS Management Console and open the CloudFront console at https://console.aws.amazon.com/cloudfront/v4/home
. -
In the left navigation pane, choose Distributions.
-
To get the alternate domain name of your CloudFront distribution, do the following:
-
In the Origins column, find the correct CloudFront distribution by looking for its origin name, which starts with the S3 bucket name for the bucket that you created in Step 1 (for example,
tutorial-bucket). -
After finding the distribution in the list, widen the Alternate domain names column to copy the value of the alternate domain name of your CloudFront distribution.
-
-
In a new browser tab, paste the alternate domain name of the CloudFront distribution.
-
Return to the previous browser tab, and open the Amazon S3 console at https://console.aws.amazon.com/s3/
. -
Find the path to your S3 video, as explained in Step 5.
-
Return to the browser tab where you previously pasted the alternate domain name, enter a forward slash (
/), and then paste the path to your S3 video (for example,sample.mp4).Now, your S3 video is publicly accessible and hosted through CloudFront at a custom URL that looks similar to the following:
https://CloudFront distribution alternate domain name/Path to the S3 videoReplace
CloudFront distribution alternate domain nameandPath to the S3 videowith the appropriate values. An example URL ishttps://www.example.com/sample.mp4.
(Optional) Step 8: View data about requests received by your CloudFront distribution
To view data about requests received by your CloudFront distribution
Sign in to the AWS Management Console and open the CloudFront console at https://console.aws.amazon.com/cloudfront/v4/home
. -
In the left navigation pane, under Reports & analytics, choose the reports from the console, ranging from Cache statistics, Popular Objects, Top Referrers, Usage, and Viewers.
You can filter each report dashboard. For more information, see CloudFront Reports in the Console in the Amazon CloudFront Developer Guide.
-
To filter data, choose the ID of the CloudFront distribution that you created in Step 4.
Step 9: Clean up
If you hosted an S3 streaming video using CloudFront and Route 53 only as a learning exercise, delete the AWS resources that you allocated so that you no longer accrue charges.
Note
When you register a domain, it costs money immediately and it's irreversible. You can choose not to auto-renew the domain, but you pay up front and own it for the year. For more information, see Registering a new domain in the Amazon Route 53 Developer Guide.
Substeps
Delete the CloudFront distribution
Sign in to the AWS Management Console and open the CloudFront console at https://console.aws.amazon.com/cloudfront/v4/home
. -
In the left navigation pane, choose Distributions.
-
In the Origins column, find the correct CloudFront distribution by looking for its origin name, which starts with the S3 bucket name for the bucket that you created in Step 1 (for example,
tutorial-bucket). -
To delete the CloudFront distribution, you must disable it first.
-
If the value of the Status column is Enabled and the value of Last modified is the timestamp when the distribution was last modified, continue to disable the distribution before deleting it.
-
If the value of Status is Enabled and the value of Last modified is Deploying, wait until the value of Status changes to the timestamp when the distribution was last modified. Then continue to disable the distribution before deleting it.
-
-
To disable the CloudFront distribution, do the following:
-
In the Distributions list, select the check box next to the ID for the distribution that you want to delete.
-
To disable the distribution, choose Disable, and then choose Disable to confirm.
If you disable a distribution that has an alternate domain name associated with it, CloudFront stops accepting traffic for that domain name (such as
www.example.com), even if another distribution has an alternate domain name with a wildcard (*) that matches the same domain (such as*.example.com). -
The value of Status immediately changes to Disabled. Wait until the value of Last modified changes from Deploying to the timestamp when the distribution was last modified.
Because CloudFront must propagate this change to all edge locations, it might take a few minutes before the update is complete and the Delete option is available for you to delete the distribution.
-
-
To delete the disabled distribution, do the following:
-
Choose the check box next to the ID for the distribution that you want to delete.
-
Choose Delete, and then choose Delete to confirm.
-
Delete the DNS record
If you want to delete the public hosted zone for the domain (including the DNS record), see Delete the public hosted zone for your custom domain in the Amazon Route 53 Developer Guide. If you only want to delete the DNS record created in Step 6, do the following:
Sign in to the AWS Management Console and open the Route 53 console at https://console.aws.amazon.com/route53/
. -
In the left navigation pane, choose Hosted zones.
-
On the Hosted zones page, choose the name of the hosted zone that Route 53 created for you in Prerequisites (for example,
example.com). -
In the list of records, select the check box next to the records that you want to delete (the records that you created in Step 6).
Note
You can't delete records that have a Type value of NS or SOA.
-
Choose Delete records.
-
To confirm the deletion, choose Delete.
Changes to records take time to propagate to the Route 53 DNS servers. Currently, the only way to verify that your changes have propagated is to use the GetChange API action. Changes usually propagate to all Route 53 name servers within 60 seconds.
Delete the public hosted zone for your custom domain
Warning
If you want to keep your domain registration but stop routing internet traffic to your website or web application, we recommend that you delete records in the hosted zone (as described in the prior section) instead of deleting the hosted zone.
If you delete a hosted zone, someone else can use the domain and route traffic to their own resources using your domain name.
In addition, if you delete a hosted zone, you can't undelete it. You must create a new hosted zone and update the name servers for your domain registration, which can take up to 48 hours to take effect.
If you want to make the domain unavailable on the internet, you can first transfer your DNS service to a free DNS service and then delete the Route 53 hosted zone. This prevents future DNS queries from possibly being misrouted.
-
If the domain is registered with Route 53, see Adding or changing name servers and glue records for a domain in the Amazon Route 53 Developer Guide for information about how to replace Route 53 name servers with name servers for the new DNS service.
-
If the domain is registered with another registrar, use the method provided by the registrar to change name servers for the domain.
Note
If you're deleting a hosted zone for a subdomain
(www.example.com), you don't need to change name servers
for the domain (example.com).
Sign in to the AWS Management Console and open the Route 53 console at https://console.aws.amazon.com/route53/
. -
In the left navigation pane, choose Hosted zones.
-
On the Hosted zones page, choose the name of the hosted zone that you want to delete.
-
On the Records tab for your hosted zone, confirm that the hosted zone that you want to delete contains only an NS and an SOA record.
If it contains additional records, delete them first.
If you created any NS records for subdomains in the hosted zone, delete those records too.
-
On the DNSSEC signing tab for your hosted zone, disable DNNSSEC signing if it was enabled. For more information, see Disabling DNSSEC signing in the Amazon Route 53 Developer Guide.
-
At the top of the details page of the hosted zone, choose Delete zone.
-
To confirm the deletion, enter
delete, and then choose Delete.
Delete the custom domain name from Route 53
For most top-level domains (TLDs), you can delete the registration if you no longer want it. If you delete a domain name registration from Route 53 before the registration is scheduled to expire, AWS does not refund the registration fee. For more information, see Deleting a domain name registration in the Amazon Route 53 Developer Guide.
Important
If you want to transfer the domain between AWS accounts or transfer the domain to another registrar, don't delete the domain and expect to immediately reregister it. Instead, see the applicable documentation in the Amazon Route 53 Developer Guide:
Delete the original video in the S3 source bucket
Sign in to the AWS Management Console and open the Amazon S3 console at https://console.aws.amazon.com/s3/
. -
In the left navigation pane, choose Buckets.
-
In the Bucket name list, choose the name of the bucket that you uploaded the video to in Step 2 (for example,
tutorial-bucket). -
On the Objects tab, select the check box next to the name of the object that you want to delete (for example,
sample.mp4). -
Choose Delete.
-
Under Permanently delete objects?, enter
permanently deleteto confirm that you want to delete this object. -
Choose Delete objects.
Delete the S3 source bucket
Sign in to the AWS Management Console and open the Amazon S3 console at https://console.aws.amazon.com/s3/
. -
In the left navigation pane, choose Buckets.
-
In the Buckets list, select the option button next to the name of the bucket that you created in Step 1 (for example,
tutorial-bucket). -
Choose Delete.
-
On the Delete bucket page, confirm that you want to delete the bucket by entering the bucket name in the text field, and then choose Delete bucket.
Next steps
After you complete this tutorial, you can further explore the following related use cases:
-
Transcode S3 videos into streaming formats needed by a particular television or connected device before hosting these videos with a CloudFront distribution.
To use Amazon S3 Batch Operations, AWS Lambda and AWS Elemental MediaConvert to batch-transcode a collection of videos to a variety of output media formats, see Tutorial: Batch-transcoding videos with S3 Batch Operations.
-
Host other objects stored in S3, such as images, audio, motion graphics, style sheets, HTML, JavaScript, React apps, and so on, using CloudFront and Route 53.
For example, see Tutorial: Configuring a static website using a custom domain registered with Route 53 and Speeding up your website with Amazon CloudFront.
-
Use Amazon S3 Transfer Acceleration
to configure fast and secure file transfers. Transfer Acceleration can speed up video uploading to your S3 bucket for long-distance transfer of larger videos. Transfer Acceleration improves transfer performance by routing traffic through the CloudFront globally distributed edge locations and over the AWS backbone networks. It also uses network protocol optimizations. For more information, see Configuring fast, secure file transfers using Amazon S3 Transfer Acceleration.
