Amazon CodeCatalyst is no longer open to new customers. Existing customers can continue to use the service as normal. For more information, see How to migrate from CodeCatalyst.
Tutorial: Creating a project with the Modern three-tier web application blueprint
You can get started more quickly with developing software by creating a project with a blueprint. A project created with a blueprint includes the resources that you need, including a source repository to manage your code, and a workflow to build and deploy the application. In this tutorial, we will walk you through using the Modern three-tier web application blueprint to create a project in Amazon CodeCatalyst. The tutorial also includes viewing the deployed sample, inviting other users to work on it, and making changes to the code with pull requests that are automatically built and deployed to resources in the connected AWS account when the pull request is merged. Where CodeCatalyst creates your project with reports, activity feeds, and other tools, your blueprint creates AWS resources in the AWS account associated with your project. Your blueprint files allow you to build and test a sample modern application and deploy it to infrastructure in the AWS Cloud.
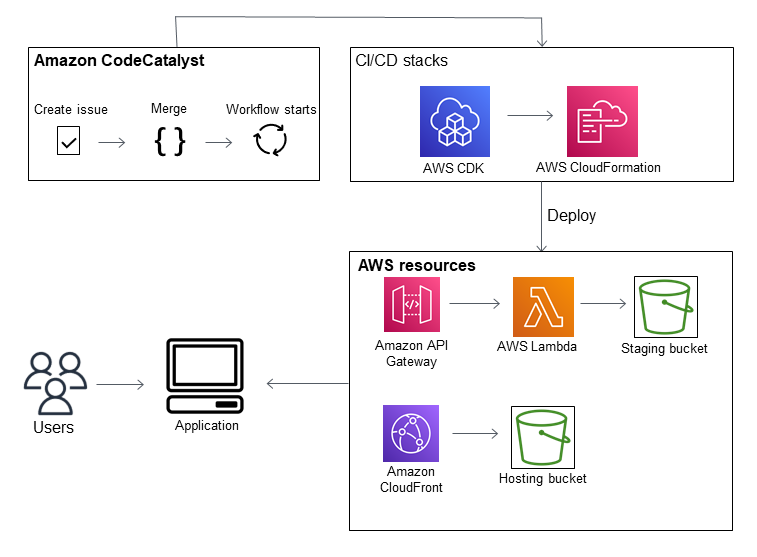
The following illustration shows how tools in CodeCatalyst are used to create an issue for tracking, merge and automatically build the change, and then start a workflow in the CodeCatalyst project that runs actions to allow AWS CDK and CloudFormation to provision your infrastructure.
The actions generate resources in the associated AWS account and deploy your application to a serverless AWS Lambdafunction with an API Gateway endpoint. The AWS Cloud Development Kit (AWS CDK) action converts one or more AWS CDK stacks to CloudFormation templates and deploys stacks to your AWS account. Resources in your stacks include Amazon CloudFront resources to distribute dynamic web content, an Amazon DynamoDB instance for your application data, and the roles and policies that support the deployed application.
When you create a project with the Modern three-tier web application blueprint, your project is created with the following resources:
In the CodeCatalyst project:
-
A source repository with sample code and workflow YAML
-
A workflow that builds and deploys the sample code whenever a change is made to the default branch
-
An issues board and backlog that you can use to plan and track work
-
A test reports suite with automated reports included in the sample code
In the associated AWS account:
-
Three AWS CloudFormation stacks that create the resources needed for the application.
For expanded details about the resources that will be created in AWS and CodeCatalyst as part of this tutorial, see Reference.
Note
The resources and samples included in a project depend on which blueprint you select. Amazon CodeCatalyst offers several project blueprints that define resources related to their defined language or framework. To learn more about blueprints, see Creating a comprehensive project with CodeCatalyst blueprints.
Topics
Prerequisites
To create a modern application project in this tutorial, you must have completed the tasks in Set up and sign in to CodeCatalyst as follows:
-
Have an AWS Builder ID for signing in to CodeCatalyst.
-
Belong to a space and have the Space administrator or Power user role assigned to you in that space. For more information, see Creating a space, Granting users space permissions, and Space administrator role.
-
Have an AWS account associated with your space and have the IAM role you created during sign-up. For example, during sign-up, you have the option to choose to create a service role with a role policy called the CodeCatalystWorkflowDevelopmentRole-
spaceNamerole policy. The role will have a nameCodeCatalystWorkflowDevelopmentRole-with a unique identifier appended. For more information about the role and role policy, see Understanding the CodeCatalystWorkflowDevelopmentRole-spaceName service role. For the steps to create the role, see Creating the CodeCatalystWorkflowDevelopmentRole-spaceName role for your account and space.spaceName
Step 1: Create the Modern three-tier web application project
After you've created it, your project is where you will develop and test code, coordinate development tasks, and view project metrics. Your project also contains your development tools and resources.
In this tutorial, you will use the Modern three-tier web application blueprint to create an interactive application. The workflow that is created and run automatically as part of your project will build and deploy the application. The workflow only runs successfully after all roles and account information is configured for your space. After the workflow has run successfully, you can visit the endpoint URL to see the application.
To create a project with a blueprint
Open the CodeCatalyst console at https://codecatalyst.aws/
. -
In the CodeCatalyst console, navigate to the space where you want to create a project.
-
Choose Create project.
-
Choose Start with a blueprint.
-
In the search bar, enter
modern. -
Select the Modern three-tier web application blueprint, and then choose Next.
-
In Name your project, enter a project name. For example:
MyExampleProject.Note
The name must be unique in your space.
-
In Account, choose the AWS account you added during sign-up. The blueprint will install resources into this account.
-
In Deployment Role, choose the role that you added during sign-up. For example, choose
CodeCatalystWorkflowDevelopmentRole-.spaceNameIf there are no roles listed, add one. To add a role, choose Add IAM role and add the role to your AWS account. For more information, see Allowing access to AWS resources with connected AWS accounts.
-
In Compute platform, choose Lambda.
-
In Frontend Hosting Option, choose Amplify Hosting. For information about AWS Amplify, see What is AWS Amplify Hosting? in the AWS Amplify User Guide.
-
In Deployment Region, enter the Region code of the AWS Region where you want the blueprint to deploy the Mysfits application and supporting resources. For a list of Region codes, see Regional endpoints in the AWS General Reference.
-
In Application name, leave the default of
mysfits.string -
(Optional) Under Generate project preview, choose View code to preview the source files that the blueprint will install. Choose View workflow to preview the CI/CD workflow definition files that the blueprint will install. The preview dynamically updates based on your selections.
-
Choose Create project.
The project workflow starts as soon as you create the project. It will take a little time to finish building and deploying the code. In the meantime, go ahead and invite someone else to your project.
Step 2: Invite someone to your project
Now that you've set up your project, invite others to work with you.
To invite someone to your project
-
Navigate to the project to which you want to invite users.
-
In the navigation pane, choose Project settings.
-
On the Members tab, choose Invite.
-
Type the email addresses of the people you want to invite as users for your project. You can type multiple email addresses separated by a space or a comma. You can also choose from members of your space who are not members of the project.
Choose the role for the user.
When you have finished adding users, choose Invite.
Step 3: Create issues to collaborate on and track work
CodeCatalyst helps you track features, tasks, bugs, and any other work involved in your project with issues. You can create issues to track needed work and ideas. By default, when you create an issue it is added to your backlog. You can move issues to a board where you track work in progress. You can also assign an issue to a specific project member.
To create an issue for a project
-
In the navigation pane, choose Issues.
-
Choose Create issue.
-
In Issue title, provide a name for the issue. Optionally, provide a description of the issue. In this example, use
make a change in thesrc/mysfit_data.jsonfile. -
Choose the priority, estimate, status, and labels. Under assignee, choose +Add me to assign the issue to yourself.
-
Choose Create issue. The issue is now visible on the board. Choose the card to move the issue to the In progress column.
For more information, see Track and organize work with issues in CodeCatalyst.
Step 4: View your source repository
Your blueprint installs a source repository that contains files to define and support your application or service. A few noteworthy directories and files in the source repository are:
-
.cloud9 directory – Contains supporting files for the AWS Cloud9 Dev Environment.
-
.codecatalyst directory – Contains the
YAMLworkflow definition file for each workflow included in the blueprint. -
.idea directory – Contains supporting files for the JetBrains Dev Environments.
-
.vscode directory – Contains supporting files for the Visual Studio Code Dev Environment.
-
cdkStacks directory – Contains the AWS CDK stack files that define the infrastructure in the AWS Cloud.
-
src directory – Contains the application source code.
-
tests directory – Contains files for the integ and unit tests that are run as part of the automated CI/CD workflow that runs when you build and test your application.
-
web directory – Contains the frontend source code. Other files include project files such as the
package.jsonfile that contains important metadata about your project, theindex.htmlpage for the website, the.eslintrc.cjsfile for linting code, and thetsconfig.jsonfile for specifying root files and compiler options. -
Dockerfilefile – Describes the application's container. -
README.mdfile – Contains configuration information for the project.
To navigate to the source repositories for a project
-
Navigate to your project, and do one of the following:
On the summary page for your project, choose the repository you want from the list, and then choose View repository.
-
In the navigation pane, choose Code, and then choose Source repositories. In Source repositories, choose the name of the repository from the list. You can filter the list of repositories by typing part of the repository name in the filter bar.
-
On the home page for the repository, view the contents of the repository and information about the associated resources such as the number of pull requests and workflows. By default, the contents for the default branch are shown. You can change the view by choosing a different branch from the drop-down list.
Step 5: Create a Dev Environment with a test branch and make a quick code change
You can quickly work on the code in your source repository by creating a Dev Environment. For this tutorial, we assume you will:
-
Create a AWS Cloud9 Dev Environment.
-
Choose the option to work in a new branch off the main branch when creating the Dev Environment.
-
Use the name
testfor this new branch.
In a later step, you will use the Dev Environment to make a code change and create a pull request.
To create a Dev Environment with a new branch
Open the CodeCatalyst console at https://codecatalyst.aws/
. Navigate to the project where you want to create a Dev Environment.
Choose the name of the repository from the list of source repositories for the project. Alternatively, in the navigation pane, choose Code, choose Source repositories, and choose the repository for which you want to create a Dev Environment.
On the repository home page, choose Create Dev Environment.
Choose a supported IDE from the drop-down menu. See Supported integrated development environments for Dev Environments for more information.
Choose the repository to clone, choose Work in new branch, enter a branch name into the Branch name field, and choose a branch off of which to create the new branch from the Create branch from drop-down menu.
Optionally, add an alias for the Dev Environment.
Optionally, choose the Dev Environment configuration edit button to edit the Dev Environment's compute, storage, or timeout configuration.
Choose Create. While your Dev Environment is being created, the Dev Environment status column will display Starting, and the status column will display Running once the Dev Environment has been created. A new tab will open with your Dev Environment in the IDE of your choice. You can edit code and commit and push your changes.
In this section, you will work with your generated sample application in CodeCatalyst by making changes to the code with pull requests that are automatically built and deployed to resources in the connected AWS account when the pull request is merged.
To make a change in your src/mysfit_data.json file
-
Navigate to your project Dev Environment. In AWS Cloud9, expand the side navigation menu to browse the files. Expand
mysfits,src, and opensrc/mysfit_data.json -
In the file, change the value for the
"Age":field from 6 to 12. Your line should look like the following:{ "Age":12, "Description": "Twilight's personality sparkles like the night sky and is looking for a forever home with a Greek hero or God. While on the smaller side at 14 hands, he is quite adept at accepting riders and can fly to 15,000 feet. Twilight needs a large area to run around in and will need to be registered with the FAA if you plan to fly him above 500 feet. His favorite activities include playing with chimeras, going on epic adventures into battle, and playing with a large inflatable ball around the paddock. If you bring him home, he'll quickly become your favorite little Pegasus.", "GoodEvil": "Good", "LawChaos": "Lawful", "Name": "Twilight Glitter", "ProfileImageUri": "https://www.mythicalmysfits.com/images/pegasus_hover.png", "Species": "Pegasus", "ThumbImageUri": "https://www.mythicalmysfits.com/images/pegasus_thumb.png" }, -
Save the file.
-
Change to the mysfits repository with the
cd /projects/mysfitscommand. -
Add, commit and push your changes with the git add, git commit, and git push commands.
git add .
git commit -m "make an example change"
git push
Step 6: View the workflow that builds the modern application
After creating the modern application project, CodeCatalyst generates several resources on your behalf, including a workflow. A workflow is an automated procedure defined in a .yaml file that describes how to build, test, and deploy your code.
In this tutorial, CodeCatalyst created a workflow and started it automatically when you created your project. (The workflow might still be running depending on how long ago you created your project.) Use the following procedures to check on the workflow's progress, review the generated logs and test reports, and finally, navigate to the URL of the deployed application.
To check on the workflow progress
-
In the CodeCatalyst console, in the navigation pane, choose CI/CD, and then choose Workflows.
A list of workflows appears. These are the workflows that the CodeCatalyst blueprint generated and started when you created your project.
-
Observe the list of workflows. You should see four:
-
The two workflows at the top correspond to the
testbranch that you created earlier in Step 5: Create a Dev Environment with a test branch and make a quick code change. These workflows are clones the workflows on themainbranch. The ApplicationDeploymentPipeline is not active because it is configured for use with themainbranch. The OnPullRequest workflow did not run because no pull request has been made. -
The two workflows at the bottom correspond to the
mainbranch that was created when you ran the blueprint earlier. The ApplicationDeploymentPipeline workflow is active and has an in-progress (or finished) run.Note
If the ApplicationDeploymentPipeline run fails with a Build@cdk_bootstrap or DeployBackend error, it might be because you ran the Modern three-tier web application previously, and it left old resources behind that conflict with the current blueprint. You'll need to delete these old resources and then re-run the workflow. For more information, see Clean up resources.
-
-
Choose the ApplicationDeploymentPipeline workflow associated with the
mainbranch, at the bottom. This workflow was run using the source code on themainbranch.A workflow diagram appears. The diagram shows several blocks, each representing a task or action. Most actions are arranged vertically, with the actions at the top running before the ones below. Actions that are arranged side by side run in parallel. Actions that are grouped together must all run successfully before the action below them can start.
The main blocks are:
-
WorkflowSource – This block represents your source repository. It shows, among other information, the source repository name (mysfits) and the commit that automatically started the workflow run. CodeCatalyst generated this commit when you created your project.
-
Build – This block represents a grouping of two actions which must both complete successfully for the next action to start.
-
DeployBackend – This block represents an action that deploys the application's backend components into the AWS cloud.
-
Tests – This block represents a grouping of two test actions which must both complete successfully for the next action to start.
-
DeployFrontend – This block represents an action that deploys the application's frontend components into the AWS cloud.
-
-
Choose the Definition tab (near the top). The workflow definition file appears on the right. The file has the following noteworthy sections:
-
A
Triggerssection, at the top. This section indicates that the workflow must start whenever code is pushed to the source repository'smainbranch. Pushes to other branches (such astest) will not start this workflow. The workflow runs using the files on themainbranch. -
An
Actionssection, underTriggers. This section defines the actions that you see in the workflow diagram.
-
-
Choose the Latest state tab (near the top), and choose any action in the workflow diagram.
-
On the right, choose the Configuration tab to see the configuration settings used by the action during the latest run. Each configuration setting has a matching property in the workflow definition file.
-
Leave the console open and go to the next procedure.
To review the build logs and test reports
-
Choose the Latest state tab.
-
In the workflow diagram, choose the DeployFrontend action.
-
Wait for the action to finish. Watch for the "in-progress" icon (
 ) to change to a "success" icon (
 ).
). -
Choose the build_backend action.
-
Choose the Logs tab, and expand a couple of sections to view the log messages for these steps. You can see messages related to the backend setup.
-
Choose the Reports tab, and then choose the
backend-coverage.xmlreport. CodeCatalyst displays the associated report. The report shows the code coverage tests that were run, and indicates the proportion of lines of code that were successfully validated by testing, such as 80%.For more information about test reports, see Testing with workflows.
Tip
You can also view your test reports by choosing Reports in the navigation pane.
-
Leave the CodeCatalyst console open, and go to the next procedure.
To confirm that the modern application was deployed successfully
-
Return to the ApplicationDeploymentPipeline workflow, and choose the Run-
stringlink of the latest run. -
In the workflow diagram, find the DeployFrontend action and choose the View app link. The Mysfit website appears.
Note
If you don't see the View app link inside the DeployFrontend action, make sure you chose the run ID link.
-
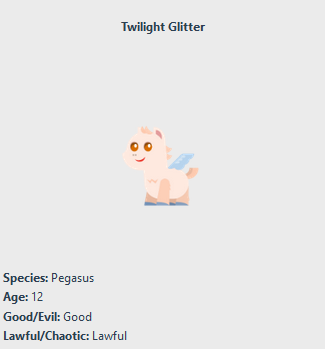
Search for the pegasus Mysfit named Twilight Glitter. Note the value for the age. It is
6. You will make a code change to update the age.
Step 7: Ask others to review your changes
Now that you have changes in a branch named test, you can ask others to
review them by creating a pull request. Perform the following steps to create a pull request
to merge the changes from the test branch into the main
branch.
To create a pull request
-
Navigate to your project.
-
Do one of the following:
-
In the navigation pane, choose Code, choose Pull requests, and then choose Create pull request.
-
On the repository home page, choose More, and then choose Create pull request.
-
On the project page, choose Create pull request.
-
-
In Source repository, make sure that the specified source repository is the one that contains the committed code. This option only appears if you did not create the pull request from the repository's main page.
-
In Destination branch, choose the branch to merge the code into after it is reviewed.
-
In Source branch, choose the branch that contains the committed code.
-
In Pull request title, enter a title that helps other users understand what needs to be reviewed and why.
-
(Optional) In Pull request description, provide information such as a link to issues or a description of your changes.
Tip
You can choose Write description for me to have CodeCatalyst automatically generate a description of the changes contained in the pull request. You can make changes to the automatically generated description after you add it to the pull request.
This functionality requires that generative AI features are enabled for the space and is not available for pull requests in linked repositories. For more information, see Managing generative AI features.
-
(Optional) In Issues, choose Link issues, and then either choose an issue from the list or enter its ID. To unlink an issue, choose the unlink icon.
-
(Optional) In Required reviewers, choose Add required reviewers. Choose from the list of project members to add them. Required reviewers must approve the changes before the pull request can be merged into the destination branch.
Note
You cannot add a reviewer as both a required reviewer and an optional reviewer. You cannot add yourself as a reviewer.
-
(Optional) In Optional reviewers, choose Add optional reviewers. Choose from the list of project members to add them. Optional reviewers do not have to approve the changes as a requirement before the pull request can be merged into the destination branch.
-
Review the differences between the branches. The difference displayed in a pull request is the changes between the revision in the source branch and the merge base, which is the head commit of the destination branch at the time the pull request was created. If no changes display, the branches might be identical, or you might have chosen the same branch for both the source and the destination.
-
When you are satisfied that the pull request contains the code and changes you want reviewed, choose Create.
Note
After you create the pull request, you can add comments. Comments can be added to the pull request or to individual lines in files as well as to the overall pull request. You can add links to resources, such as files, by using the @ sign followed by the name of the file.
When you create the pull request, the OnPullRequest
workflow starts using the source files in the test branch. While your reviewers
are approving your code change, you can observe the results by choosing the workflow and
viewing the test output.
After you've had the change reviewed, you can merge the code. Merging the code to the default branch will automatically start the workflow that will build and deploy your changes.
To merge a pull request from the CodeCatalyst console
-
Navigate to your modern application project.
-
On the project page, under Open pull requests, choose the pull request you want to merge. If you do not see the pull request, choose View all and then choose it from the list. Choose Merge.
-
Choose from the available merge strategies for the pull request. Optionally select or deselect the option to delete the source branch after merging the pull request, and then choose Merge.
Note
If the Merge button is not active, or you see the Not mergeable label, either one or more required reviewers have not yet approved the pull request, or the pull request cannot be merged in the CodeCatalyst console. A reviewer who has not approved a pull request is indicated by a clock icon in Overview in the Pull request details area. If all required reviewers have approved the pull request but the Merge button is still not active, you might have a merge conflict. You can resolve merge conflicts for the destination branch in the CodeCatalyst console and then merge the pull request, or you can resolve conflicts and merge locally, and then push the commit that contains the merge to CodeCatalyst. For more information, see Merging a pull request (Git) and your Git documentation.
Once you've merged the changes from the test branch into the
main branch, the change automatically starts the ApplicationDeploymentPipeline workflow that builds and deploys your
change.
To see the merged commit run through the ApplicationDeploymentPipeline workflow
-
In the navigation pane, choose CI/CD, and then choose Workflows.
-
In Workflows, in ApplicationDeploymentPipeline, expand Recent runs. You can see the workflow run started by the merge commit. Optionally choose it to watch the run progress.
-
When the run completes, reload the URL you visited earlier. View the pegasus to verify that the age changed.
Step 8: Close the issue
When an issue is resolved, it can be closed on the CodeCatalyst console.
To close an issue for a project
-
Navigate to your project.
-
In the navigation pane, choose Issues.
-
Drag-and-drop the issue to the Done column.
For more information, see Track and organize work with issues in CodeCatalyst.
Clean up resources
Clean up in CodeCatalyst and AWS to remove traces of this tutorial from your environment.
You can choose to keep using the project you used for this tutorial, or you can delete the project and its associated resources.
Note
Deleting this project will delete all repositories, issues, and artifacts in the project for all members.
To delete a project
-
Navigate to your project, and then choose Project settings.
-
Choose the General tab.
-
Under the project name, choose Delete project.
To delete resources in CloudFormation and Amazon S3
-
Sign in to the AWS Management Console with the same account that you added to your CodeCatalyst space.
-
Go to the CloudFormation service.
-
Delete the mysfits
stringstack. -
Delete the development-mysfits
stringstack. -
Choose (but do not delete) the CDKToolkit stack. Choose the Resources tab. Choose the StagingBucket link, and delete the bucket and bucket contents in Amazon S3.
Note
If you don't delete this bucket manually, you may see an error when re-running the Modern three-tier web application blueprint.
-
(Optional) Delete the CDKToolkit stack.
Reference
The Modern three-tier web application blueprint deploys resources into your CodeCatalyst space and your AWS account in the AWS cloud. These resources are:
-
In your CodeCatalyst space:
-
A CodeCatalyst project that includes the following resources:
-
A source repository – This repository contains sample code for a 'Mysfits' web application.
-
A workflow – This workflow builds and deploys the Mysfits application code whenever a change is made to the default branch
-
An issues board and backlog – This board and backlog can be used to plan and track work.
-
A test reports suite – This suite includes automated reports included in the sample code.
-
-
-
In the associated AWS account:
-
A CDKToolkit stack – This stack deploys the following resources:
-
An Amazon S3 staging bucket, bucket policy, and the AWS KMS key used to encrypt the bucket.
-
An IAM deployment role for the deploy action.
-
AWS IAM roles and policies in support of the resources in the stack.
Note
The CDKToolkit is not torn down and recreated for each deployment. This is a stack that is initiated in each account to support the AWS CDK.
-
-
A development-mysfits
stringBackEnd stack – This stack deploys the following backend resources:-
An Amazon API Gateway endpoint.
-
AWS IAM roles and policies in support of the resources in the stack.
-
An AWS Lambda function and layer provides the serverless compute platform for the modern application.
-
An IAM policy and role for the bucket deployment and Lambda function.
-
-
A mysfits
stringstack – This stack deploys the AWS Amplify frontend application.
-
See also
For more information about the AWS services where resources are created as part of this tutorial, see the following:
-
Amazon S3 – A service for storing your frontend assets on an object storage service offering industry-leading scalability, data high availability, security, and performance. For more information, see Amazon S3 User Guide.
-
Amazon API Gateway – A service for creating, publishing, maintaining, monitoring, and securing REST, HTTP, and WebSocket APIs at any scale For more information, see API Gateway Developer Guide.
-
Amplify – A service for hosting your frontend application. For more information, see AWS Amplify Hosting User Guide.
-
AWS Cloud Development Kit (AWS CDK) – A framework for defining cloud infrastructure in code and provisioning it through AWS CloudFormation. The AWS CDK includes the AWS CDK Toolkit, which is a command line tool for interacting with AWS CDK apps and stacks. For more information, see AWS Cloud Development Kit (AWS CDK) Developer Guide.
-
Amazon DynamoDB – A fully managed NoSQL database service for storing data. For more information, see Amazon DynamoDB Developer Guide.
-
AWS Lambda – A service for invoking your code on a high availability compute infrastructure without provisioning or managing servers. For more information, see AWS Lambda Developer Guide.
-
AWS IAM – A service for securely controlling access to AWS and its resources. For more information, see IAM User Guide.
