Tutorial: Transferring data from on-premises storage to Amazon S3 across AWS accounts
When using AWS DataSync with on-premises storage, you typically transfer data to an AWS storage service that belongs to the same AWS account as your DataSync agent. There are situations, however, where you might need to transfer data to an Amazon S3 bucket that's associated with a different account.
Important
Transferring data across AWS accounts by using the methods in this tutorial works only when Amazon S3 is one of the DataSync transfer locations.
Overview
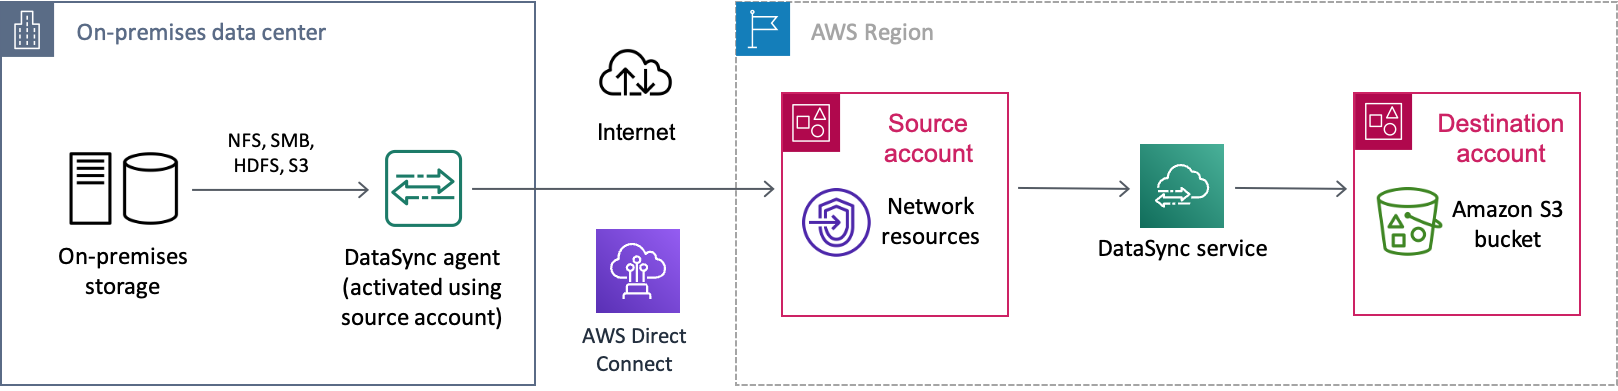
It's not uncommon to need to transfer data between different AWS accounts, especially if you have separate teams managing your organization's resources. Here's what a cross-account transfer using DataSync can look like:
-
Source account: The AWS account for managing network resources. This is the account that you activate your DataSync agent with.
-
Destination account: The AWS account for managing the S3 bucket that you need to transfer data to.
The following diagram illustrates this kind of scenario.
Prerequisite: Required source account permissions
For your source AWS account, there are two sets of permissions to consider with this kind of cross-account transfer:
-
User permissions that allow a user to work with DataSync (this might be you or your storage administrator). These permissions let you create DataSync locations and tasks.
-
DataSync service permissions that allow DataSync to transfer data to your destination account bucket.
Prerequisite: Required destination account permissions
In your destination account, your user permissions must allow you to update your destination bucket's policy and disable its access control lists (ACLs). For more information on these specific permissions, see the Amazon S3 User Guide.
Step 1: In your source account, create a DataSync agent
To get started, you must create a DataSync agent that can read from your on-premises storage system and communicate with the DataSync service. This process includes deploying an agent in your on-premises storage environment and activating the agent in your source AWS account.
Note
The steps in this tutorial apply to any type of agent and service endpoint that you use.
To create a DataSync agent
-
Deploy a DataSync agent in your on-premises storage environment.
-
Choose a service endpoint that the agent will use to communicate with AWS.
-
Activate your agent in your source account.
Step 2: In your source account, create a DataSync IAM role for destination bucket access
In your source account, you need an IAM role that gives DataSync the permissions to transfer data to your destination account bucket.
Since you're transferring across accounts, you must create the role manually. (DataSync can create this role for you in the console when transferring in the same account.)
Create the DataSync IAM role
Create an IAM role with DataSync as the trusted entity.
To create the IAM role
-
Log in to the AWS Management Console with your source account.
Open the IAM console at https://console.aws.amazon.com/iam/
. -
In the left navigation pane, under Access management, choose Roles, and then choose Create role.
-
On the Select trusted entity page, for Trusted entity type, choose AWS service.
-
For Use case, choose DataSync in the dropdown list and select DataSync. Choose Next.
-
On the Add permissions page, choose Next.
-
Give your role a name and choose Create role.
For more information, see Creating a role for an AWS service (console) in the IAM User Guide.
Add permissions to the DataSync IAM role
The IAM role that you just created needs the permissions that allow DataSync to transfer data to the S3 bucket in your destination account.
To add permissions to your IAM role
-
On the Roles page of the IAM console, search for the role that you just created and choose its name.
-
On the role's details page, choose the Permissions tab. Choose Add permissions then Create inline policy.
-
Choose the JSON tab and do the following:
-
Paste the following JSON into the policy editor:
Note
The value for
aws:ResourceAccountshould be the account ID that owns the Amazon S3 bucket specified in the policy. -
Replace each instance of
amzn-s3-demo-destination-bucket
-
-
Choose Next. Give your policy a name and choose Create policy.
Step 3: In your destination account, update your S3 bucket policy
In your destination account, modify the destination S3 bucket policy to include the DataSync IAM role that you created in your source account.
Before you begin: Make sure that you have the required permissions for your destination account.
To update the destination S3 bucket policy
-
In the AWS Management Console, switch to your destination account.
Open the Amazon S3 console at https://console.aws.amazon.com/s3/
. -
In the left navigation pane, choose Buckets.
-
In the Buckets list, choose the S3 bucket that you're transferring data to.
-
On the bucket's detail page, choose the Permissions tab.
-
Under Bucket policy, choose Edit and do the following to modify your S3 bucket policy:
-
Update what's in the editor to include the following policy statements:
-
Replace each instance of
source-account -
Replace
source-datasync-role -
Replace each instance of
amzn-s3-demo-destination-bucket
-
-
Choose Save changes.
Step 4: In your destination account, disable ACLs for your S3 bucket
It's important that all the data that you copy to the S3 bucket belongs to your destination account. To ensure that this account owns the data, disable the bucket's access control lists (ACLs). For more information, see Controlling ownership of objects and disabling ACLs for your bucket in the Amazon S3 User Guide.
To disable ACLs for your destination bucket
-
While still logged in to the S3 console with your destination account, choose the S3 bucket that you're transferring data to.
-
On the bucket's detail page, choose the Permissions tab.
-
Under Object Ownership, choose Edit.
-
If it isn't already selected, choose the ACLs disabled (recommended) option.
-
Choose Save changes.
Step 5: In your source account, create a DataSync source location for your on-premises storage
In your source account, create a DataSync source location for the on-premises storage system that you're transferring data from. This location uses the agent that you activated in your source account.
Step 6: In your source account, create a DataSync destination location for your S3 bucket
While still in your source account, create a location for the S3 bucket that you're transferring data to.
Before you begin: Make sure that you have the required permissions for your source account.
Since you can't create cross-account locations by using the DataSync console interface,
these instructions require that you run a create-location-s3 command to
create your destination location. We recommend running the command by using AWS CloudShell, a
browser-based, pre-authenticated shell that you launch directly from the console.
CloudShell allows you to run AWS CLI commands like create-location-s3
without downloading or installing command line tools.
Note
To complete the following steps by using a command line tool other than CloudShell, make sure that your AWS CLI profile uses the same IAM role that includes the required user permissions to use DataSync in your source account.
To create a DataSync destination location by using CloudShell
-
While still in your source account, do one of the following to launch CloudShell from the console:
-
Choose the CloudShell icon on the console navigation bar. It's located to the right of the search box.
-
Use the search box on the console navigation bar to search for CloudShell and then choose the CloudShell option.
-
-
Copy the following command:
aws datasync create-location-s3 \ --s3-bucket-arn arn:aws:s3:::amzn-s3-demo-destination-bucket\ --s3-config '{ "BucketAccessRoleArn":"arn:aws:iam::source-user-account:role/source-datasync-role" }' -
Replace
amzn-s3-demo-destination-bucket -
Replace
source-user-account -
Replace
source-datasync-role -
Run the command in CloudShell.
If the command returns a DataSync location ARN similar to this, you successfully created the location:
{ "LocationArn": "arn:aws:datasync:us-east-2:123456789012:location/loc-abcdef01234567890" } -
In the left navigation pane, expand Data transfer, then choose Locations.
From your source account, you can see the S3 location that you just created for your destination account bucket.
Step 7: In your source account, create and start your DataSync task
Before starting a DataSync task to transfer your data, let's recap what you've done so far:
-
In your source account, you created your DataSync agent. The agent can read from your on-premises storage system and communicate with the DataSync service.
-
In your source account, you created an IAM role that allows DataSync to transfer data to the S3 bucket in your destination account.
-
In your destination account, you configured your S3 bucket so that DataSync can transfer data to it.
-
In your source account, you created the DataSync source and destination locations for your transfer.
To create and start the DataSync task
-
While still using the DataSync console in your source account, expand Data transfer in the left navigation pane, then choose Tasks and Create task.
-
On the Configure source location page, choose Choose an existing location. Choose the source location that you're copying data from (your on-premises storage) then Next.
-
On the Configure destination location page, choose Choose an existing location. Choose the destination location that you're copying data to (the S3 bucket in your destination account) then Next.
-
On the Configure settings page, give the task a name. As needed, configure additional settings, such as specifying an Amazon CloudWatch log group. Choose Next.
-
On the Review page, review your settings and choose Create task.
-
On the task's details page, choose Start, and then choose one of the following:
-
To run the task without modification, choose Start with defaults.
-
To modify the task before running it, choose Start with overriding options.
-
When your task finishes, check the S3 bucket in your destination account. You should see the data that moved from your source location.
Related resources
For more information about what you did in this tutorial, see the following topics:
