Configuring AWS DataSync transfers with Google Cloud Storage
With AWS DataSync, you can transfer data between Google Cloud Storage and the following AWS storage services:
-
Amazon S3
-
Amazon EFS
-
Amazon FSx for Windows File Server
-
Amazon FSx for Lustre
-
Amazon FSx for OpenZFS
-
Amazon FSx for NetApp ONTAP
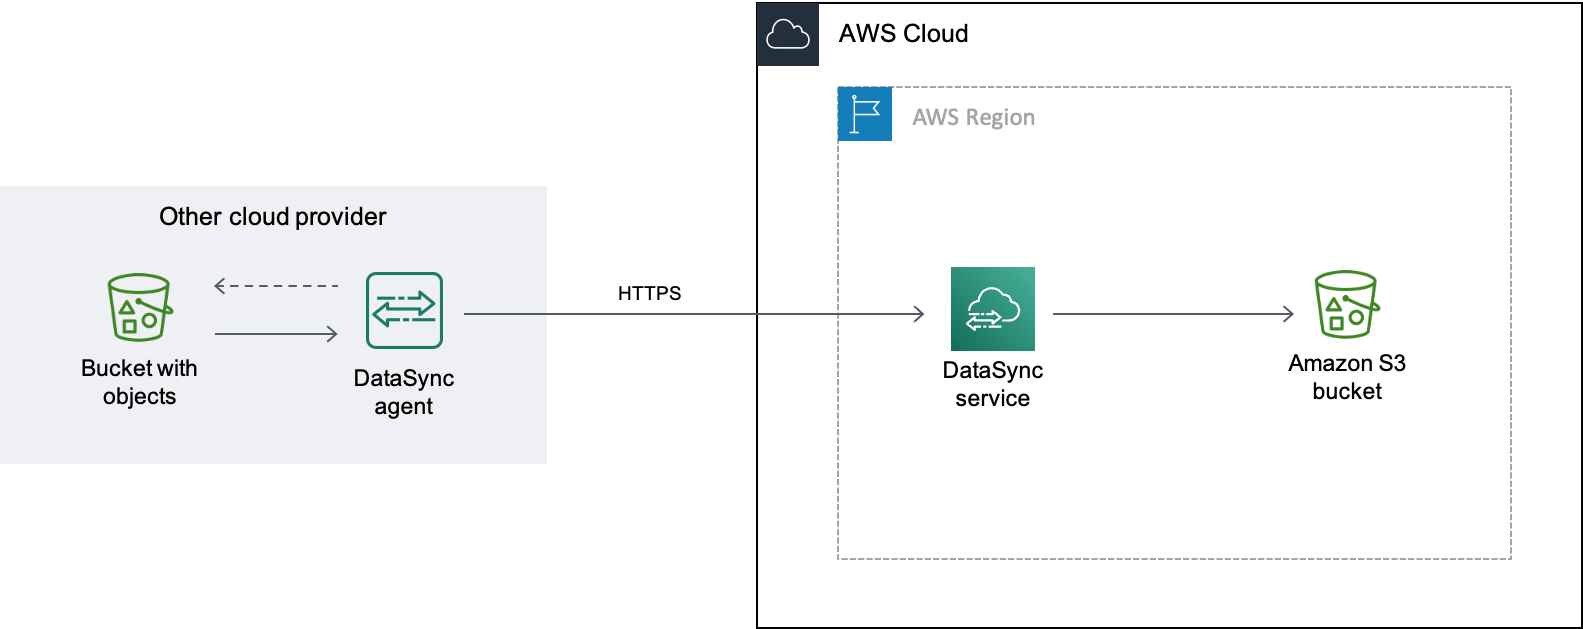
To begin the transfer setup, create a location for your Google Cloud Storage. This location can serve as either your transfer source or destination. A DataSync agent is required only when you transfer data between Google Cloud Storage and Amazon EFS or Amazon FSx, or when using Basic mode tasks. Enhanced mode data transfers between Google Cloud Storage and Amazon S3 don't require an agent.
Note
For private cloud connectivity between Google Cloud Storage and AWS, use Basic mode with agents.
Overview
DataSync uses the Google Cloud Storage XML API
When you use Basic mode for transfers, you can deploy the agent in Google Cloud Storage or your Amazon VPC.

Costs
The fees associated with this migration might include:
-
Running a Google Compute Engine
virtual machine (VM) instance (if you deploy your DataSync agent in Google Cloud) -
Running an Amazon EC2
instance (if you deploy your DataSync agent in a VPC within AWS) -
Transferring the data by using DataSync
, including request charges related to Google Cloud Storage and Amazon S3 (if S3 is one of your transfer locations) -
Transferring data out of Google Cloud Storage
-
Storing data in Amazon S3
Prerequisites
Before you begin, do the following if you haven’t already:
-
Create a Google Cloud Storage bucket
with the objects that you want to transfer to AWS. -
Create an Amazon S3 bucket for storing your objects after they're in AWS.
Creating an HMAC key for your Google Cloud Storage bucket
DataSync uses an HMAC key that's associated with your Google service account to
authenticate with and read the bucket that you’re transferring data from. (For detailed
instructions on how to create HMAC keys, see the
Google Cloud
Storage documentation
To create an HMAC key
-
Create an HMAC key for your Google service account.
-
Make sure that your Google service account has at least
Storage Object
                        Viewer
permissions. -
Save your HMAC key's access ID and secret in a secure location.
You'll need these items later to configure your DataSync source location.
Step 2: Configure your network
Network configuration is required only when using a DataSync agent with your transfer. The network requirements for this migration depend on where you choose to deploy your agent.
If you want to host your DataSync agent in Google Cloud, configure your network to allow DataSync transfers through a public endpoint.
If you want to host your agent in AWS, you need a VPC with an interface endpoint. DataSync uses the VPC endpoint to facilitate the transfer.
To configure your network for a VPC endpoint
-
If you don't have one, create a VPC in the same AWS Region as your S3 bucket.
-
Create a VPC service endpoint for DataSync.
-
Configure your network to allow DataSync transfers through a VPC service endpoint.
To do this, modify the security group that's associated with your VPC service endpoint.
Step 3: Create a DataSync agent (optional)
A DataSync agent is only required when using Basic mode tasks. If you are using Enhanced mode to transfer between Google Cloud Storage (GCS) and Amazon S3, then no agent is required. If you want to use Basic mode, then you need a DataSync agent that can access your GCS bucket.
In this scenario, the DataSync agent runs in your Google Cloud environment.
Before you begin: Install the Google Cloud
CLI
To create the agent for Google Cloud
-
Open the AWS DataSync console at https://console.aws.amazon.com/datasync/
. -
In the left navigation pane, choose Agents, then choose Create agent.
-
For Hypervisor, choose VMware ESXi, then choose Download the image to download a
.zipfile that contains the agent. -
Open a terminal. Unzip the image by running the following command:
unzip AWS-DataSync-Agent-VMWare.zip -
Extract the contents of the agent's
.ovafile beginning withaws-datasyncby running the following command:tar -xvf aws-datasync-2.0.1655755445.1-x86_64.xfs.gpt.ova -
Import the agent's
.vmdkfile into Google Cloud by running the following Google Cloud CLI command:gcloud compute images import aws-datasync-2-test \ --source-file INCOMPLETE-aws-datasync-2.0.1655755445.1-x86_64.xfs.gpt-disk1.vmdk \ --os centos-7Note
Importing the
.vmdkfile might take up to two hours. -
Create and start a VM instance for the agent image that you just imported.
The instance needs the following configurations for your agent. (For detailed instructions on how to create an instance, see the Google Cloud Compute Engine documentation
.) -
For the machine type, choose one of the following:
-
e2-standard-8 – For DataSync task executions working with up to 20 million objects.
-
e2-standard-16 – For DataSync task executions working with more than 20 million objects.
-
-
For the boot disk settings, go to the custom images section. Then choose the DataSync agent image that you just imported.
-
For the service account setting, choose your Google service account (the same account that you used in Step 1).
-
For the firewall setting, choose the option to allow HTTP (port 80) traffic.
To activate your DataSync agent, port 80 must be open on the agent. The port doesn't need to be publicly accessible. Once activated, DataSync closes the port.
-
-
After the VM instance is running, take note of its public IP address.
You'll need this IP address to activate the agent.
-
Go back to the DataSync console. On the Create agent screen where you downloaded the agent image, do the following to activate your agent:
-
For Endpoint type, choose the public service endpoints option (for example, Public service endpoints in US East Ohio).
-
For Activation key, choose Automatically get the activation key from your agent.
-
For Agent address, enter the public IP address of the agent VM instance that you just created.
-
Choose Get key.
-
-
Give your agent a name, and then choose Create agent.
Your agent is online and ready to transfer data.
In this scenario, the agent runs as an Amazon EC2 instance in a VPC that's associated with your AWS account.
Before you begin: Set up the AWS Command Line Interface (AWS CLI).
To create the agent for your VPC
-
Open a terminal. Make sure to configure your AWS CLI profile to use the account that's associated with your S3 bucket.
-
Copy the following command. Replace
vpc-regionus-east-1).aws ssm get-parameter --name /aws/service/datasync/ami --regionvpc-region -
Run the command. In the output, take note of the
"Value"property.This value is the DataSync Amazon Machine Image (AMI) ID of the Region that you specified. For example, an AMI ID could look like
ami-1234567890abcdef0. -
Copy the following URL. Again, replace
vpc-regionami-idhttps://console.aws.amazon.com/ec2/v2/home?region=vpc-region#LaunchInstanceWizard:ami=ami-id -
Paste the URL into a browser.
The Amazon EC2 instance launch page in the AWS Management Console displays.
-
For Instance type, choose one of the recommended Amazon EC2 instances for DataSync agents.
-
For Key pair, choose an existing key pair, or create a new one.
-
For Network settings, choose the VPC and subnet where you want to deploy the agent.
-
Choose Launch instance.
-
Once the Amazon EC2 instance is running, choose your VPC endpoint.
Step 4: Create a DataSync source location for your Google Cloud Storage bucket
To set up a DataSync location for your Google Cloud Storage bucket, you need the access ID and secret for the HMAC key that you created in Step 1.
To create the DataSync source location
Open the AWS DataSync console at https://console.aws.amazon.com/datasync/
. In the left navigation pane, expand Data transfer, then choose Locations and Create location.
-
For Location type, choose Object storage.
-
For Server, enter
storage.googleapis.com. -
For Bucket name, enter the name of your Google Cloud Storage bucket.
-
For Folder, enter an object prefix.
DataSync only copies objects with this prefix.
-
If your transfer requires an agent, choose Use agents, then choose the agent that you created in Step 3.
-
Expand Additional settings. For Server protocol, choose HTTPS. For Server port, choose 443.
-
Scroll down to the Authentication section. Make sure that the Requires credentials check box is selected, and then do the following:
-
For Access key, enter your HMAC key's access ID.
-
For Secret key, either enter your HMAC key's secret key directly, or specify an AWS Secrets Manager secret that contains the key. For more information, see Providing credentials for storage locations.
-
-
Choose Create location.
Step 5: Create a DataSync destination location for your S3 bucket
You need a DataSync location for where you want your data to end up.
To create the DataSync destination location
Open the AWS DataSync console at https://console.aws.amazon.com/datasync/
. In the left navigation pane, expand Data transfer, then choose Locations and Create location.
-
Create a DataSync location for the S3 bucket.
If you deployed the DataSync agent in your VPC, this tutorial assumes that the S3 bucket is in the same AWS Region as your VPC and DataSync agent.
Step 6: Create and start a DataSync task
With your source and destinations locations configured, you can start moving your data into AWS.
To create and start the DataSync task
Open the AWS DataSync console at https://console.aws.amazon.com/datasync/
. In the left navigation pane, expand Data transfer, then choose Tasks, and then choose Create task.
-
On the Configure source location page, do the following:
-
Choose Choose an existing location.
-
Choose the source location that you created in Step 4, then choose Next.
-
-
On the Configure destination location page, do the following:
-
Choose Choose an existing location.
-
Choose the destination location that you created in Step 5, then choose Next.
-
-
On the Configure settings page, do the following:
-
Under Data transfer configuration, expand Additional settings and clear the Copy object tags check box.
Important
Because the Google Cloud Storage XML API does not support reading or writing object tags, your DataSync task might fail if you try to copy object tags.
-
Configure any other task settings that you want, and then choose Next.
-
-
On the Review page, review your settings, and then choose Create task.
-
On the task's details page, choose Start, and then choose one of the following:
-
To run the task without modification, choose Start with defaults.
-
To modify the task before running it, choose Start with overriding options.
-
When your task finishes, you'll see the objects from your Google Cloud Storage bucket in your S3 bucket.
