Migrate an Oracle PeopleSoft database to AWS by using AWS DMS
sampath kathirvel, Amazon Web Services
Summary
Oracle PeopleSoft
If you migrate your Oracle database to Amazon RDS, Amazon Web Services (AWS) can take care of backup tasks and high availability, leaving you free to concentrate on maintaining your PeopleSoft application and its functionality. For a comprehensive list of key factors to consider during the migration process, see Oracle database migration strategies in AWS Prescriptive Guidance.
This pattern provides a solution for migrating your on-premises Oracle databases to Amazon RDS for Oracle using Oracle Data Pump with AWS Database Migration Service (AWS DMS)
When migrating critical ERP applications such as Oracle PeopleSoft, minimizing the downtime is key. AWS DMS minimizes downtime by supporting both full load and continuous replication. from the source database to the target database. AWS DMS also provides real-time monitoring and logging of the migration, which can help you to identify and resolve any issues that could cause downtime.
When replicating changes with AWS DMS, you must specify a time or system change number (SCN) as the starting point for AWS DMS to read changes from the database logs. It's crucial to keep these logs accessible on the server for a designated amount of time to ensure that AWS DMS has access to these changes.
Prerequisites and limitations
Prerequisites
Provisioned Amazon RDS for Oracle database in your AWS Cloud environment as the target database.
An Oracle PeopleSoft database running on premises or on Amazon Elastic Compute Cloud (Amazon EC2) in the AWS Cloud.
Note
This pattern is designed for migrating from on premises to AWS, but it was tested by using Oracle Database on an Amazon EC2 instance. For migrating from on premises, you will need to configure the appropriate network connectivity.
Schema details. When migrating an Oracle PeopleSoft application to Amazon RDS for Oracle, it is necessary to identify which Oracle database schema (for example,
SYSADM) to migrate. Before starting the migration process, gather the following details about the schema:Size
The number of objects per object type
The number of invalid objects.
This information will aid in the migration process.
Limitations
This scenario has been tested only with the PeopleSoft DEMO database. It hasn’t been tested with a large dataset.
Architecture
The following diagram shows an instance running an Oracle database as the source database and an Amazon RDS for Oracle database as the target database. The data is exported and imported from the source Oracle database to the target Amazon RDS for Oracle database using Oracle Data Pump and replicated for CDC changes using AWS DMS.
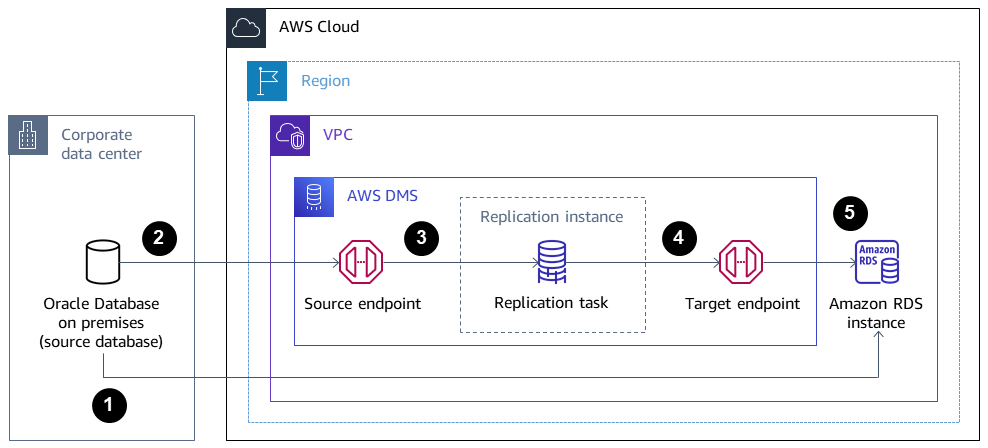
The initial step involves extracting data from the source database by using Oracle Data Pump, followed by sending it to the Amazon RDS for Oracle database target.
Data is sent from the source database to a source endpoint in AWS DMS.
From the source endpoint, the data is sent to the AWS DMS replication instance, where the replication task is performed.
After the replication task is completed, the data is sent to the target endpoint in AWS DMS.
From the target endpoint, the data is sent to the Amazon RDS for Oracle database instance.
Tools
AWS services
AWS Database Migration Service (AWS DMS) helps you migrate data stores into the AWS Cloud or between combinations of cloud and on-premises setups.
Amazon Relational Database Service (Amazon RDS) for Oracle helps you set up, operate, and scale an Oracle relational database in the AWS Cloud.
Other services
Oracle Data Pump
helps you move data and metadata from one database to another at high speeds.
Best practices
Migrating LOBs
If your source database contains large binary objects (LOBs) that need to be migrated to the target database, AWS DMS provides the following options:
Full LOB mode – AWS DMS migrates all the LOBs from the source to the target database regardless of their size. Although the migration is slower, the advantage is that data isn’t truncated. For better performance, you can create a separate task on the new replication instance to migrate the tables that have LOBs larger than a few megabytes.
Limited LOB mode – You specify the maximum size of LOB column data, which allows AWS DMS to pre-allocate resources and apply the LOBs in bulk. If the size of the LOB columns exceeds the size that is specified in the task, AWS DMS truncates the data and sends warnings to the AWS DMS log file. You can improve performance by using Limited LOB mode if your LOB data size is within the Limited LOB size.
Inline LOB mode – You can migrate LOBs without truncating the data or slowing the performance of your task by replicating both small and large LOBs. First, specify a value for the InlineLobMaxSize parameter, which is available only when Full LOB mode is set to true. The AWS DMS task transfers the small LOBs inline, which is more efficient. Then, AWS DMS migrates the large LOBs by performing a lookup from the source table. However, Inline LOB mode works only during the full load phase.
Generating sequence values
Keep in mind that during the change data capture process with AWS DMS, incremental sequence numbers are not replicated from the source database. To avoid discrepancies in sequence values, you must generate the most recent sequence value from the source for all sequences, and apply it to the target Amazon RDS for Oracle database.
Credential management
To help secure your AWS resources, we recommend following the best practices for AWS Identity and Access Management (IAM).
Epics
| Task | Description | Skills required |
|---|---|---|
Download the template. | Download the DMS_instance.yaml | Cloud administrator, DBA |
Start the stack creation. |
| Cloud administrator, DBA |
Specify the parameters. |
| Cloud administrator, DBA |
Create the stack. |
The provisioning should complete in approximately 5–10 minutes. It is complete when the AWS CloudFormation Stacks page shows CREATE_COMPLETE. | Cloud administrator, DBA |
Set up the endpoints. |
| Cloud administrator, DBA |
Test connectivity. | After the source and target endpoints shows status as Active, test the connectivity. Choose Run test for each endpoint (source and target) to make sure that the status shows as successful. | Cloud administrator, DBA |
| Task | Description | Skills required |
|---|---|---|
Generate the SCN. | When the source database is active and in use by the application, initiate the data export with Oracle Data Pump. You must first generate a system change number (SCN) from the source database for both data consistency during the export with Oracle Data Pump and as a starting point for change data capture in AWS DMS. To generate the current SCN from your source database, enter the following SQL statement.
Save the generated SCN to use when you export the data and for creating the AWS DMS replication task. | DBA |
Create the parameter file. | To create a parameter file for exporting the schema, you can use the following code.
NoteYou can also define your own
| DBA |
Export the schema. | To perform the export, use the
| DBA |
| Task | Description | Skills required |
|---|---|---|
Transfer the dump file to the target instance. | To transfer your files using Alternatively, you can transfer the Data Pump files to Amazon Simple Storage Service (Amazon S3) To create a database link
| DBA |
Test the database link. | Test the database link to make sure that you can connect using sqlplus to the Amazon RDS for Oracle target database.
| DBA |
Transfer the dump file to the target database. | To copy the dump file over to Amazon RDS for Oracle database, you can either use the default
The following script copies a dump file named
| DBA |
List the dump file in the target database. | After the PL/SQL procedure is completed, you can list the data dump file in the Amazon RDS for Oracle database by using the following code.
| DBA |
Initiate the import on the target database. | Before you start the import process, set up the roles, schemas, and tablespaces on the target Amazon RDS for Oracle database by using the data dump file. To perform the import, access the target database with the Amazon RDS master user account, and use the connection string name in the To start the import, use the following code.
To ensure a successful import, check the import log file for any errors, and review details such as object count, row count, and invalid objects. If there are any invalid objects, recompile them. Additionally, compare the source and target database objects to confirm that they match. | DBA |
| Task | Description | Skills required |
|---|---|---|
Create the replication task. | Create the AWS DMS replication task by using the following steps:
After you create the task, it migrates the CDC to the Amazon RDS for Oracle database instance from the SCN that you provided under CDC start mode. You can also verify by reviewing the CloudWatch logs. | Cloud administrator, DBA |
| Task | Description | Skills required |
|---|---|---|
Validate the data transfer. | After the AWS DMS task starts, you can check the Table statistics tab on the Tasks page to see the changes made to the data. You can monitor the status of ongoing replication in the console on the Database migration tasks page. For more information, see AWS DMS data validation. | Cloud administrator, DBA |
| Task | Description | Skills required |
|---|---|---|
Stop replication. | Discontinue the replication procedure and halt the source application services. | Cloud administrator, DBA |
Launch the PeopleSoft middle tier. | Launch the target PeopleSoft middle tier application in AWS, and direct it to the recently migrated Amazon RDS for Oracle database. When you access the application, you should notice that all app connections are now established with the Amazon RDS for Oracle database. | DBA, PeopleSoft administrator |
Turn off the source database. | After you confirm that there are no more connections to the source database, it can be turned off. | DBA |
Related resources
Additional information
Transfer files using Amazon S3
To transfer the files to Amazon S3, you can use the AWS CLI or the Amazon S3 console. After you transfer the files to Amazon S3, you can use the Amazon RDS for Oracle instance to import the Data Pump files from Amazon S3.
If you choose to transfer the dump file using Amazon S3 integration as an alternate method, perform the follow steps:
Create an S3 bucket.
Export the data from the source database using Oracle Data Pump.
Upload the Data Pump files to the S3 bucket.
Download the Data Pump files from the S3 bucket to the target Amazon RDS for Oracle database.
Perform the import using the Data Pump files.
Note
To transfer large data files between S3 and RDS instances, it is recommended to use the Amazon S3 Transfer Acceleration feature.
Activate supplemental logging
If you receive a warning message to enable supplemental logging
SQL> ALTER DATABASE ADD SUPPLEMENTAL LOG DATA (ALL) COLUMNS;
SQL> ALTER DATABASE ADD SUPPLEMENTAL LOG DATA (PRIMARY KEY) COLUMNS;
SQL> ALTER DATABASE ADD SUPPLEMENTAL LOG DATA (UNIQUE) COLUMNS;
SQL> ALTER DATABASE ADD SUPPLEMENTAL LOG DATA (FOREIGN KEY) COLUMNS;
SQL> ALTER DATABASE ADD SUPPLEMENTAL LOG DATA (PRIMARY KEY) COLUMNS
SQL> ALTER DATABASE ADD SUPPLEMENTAL LOG DATA (UNIQUE) COLUMNS;
