Migrate Windows SSL certificates to an Application Load Balancer using ACM
Chandra Sekhar Yaratha and Igor Kovalchuk, Amazon Web Services
Summary
The pattern provides guidance for using AWS Certificate Manager (ACM) to migrate existing Secure Sockets Layer (SSL) certificates from websites that are hosted on on-premises servers or Amazon Elastic Compute Cloud (Amazon EC2) instances on Microsoft Internet Information Services (IIS). The SSL certificates can then be used with Elastic Load Balancing on AWS.
SSL protects your data, affirms your identity, provides better search engine rankings, helps meet Payment Card Industry Data Security Standard (PCI DSS) requirements, and improves customer trust. Developers and IT teams that manage these workloads want their web applications and infrastructure, including the IIS server and Windows Server, to remain compliant with their baseline policies.
This pattern covers manually exporting existing SSL certificates from Microsoft IIS, converting them from Personal Information Exchange (PFX) format to the Private Enhanced Mail (PEM) format that ACM supports, and then importing them into ACM in your AWS account. It also describes how to create an Application Load Balancer for your application and configure the Application Load Balancer to use your imported certificates. HTTPS connections are then terminated on the Application Load Balancer, and you don’t need further configuration overhead on the web server. For more information, see Create an HTTPS listener for your Application Load Balancer.
Windows servers use .pfx or .p12 files to contain the public key file (SSL certificate) and its unique private key file. The Certificate Authority (CA) provides you with your public key file. You use your server to generate the associated private key file where the certificate signing request (CSR) was created.
Prerequisites and limitations
Prerequisites
An active AWS account
A virtual private cloud (VPC) on AWS with at least one private and one public subnet in each Availability Zone used by your targets
IIS version 8.0 or later running on Windows Server 2012 or later
A web application running on IIS
Administrator access to the IIS server
Architecture
Source technology stack
IIS web server implementation with SSL to ensure that data is transmitted securely in an encrypted connection (HTTPS)
Source architecture

Target technology stack
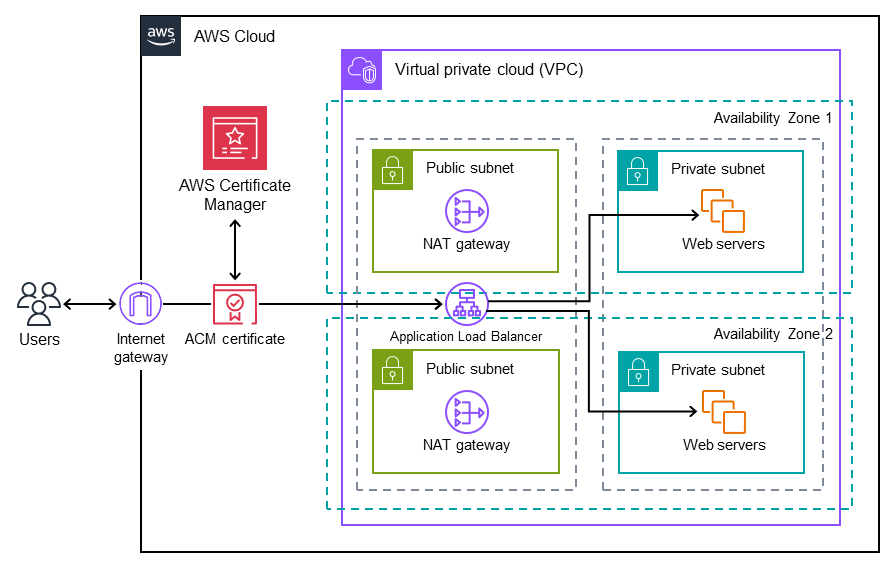
ACM certificates in your AWS account
An Application Load Balancer configured to use imported certificates
Windows Server instances in the private subnets
Target architecture

Tools
AWS Certificate Manager (ACM) helps you create, store, and renew public and private SSL/TLS X.509 certificates and keys that protect your AWS websites and applications.
Elastic Load Balancing (ELB) distributes incoming application or network traffic across multiple targets. For example, you can distribute traffic across EC2 instances, containers, and IP addresses in one or more Availability Zones.
Best practices
Enforce traffic redirects from HTTP to HTTPS.
Configure security groups for your Application Load Balancer properly to allow inbound traffic only to specific ports.
Launch your EC2 instances in different Availability Zones to ensure high availability.
Configure your application’s domain to point to the Application Load Balancer’s DNS name instead of its IP address.
Make sure that the Application Load Balancer has application-layer health checks configured.
Configure the threshold for health checks.
Use Amazon CloudWatch
to monitor the Application Load Balancer.
Epics
| Task | Description | Skills required |
|---|---|---|
Export the .pfx file from Windows Server. | To export the SSL certificate as a .pfx file from the on-premises IIS manager in Windows Server:
Your .pfx file should now be saved to the location and path you specified. | Systems administrator |
| Task | Description | Skills required |
|---|---|---|
Download and install the OpenSSL toolkit. |
| Systems administrator |
Convert the PFX-encoded certificate to PEM format. | The following steps convert the PFX-encoded, signed certificate file into three files in PEM format:
To convert the PFX encoded certificate:
| Systems administrator |
| Task | Description | Skills required |
|---|---|---|
Prepare to import the certificate. | On the ACM console | Cloud administrator |
Provide the certificate body. | For Certificate body, paste the PEM-encoded certificate that you want to import. For more information about the commands and steps described in this and other tasks in this epic, see Importing a certificate in the ACM documentation. | Cloud administrator |
Provide the certificate private key. | For Certificate private key, paste the PEM-encoded, unencrypted private key that matches the certificate's public key. | Cloud administrator |
Provide the certificate chain. | For Certificate chain, paste the PEM-encoded certificate chain, which is stored in the | Cloud administrator |
Import the certificate. | Choose Review and import. Confirm that the information about your certificate is correct, and then choose Import. | Cloud administrator |
| Task | Description | Skills required |
|---|---|---|
Create and configure the load balancer and listeners. | Follow the instructions in the Elastic Load Balancing documentation to configure a target group, register targets, and create an Application Load Balancer and listener. Add a second listener (HTTPS) for port 443. | Cloud administrator |
Troubleshooting
| Issue | Solution |
|---|---|
Windows PowerShell doesn't recognize the OpenSSL command even after you add it to the system path. | Check If it doesn’t, run the following command in PowerShell:
|
Related resources
Importing a certificate into ACM
Creating an Application Load Balancer