기계 번역으로 제공되는 번역입니다. 제공된 번역과 원본 영어의 내용이 상충하는 경우에는 영어 버전이 우선합니다.
Amazon Connect 채팅을 모바일 애플리케이션에 통합
이 주제에서는 Amazon Connect Chat을 모바일 애플리케이션에 통합하는 방법을 설명합니다. 다음 옵션 중 하나를 사용할 수 있습니다.
StartChatContact API를 Amazon Connect 사용하여 연락을 시작합니다.
사용할 통합 옵션
이 섹션에서는 솔루션에 사용할 통합 옵션을 결정하는 데 도움이 되는 각 통합 옵션에 대한 설명을 제공합니다.
WebView 통합
Amazon Connect Chat WebView 통합을 사용하면 개발 노력을 최소화하면서 모바일 애플리케이션에 전체 채팅 환경을 포함할 수 있습니다. 이 방법은 WebView Android 및 iOSWKWebView에서를 사용하여 원활하고 포괄적인 채팅 인터페이스를 제공합니다. 빠르고 out-of-the-box 가능한 솔루션을 찾는 팀이 광범위한 사용자 지정 없이 채팅 기능을 통합하는 데 적합합니다.
이 접근 방식은 보안 통신을 보장하고 웹 기반 Amazon Connect 채팅 인터페이스를 활용합니다. 그러나 쿠키와 JavaScript를 올바르게 처리하도록 앱을 구성해야 합니다.
WebView 통합 구현에 대한 자세한 내용은 Amazon Connect 채팅 UI 예제
권장 사항: WebView 기반 통합은 포괄적인 채팅 기능을 보장하면서 신속한 개발과 최소한의 유지 관리에 적합합니다.
Amazon Connect 모바일용 채팅 SDKs
iOS 및 Android용 Amazon Connect Chat SDKs는 네이티브 모바일 애플리케이션을 위한 Amazon Connect 채팅 통합을 간소화합니다. SDKs는 Amazon Connect ChatJS 라이브러리와 유사한 클라이언트 측 채팅 로직 및 백엔드 통신을 처리하는 데 도움이 됩니다.
Amazon Connect Chat SDKs는 Amazon Connect 참가자 서비스 APIs를 래핑하고 채팅 세션 및 WebSocket의 관리를 추상화합니다. 이를 통해 Amazon Connect Chat SDK를 사용하여 모든 백엔드 서비스와 상호 작용하면서 사용자 인터페이스와 경험에 집중할 수 있습니다. 이 접근 방식을 사용하려면 여전히 자체 채팅 백엔드를 사용하여 StartChatContact API를 호출하여 고객 응대를 Amazon Connect 시작해야 합니다.
Swift 기반 iOS SDK에 대한 자세한 내용은 iOS용Amazon Connect Chat SDK
GitHub 페이지를 참조하세요. Kotlin 기반 Android SDK에 대한 자세한 내용은 Android용Amazon Connect Chat SDK
GitHub 페이지를 참조하세요.
이점: 네이티브 SDKs 지원하므로 심층 사용자 지정과 원활한 사용자 경험이 필요한 애플리케이션에 적합합니다.
React Native 통합
Amazon Connect Chat React Native 통합은 교차 플랫폼 솔루션을 제공합니다. 이를 통해 팀은 공유 코드베이스를 사용하여 Android와 iOS 모두에 대한 채팅 기능을 구축할 수 있습니다. 이 방법은 사용자 지정과 개발 효율성의 균형을 맞추는 동시에 React Native의 기능을 활용하여 강력한 모바일 애플리케이션을 생성합니다.
이 통합은 네이티브 브리지를 사용하여 고급 기능에 액세스하고 플랫폼 전체에서 일관된 성능과 균일한 사용자 경험을 보장합니다. 에서 react-native-websocket 및 API 호출과 같은 라이브러리를 사용하여 WebSocket 통신과 같은 주요 기능을 더 쉽게 구현할 수 있습니다axios.
가장 적합: 기능 유연성을 유지하면서 코드 재사용을 극대화하려는 팀.
Amazon Connect 채팅 통합 워크플로
다음 다이어그램은 모바일 앱을 사용하는 고객과 에이전트 간의 프로그래밍 흐름을 보여줍니다. 다이어그램 안의 숫자가 매겨진 텍스트는 이미지 아래의 숫자가 매겨진 텍스트에 해당합니다.
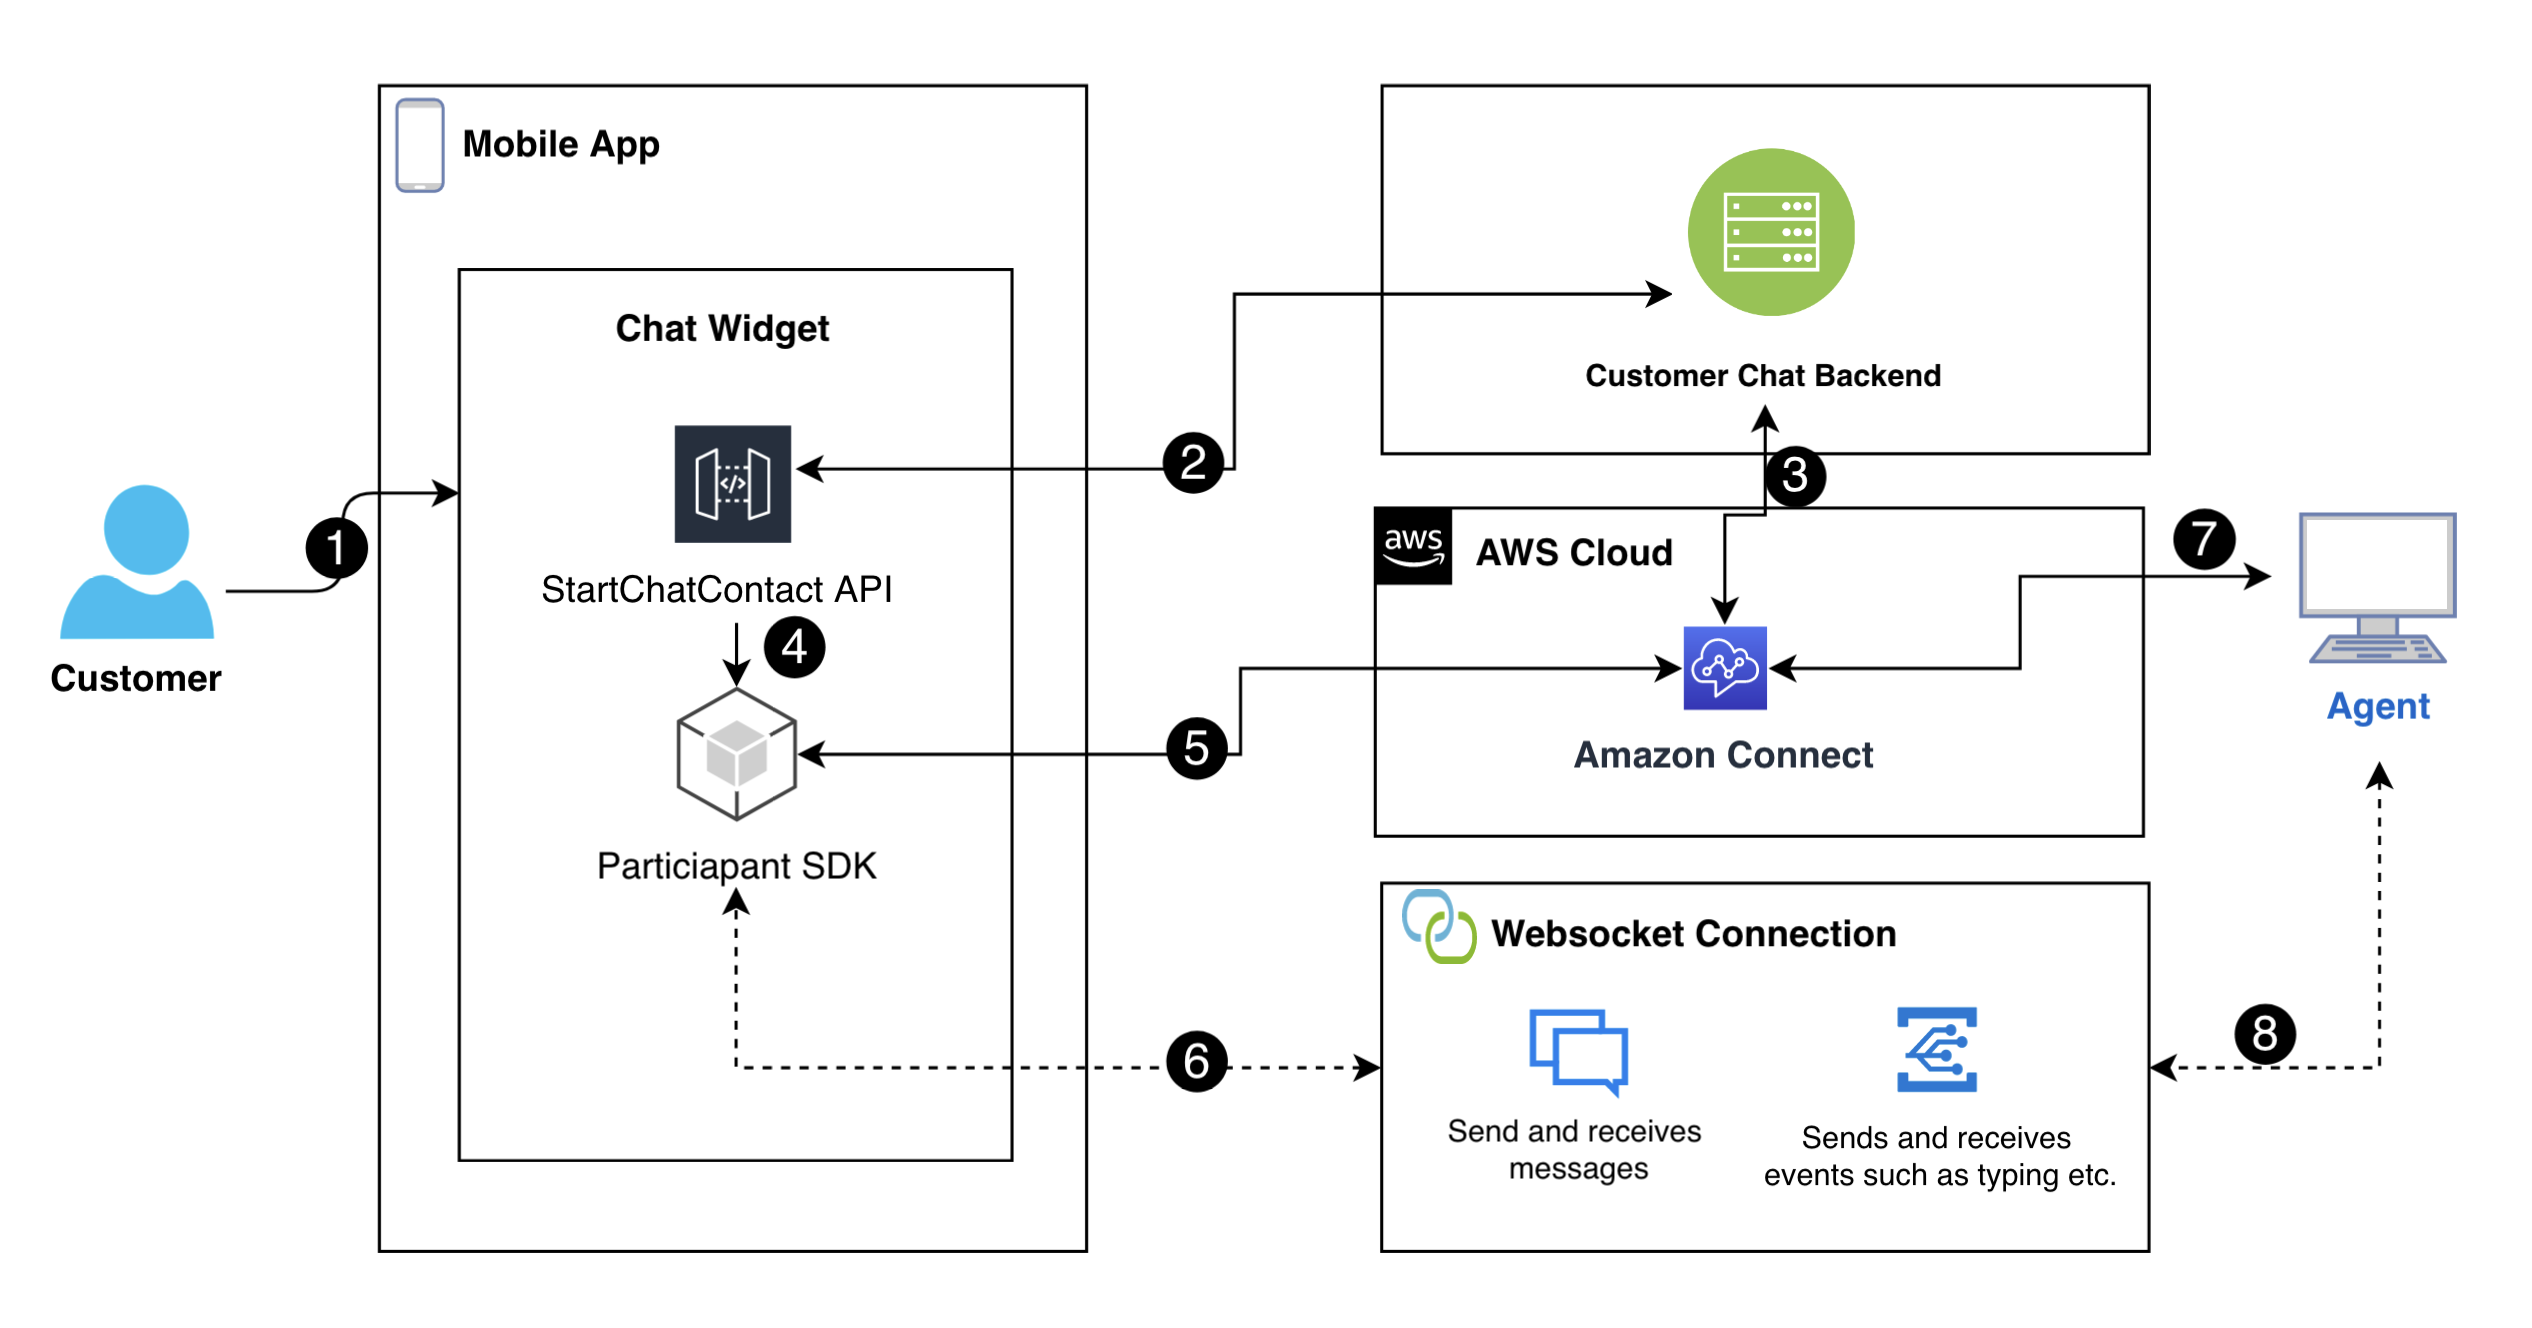
다이어그램에서,
-
고객이 모바일 앱에서 채팅을 시작하면 앱은 StartChatContact API를 Amazon Connect 사용하여에 요청을 보내야 합니다. 이렇게 하려면 API 엔드포인트 및 인스턴스의 ID와 연락처 흐름과 같은 특정 파라미터가 채팅을 인증하고 시작해야 합니다.
-
StartChatContactAPI는 백엔드 시스템과 상호 작용하여 채팅 세션의 고유 식별자 역할을 하는 참가자 토큰과 연락처 ID를 얻습니다. -
앱의 UI는 SDK가 Amazon Connect 참가자 서비스와 적절하게 통신하고 고객의 채팅 세션을 설정할 수 있도록 모바일 SDK에
StartChatContact응답을 전달합니다. -
SDK는 채팅 세션과 상호 작용하는 데 쉽게 사용할 수 있는 메서드가 포함된 chatSession
객체를 UI에 노출합니다. -
후드 아래에서 SDK는 AWS SDK
를 사용하여 Amazon Connect 참가자 서비스와 상호 작용합니다. Amazon Connect 참가자 서비스와의 통신은 채팅 세션과의 모든 고객 상호 작용을 담당합니다. 여기에는 CreateParticipantConnection,SendMessage,GetTranscript또는DisconnectParticipant와 같은 작업이 포함됩니다. -
또한 SDK는 에이전트로부터 메시지, 이벤트 및 첨부 파일을 수신하는 데 필요한 WebSocket 연결을 관리합니다. 이는 모두 SDK에서 처리 및 구문 분석되며 쉽게 사용할 수 있는 구조로 UI에 표시됩니다.
Amazon Connect 채팅 통합 시작하기
다음 단계와 리소스는 Amazon Connect 채팅을 기본 모바일 애플리케이션에 통합하는 데 도움이 됩니다.
-
GitHub의 StartChatContact 예제를 보면 AWS CloudFormation 스택을 빠르게 설정하여 StartChatContact를 호출하는 데 필요한 백엔드를 제공할 수 있습니다. startChatContactAPI
Amazon Connect Chat SDKs로 구동되는 모바일 채팅 UI를 구축하는 방법을 보여주는 예제는 UI 예제
GitHub 프로젝트를 참조하세요. iOS
/Android용 https://github.com/amazon-connect/amazon-connect-chat-ui-examples/tree/master/mobileChatExamples/androidChatExample Chat SDK를 사용하여 채팅 애플리케이션을 구동하는 방법을 보여주는 샘플 iOS 및 Android Amazon Connect 채팅 예제를 참조하세요. -
iOS용Amazon Connect Chat SDK
및 Android용Amazon Connect Chat SDK GitHub 페이지를 확인하세요. GitHub 페이지에는 API 설명서와 사전 조건 및 설치 단계를 설명하는 구현 가이드가 포함되어 있습니다. -
React Native 통합 설정: React Native
예제를 활용하여 반응 네이티브 기반 솔루션 구현에 대한 지침을 확인하세요. -
모바일 애플리케이션에서 Amazon Connect Chat SDK를 설정하거나 사용하는 것과 관련하여 질문이나 문제가 있는 경우 Amazon Connect iOS용 Chat SDK 문제
페이지 또는 Amazon Connect Android용 Chat SDK 문제 페이지에서 문제를 제출할 수 있습니다. 모바일 채팅 UI 예제에 문제가 있는 경우 Amazon Connect Chat UI 예제 문제 페이지에서 문제를 제기할 수 있습니다.
