Automatically build CI/CD pipelines and Amazon ECS clusters for microservices using AWS CDK
Varsha Raju, Amazon Web Services
Summary
This pattern describes how to automatically create the continuous integration and continuous delivery (CI/CD) pipelines and underlying infrastructure for building and deploying microservices on Amazon Elastic Container Service (Amazon ECS). You can use this approach if you want to set up proof-of-concept CI/CD pipelines to show your organization the benefits of CI/CD, microservices, and DevOps. You can also use this approach to create initial CI/CD pipelines that you can then customize or change according to your organization’s requirements.
The pattern’s approach creates a production environment and non-production environment that each have a virtual private cloud (VPC) and an Amazon ECS cluster configured to run in two Availability Zones. These environments are shared by all your microservices and you then create a CI/CD pipeline for each microservice. These CI/CD pipelines pull changes from a source repository in AWS CodeCommit, automatically build the changes, and then deploy them into your production and non-production environments. When a pipeline successfully completes all of its stages, you can use URLs to access the microservice in the production and non-production environments.
Prerequisites and limitations
Prerequisites
An active Amazon Web Services (AWS) account.
An existing Amazon Simple Storage Service (Amazon S3) bucket that contains the
starter-code.zipfile (attached).AWS Cloud Development Kit (AWS CDK), installed and configured in your account. For more information about this, see Getting started with the AWS CDK in the AWS CDK documentation.
Python 3 and
pip, installed and configured. For more information about this, see the Python documentation. Familiarity with AWS CDK, AWS CodePipeline, AWS CodeBuild, CodeCommit, Amazon Elastic Container Registry (Amazon ECR), Amazon ECS, and AWS Fargate.
Familiarity with Docker.
An understanding of CI/CD and DevOps.
Limitations
General AWS account limits apply. For more information about this, see AWS service quotas in the AWS General Reference documentation.
Product versions
The code was tested using Node.js version 16.13.0 and AWS CDK version 1.132.0.
Architecture
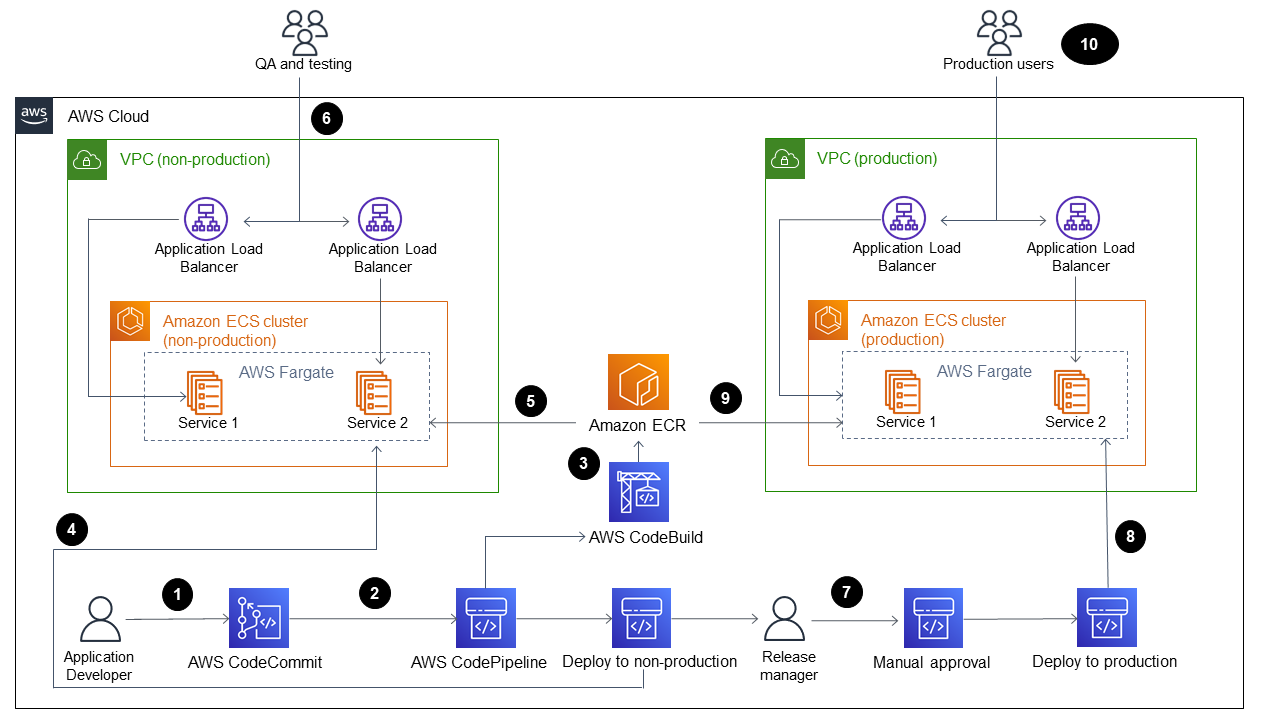
The diagram shows the following workflow:
An application developer commits code to a CodeCommit repository.
A pipeline is initiated.
CodeBuild builds and pushes the Docker image to an Amazon ECR repository
CodePipeline deploys a new image to an existing Fargate service in a non-production Amazon ECS cluster.
Amazon ECS pulls the image from the Amazon ECR repository into a non-production Fargate service.
Testing is performed using a non-production URL.
The release manager approves the production deployment.
CodePipeline deploys the new image to an existing Fargate service in a production Amazon ECS cluster
Amazon ECS pulls the image from the Amazon ECR repository into the production Fargate service.
Production users access your feature by using a production URL.
Technology stack
AWS CDK
CodeBuild
CodeCommit
CodePipeline
Amazon ECR
Amazon ECS
Amazon VPC
Automation and scale
You can use this pattern’s approach to create pipelines for microservices deployed in a shared AWS CloudFormation stack. The automation can create more than one Amazon ECS cluster in each VPC and also create pipelines for microservices deployed in a shared Amazon ECS cluster. However, this requires that you provide new resource information as inputs to the pipeline stack.
Tools
AWS CDK – AWS Cloud Development Kit (AWS CDK) is a software development framework for defining cloud infrastructure in code and provisioning it through AWS CloudFormation.
AWS CodeBuild – AWS CodeBuild is a fully managed build service in the cloud. CodeBuild compiles your source code, runs unit tests, and produces artifacts that are ready to deploy.
AWS CodeCommit – AWS CodeCommit is a version control service that enables you to privately store and manage Git repositories in the AWS Cloud. CodeCommit eliminates the need for you to manage your own source control system or worry about scaling its infrastructure.
AWS CodePipeline – AWS CodePipeline is a continuous delivery service you can use to model, visualize, and automate the steps required to release your software. You can quickly model and configure the different stages of a software release process. CodePipeline automates the steps required to release your software changes continuously.
Amazon ECS – Amazon Elastic Container Service (Amazon ECS) is a highly scalable, fast container management service that is used for running, stopping, and managing containers on a cluster. You can run your tasks and services on a serverless infrastructure that is managed by AWS Fargate. Alternatively, for more control over your infrastructure, you can run your tasks and services on a cluster of Amazon Elastic Compute Cloud (Amazon EC2) instances that you manage.
Docker
– Docker helps developers to pack, ship, and run any application as a lightweight, portable, and self-sufficient container.
Code
The code for this pattern is available in the cicdstarter.zip and starter-code.zip files (attached).
Epics
| Task | Description | Skills required |
|---|---|---|
| Set up the working directory for AWS CDK. |
| AWS DevOps, Cloud infrastructure |
| Task | Description | Skills required |
|---|---|---|
| Create the shared infrastructure. |
| AWS DevOps, Cloud infrastructure |
| Monitor the AWS CloudFormation stack. |
| AWS DevOps, Cloud infrastructure |
| Test the AWS CloudFormation stack. |
ImportantMake sure that you record the IDs for the two VPCs and the security group IDs for the default security groups in both VPCs. | AWS DevOps, Cloud infrastructure |
| Task | Description | Skills required |
|---|---|---|
| Create the infrastructure for the microservice. |
NoteYou can also provide the values for both commands by using the | AWS DevOps, Cloud infrastructure |
| Monitor the AWS CloudFormation stack. | Open the AWS CloudFormation console and monitor the progress of the | AWS DevOps, Cloud infrastructure |
| Test the AWS CloudFormation stack. |
| |
| Use the pipeline. |
| AWS DevOps, Cloud infrastructure |
| Repeat this epic for each microservice. | Repeat the tasks in this epic to create a CI/CD pipeline for each of your microservices. | AWS DevOps, Cloud infrastructure |
Related resources
Additional information
cdk synth command
cdk synth --context aws_account=<aws_account_number> --context aws_region=<aws_region> --context vpc_nonprod_id=<id_of_non_production VPC> --context vpc_prod_id=<id_of_production_VPC> --context ecssg_nonprod_id=< default_security_group_id_of_non-production_VPC> --context ecssg_prod_id=<default_security_group_id_of_production_VPC> --context code_commit_s3_bucket_for_code=<S3 bucket name> --context code_commit_s3_object_key_for_code=<Object_key_of_starter_code> --context microservice_name=<name_of_microservice>
cdk deploy command
cdk deploy --context aws_account=<aws_account_number> --context aws_region=<aws_region> --context vpc_nonprod_id=<id_of_non_production_VPC> --context vpc_prod_id=<id_of_production_VPC> --context ecssg_nonprod_id=< default_security_group_id_of_non-production_VPC> --context ecssg_prod_id=<default_security_group_id_of_production_VPC> --context code_commit_s3_bucket_for_code=<S3 bucket name> --context code_commit_s3_object_key_for_code=<Object_key_of_starter_code> --context microservice_name=<name_of_microservice>
Attachments
To access additional content that is associated with this document, unzip the following file: attachment.zip
