Automatically detect changes and initiate different CodePipeline pipelines for a monorepo in CodeCommit
Helton Ribeiro, Petrus Batalha, and Ricardo Morais, Amazon Web Services
Summary
Notice: AWS CodeCommit is no longer available to new customers. Existing customers of AWS CodeCommit can continue to use the service as normal. Learn more
Notice: AWS Cloud9 is no longer available to new customers. Existing customers of AWS Cloud9 can continue to use the service as normal. Learn more
This pattern helps you automatically detect changes to the source code of a monorepo-based application in AWS CodeCommit and then initiate a pipeline in AWS CodePipeline that runs the continuous integration and continuous delivery (CI/CD) automation for each microservice. This approach means that each microservice in your monorepo-based application can have a dedicated CI/CD pipeline, which ensures better visibility, easier sharing of code, and improved collaboration, standardization, and discoverability.
The solution described in this pattern doesn't perform any dependency analysis among the microservices inside the monorepo. It only detects changes in the source code and initiates the matching CI/CD pipeline.
The pattern uses AWS Cloud9 as the integrated development environment (IDE) and AWS Cloud Development Kit (AWS CDK) to define an infrastructure by using two AWS CloudFormation stacks: MonoRepoStack and PipelinesStack. The MonoRepoStack stack creates the monorepo in AWS CodeCommit and the AWS Lambda function that initiates the CI/CD pipelines. The PipelinesStack stack defines your pipeline infrastructure.
Important
This pattern’s workflow is a proof of concept (PoC). We recommend that you use it only in a test environment. If you want to use this pattern’s approach in a production environment, see Security best practices in IAM in the AWS Identity and Access Management (IAM) documentation and make the required changes to your IAM roles and AWS services.
Prerequisites and limitations
Prerequisites
An active AWS account.
AWS Command Line Interface (AWS CLI), installed and configured. For more information, see Installing, updating, and uninstalling the AWS CLI in the AWS CLI documentation.
Python 3 and
pip, installed on your local machine. For more information, see the Python documentation. AWS CDK, installed and configured. For more information, see Getting started with the AWS CDK in the AWS CDK documentation.
An AWS Cloud9 IDE, installed and configured. For more information, see Setting up AWS Cloud9 in the AWS Cloud9 documentation.
The GitHub AWS CodeCommit monorepo multi-pipeline triggers
repository, cloned on your local machine. An existing directory containing application code that you want to build and deploy with CodePipeline.
Familiarity and experience with DevOps best practices on the AWS Cloud. To increase your familiarity with DevOps, you can use the pattern Build a loosely coupled architecture with microservices using DevOps practices and AWS Cloud9 on the AWS Prescriptive Guidance website.
Architecture
The following diagram shows how to use the AWS CDK to define an infrastructure with two AWS CloudFormation stacks: MonoRepoStack and PipelinesStack.

The diagram shows the following workflow:
The bootstrap process uses the AWS CDK to create the AWS CloudFormation stacks
MonoRepoStackandPipelinesStack.The
MonoRepoStackstack creates the CodeCommit repository for your application and themonorepo-event-handlerLambda function that is initiated after each commit.The
PipelinesStackstack creates the pipelines in CodePipeline that are initiated by the Lambda function. Each microservice must have a defined infrastructure pipeline.The pipeline for
microservice-nis initiated by the Lambda function and starts its isolated CI/CD stages that are based on the source code in CodeCommit.The pipeline for
microservice-1is initiated by the Lambda function and starts its isolated CI/CD stages that are based on the source code in CodeCommit.
The following diagram shows the deployment of the AWS CloudFormation stacks MonoRepoStack and PipelinesStack in an account.
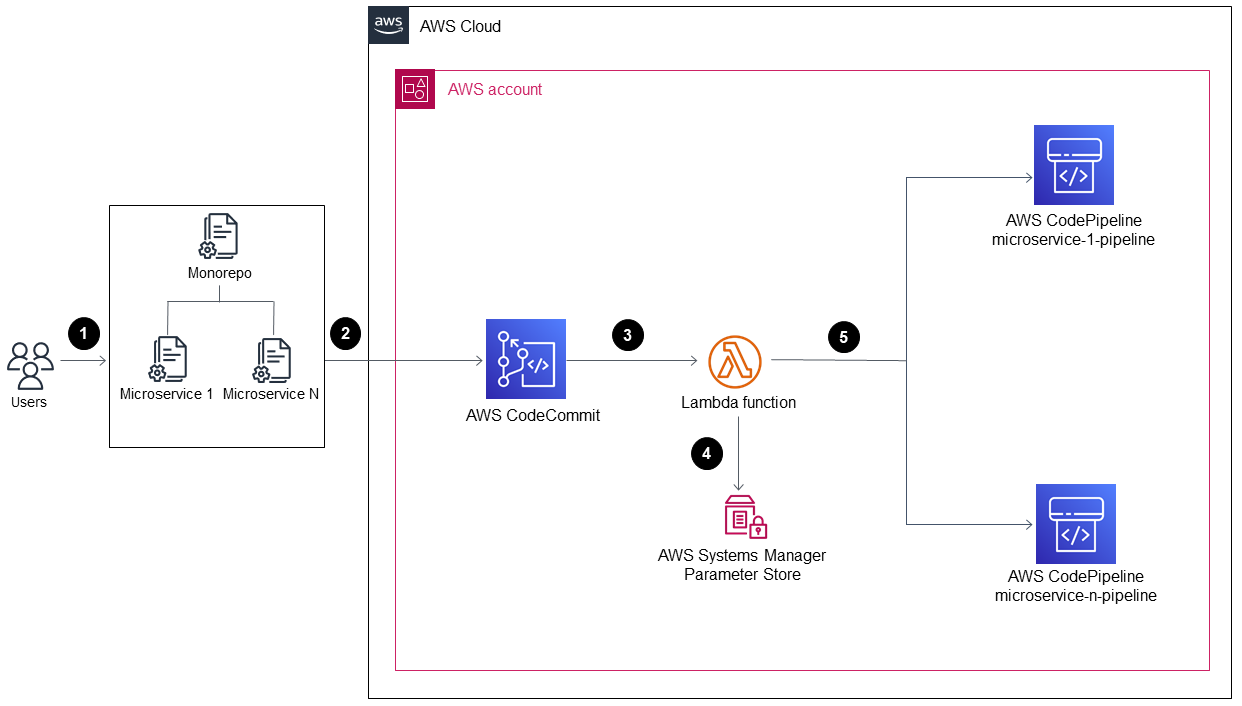
A user changes code in one of the application’s microservices.
The user pushes the changes from a local repository to a CodeCommit repository.
The push activity initiates the Lambda function that receives all pushes to the CodeCommit repository.
The Lambda function reads a parameter in Parameter Store, a capability of AWS Systems Manager, to retrieve the most recent commit ID. The parameter has the naming format:
/MonoRepoTrigger/{repository}/{branch_name}/LastCommit. If the parameter isn’t found, the Lambda function reads the last commit ID from the CodeCommit repository and saves the returned value in Parameter Store.After identifying the commit ID and the changed files, the Lambda function identifies the pipelines for each microservice directory and initiates the required CodePipeline pipeline.
Tools
AWS Cloud Development Kit (AWS CDK) is a software development framework for defining cloud infrastructure in code and provisioning it through AWS CloudFormation.
Python
is a programming language that lets you work quickly and integrate systems more effectively.
Code
The source code and templates for this pattern are available in the GitHub AWS CodeCommit monorepo multi-pipeline triggers
Best practices
This sample architecture doesn't include a monitoring solution for the deployed infrastructure. If you want to deploy this solution in a production environment, we recommend that you enable monitoring. For more information, see Monitor your serverless applications with CloudWatch Application Insights in the AWS Serverless Application Model (AWS SAM) documentation.
When you edit the sample code provided by this pattern, follow the best practices for developing and deploying cloud infrastructure in the AWS CDK documentation.
When you define your microservice pipelines, review the security best practices in the AWS CodePipeline documentation.
You can also check your AWS CDK code for best practices by using the cdk-nag
utility. This tool uses a set of rules, grouped by packs, to evaluate your code. The available packs are:
Epics
| Task | Description | Skills required |
|---|---|---|
Create a virtual Python envionment. | In your AWS Cloud9 IDE, create a virtual Python environment and install the required dependencies by running the following command:
| Developer |
Bootstrap the AWS account and AWS Region for the AWS CDK. | Bootstrap the required AWS account and Region by running the following command:
| Developer |
| Task | Description | Skills required |
|---|---|---|
Add your sample code to your application directory. | Add the directory that contains your sample application code to the | Developer |
Edit the | Add the directory name of your application’s code and the pipeline's name to the | Developer |
Create the pipeline. | In the You can copy one of the files and makes changes to it according to your application’s requirements. | Developer |
Edit the | In For example, the following code shows a pipeline definition in the
| Developer |
| Task | Description | Skills required |
|---|---|---|
Deploy the AWS CloudFormation stack. | Deploy the AWS CloudFormation You can change the repository’s name by running the NoteYou can simultaneously deploy both pipelines by using the | Developer |
Validate the CodeCommit repository. | Validate that your resources were created by running the ImportantBecause the AWS CloudFormation stack creates the CodeCommit repository where the monorepo is stored, don’t run the | Developer |
Validate the AWS CloudFormation stack results. | Validate that the AWS CloudFormation
| Developer |
| Task | Description | Skills required |
|---|---|---|
Deploy the AWS CloudFormation stack. | The AWS CloudFormation Deploy the PipelinesStack stack by running the NoteYou can also deploy simultaneously deploy both pipelines by running the The following sample output shows how the
| Developer |
Validate the AWS CloudFormation stack results. | Validate that the AWS CloudFormation
| Developer |
| Task | Description | Skills required |
|---|---|---|
Delete your AWS CloudFormation stacks. | Run the | Developer |
Delete the S3 buckets for your pipelines. |
| Developer |
Troubleshooting
| Issue | Solution |
|---|---|
I encountered AWS CDK issues. | See Troubleshooting common AWS CDK issues in the AWS CDK documentation. |
I pushed my microservice code, but the microservice pipeline didn't run. | Setup validation Verify branch configuration:
Validate configuration files:
Troubleshooting on the console AWS CodePipeline checks:
AWS Lambda troubleshooting:
|
I need to redeploy all my microservices. | There are two approaches to force the redeployment of all microservices. Choose the option that fits your requirements. Approach 1: Delete a parameter in Parameter Store This method involves deleting a specific parameter within Systems Manager Parameter Store that tracks the last commit ID used for deployment. When you remove this parameter, the system is forced to redeploy all microservices upon the next trigger, because it perceives it as a fresh state. Steps:
Pros:
Cons:
Approach 2: Push a commit in each monorepo subfolder This method involves making a minor change and pushing it in each microservice subfolder within the monorepo to initiate their individual pipelines. Steps:
Pros:
Cons:
|
Related resources
Continuous integration and delivery (CI/CD) using CDK Pipelines (AWS CDK documentation)
aws-cdk/pipelines module (AWS CDK API reference)
