Migrate an Oracle JD Edwards EnterpriseOne database to AWS by using Oracle Data Pump and AWS DMS
Thanigaivel Thirumalai, Amazon Web Services
Summary
You can migrate and run your JD Edwards EnterpriseOne database on Amazon Relational Database Service (Amazon RDS). When you migrate your database to Amazon RDS, AWS can take care of backup tasks and high availability setup, so you can concentrate on maintaining your EnterpriseOne application and its functionality. For a comprehensive list of key factors to consider during the migration process, see Oracle database migration strategies in AWS Prescriptive Guidance.
There are multiple ways to migrate an EnterpriseOne database, including:
Using Oracle Universal Batch Engine (UBE) R98403 for schema and table creation, and using AWS Database Migration Service (AWS DMS) for migration
Using DB native tools for schema and table creation and using AWS DMS for migration
Using DB native tools for the migration of existing data (full load) and using AWS DMS for change data capture (CDC) tasks
This pattern covers the third option. It explains how to migrate your on-premises EnterpriseOne databases to Amazon RDS for Oracle by using Oracle Data Pump with AWS DMS
Oracle JD Edwards EnterpriseOne
When you migrate critical ERP applications such as JD Edwards EnterpriseOne, minimizing downtime is key. AWS DMS minimizes downtime by supporting both full load and continuous replication from the source database to the target database. AWS DMS also provides real-time monitoring and logging for the migration, which can help you identify and resolve any issues that could cause downtime.
When you replicate changes with AWS DMS, you must specify a time or system change number (SCN) as the starting point for reading changes from the database logs. It's crucial to keep these logs accessible on the server for a designated amount of time (we recommend 15 days) to ensure that AWS DMS has access to these changes.
Prerequisites and limitations
Prerequisites
An Amazon RDS for Oracle database provisioned in your AWS Cloud environment as the target database. For instructions, see the Amazon RDS documentation.
An EnterpriseOne database that’s running on premises or on an Amazon Elastic Compute Cloud (Amazon EC2) instance on AWS.
Note
This pattern is designed for migrating from on premises to AWS, but it was tested by using an EnterpriseOne database on an EC2 instance. If you plan to migrate from your on-premises environment, you must configure the appropriate network connectivity.
Schema details. Identify which Oracle database schema (for example, DV920) you plan to migrate for EnterpriseOne. Before you start the migration process, gather the following details about the schema:
Schema size
The number of objects per object type
The number of invalid objects
Limitations
You have to create any schemas you want on the target Amazon RDS for Oracle database―AWS DMS doesn't create these for you. (The Epics section describes how to use Data Pump to export and import schemas.) The schema name must already exist for the target Oracle database. Tables from the source schema are imported to the user or the schema, and AWS DMS uses the administrator or system account to connect to the target instance. To migrate multiple schemas, you can create multiple replication tasks. You can also migrate data to different schemas on a target instance. To do this, use schema transformation rules on the AWS DMS table mappings.
This pattern has been tested with a demo dataset. We recommend that you validate compatibility for your dataset and customization.
This pattern uses an EnterpriseOne database that’s running on Microsoft Windows. However, you can use the same process with other operating systems that are supported by AWS DMS.
Architecture
The following diagram shows a system that’s running EnterpriseOne on an Oracle database as the source database, and an Amazon RDS for Oracle database as the target database. The data is exported from the source Oracle database and imported into the target Amazon RDS for Oracle database by using Oracle Data Pump, and replicated for CDC updates by using AWS DMS.
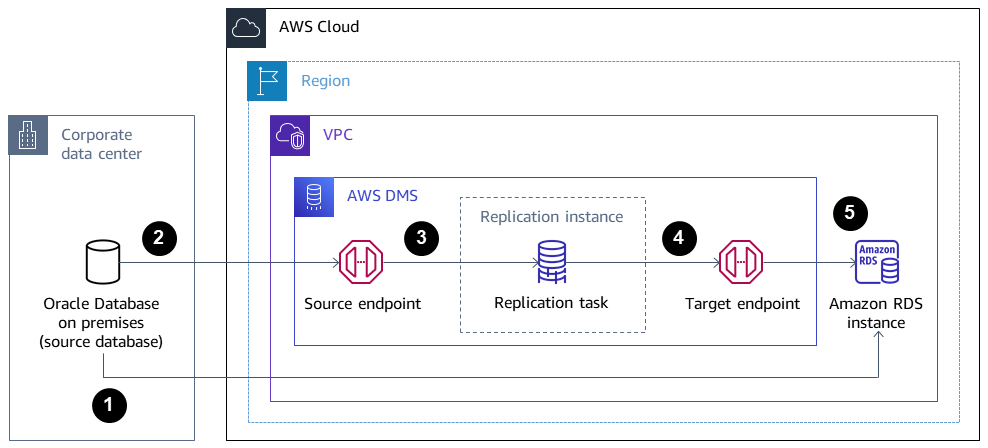
Oracle Data Pump extracts data from the source database, and the data is sent to the Amazon RDS for Oracle database target.
CDC data is sent from the source database to a source endpoint in AWS DMS.
From the source endpoint, the data is sent to the AWS DMS replication instance, where the replication task is performed.
After the replication task is complete, the data is sent to the target endpoint in AWS DMS.
From the target endpoint, the data is sent to the Amazon RDS for Oracle database instance.
Tools
AWS services
AWS Database Migration Service (AWS DMS) helps you migrate data stores into the AWS Cloud or between combinations of cloud and on-premises setups.
Amazon Relational Database Service (Amazon RDS) for Oracle helps you set up, operate, and scale an Oracle relational database in the AWS Cloud.
Other services
Oracle Data Pump
helps you move data and metadata from one database to another at high speed.
Best practices
Migrating LOBs
If your source database contains large binary objects (LOBs) that need to be migrated to the target database, AWS DMS provides the following options:
Full LOB mode – AWS DMS migrates all the LOBs from the source to the target database regardless of their size. Although the migration is slower than the other modes, the advantage is that data isn’t truncated. For better performance, you can create a separate task on the new replication instance to migrate the tables that have LOBs that are larger than a few megabytes.
Limited LOB mode – You specify the maximum size of LOB column data, which allows AWS DMS to pre-allocate resources and apply the LOBs in bulk. If the size of the LOB columns exceeds the size that is specified in the task, AWS DMS truncates the data and sends warnings to the AWS DMS log file. You can improve performance by using limited LOB mode if your LOB data size is within the limited LOB size.
Inline LOB mode – You can migrate LOBs without truncating the data or slowing the performance of your task by replicating both small and large LOBs. First, specify a value for the
InlineLobMaxSizeparameter, which is available only when full LOB mode is set totrue. The AWS DMS task transfers the small LOBs inline, which is more efficient. Then, AWS DMS migrates the large LOBs by performing a lookup from the source table. However, inline LOB mode works only during the full load phase.
Generating sequence values
During the AWS DMS CDC process, incremental sequence numbers aren’t replicated from the source database. To avoid discrepancies in sequence values, you must generate the most recent sequence value from the source for all sequences, and apply it to the target Amazon RDS for Oracle database.
AWS Secrets Manager
To help manage your credentials, we recommend that you follow the instructions in the blog post Manage your AWS DMS endpoint credentials with AWS Secrets Manager
Performance
Replication instances ‒ For guidance on choosing the best instance size, see Selecting the best size for a replication instance in the AWS DMS documentation.
Connectivity options ‒ To avoid latency issues, we recommend that you choose the right connectivity option. AWS Direct Connect provides the shortest path to AWS resources, because it is a dedicated connection between your corporate data centers and AWS. While in transit, your network traffic remains on the AWS global network and never goes over the internet. This reduces the chance of hitting bottlenecks or unexpected increases in latency when compared with using VPN or the public internet.
Network bandwidth ‒ To optimize performance, verify that your network throughput is fast. If you are using a VPN tunnel between your on-premises source database and AWS DMS, ensure that the bandwidth is sufficient for your workload.
Task parallelism ‒ You can speed up data replication by loading multiple tables in parallel during full load. This pattern uses of RDBMS endpoints, so this option applies only to the full load process. Task parallelism is controlled by the
MaxFullLoadSubTasksparameter, which determines how many full load sub-tasks are run in parallel. By default, this parameter is set to 8, which means that eight tables (if selected in table mapping) are loaded together during full mode. You can adjust this parameter in the full-load task settings section of the JSON script for the task.Table parallelism ‒ AWS DMS also enables you to load a single large table by using multiple parallel threads. This is particularly useful for Oracle source tables that have billions of records as well as multiple partitions and subpartitions. If the source table isn’t partitioned, you can use column boundaries for parallel loads.
Split loads ‒ When you split loads across multiple tasks or AWS DMS instances, remember transaction boundaries when you capture changes.
Epics
| Task | Description | Skills required |
|---|---|---|
Generate the SCN. | When the source database is active and in use by the EnterpriseOne application, initiate the data export with Oracle Data Pump. You must first generate a system change number (SCN) from the source database for both data consistency during the export with Oracle Data Pump and as a starting point for CDC in AWS DMS. To generate the current SCN from your source database, use the following SQL statement:
Save the generated SCN. You will use the SCN when you export the data and to create the AWS DMS replication task. | DBA |
Create the parameter file. | To create a parameter file for exporting the schema, you can use the following code.
NoteYou can also define your own
| DBA |
Export the schema. | To perform the export, use the
| DBA |
| Task | Description | Skills required |
|---|---|---|
Transfer the dump file to the target instance. | To transfer your files by using the Alternatively, you can transfer the Data Pump files to Amazon Simple Storage Service (Amazon S3) To create a database link
| DBA |
Test the database link. | Test the database link to make sure that you can connect to the Amazon RDS for Oracle target database by using
| DBA |
Transfer the dump file to the target database. | To copy the dump file over to the Amazon RDS for Oracle database, you can either use the default
The following script copies a dump file named
| DBA |
List the dump file in the target database. | After the PL/SQL procedure is complete, you can list the data dump file in the Amazon RDS for Oracle database by using the following code:
| DBA |
Create JDE-specific users in the target Instance. | Create a JD Edwards profile and role by using these commands in the target instance:
Grant the required permissions to the role:
| DBA, JDE CNC |
Create tablespaces in the target instance. | Create the required tablespaces in the target instance by using the following commands for the schemas that are involved in this migration:
| DBA, JDE CNC |
Initiate the import on the target database. | Before you start the import process, set up the roles, schemas, and tablespaces on the target Amazon RDS for Oracle database by using the data dump file. To perform the import, access the target database with the Amazon RDS primary user account, and use the connection string name in the To start the import, use the following code:
To ensure a successful import, check the import log file for any errors, and review details such as object count, row count, and invalid objects. If there are any invalid objects, recompile them. Additionally, compare the source and target database objects to confirm that they match. | DBA |
| Task | Description | Skills required |
|---|---|---|
Download the template. | Download the AWS CloudFormation DMS_instance.yaml | Cloud administrator, DBA |
Start the stack creation. |
| Cloud administrator, DBA |
Specify the parameters. |
| Cloud administrator, DBA |
Create the stack. |
The provisioning should complete in approximately 5–10 minutes. It is complete when the AWS CloudFormation Stacks page shows CREATE_COMPLETE. | Cloud administrator, DBA |
Set up the endpoints. |
| Cloud administrator, DBA |
Test connectivity. | After the source and target endpoints shows the status as Active, test the connectivity. Choose Run test for each endpoint (source and target) to make sure that the status shows as successful. | Cloud administrator, DBA |
| Task | Description | Skills required |
|---|---|---|
Create the replication task. | Create the AWS DMS replication task by using the following steps:
After you create the task, AWS DMS migrates ongoing changes to the Amazon RDS for Oracle database instance from the SCN that you provided under CDC start mode. You can also verify the migration by reviewing the CloudWatch logs. | Cloud administrator, DBA |
Repeat the replication task. | Repeat the previous steps to create replication tasks for other JD Edwards schemas that are part of the migration. | Cloud administrator, DBA, JDE CNC administrator |
| Task | Description | Skills required |
|---|---|---|
Validate the data transfer. | After the AWS DMS task starts, you can check the Table statistics tab on the Tasks page to see the changes made to the data. You can monitor the status of ongoing replication in the console on the Database migration tasks page. For more information, see AWS DMS data validation. | Cloud administrator, DBA |
| Task | Description | Skills required |
|---|---|---|
Stop replication. | Discontinue the replication procedure and stop the source application services. | Cloud administrator, DBA |
Launch the JD Edwards application. | Launch the target JD Edwards presentation and logic tier application on AWS, and direct it to the Amazon RDS for Oracle database. When you access the application, you should notice that all connections are now established with the Amazon RDS for Oracle database. | DBA, JDE CNC administrator |
Turn off the source database. | After you confirm that there are no more connections, you can turn the source database off. | DBA |
Troubleshooting
| Issue | Solution |
|---|---|
You receive a warning message to enable supplemental logging | Enter these commands to enable supplemental logging:
|
AWS DMS has supplemental logging turned off. | Supplemental logging is turned off by default in AWS DMS. To turn it on for a source Oracle endpoint:
|
Supplemental logging isn’t enabled at the CDB level. |
|
You receive the error message: "Test Endpoint failed: Application-Status: 1020912, Application-Message: LogMiner is not supported in Oracle PDB environment Endpoint initialization failed." | If you encounter this error message, you can use Binary Reader instead of LogMiner. Under Endpoint settings, add this line to the extra connection attributes for your source database:
|
Related resources
Additional information
Transfer files using Amazon S3
To transfer the files to Amazon S3, you can use the AWS CLI or the Amazon S3 console. After you transfer the files to Amazon S3, you can use the Amazon RDS for Oracle instance to import the Data Pump files from Amazon S3.
If you choose to transfer the dump file using Amazon S3 integration as an alternate method, perform the follow steps:
Create an S3 bucket.
Export the data from the source database using Oracle Data Pump.
Upload the Data Pump files to the S3 bucket.
Download the Data Pump files from the S3 bucket to the target Amazon RDS for Oracle database.
Perform the import using the Data Pump files.
Note
To transfer large data files between S3 and RDS instances, we recommend that you use the Amazon S3 Transfer Acceleration feature.
