Connect to data sources
In Amazon SageMaker Canvas, you can import data from a location outside of your local file system through an AWS service, a SaaS platform, or other databases using JDBC connectors. For example, you might want to import tables from a data warehouse in Amazon Redshift, or you might want to import Google Analytics data.
When you go through the Import workflow to import data in the Canvas application, you can choose your data source and then select the data that you want to import. For certain data sources, like Snowflake and Amazon Redshift, you must specify your credentials and add a connection to the data source.
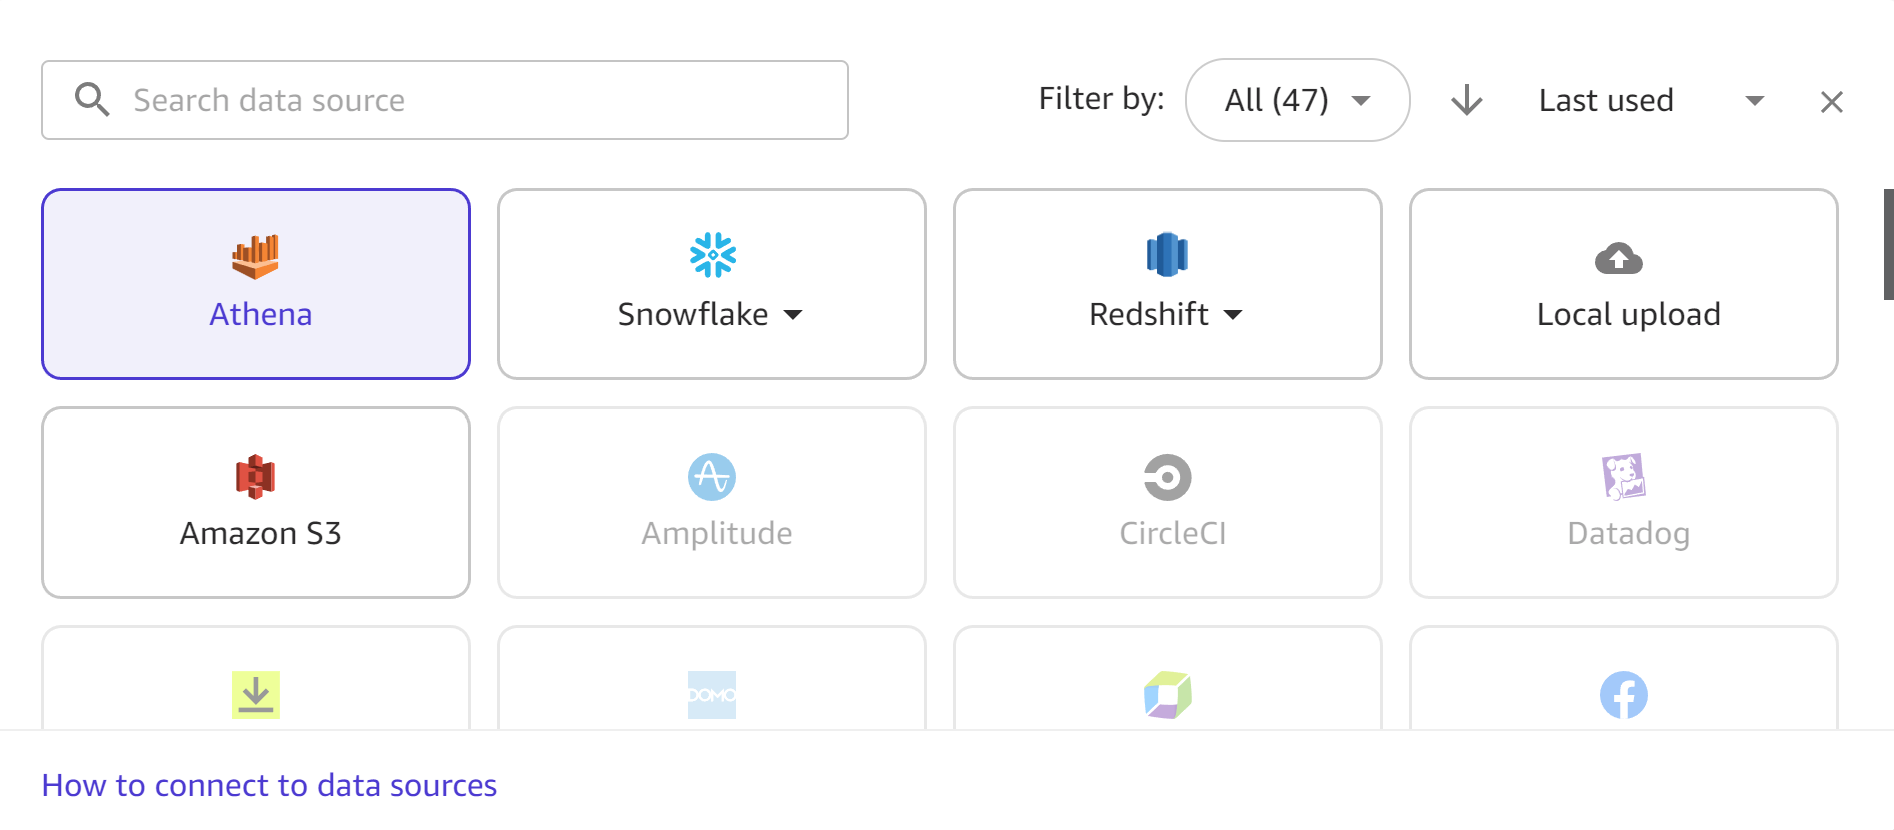
The following screenshot shows the data sources toolbar in the Import workflow, with all of the available data sources highlighted. You can only import data from the data sources that are available to you. Contact your administrator if your desired data source isn’t available.
The following sections provide information about establishing connections to external data sources and and importing data from them. Review the following section first to determine what permissions you need to import data from your data source.
Permissions
Review the following information to ensure that you have the necessary permissions to import data from your data source:
Amazon S3: You can import data from any Amazon S3 bucket as long as your user has permissions to access the bucket. For more information about using AWS IAM to control access to Amazon S3 buckets, see Identity and access management in Amazon S3 in the Amazon S3 User Guide.
Amazon Athena: If you have the AmazonSageMakerFullAccess policy and the AmazonSageMakerCanvasFullAccess policy attached to your user’s execution role, then you can query your AWS Glue Data Catalog with Amazon Athena. If you’re part of an Athena workgroup, make sure that the Canvas user has permissions to run Athena queries on the data. For more information, see Using workgroups for running queries in the Amazon Athena User Guide.
Amazon DocumentDB: You can import data from any Amazon DocumentDB database as long as you have the credentials (username and password) to connect to the database and have the minimum base Canvas permissions attached to your user’s execution role. For more information about Canvas permissions, see the Prerequisites for setting up Amazon SageMaker Canvas.
Amazon Redshift: To give yourself the necessary permissions to import data from Amazon Redshift, see Grant Users Permissions to Import Amazon Redshift Data.
Amazon RDS: If you have the AmazonSageMakerCanvasFullAccess policy attached to your user’s execution role, then you’ll be able to access your Amazon RDS databases from Canvas.
SaaS platforms: If you have the AmazonSageMakerFullAccess policy and the AmazonSageMakerCanvasFullAccess policy attached to your user’s execution role, then you have the necessary permissions to import data from SaaS platforms. See Use SaaS connectors with Canvas for more information about connecting to a specific SaaS connector.
JDBC connectors: For database sources such as Databricks, MySQL or MariaDB, you must enable username and password authentication on the source database before attempting to connect from Canvas. If you’re connecting to a Databricks database, you must have the JDBC URL that contains the necessary credentials.
Connect to a database stored in AWS
You might want to import data that you’ve stored in AWS. You can import data from Amazon S3, use Amazon Athena to query a database in the AWS Glue Data Catalog, import data from Amazon RDS, or make a connection to a provisioned Amazon Redshift database (not Redshift Serverless).
You can create multiple connections to Amazon Redshift. For Amazon Athena, you can access any databases that you have in your AWS Glue Data Catalog. For Amazon S3, you can import data from a bucket as long as you have the necessary permissions.
Review the following sections for more detailed information.
Connect to data in Amazon S3, Amazon Athena, or Amazon RDS
For Amazon S3, you can import data from an Amazon S3 bucket as long as you have permissions to access the bucket.
For Amazon Athena, you can access databases in your AWS Glue Data Catalog as long as you have permissions through your Amazon Athena workgroup.
For Amazon RDS, if you have the AmazonSageMakerCanvasFullAccess policy attached to your user’s role, then you’ll be able to import data from your Amazon RDS databases into Canvas.
To import data from an Amazon S3 bucket, or to run queries and import data tables with Amazon Athena, see Create a dataset. You can only import tabular data from Amazon Athena, and you can import tabular and image data from Amazon S3.
Connect to an Amazon DocumentDB database
Amazon DocumentDB is a fully managed, serverless, document database service. You can import unstructured document data stored in an Amazon DocumentDB database into SageMaker Canvas as a tabular dataset, and then you can build machine learning models with the data.
Important
Your SageMaker AI domain must be configured in VPC only mode to add connections to Amazon DocumentDB. You can only access Amazon DocumentDB clusters in the same Amazon VPC as your Canvas application. Additionally, Canvas can only connect to TLS-enabled Amazon DocumentDB clusters. For more information about how to set up Canvas in VPC only mode, see Configure Amazon SageMaker Canvas in a VPC without internet access.
To import data from Amazon DocumentDB databases, you must have credentials to access the Amazon DocumentDB database and specify the username and password when creating a database connection. You can configure more granular permissions and restrict access by modifying the Amazon DocumentDB user permissions. To learn more about access control in Amazon DocumentDB, see Database Access Using Role-Based Access Control in the Amazon DocumentDB Developer Guide.
When you import from Amazon DocumentDB, Canvas converts your unstructured data into a
tabular dataset by mapping the fields to columns in a table. Additional tables
are created for each complex field (or nested structure) in the data, where the
columns correspond to the sub-fields of the complex field. For more detailed
information about this process and examples of schema conversion, see the Amazon DocumentDB JDBC Driver Schema Discovery
Canvas can only make a connection to a single database in Amazon DocumentDB. To import data from a different database, you must create a new connection.
You can import data from Amazon DocumentDB into Canvas by using the following methods:
-
Create a dataset. You can import your Amazon DocumentDB data and create a tabular dataset in Canvas. If you choose this method, make sure that you follow the Import tabular data procedure.
-
Create a data flow. You can create a data preparation pipeline in Canvas and add your Amazon DocumentDB database as a data source.
To proceed with importing your data, follow the procedure for one of the methods linked in the preceding list.
When you reach the step in either workflow to choose a data source (Step 6 for creating a dataset, or Step 8 for creating a data flow), do the following:
For Data Source, open the dropdown menu and choose DocumentDB.
Choose Add connection.
-
In the dialog box, specify your Amazon DocumentDB credentials:
Enter a Connection name. This is a name used by Canvas to identify this connection.
For Cluster, select the cluster in Amazon DocumentDB that stores your data. Canvas automatically populates the dropdown menu with Amazon DocumentDB clusters in the same VPC as your Canvas application.
Enter the Username for your Amazon DocumentDB cluster.
Enter the Password for your Amazon DocumentDB cluster.
Enter the name of the Database to which you want to connect.
-
The Read preference option determines which types of instances on your cluster Canvas reads the data from. Select one of the following:
Secondary preferred – Canvas defaults to reading from the cluster’s secondary instances, but if a secondary instance isn’t available, then Canvas reads from a primary instance.
Secondary – Canvas only reads from the cluster’s secondary instances, which prevents the read operations from interfering with the cluster’s regular read and write operations.
-
Choose Add connection. The following image shows the dialog box with the preceding fields for an Amazon DocumentDB connection.

You should now have an Amazon DocumentDB connection, and you can use your Amazon DocumentDB data in Canvas to create either a dataset or a data flow.
Connect to an Amazon Redshift database
You can import data from Amazon Redshift, a data warehouse where your organization keeps its
data. Before you can import data from Amazon Redshift, the AWS IAM role you use must have
the AmazonRedshiftFullAccess managed policy attached. For instructions on how
to attach this policy, see Grant Users Permissions to Import Amazon Redshift
Data.
To import data from Amazon Redshift, you do the following:
-
Create a connection to an Amazon Redshift database.
-
Choose the data that you're importing.
-
Import the data.
You can use the Amazon Redshift editor to drag datasets onto the import pane and import them into SageMaker Canvas. For more control over the values returned in the dataset, you can use the following:
-
SQL queries
-
Joins
With SQL queries, you can customize how you import the values in the dataset. For example, you can specify the columns returned in the dataset or the range of values for a column.
You can use joins to combine multiple datasets from Amazon Redshift into a single dataset. You can drag your datasets from Amazon Redshift into the panel that gives you the ability to join the datasets.
You can use the SQL editor to edit the dataset that you've joined and convert the joined dataset into a single node. You can join another dataset to the node. You can import the data that you've selected into SageMaker Canvas.
Use the following procedure to import data from Amazon Redshift.
In the SageMaker Canvas application, go to the Datasets page.
Choose Import data, and from the dropdown menu, choose Tabular.
-
Enter a name for the dataset and choose Create.
For Data Source, open the dropdown menu and choose Redshift.
-
Choose Add connection.
-
In the dialog box, specify your Amazon Redshift credentials:
-
For Authentication method, choose IAM.
-
Enter the Cluster identifier to specify to which cluster you want to connect. Enter only the cluster identifier and not the full endpoint of the Amazon Redshift cluster.
-
Enter the Database name of the database to which you want to connect.
-
Enter a Database user to identify the user you want to use to connect to the database.
-
For ARN, enter the IAM role ARN of the role that the Amazon Redshift cluster should assume to move and write data to Amazon S3. For more information about this role, see Authorizing Amazon Redshift to access other AWS services on your behalf in the Amazon Redshift Management Guide.
-
Enter a Connection name. This is a name used by Canvas to identify this connection.
-
-
From the tab that has the name of your connection, drag the .csv file that you're importing to the Drag and drop table to import pane.
-
Optional: Drag additional tables to the import pane. You can use the GUI to join the tables. For more specificity in your joins, choose Edit in SQL.
-
Optional: If you're using SQL to query the data, you can choose Context to add context to the connection by specifying values for the following:
-
Warehouse
-
Database
-
Schema
-
-
Choose Import data.
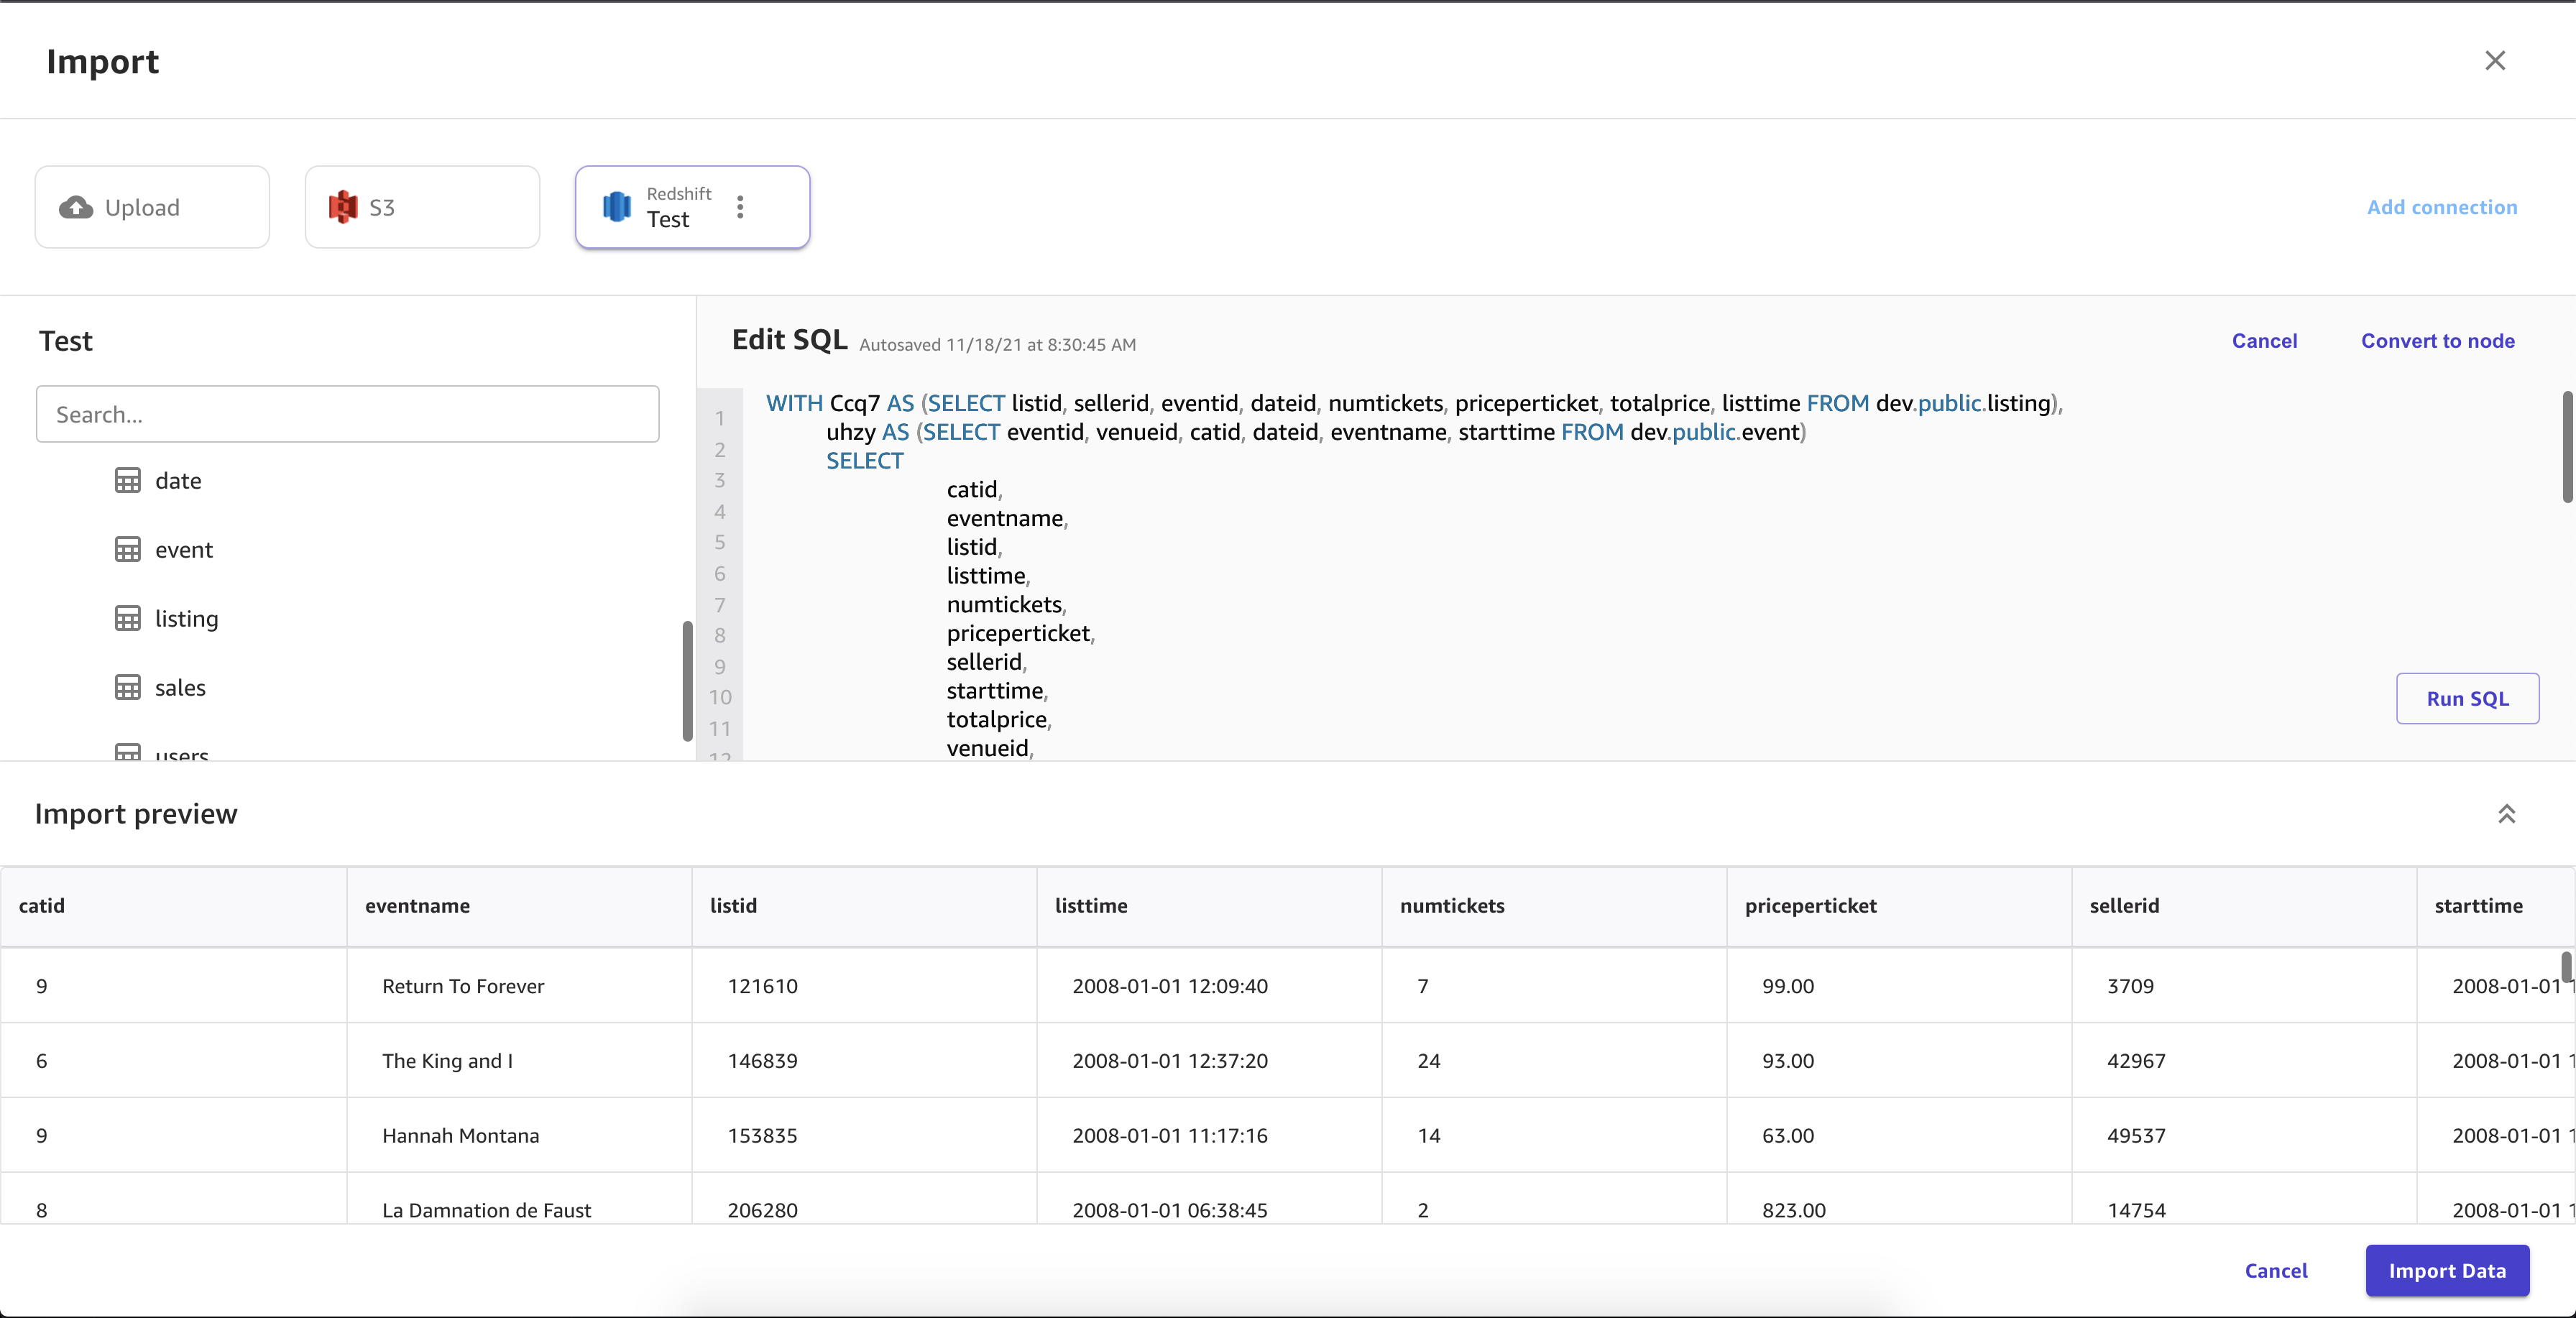
The following image shows an example of fields specified for an Amazon Redshift connection.

The following image shows the page used to join datasets in Amazon Redshift.

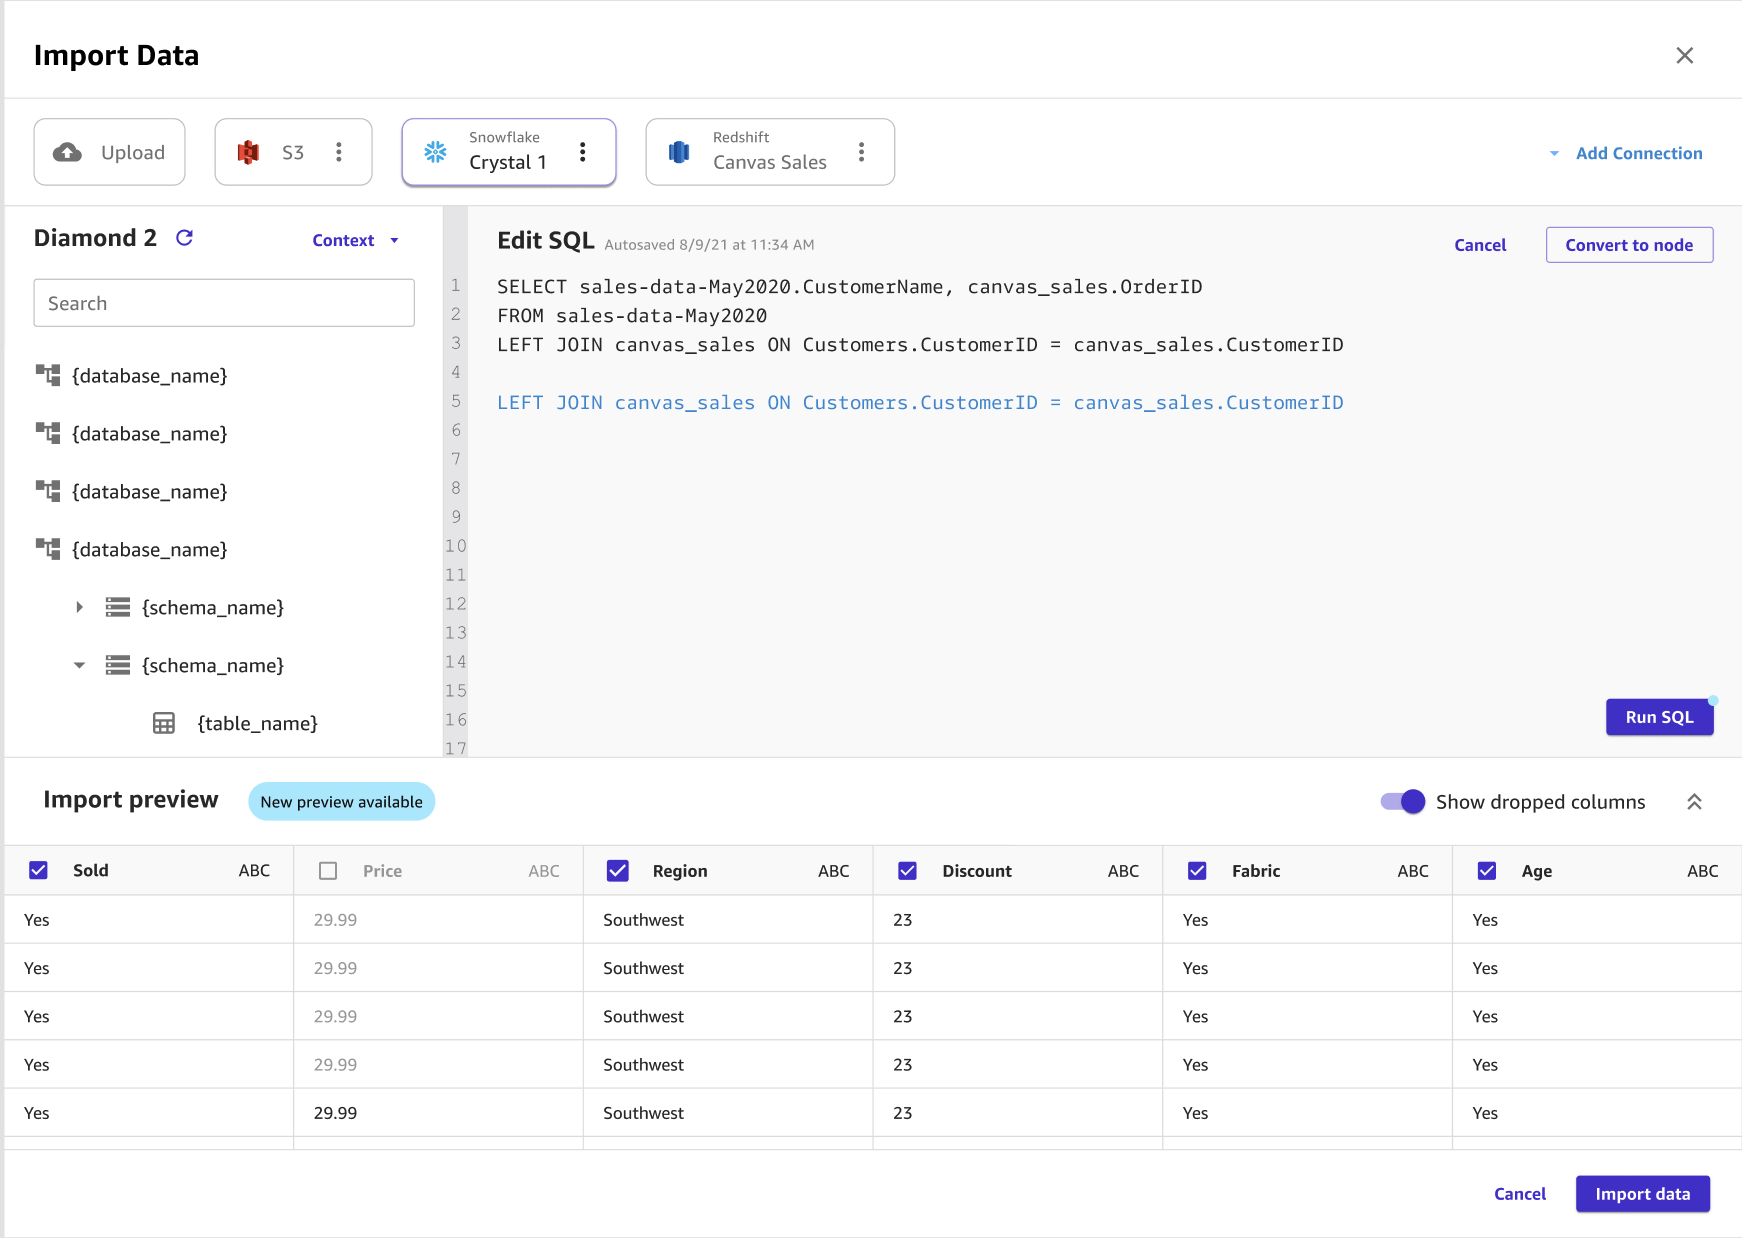
The following image shows an SQL query being used to edit a join in Amazon Redshift.
Connect to your data with JDBC connectors
With JDBC, you can connect to your databases from sources such as Databricks, SQLServer, MySQL, PostgreSQL, MariaDB, Amazon RDS, and Amazon Aurora.
You must make sure that you have the necessary credentials and permissions to create the connection from Canvas.
For Databricks, you must provide a JDBC URL. The URL formatting can vary between Databricks instances. For information about finding the URL and the specifying the parameters within it, see JDBC configuration and connection parameters
in the Databricks documentation. The following is an example of how a URL can be formatted: jdbc:spark://aws-sagemaker-datawrangler.cloud.databricks.com:443/default;transportMode=http;ssl=1;httpPath=sql/protocolv1/o/3122619508517275/0909-200301-cut318;AuthMech=3;UID=token;PWD=personal-access-tokenFor other database sources, you must set up username and password authentication, and then specify those credentials when connecting to the database from Canvas.
Additionally, your data source must either be accessible through the public internet, or if your Canvas application is running in VPC only mode, then the data source must run in the same VPC. For more information about configuring an Amazon RDS database in a VPC, see Amazon VPC VPCs and Amazon RDS in the Amazon RDS User Guide.
After you’ve configured your data source credentials, you can sign in to the Canvas application and create a connection to the data source. Specify your credentials (or, for Databricks, the URL) when creating the connection.
Connect to data sources with OAuth
Canvas supports using OAuth as an authentication method for connecting to your
data in Snowflake and Salesforce Data Cloud. OAuth
Note
You can only establish one OAuth connection for each data source.
To authorize the connection, you must following the initial setup described in Set up connections to data sources with OAuth.
After setting up the OAuth credentials, you can do the following to add a Snowflake or Salesforce Data Cloud connection with OAuth:
Sign in to the Canvas application.
Create a tabular dataset. When prompted to upload data, choose Snowflake or Salesforce Data Cloud as your data source.
Create a new connection to your Snowflake or Salesforce Data Cloud data source. Specify OAuth as the authentication method and enter your connection details.
You should now be able to import data from your databases in Snowflake or Salesforce Data Cloud.
Connect to a SaaS platform
You can import data from Snowflake and over 40 other external SaaS platforms. For a full list of the connectors, see the table on Data import.
Note
You can only import tabular data, such as data tables, from SaaS platforms.
Use Snowflake with Canvas
Snowflake is a data storage and analytics service, and you can import your data from Snowflake
into SageMaker Canvas. For more information about Snowflake, see the Snowflake documentation
You can import data from your Snowflake account by doing the following:
-
Create a connection to the Snowflake database.
-
Choose the data that you're importing by dragging and dropping the table from the left navigation menu into the editor.
-
Import the data.
You can use the Snowflake editor to drag datasets onto the import pane and import them into SageMaker Canvas. For more control over the values returned in the dataset, you can use the following:
-
SQL queries
-
Joins
With SQL queries, you can customize how you import the values in the dataset. For example, you can specify the columns returned in the dataset or the range of values for a column.
You can join multiple Snowflake datasets into a single dataset before you import into Canvas using SQL or the Canvas interface. You can drag your datasets from Snowflake into the panel that gives you the ability to join the datasets, or you can edit the joins in SQL and convert the SQL into a single node. You can join other nodes to the node that you've converted. You can then combine the datasets that you've joined into a single node and join the nodes to a different Snowflake dataset. Finally, you can import the data that you've selected into Canvas.
Use the following procedure to import data from Snowflake to Amazon SageMaker Canvas.
In the SageMaker Canvas application, go to the Datasets page.
Choose Import data, and from the dropdown menu, choose Tabular.
-
Enter a name for the dataset and choose Create.
For Data Source, open the dropdown menu and choose Snowflake.
-
Choose Add connection.
-
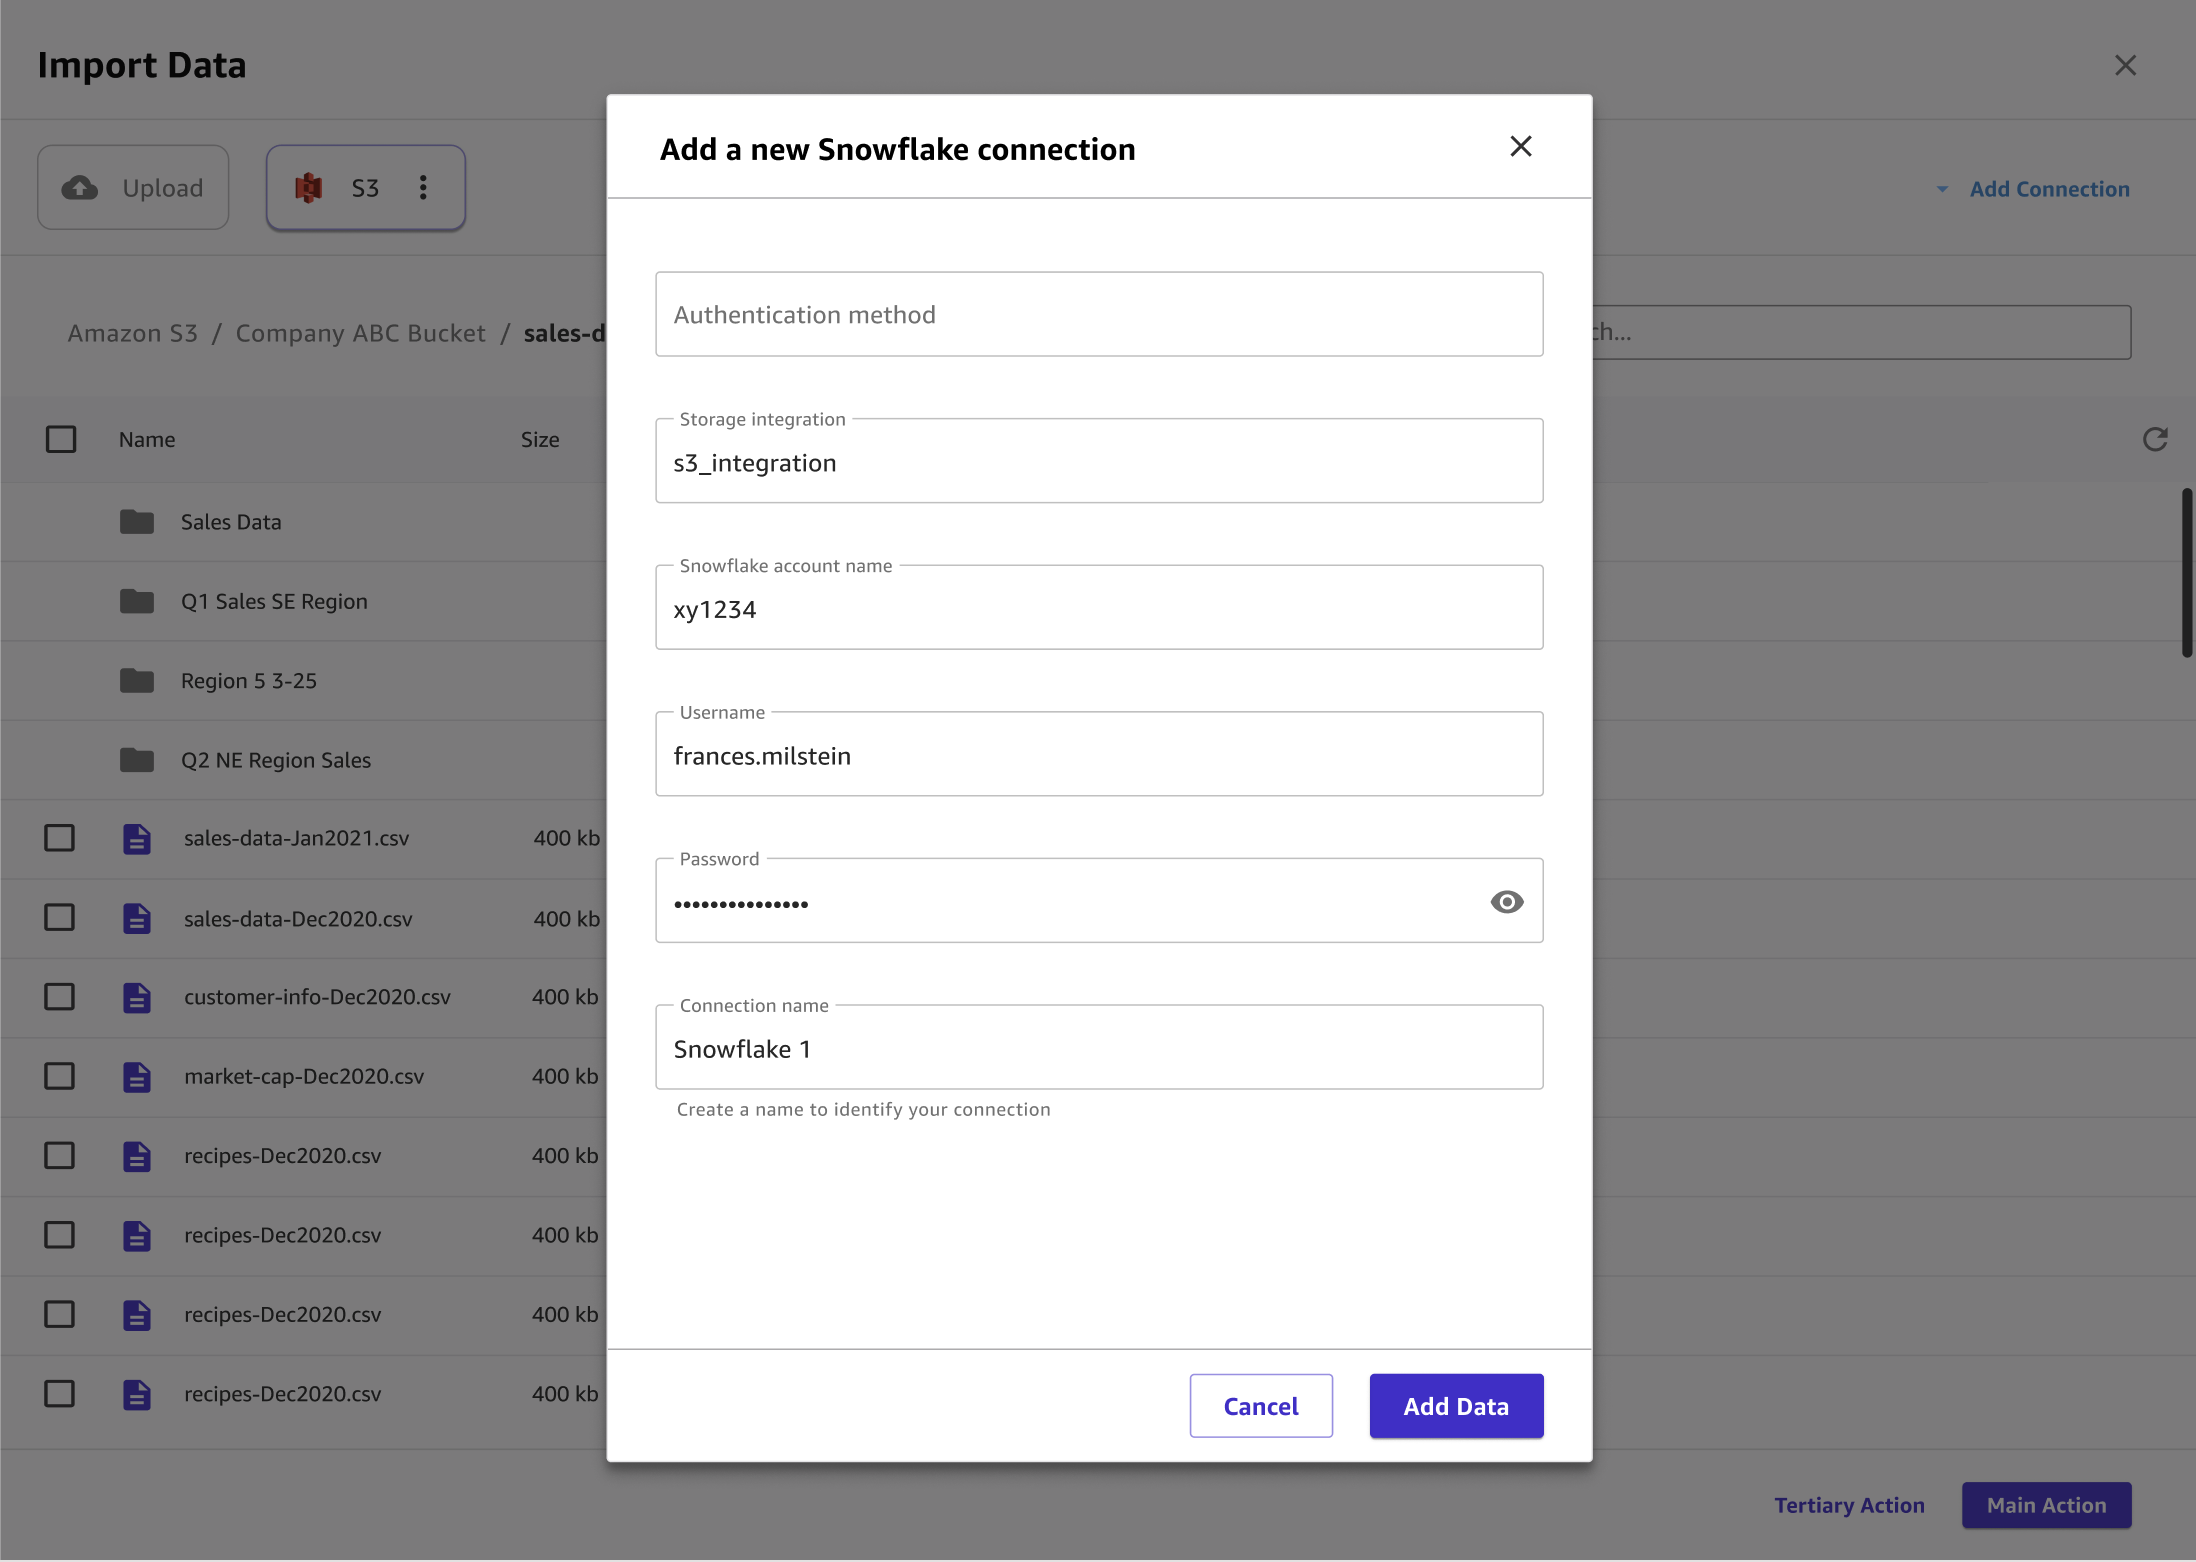
In the Add a new Snowflake connection dialog box, specify your Snowflake credentials. For the Authentication method, choose one of the following:
Basic - username password – Provide your Snowflake account ID, username, and password.
-
ARN – For improved protection of your Snowflake credentials, provide the ARN of an AWS Secrets Manager secret that contains your credentials. For more information, see Create an AWS Secrets Manager secret in the AWS Secrets Manager User Guide.
Your secret should have your Snowflake credentials stored in the following JSON format:
{"accountid": "ID",
"username": "username",
"password": "password"}
OAuth – OAuth lets you authenticate without providing a password but requires additional setup. For more information about setting up OAuth credentials for Snowflake, see Set up connections to data sources with OAuth.
-
Choose Add connection.
-
From the tab that has the name of your connection, drag the .csv file that you're importing to the Drag and drop table to import pane.
-
Optional: Drag additional tables to the import pane. You can use the user interface to join the tables. For more specificity in your joins, choose Edit in SQL.
-
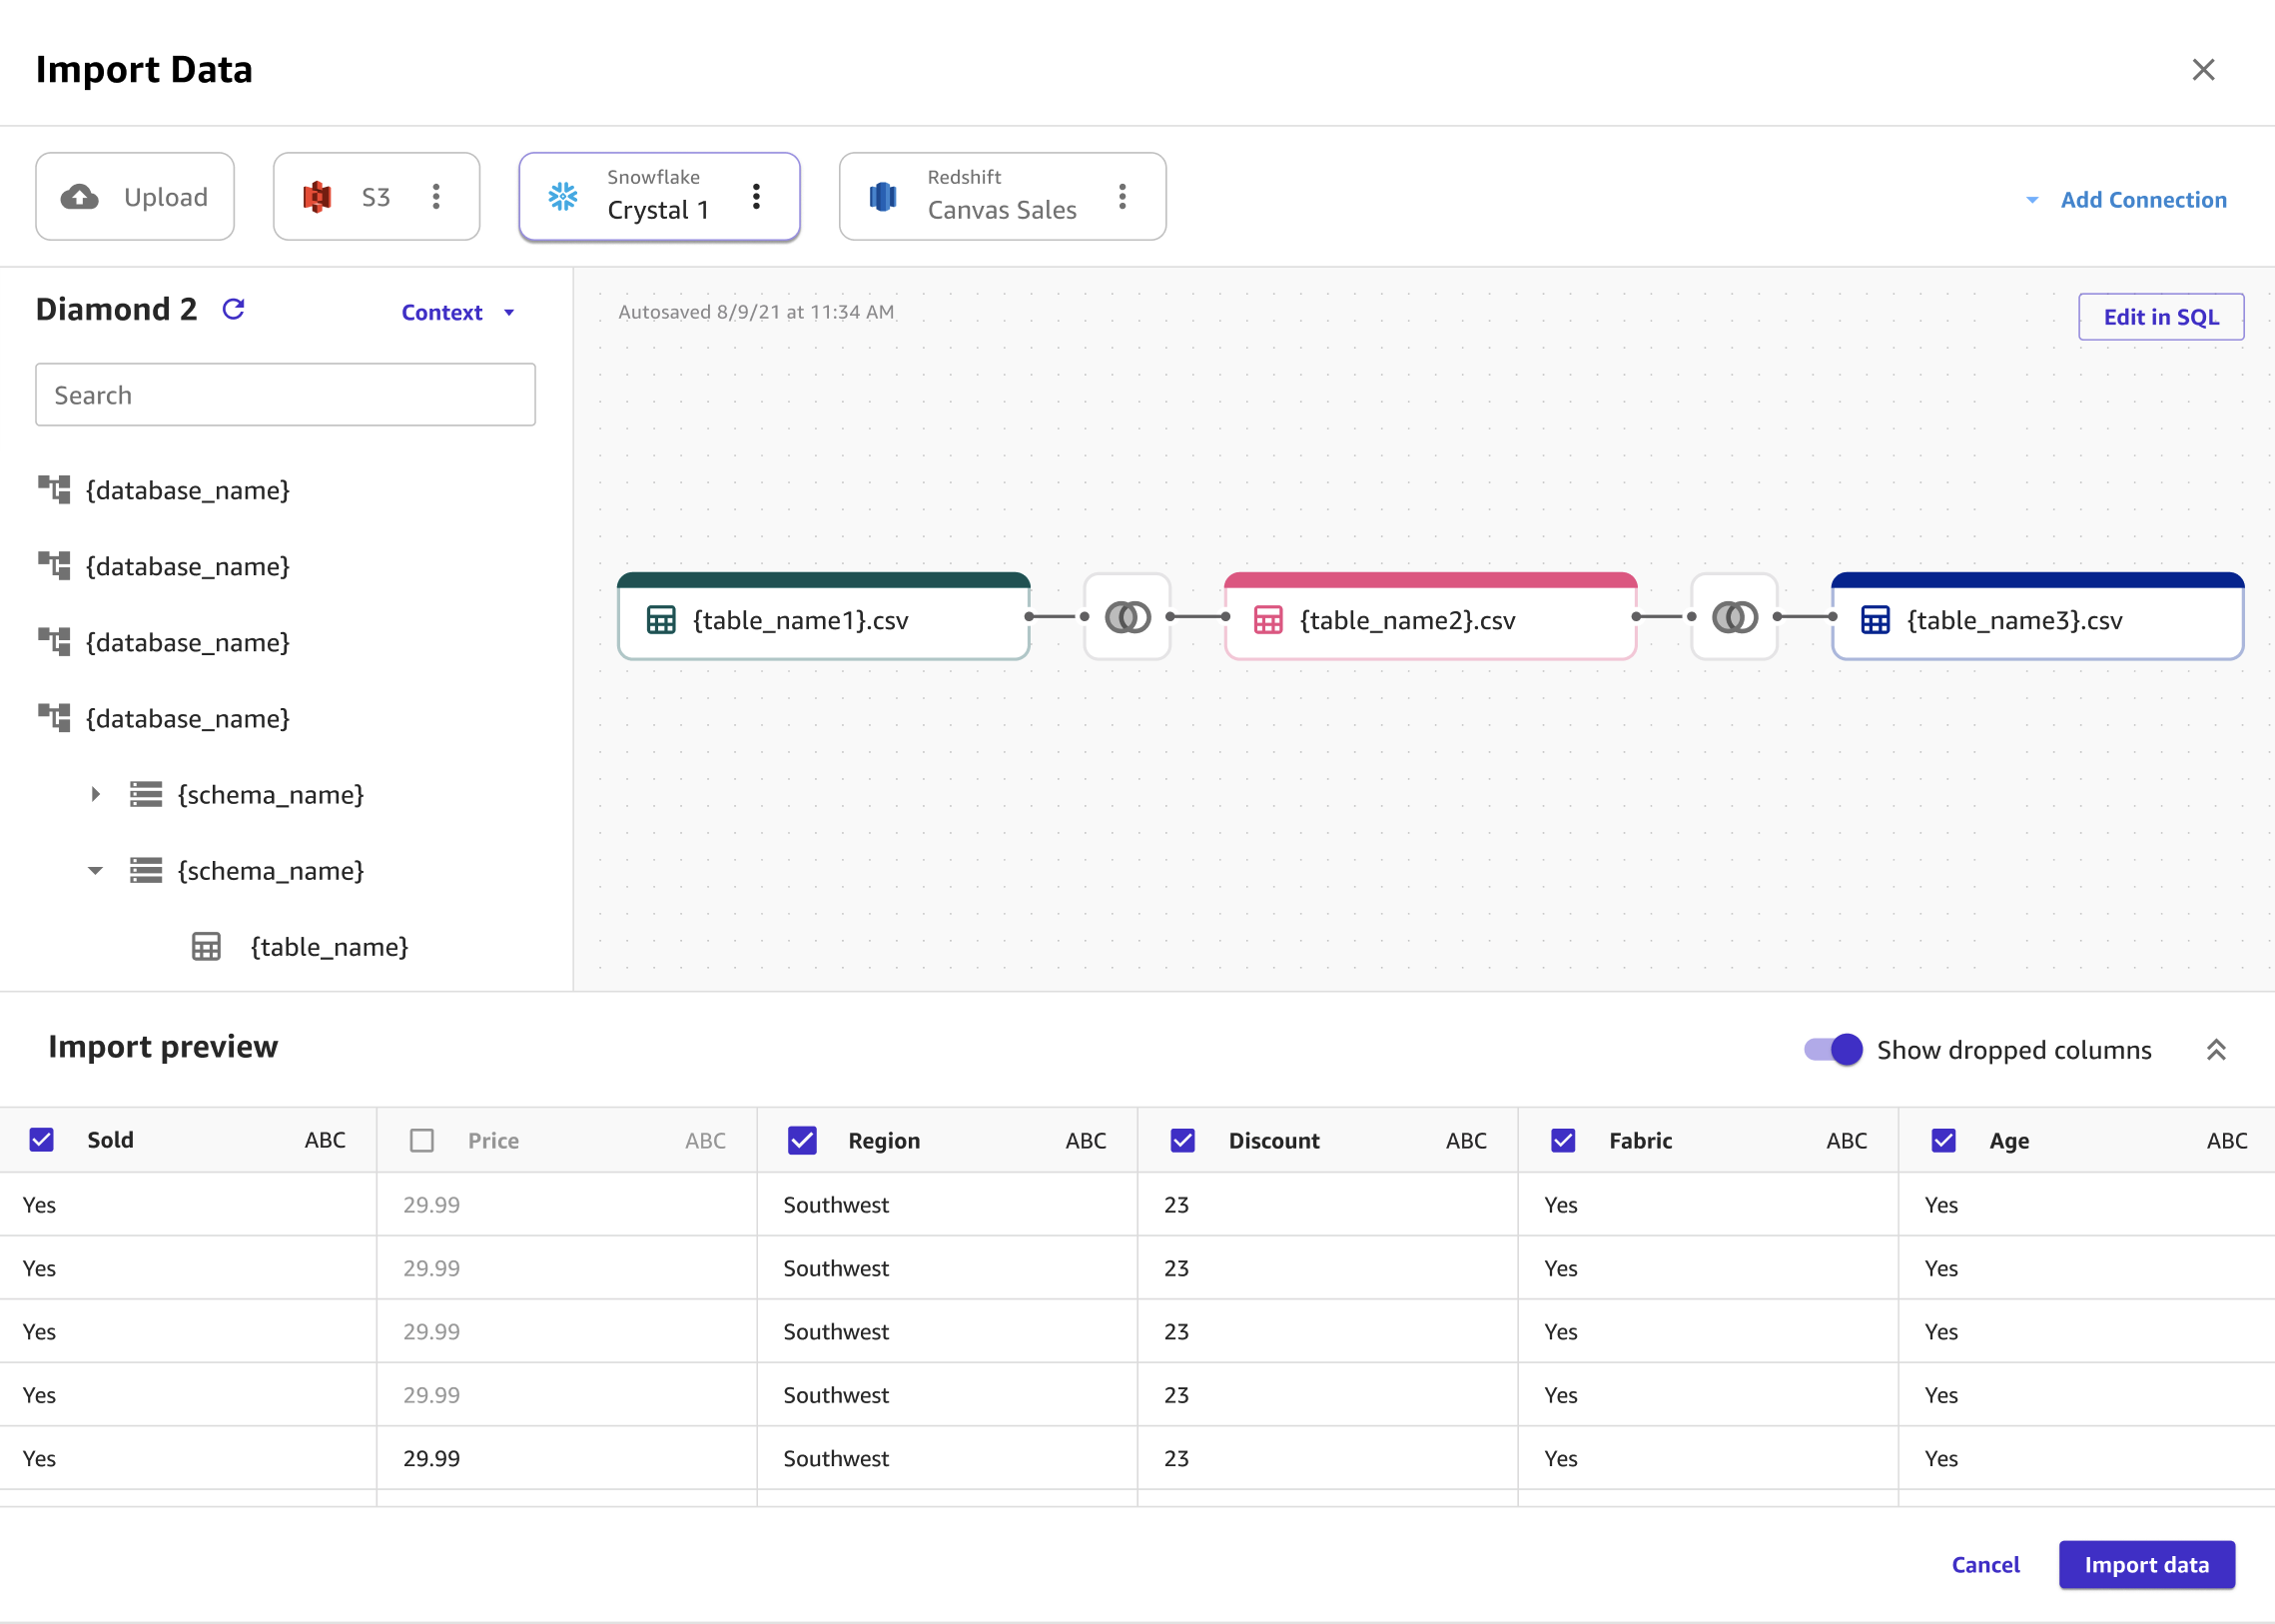
Optional: If you're using SQL to query the data, you can choose Context to add context to the connection by specifying values for the following:
-
Warehouse
-
Database
-
Schema
Adding context to a connection makes it easier to specify future queries.
-
-
Choose Import data.
The following image shows an example of fields specified for a Snowflake connection.
The following image shows the page used to add context to a connection.

The following image shows the page used to join datasets in Snowflake.
The following image shows a SQL query being used to edit a join in Snowflake.
Use SaaS connectors with Canvas
Note
For SaaS platforms besides Snowflake, you can only have one connection per data source.
Before you can import data from a SaaS platform, your administrator must authenticate and create a connection to the data source. For more information about how administrators can create a connection with a SaaS platform, see Managing Amazon AppFlow connections in the Amazon AppFlow User Guide.
If you’re an administrator getting started with Amazon AppFlow for the first time, see Getting started in the Amazon AppFlow User Guide.
To import data from a SaaS platform, you can follow the standard Import tabular data procedure, which shows you how to import tabular datasets into Canvas.
