Transferring files over a server endpoint using a client
You transfer files over the AWS Transfer Family service by specifying the transfer operation in a client. AWS Transfer Family supports the following clients:
-
We support version 3 of the SFTP protocol.
-
OpenSSH (macOS and Linux)
Note
This client works only with servers that are enabled for Secure Shell (SSH) File Transfer Protocol (SFTP).
-
WinSCP (Microsoft Windows only)
-
Cyberduck (Windows, macOS, and Linux)
-
FileZilla (Windows, macOS, and Linux)
The following limitations apply to every client:
-
The SCP protocol is not supported, as it is considered insecure. You can use the OpenSSH
scpcommand as described in Using the scp command. -
The maximum number of concurrent, multiplexed, SFTP sessions per connection is 10.
-
For idle connections, the timeout value is 1800 seconds (30 minutes) for all protocols (SFTP/FTP/FTPS). If there is no activity after this period, the client may be disconnected. For unresponsive connections:
-
SFTP has a 300 seconds (5 minutes) timeout when a client is completely unresponsive.
-
FTPS and FTP have an approximately 10 minute unresponsive timeout that is handled by the underlying library.
-
-
Amazon S3 and Amazon EFS (due to the NFSv4 protocol) require filenames to be in UTF-8 encoding. Using different encoding can lead to unexpected results. For Amazon S3, see Object key naming guidelines.
-
For File Transfer Protocol over SSL (FTPS), only Explicit mode is supported. Implicit mode is not supported.
-
For File Transfer Protocol (FTP) and FTPS, only Passive mode is supported.
-
For FTP and FTPS, only STREAM mode is supported.
-
For FTP and FTPS, only Image/Binary mode is supported.
-
For FTP and FTPS, TLS - PROT C (unprotected) TLS for the data connection is the default but PROT C is not supported in the AWS Transfer Family FTPS protocol. So for FTPS, you need to issue PROT P for your data operation to be accepted.
-
If you are using Amazon S3 for your server's storage, and if your client contains an option to use multiple connections for a single transfer, make sure to disable the option. Otherwise, large file uploads can fail in unpredictable ways. Note that if you are using Amazon EFS as your storage backend, EFS does support multiple connections for a single transfer.
The following is a list of available commands for FTP and FTPS:
| Available commands | |||||
|---|---|---|---|---|---|
ABOR |
FEAT |
MLST |
PASS |
RETR |
STOR |
AUTH |
LANG |
MKD |
PASV |
RMD |
STOU |
CDUP |
LIST |
MODE |
PBSZ |
RNFR |
STRU |
CWD |
MDTM |
NLST |
PROT |
RNTO |
SYST |
DELE |
MFMT |
NOOP |
PWD |
SIZE |
TYPE |
EPSV |
MLSD |
OPTS |
QUIT |
STAT |
USER |
Note
APPE is not supported.
For SFTP, the following operations are currently not supported for users that are using the logical home directory on servers that are using Amazon Elastic File System (Amazon EFS).
| Unsupported SFTP commands | |||
|---|---|---|---|
SSH_FXP_READLINK |
SSH_FXP_SYMLINK |
SSH_FXP_STAT when the requested file is a symlink |
SSH_FXP_REALPATH when the requested path contains any symlink components |
Generate public-private key pair
Before you can transfer a file, you must have a public-private key pair available. If you have not previously generated a key pair, see Generate SSH keys for service-managed users.
Topics
Available SFTP/FTPS/FTP Commands
The following table describes the available commands for AWS Transfer Family, for the SFTP, FTPS, and FTP protocols.
Note
The table mentions files and directories for Amazon S3, which only supports buckets and objects: there is no hierarchy. However, you can use prefixes in object key names to imply a hierarchy and organize your data in a way similar to folders. This behavior is described in Working with object metadata in the Amazon Simple Storage Service User Guide.
| Command | Amazon S3 | Amazon EFS |
|---|---|---|
cd |
Supported | Supported |
chgrp |
Not supported | Supported (root or owner only) |
chmod |
Not supported | Supported (root only) |
chmtime |
Not supported | Supported |
chown |
Not supported | Supported (root only) |
get |
Supported | Supported (including resolving symbolic links) |
ln -s |
Not supported | Supported |
ls/dir |
Supported | Supported |
mkdir |
Supported | Supported |
put |
Supported | Supported |
pwd |
Supported | Supported |
rename |
Supported for files only NoteRenaming that would overwrite an existing file is not supported. |
Supported NoteRenaming that would overwrite an existing file or directory is not supported. |
rm |
Supported | Supported |
rmdir |
Supported (empty directories only) | Supported |
version |
Supported | Supported |
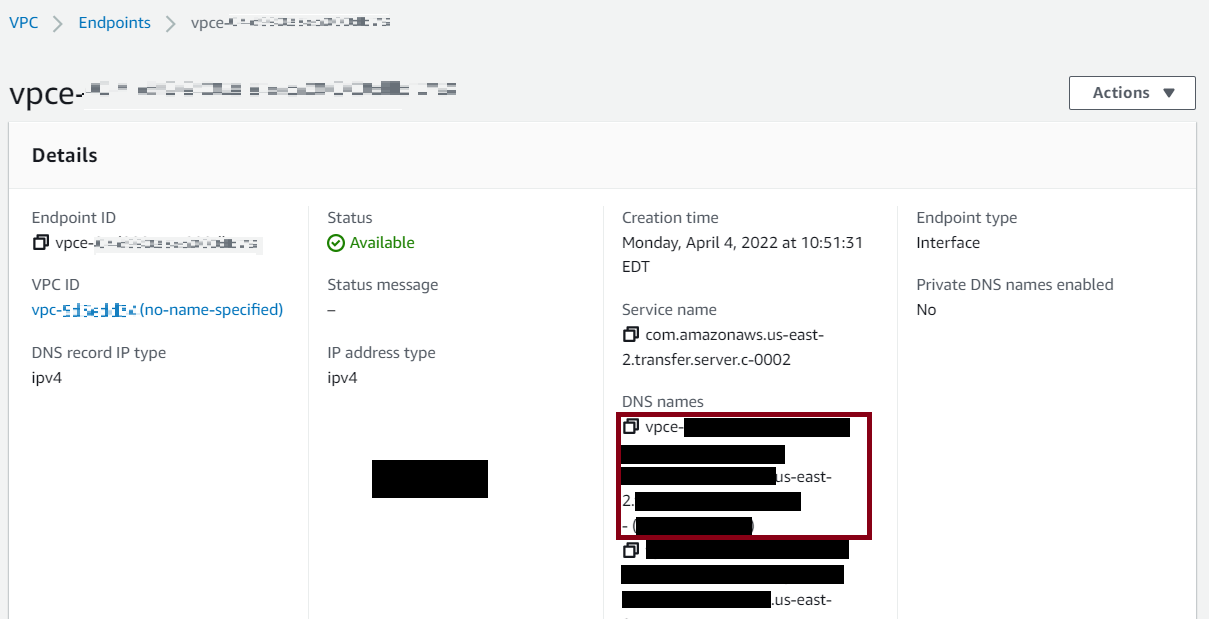
Find your Amazon VPC endpoint
If the endpoint type for your Transfer Family server is VPC, identifying the endpoint to use for transferring files is not straightforward. In this case, use the following procedure to find your Amazon VPC endpoint.
To find your Amazon VPC endpoint
-
Navigate to your server's details page.
-
In the Endpoint details pane, select the VPC.

-
In the Amazon VPC dashboard, select the VPC endpoint ID.
-
In the list of DNS names, your server endpoint is the first one listed.
Avoid setstat errors
Some SFTP file transfer clients can attempt to change the attributes of remote files, including timestamp and permissions, using commands, such as SETSTAT when uploading the file. However, these commands are not compatible with object storage systems, such as Amazon S3. Due to this incompatibility, file uploads from these clients can result in errors even when the file is otherwise successfully uploaded.
-
When you call the
CreateServerorUpdateServerAPI, use theProtocolDetailsoptionSetStatOptionto ignore the error that is generated when the client attempts to use SETSTAT on a file you are uploading to an S3 bucket. -
Set the value to
ENABLE_NO_OPto have the Transfer Family server ignore the SETSTAT command, and upload files without needing to make any changes to your SFTP client. -
Note that while the
SetStatOptionENABLE_NO_OPsetting ignores the error, it does generate a log entry in CloudWatch Logs, so you can determine when the client is making a SETSTAT call.
For the API details for this option, see ProtocolDetails.
Use OpenSSH
This section contains instructions to transfer files from the command line using OpenSSH.
Note
This client works only with an SFTP-enabled server.
Using OpenSSH
To transfer files over AWS Transfer Family using the OpenSSH command line utility
-
On Linux, macOS, or Windows, open a command terminal.
-
At the prompt, enter the following command:
sftp -itransfer-keysftp_user@service_endpointIn the preceding command,
sftp_usertransfer-keyservice_endpointNote
This command uses settings that are in the default
ssh_configfile. Unless you have previously edited this file, SFTP uses port 22. You can specify a different port (for example 2222) by adding a-Pflag to the command, as follows.sftp -P 2222 -itransfer-keysftp_user@service_endpointAlternatively, if you always want to use port 2222 or port 22000, you can update your default port in your
ssh_configfile.An
sftpprompt should appear. -
(Optional) To view the user's home directory, enter the following command at the
sftpprompt:pwd -
To upload a file from your file system to the Transfer Family server, use the
putcommand. For example, to uploadhello.txt(assuming that file is in your current directory on your file system), run the following command at thesftpprompt:put hello.txtA message similar to the following appears, indicating that the file transfer is in progress, or complete.
Uploading hello.txt to
                            /amzn-s3-demo-bucket/home/sftp_user/hello.txt
hello.txt 100% 127 0.1KB/s 00:00
Note
After your server is created, it can take a few minutes for the server endpoint hostname to be resolvable by the DNS service in your environment.
Using the scp command
Transfer Family doesn't support the SCP protocol. However, you can use the OpenSSH
scp command if you need this functionality.
The recommendation for using SCP over SFTP is to use OpenSSH version 9.0 or later.
In OpenSSH version 9 and later, the scp command defaults to using the
SFTP protocol for file transfers instead of the legacy SCP protocol.
Important
Ensure that your Transfer Family server has been configured to use S3 optimized directory access.
Use WinSCP
Use the instructions that follow to transfer files from the command line using WinSCP.
Note
If you are using WinSCP 5.19, you can directly connect to Amazon S3 using your AWS
credentials and upload/download files. For more details, see Connecting to Amazon S3
service
To transfer files over AWS Transfer Family using WinSCP
-
Open the WinSCP client.
-
In the Login dialog box, for File protocol, choose a protocol: SFTP or FTP.
If you chose FTP, for Encryption, choose one of the following:
-
No encryption for FTP
-
TLS/SSL Explicit encryption for FTPS
-
-
For Host name, enter your server endpoint. The server endpoint is located on the Server details page. For more information, see View SFTP, FTPS, and FTP server details.
If your server uses a VPC endpoint, see Find your Amazon VPC endpoint.
-
For Port number, enter the following:
-
22for SFTP -
21for FTP/FTPS
-
-
For User name, enter the name for the user that you created for your specific identity provider.
Tip: The username should be one of the users you created or configured for your identity provider. AWS Transfer Family provides the following identity providers:
-
Choose Advanced to open the Advanced Site Settings dialog box. In the SSH section, choose Authentication.
-
For Private key file, browse for and choose the SSH private key file from your file system.
If WinSCP offers to convert your SSH private key to the PPK format, choose OK.
-
Choose OK to return to the Login dialog box, and then choose Save.
-
In the Save session as site dialog box, choose OK to complete your connection setup.
-
In the Login dialog box, choose Tools, and then choose Preferences.
-
In the Preferences dialog box, for Transfer, choose Endurance.
For the Enable transfer resume/transfer to temporary filename for option, choose Disable.
Important
If you leave this option enabled, it increases upload costs, substantially decreasing upload performance. It also can lead to failures of large file uploads.
-
For Transfer, choose Background, and clear the Use multiple connections for single transfer check box.
Tip: If you leave this option selected, large file uploads can fail in unpredictable ways. For example, orphaned multipart uploads that incur Amazon S3 charges can be created. Silent data corruption can also occur.
-
Perform your file transfer.
You can use drag-and-drop methods to copy files between the target and source windows. You can use toolbar icons to upload, download, delete, edit, or modify the properties of files in WinSCP.
Note
This note does not apply if you are using Amazon EFS for storage.
Commands that attempt to change attributes of remote files, including timestamps,
are not compatible with object storage systems such as Amazon S3. Therefore, if you are
using Amazon S3 for storage, be sure to disable WinSCP timestamp settings (or use the
SetStatOption as described in Avoid setstat errors) before you perform file transfers. To do so,
in the WinSCP Transfer settings dialog box, disable the
Set permissions upload option and the Preserve
timestamp common option.
Use Cyberduck
Use the instructions that follow to transfer files from the command line using Cyberduck.
To transfer files over AWS Transfer Family using Cyberduck
-
Open the Cyberduck
client. -
Choose Open Connection.
-
In the Open Connection dialog box, choose a protocol: SFTP (SSH File Transfer Protocol), FTP-SSL (Explicit AUTH TLS), or FTP (File Transfer Protocol).
-
For Server, enter your server endpoint. The server endpoint is located on the Server details page. For more information, see View SFTP, FTPS, and FTP server details.
If your server uses a VPC endpoint, see Find your Amazon VPC endpoint.
-
For Port number, enter the following:
-
22for SFTP -
21for FTP/FTPS
-
-
For Username, enter the name for the user that you created in Managing users for server endpoints.
-
If SFTP is selected, for SSH Private Key, choose or enter the SSH private key.
-
Choose Connect.
-
Perform your file transfer.
Depending on where your files are, do one of the following:
-
In your local directory (the source), choose the files that you want to transfer, and drag and drop them into the Amazon S3 directory (the target).
-
In the Amazon S3 directory (the source), choose the files that you want to transfer, and drag and drop them into your local directory (the target).
-
Use FileZilla
Use the instructions that follow to transfer files using FileZilla.
To set up FileZilla for a file transfer
-
Open the FileZilla client.
-
Choose File, and then choose Site Manager.
-
In the Site Manager dialog box, choose New site.
-
On the General tab, for Protocol, choose a protocol: SFTP or FTP.
If you chose FTP, for Encryption, choose one of the following:
-
Only use plain FTP (insecure) – for FTP
-
Use explicit FTP over TLS if available – for FTPS
-
-
For Host name, enter the protocol that you are using, followed by your server endpoint. The server endpoint is located on the Server details page. For more information, see View SFTP, FTPS, and FTP server details.
-
If you are using SFTP, enter:
sftp://hostname -
If you are using FTPS, enter:
ftps://hostname
Make sure to replace
hostnamewith your actual server endpoint.If your server uses a VPC endpoint, see Find your Amazon VPC endpoint.
-
-
For Port number, enter the following:
-
22for SFTP -
21for FTP/FTPS
-
-
If SFTP is selected, for Logon Type, choose Key file.
For Key file, choose or enter the SSH private key.
-
For User, enter the name for the user that you created in Managing users for server endpoints.
-
Choose Connect.
-
Perform your file transfer.
Note
If you interrupt a file transfer in progress, AWS Transfer Family might write a partial object in your Amazon S3 bucket. If you interrupt an upload, check that the file size in the Amazon S3 bucket matches the file size of the source object before continuing.
Use a Perl client
If you use the NET::SFTP::Foreign perl client, you must set the
queue_size to 1. For example:
my $sftp =
                    Net::SFTP::Foreign->new('user@s-12345.server.transfer.us-east-2.amazonaws.com',
                queue_size => 1);
Note
This workaround is needed for revisions of Net::SFTP::Foreign prior
to 1.92.02
Use LFTP
LFTP is a free FTP client that allows users to perform file transfers via the command-line interface from most Linux machines.
For large file downloads, LFTP has a known issue with out of order packets, causing the file transfer to fail.
Post upload processing
You can view post upload processing information including Amazon S3 object metadata and event notifications.
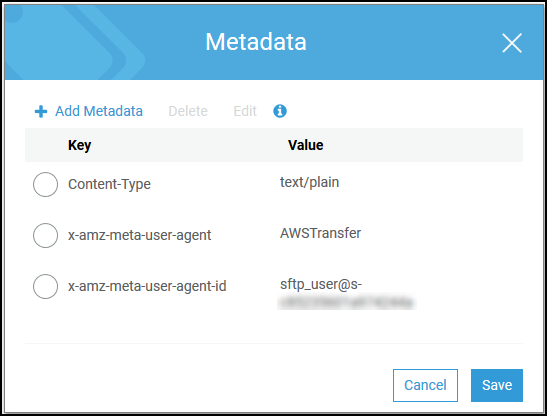
Amazon S3 object metadata
As a part of your object's metadata you see a key called
x-amz-meta-user-agent whose value is AWSTransfer and
x-amz-meta-user-agent-id whose value is
username@server-id. The username is the Transfer Family user who uploaded
the file and server-id is the server used for the upload. This information
can be accessed using the HeadObject operation on the S3
object inside your Lambda function.
Amazon S3 event notifications
When an object is uploaded to your S3 bucket using Transfer Family, RoleSessionName
is contained in the Requester field in the S3 event notification
structure as [AWS:Role Unique
Identifier]/username.sessionid@server-id.
For example, the following are the contents for a sample Requester field from an S3 access log for a file that was copied to the S3 bucket.
arn:aws:sts::AWS-Account-ID:assumed-role/IamRoleName/username.sessionid@server-id
In the Requester field above, it shows the IAM Role called IamRoleName.
For more information about configuring S3 event notifications, see Configuring Amazon S3
event notifications in the Amazon Simple Storage Service Developer
Guide. For more information about AWS Identity and Access Management (IAM) role unique
identifiers, see Unique
identifiers in the AWS Identity and Access Management User Guide.
SFTP messages
This section describes client side messages that you may receive during or after your SFTP file transfers when using a Transfer Family server. For more information on any SFTP event, check your SFTP client logs. You can use that information to troubleshoot any errors, or forward that information to your network team for their help in identifying the issue.
| Activity | Description |
|---|---|
| AUTH_FAILURE | The user failed authentication. This can be any kind of failure from a custom identity provider or service managed user. The details in the event help clarify the root cause of the failure. |
| CLOSE | Indicates that an opened file or directory is closed successfully. |
| CONNECTED/DISCONNECTED | Indicates normal connection success and disconnections. |
| CREATE_SYMLINK | A symbolic link was created (successfully or unsuccessfully). |
| DELETE | A file was deleted (successfully or unsuccessfully). |
| ERROR | A general, unexpected error. The associated description contains information that can help you or your network administrators to identify the specific issue. |
| EXIT_REASON | Emitted when an unexpected error caused termination of your SFTP session. The message associated with the event describes the cause. |
| MKDIR | A directory was created (successfully or unsuccessfully). |
| OPEN | A file was opened for read or write (successfully or unsuccessfully) |
| PARTIAL_CLOSE | The client disconnected from the server while a file was still open
with no CLOSE message received. Transfer Family stores the received portion of the
file (which could in fact be the complete file) and emits the
PARTIAL_CLOSE event to alert the customer about the issue. Workflows
integration also receives an onPartialClose event to handle
the file appropriately. |
| RENAME | A file was renamed (successfully or unsuccessfully) |
| RMDIR | A directory was deleted (successfully or unsuccessfully) |
| SETSTAT |
The attributes of a file are changed (successfully or unsuccessfully). NoteTransfer Family doesn't support SETSTAT if you are using Amazon S3 for
storage. The Avoid setstat errors section provides details on
how to avoid |
| TLS_RESUME_FAILURE | The server is configured to enforce TLS Session Resumption and the client does not support it. |
