AWS SDK for JavaScript V3 API參考指南詳細描述 AWS SDK for JavaScript 第 3 版 (V3) 的所有API操作。
本文為英文版的機器翻譯版本,如內容有任何歧義或不一致之處,概以英文版為準。
建立排程事件以執行AWS Lambda功能
您可以使用 Amazon 事件建立叫用AWS Lambda函數的排程 CloudWatch 事件。您可以將 CloudWatch 事件設定為使用 cron 運算式來排程叫用 Lambda 函數的時間。例如,您可以排程 CloudWatch 事件,以便在每個工作日叫用 Lambda 函數。
AWS Lambda是一種運算服務,可讓您在不佈建或管理伺服器的情況下執行程式碼。您可以使用各種程式設計語言建立 Lambda 函數。如需 AWS Lambda 的詳細資訊,請參閱什麼是 AWS Lambda?。
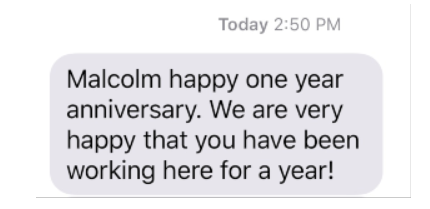
在本教學課程中,您會使用 Lambda JavaScript 執行階段 API 建立 Lambda 函數。這個範例會調用不同的 AWS 服務來執行特定使用案例。例如,假設某個組織傳送行動文字訊息給其員工,並在一年週年日期祝賀他們,如本圖所示。

此教學課程需約 20 分鐘完成。
本教學課程說明如何使用 JavaScript 邏輯來建立執行此使用案例的解決方案。例如,您將學習如何讀取資料庫,以判斷哪些員工已經達到一年週年紀念日、如何處理資料,以及使用 Lambda 函數傳送文字訊息。然後,您將學習如何使用 cron 表達式每個工作日調用 Lambda 函數。
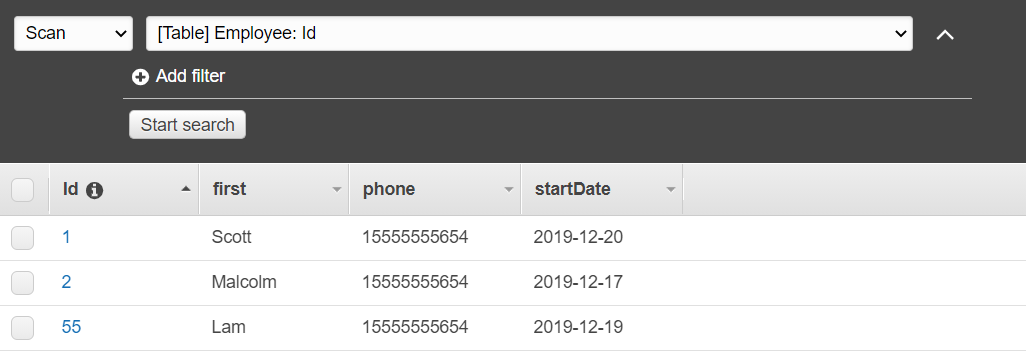
本AWS教學課程使用名為員工的 Amazon DynamoDB 資料表,其中包含這些欄位。
id-表的主鍵。
名字-員工的名字。
電話-員工的電話號碼。
開始日期-員工的開始日期。

重要
完成成本:本文件中包含的AWS服務包含在AWS免費方案中。但是,請務必在完成此教學課程之後終止所有資源,以確保不會向您收費。
若要建置應用程式:
必要工作
若要設定和執行此範例,您必須先完成這些任務:
-
設置項目環境以運行這些 Node.js TypeScript 示例,並安裝所需AWS SDK for JavaScript的第三方模塊。按照上的說明進行操作 GitHub
。 -
透過使用者登入資料建立共用組態檔。有關提供共用認證檔案的詳細資訊,請參閱 AWSSDK 和工具參考指南中的共用設定和認證檔案。
建立資AWS源
本教學課程需要下列資源。
-
一個名為員工的 Amazon DynamoDB 資料表,其中包含一個名為 ID 的金鑰,以及上圖中顯示的欄位。請務必輸入正確的資料,包括您要測試此使用案例的有效行動電話。如需詳細資訊,請參閱建立資料表。
-
具有附加權限的 IAM 角色,可執行 Lambda 函數。
-
一個 Amazon S3 存儲桶來託管 Lambda 函數。
您可以手動建立這些資源,但我們建議您使用本教學課程中所AWS CloudFormation述來佈建這些資源。
使用建立AWS資源 AWS CloudFormation
AWS CloudFormation 可讓您以可預期和重複的方式建立及佈建 AWS 基礎設施部署。如需 AWS CloudFormation 的相關資訊,請參閱《 使用者指南》AWS CloudFormation。
要使用以下命AWS CloudFormation令創建堆棧AWS CLI:
安裝並設定AWS CLI以下AWS CLI使用者指南中的指示。
在項目文件夾的根目錄
setup.yaml中創建一個名為的文件,然後將此處的內容複製 GitHub到其中。 注意
AWS CloudFormation範本是使用中AWS CDK提供的來產生的 GitHub
。如需關於 AWS CDK 的詳細資訊,請參閱《AWS Cloud Development Kit (AWS CDK) 開發人員指南》。 從命令列執行下列命令,並以
堆疊的唯一名稱取代 STACK_NAME。重要
堆疊名稱在AWS區域和AWS帳戶中必須是唯一的。您最多可以指定 128 個字元,且允許使用數字和連字號。
aws cloudformation create-stack --stack-name STACK_NAME --template-body file://setup.yaml --capabilities CAPABILITY_IAM若要取得有關指
create-stack令參數的更多資訊,請參閱《指AWS CLI令參考指南》和《AWS CloudFormation使用指南》。開啟AWS CloudFormation儀表板上的堆疊,然後選擇 [資源] 索引標籤,以檢視主控台中的資源清單。您在本教學課程中需要這些資訊。
建立堆疊時,請使用填AWS SDK for JavaScript入 DynamoDB 表格,如中所述。填入 DynamoDB 料表
填入 DynamoDB 料表
要填充表格,請先創建一個名為的目錄libs,並在其中創建一個名為的文件dynamoClient.js,然後將下面的內容粘貼到其中。
const { DynamoDBClient } = require( "@aws-sdk/client-dynamodb" );
// Set the AWS Region.
const REGION = "REGION"; // e.g. "us-east-1"
// Create an Amazon DynamoDB service client object.
const dynamoClient = new DynamoDBClient({region:REGION});
module.exports = { dynamoClient };
此程式碼可在此處取
接下來,在項目文件夾的根目錄populate-table.js中創建一個名為的文件,然後將此處phone屬性的值取代為 E.164 格式的有效行動電話號碼,並取代為今天日期的值。startDate
從命令行運行以下命令。
node populate-table.js
const {
BatchWriteItemCommand } = require( "aws-sdk/client-dynamodb" );
const {dynamoClient} = require(  "./libs/dynamoClient" );
// Set the parameters.
const params = {
  RequestItems: {
    Employees: [
      {
        PutRequest: {
          Item: {
            id: { N: "1" },
            firstName: { S: "Bob" },
            phone: { N: "155555555555654" },
            startDate: { S: "2019-12-20" },
          },
        },
      },
      {
        PutRequest: {
          Item: {
            id: { N: "2" },
            firstName: { S: "Xing" },
            phone: { N: "155555555555653" },
            startDate: { S: "2019-12-17" },
          },
        },
      },
      {
        PutRequest: {
          Item: {
            id: { N: "55" },
            firstName: { S: "Harriette" },
            phone: { N: "155555555555652" },
            startDate: { S: "2019-12-19" },
          },
        },
      },
    ],
  },
};

export const run = async () => {
  try {
    const data = await dbclient.send(new BatchWriteItemCommand(params));
    console.log("Success", data);
  } catch (err) {
    console.log("Error", err);
  }
};
run();
此程式碼可在此處取
建立 AWS Lambda 函數
設定軟體開發套件
首先匯入必要的 AWS SDK for JavaScript (v3) 模組和命令:以DynamoDBClient及 DynamoDBScanCommand,以SNSClient及 Amazon SNS PublishCommand 命令。將「地區」取代為「AWS區域」。然後計算今天的日期並將其分配給參數。然後使用您在此範建立資AWS源 例中建立的資料表名稱建立 ScanCommand .Replace TABLE_NAME 的參數。
下列程式碼片段說明此步驟。(如需完整範例,請參閱捆綁 Lambda 函數。)
"use strict";
// Load the required clients and commands.
const { DynamoDBClient, ScanCommand } = require("@aws-sdk/client-dynamodb");
const { SNSClient, PublishCommand } = require("@aws-sdk/client-sns");

//Set the AWS Region.
const REGION = "REGION"; //e.g. "us-east-1"

// Get today's date.
const today = new Date();
const dd = String(today.getDate()).padStart(2, "0");
const mm = String(today.getMonth() + 1).padStart(2, "0"); //January is 0!
const yyyy = today.getFullYear();
const date = yyyy + "-" + mm + "-" + dd;

// Set the parameters for the ScanCommand method.
const params = {
  // Specify which items in the results are returned.
  FilterExpression: "startDate = :topic",
  // Define the expression attribute value, which are substitutes for the values you want to compare.
  ExpressionAttributeValues: {
    ":topic": { S: date },
  },
  // Set the projection expression, which the the attributes that you want.
  ProjectionExpression: "firstName, phone",
  TableName: "TABLE_NAME",
};
掃描 DynamoDB 料表
首先創建一個異步/等待函數調用發布sendText使用 Amazon SNS 的文本消息。PublishCommand然後,新增try區塊模式,針對今天的工作週年紀念日掃描 DynamoDB 表格,然後呼叫sendText函數以傳送文字訊息給這些員工。如果發生錯誤,則會呼叫catch區塊。
下列程式碼片段說明此步驟。(如需完整範例,請參閱捆綁 Lambda 函數。)
exports.handler = async (event, context, callback) => {
  // Helper function to send message using Amazon SNS.
  async function sendText(textParams) {
    try {
      const data = await snsclient.send(new PublishCommand(textParams));
      console.log("Message sent");
    } catch (err) {
      console.log("Error, message not sent ", err);
    }
  }
  try {
    // Scan the table to check identify employees with work anniversary today.
    const data = await dbclient.send(new ScanCommand(params));
    data.Items.forEach(function (element, index, array) {
      const textParams = {
        PhoneNumber: element.phone.N,
        Message:
          "Hi " +
          element.firstName.S +
          "; congratulations on your work anniversary!",
      };
      // Send message using Amazon SNS.
      sendText(textParams);
    });
  } catch (err) {
    console.log("Error, could not scan table ", err);
  }
};
捆綁 Lambda 函數
本主題說明如何將此範例中的mylambdafunction.js和所需AWS SDK for JavaScript模組捆綁到名為的隨附檔案中index.js。
如果您還沒有,請按照此示例中必要工作的安裝 webpack。
注意
如需 Webpack 的相關資訊,請參閱捆綁應用程序與網絡包。
在命令列中執行下列命令,將此範例中的 JavaScript 項目捆綁到名為的檔案中
<index.js>:webpack mylamdbafunction.js --mode development --target node --devtool false --output-library-target umd -o index.js重要
請注意輸出已命名
index.js。這是因為 Lambda 函數必須具有index.js處理常式才能運作。將隨附的輸出檔案壓縮成一個名為的 ZIP 檔案
my-lambda-function.zip。index.js上傳
mylambdafunction.zip到您在本教學建立資AWS源 主題中建立的 Amazon S3 儲存貯體。
下面是完整的瀏覽器腳本代碼mylambdafunction.js.
"use strict";
// Load the required clients and commands.
const { DynamoDBClient, ScanCommand } = require("@aws-sdk/client-dynamodb");
const { SNSClient, PublishCommand } = require("@aws-sdk/client-sns");

//Set the AWS Region.
const REGION = "REGION"; //e.g. "us-east-1"

// Get today's date.
const today = new Date();
const dd = String(today.getDate()).padStart(2, "0");
const mm = String(today.getMonth() + 1).padStart(2, "0"); //January is 0!
const yyyy = today.getFullYear();
const date = yyyy + "-" + mm + "-" + dd;

// Set the parameters for the ScanCommand method.
const params = {
  // Specify which items in the results are returned.
  FilterExpression: "startDate = :topic",
  // Define the expression attribute value, which are substitutes for the values you want to compare.
  ExpressionAttributeValues: {
    ":topic": { S: date },
  },
  // Set the projection expression, which the the attributes that you want.
  ProjectionExpression: "firstName, phone",
  TableName: "TABLE_NAME",
};

// Create the client service objects.
const dbclient = new DynamoDBClient({ region: REGION });
const snsclient = new SNSClient({ region: REGION });

exports.handler = async (event, context, callback) => {
  // Helper function to send message using Amazon SNS.
  async function sendText(textParams) {
    try {
      const data = await snsclient.send(new PublishCommand(textParams));
      console.log("Message sent");
    } catch (err) {
      console.log("Error, message not sent ", err);
    }
  }
  try {
    // Scan the table to check identify employees with work anniversary today.
    const data = await dbclient.send(new ScanCommand(params));
    data.Items.forEach(function (element, index, array) {
      const textParams = {
        PhoneNumber: element.phone.N,
        Message:
          "Hi " +
          element.firstName.S +
          "; congratulations on your work anniversary!",
      };
      // Send message using Amazon SNS.
      sendText(textParams);
    });
  } catch (err) {
    console.log("Error, could not scan table ", err);
  }
};
部署 Lambda 函數。
在項目的根目錄中,創建一個lambda-function-setup.js文件,然後將下面的內容粘貼到其中。
將 BUCKET_NAME 取代為您將 Lambda 函數的 ZIP 版本上傳到的 Amazon S3 儲存貯體的名稱。將 ZIP_FILE_NAME 取代為您的 Lambda 函數的 ZIP 版本名稱的名稱。將 IAM_ROLE_ARN 取代為您在本教學課程主題中建立的 IAM 角色的 Amazon 資源編號 (ARN)。建立資AWS源 將 Lambda 函數名稱取代為 Lambda 函數的名稱。
// Load the required Lambda client and commands.
const {
   CreateFunctionCommand,
} = require("@aws-sdk/client-lambda");
const {
   lambdaClient
} = require("..libs/lambdaClient.js");

// Instantiate an Lambda client service object.
const lambda = new LambdaClient({ region: REGION });

// Set the parameters.
const params = {
  Code: {
    S3Bucket: "BUCKET_NAME", // BUCKET_NAME
    S3Key: "ZIP_FILE_NAME", // ZIP_FILE_NAME
  },
  FunctionName: "LAMBDA_FUNCTION_NAME",
  Handler: "index.handler",
  Role: "IAM_ROLE_ARN", // IAM_ROLE_ARN; e.g., arn:aws:iam::650138640062:role/v3-lambda-tutorial-lambda-role
  Runtime: "nodejs12.x",
  Description:
    "Scans a DynamoDB table of employee details and using Amazon Simple Notification Services (Amazon SNS) to " +
    "send employees an email the each anniversary of their start-date.",
};

const run = async () => {
  try {
    const data = await lambda.send(new CreateFunctionCommand(params));
    console.log("Success", data); // successful response
  } catch (err) {
    console.log("Error", err); // an error occurred
  }
};
run();
在命令列中輸入以下指令,以部署 Lambda 函數。
node lambda-function-setup.js
此程式碼範例可在此處取
設定 CloudWatch 以叫用 Lambda 函數
若要設定 CloudWatch 為叫用 Lambda 函數:
-
開啟 Lambda 主控台中的 Functions (函數) 頁面。
-
選擇 Lambda 函數。
-
在 Designer (設計工具) 下,選擇 Add trigger (新增觸發)。
-
將觸發類型設定為「CloudWatch 事件/EventBridge」。
-
針對「規則」,選擇「建立新規則」。
-
填寫規則名稱和規則說明。
-
針對規則類型,選取排程運算式。
-
在「排程運算式」欄位中,輸入 cron 運算式。例如,克朗(0 12? * 星期一至星期五 *)。
-
選擇新增。
注意
如需詳細資訊,請參閱搭配 CloudWatch 事件使用 Lambda。
刪除資源
恭喜您!您已透過 Amazon CloudWatch 排定的事件叫用 Lambda 函數使用AWS SDK for JavaScript. 如本教程開頭所述,請務必終止所有你創建的資源,同時通過本教程,以確保你不收費。您可以透過刪除您在本教學課程建立資AWS源 主題中建立的AWS CloudFormation堆疊來執行此操作,如下所示:
在「堆疊」頁面上,選取堆疊。
選擇刪除。