AWS CodeCommit is no longer available to new customers. Existing customers of
AWS CodeCommit can continue to use the service as normal.
Learn more"
Getting started with AWS CodeCommit
This tutorial shows you how to use some key CodeCommit features. First, you create a repository and commit some changes to it. Then, you browse the files and view the changes. You can also create a pull request so other users can review and comment on changes to your code.
If you want to migrate existing code to CodeCommit, see Migrate to AWS CodeCommit.
If you are unfamiliar with Git, consider completing Getting started with Git and CodeCommit too. After you complete these tutorials, you should have enough practice to start using CodeCommit for your own projects and in team environments.
The CodeCommit console includes helpful information in a collapsible panel that you can open
from the information icon (
![]() ) or any Info link on the page. You can close this
panel at any time.
) or any Info link on the page. You can close this
panel at any time.
The CodeCommit console also provides a way to quickly search for your resources, such as
repositories, build projects, deployment applications, and pipelines. Choose Go to
resource or press the / key, and then type the name of the
resource. Any matches appear in the list. Searches are case insensitive. You only see
resources that you have permissions to view. For more information, see Viewing resources in the console.
Prerequisites
Before you begin, you must complete the prerequisites and setup procedure, including:
-
Assigning permissions to the IAM user.
-
Setting up credential management for HTTPS or SSH connections on the local machine you use for this tutorial.
-
Configuring the AWS CLI if you want to use the command line or terminal for all operations, including to create the repository.
Topics
Step 1: Create a CodeCommit repository
You can use the CodeCommit console to create a CodeCommit repository. If you already have a repository you want to use for this tutorial, you can skip this step.
Note
Depending on your usage, you might be charged for creating or accessing a repository. For more information, see
Pricing
To create the CodeCommit repository
Open the CodeCommit console at https://console.aws.amazon.com/codesuite/codecommit/home
. -
Use the region selector to choose the AWS Region where you want to create the repository. For more information, see Regions and Git connection endpoints.
-
On the Repositories page, choose Create repository.
-
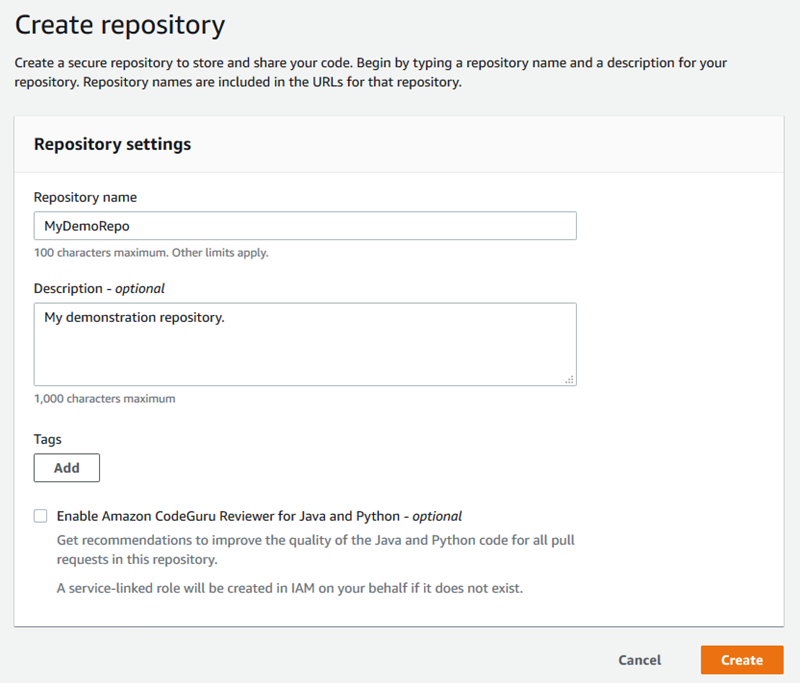
On the Create repository page, in Repository name, enter a name for your repository (for example,
MyDemoRepo).Note
Repository names are case sensitive and can be no longer than 100 characters. For more information, see Limits.
-
(Optional) In Description, enter a description (for example,
My demonstration repository). This can help you and other users identify the purpose of the repository. -
(Optional) Choose Add tag to add one or more repository tags (a custom attribute label that helps you organize and manage your AWS resources) to your repository. For more information, see Tagging repositories in AWS CodeCommit.
-
(Optional) Expand Additional configuration to specify whether to use the default AWS managed key or your own customer managed key for encrypting and decrypting the data in this repository. If you choose to use your own customer managed key, you must ensure that it is available in the AWS Region where you are creating the repository, and that the key is active. For more information, see AWS Key Management Service and encryption for AWS CodeCommit repositories.
(Optional) Select Enable Amazon CodeGuru Reviewer for Java and Python if this repository will contain Java or Python code, and you want to have CodeGuru Reviewer analyze that code. CodeGuru Reviewer uses multiple machine learning models to find code defects and to automatically suggest improvements and fixes in pull requests. For more information, see the Amazon CodeGuru Reviewer User Guide.
-
Choose Create.
Note
If you use a name other than MyDemoRepo for your
repository, be sure to use it in the remaining steps.
When the repository opens, you see information about how to add files directly from the CodeCommit console.
Step 2: Add files to your repository
You can add files to your repository by:
-
Creating a file in the CodeCommit console. If you create the first file for a repository in the console, a branch is created for you named main. This branch is the default branch for your repository.
-
Uploading a file from your local computer using the CodeCommit console. If you upload the first file for a repository from the console, a branch is created for you named main. This branch is the default branch for your repository.
-
Using a Git client to clone the repository to your local computer, and then adding, committing, and pushing files to the CodeCommit repository. A branch is created for you as part of that first commit from Git, and it is set as the default branch for your repository. The name of the branch is the default choice of your Git client. Consider configuring your Git client to use main as the name for the initial branch.
Note
You can create branches and change the default branch for a repository at any time. For more information, see Working with branches in AWS CodeCommit repositories.
The simplest way to get started is to open the CodeCommit console and add a file. By doing so, you also create a default branch for your repository named main. For instructions about how to add a file and create a first commit to a repository using the AWS CLI, see Create the first commit for a repository using the AWS CLI.
To add a file to the repository
-
In the navigation bar for the repository, choose Code.
-
Choose Add file, and then choose whether to create a file or upload a file from your computer. This tutorial shows you how to do both.
-
To add a file, do the following:
-
In the drop-down list of branches, choose the branch where you want to add the file. The default branch is selected automatically for you. In the example shown here, the default branch is named
main. If you want to add the file to a different branch, choose a different branch. -
In File name, enter a name for the file. In the code editor, enter the code for the file.
-
In Author name, enter the name you want displayed to other repository users.
-
In Email address, enter an email address.
-
(Optional) In Commit message, enter a brief message. Although this is optional, we recommend that you add a commit message to help your team members understand why you added this file. If you do not enter a commit message, a default message is used.
-
Choose Commit changes.
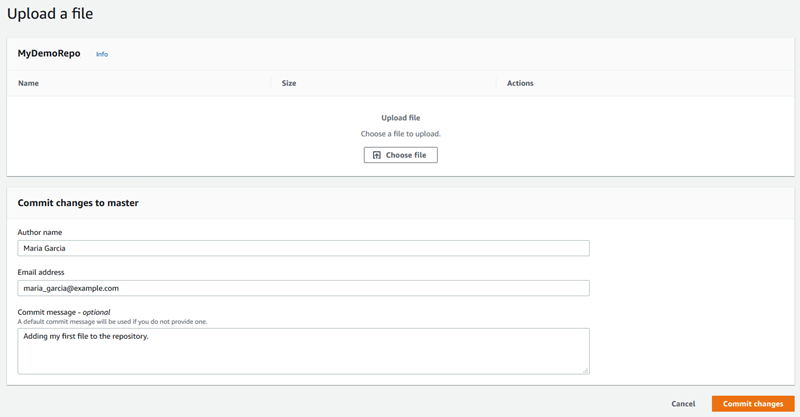
To upload a file, do the following:
-
If you're uploading a file, choose the file you want to upload.
-
In Author name, enter the name you want displayed to other repository users.
-
In Email address, enter an email address.
-
(Optional) In Commit message, enter a brief message. Although this is optional, we recommend that you add a commit message to help your team members understand why you added this file. If you do not enter a commit message, a default message is used.
-
Choose Commit changes.
-
For more information, see Working with files in AWS CodeCommit repositories.
To use a Git client to clone the repository, install Git on your local computer, and then clone the CodeCommit repository. Add some files to the local repo and push them to the CodeCommit repository. For an in-depth introduction, try the Getting started with Git and CodeCommit. If you are familiar with Git, but are not sure how to do this with a CodeCommit repository, you can view examples and instructions in Create a commit, Step 2: Create a local repo, or Connect to a repository.
After you have added some files to the CodeCommit repository, you can view them in the console.
Step 3: Browse the contents of your repository
You can use the CodeCommit console to review the files in a repository or quickly read the contents of a file. This helps you determine which branch to check out or whether to create a local copy of a repository.
To browse the repository
-
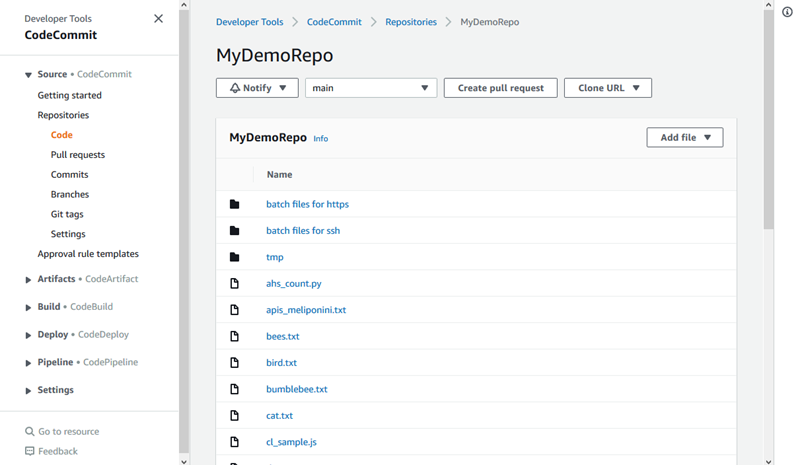
From Repositories, choose MyDemoRepo.
-
The page displays the contents in the default branch of your repository. To view another branch or to view the code at a specific tag, choose the branch or tag you want to view from the list. In the following screenshot, the view is set to the main branch.
-
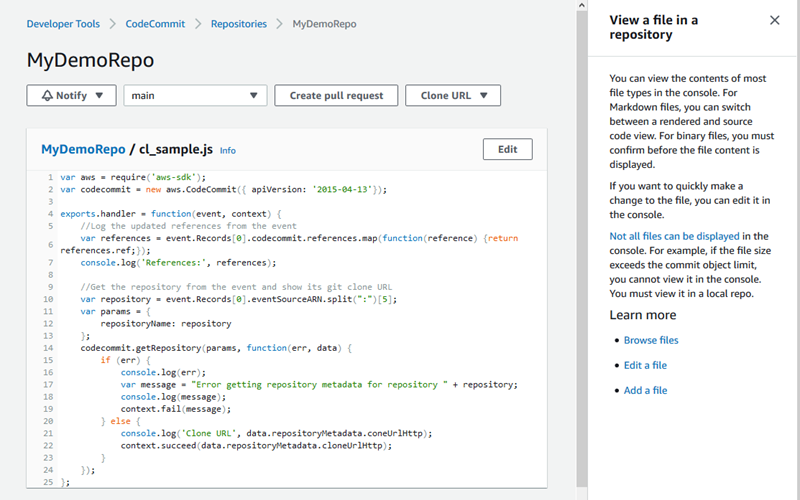
To view the contents of a file in your repository, choose the file from the list. To change the color of the displayed code, choose the settings icon.

For more information, see Browse files in a repository.
-
To browse the commit history of the repository, choose Commits. The console displays the commit history for the default branch, in reverse chronological order. Review the commit details by author, date, and more.

-
To view the commit history by branch or by Git tag, choose the branch or tag you want to view from the list.
-
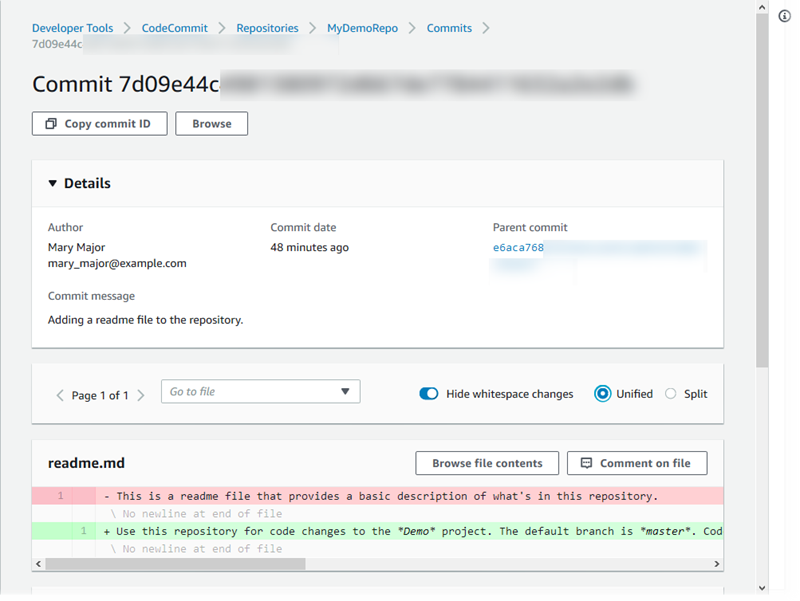
To view the differences between a commit and its parent commit, choose the abbreviated commit ID. You can choose how the changes are displayed, including showing or hiding white space changes, and whether to view changes inline (Unified view) or side by side (Split view).
Note
Your preferences for viewing code and other console settings are saved as browser cookies whenever you change them. For more information, see Working with user preferences.
-
To view all comments on a commit, choose the commit and then scroll through the changes to view them inline. You can also add your own comments and reply to the comments made by others.
For more information, see Comment on a commit.
-
To view the differences between any two commits specifiers, including tags, branches, and commit IDs, in the navigation pane, choose Commits, and then choose Compare commits.
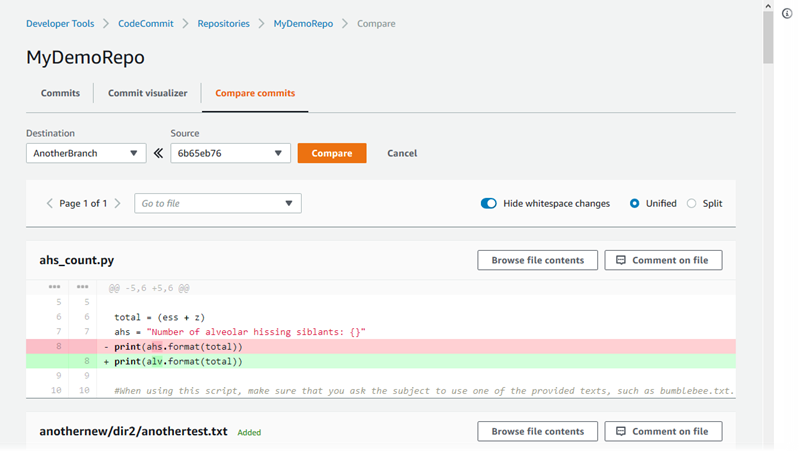
For more information, see Browse the commit history of a repository and Compare commits.
-
In Commits, choose the Commit visualizer tab.
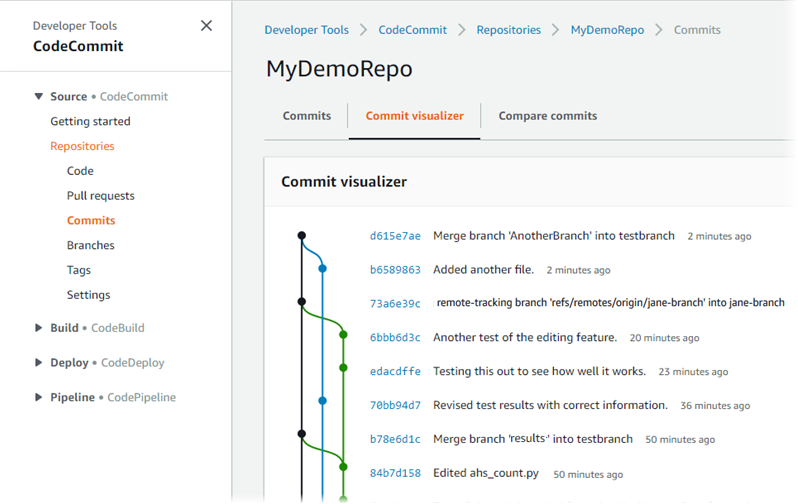
The commit graph is displayed, with the subject line for each commit shown next to its point in the graph. The subject line display is limited to 80 characters.
-
To see more details about a commit, choose its abbreviated commit ID. To render the graph from a specific commit, choose that point in the graph. For more information, see View a graph of the commit history of a repository .
Step 4: Create and collaborate on a pull request
When you work in a repository with other users, you can collaborate on code and review changes. You can create a pull request so that other users can review and comment on your code changes in a branch. You can also create one or more approval rules for the pull request. For example, you can create an approval rule that requires at least two other users to approve the pull request before it can be merged. After the pull request is approved, you can merge those changes into its destination branch. If you set up notifications for your repository, repository users can receive emails about repository events (for example, for pull requests or when someone comments on code). For more information, see Configuring notifications for events in an AWS CodeCommit repository.
Important
Before you can create a pull request, you must create a branch that contains the code changes you want to review. For more information, see Create a branch.
To create and collaborate on a pull request
-
In the navigation pane, choose Pull requests.
-
In Pull request, choose Create pull request.
Tip
You can also create pull requests from Branches and Code.
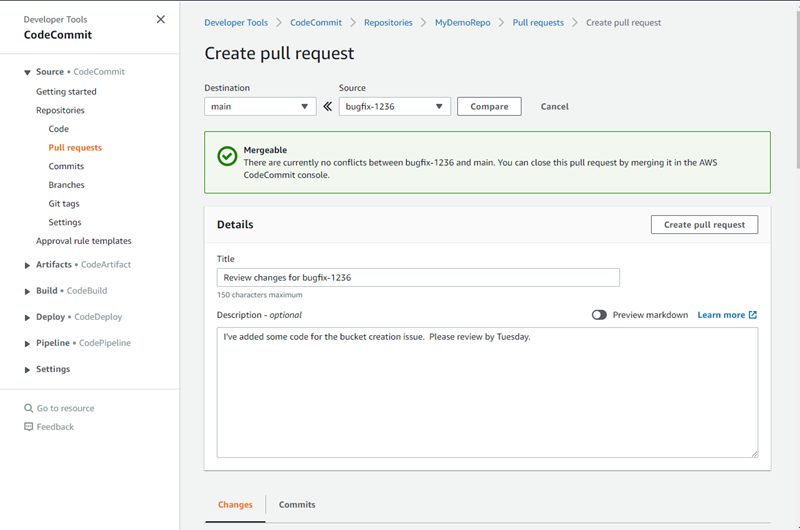
In Create pull request, in Source, choose the branch that contains the changes you want reviewed. In Destination, choose the branch where you want the reviewed code to be merged when the pull request is closed. Choose Compare.
-
Review the merge details and changes to confirm that the pull request contains the changes and commits you want reviewed. If so, in Title, enter a title for this review. This is the title that appears in the list of pull requests for the repository. In Description, enter details about what this review is about and any other useful information for reviewers. Choose Create.
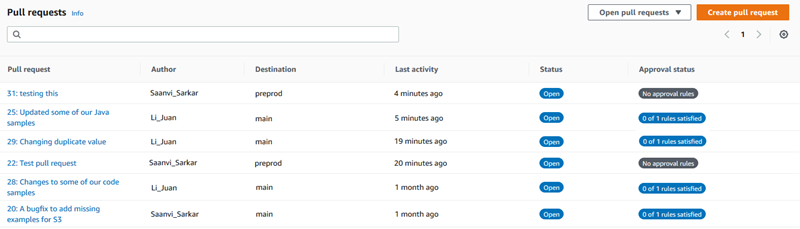
-
Your pull request appears in the list of pull requests for the repository. You can filter the view to show only open requests, closed requests, requests that you created, and more.
-
You can add an approval rule to your pull request to ensure that certain conditions are met before it can be merged. To add an approval rule to your pull request, choose the pull request from the list. On the Approvals tab, choose Create approval rule.
-
In Rule name, give the rule a descriptive name. For example, if you want to require two people to approve a pull request before it can be merged, you might name the rule
Require two approvals before
                        merge
. In Number of approvals needed, enter2, the number you want. The default is 1. Choose Submit. To learn more about approval rules and approval pool members, see Create an approval rule for a pull request.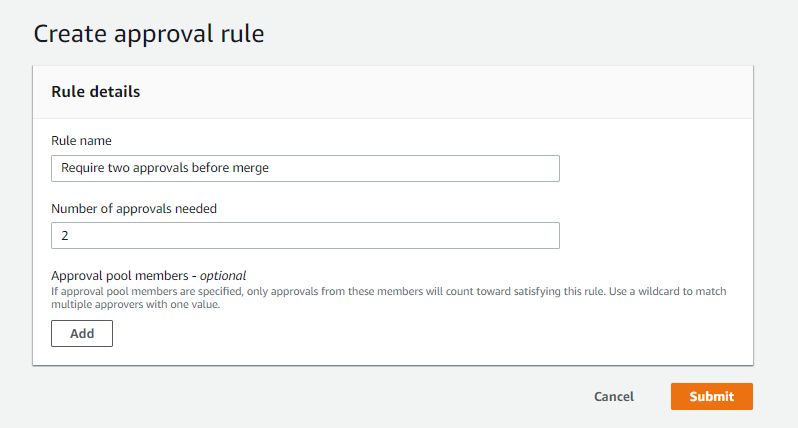
-
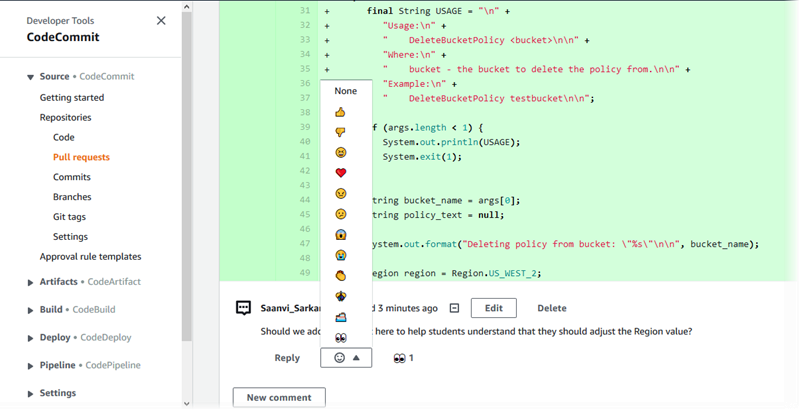
If you configured notifications for your repository and chose to notify users of pull request events, users receive email about your new pull request. Users can view the changes and comment on specific lines of code, files, and the pull request itself. They can also reply to comments with text and emojis. If necessary, you can push changes to the pull request branch, which updates the pull request.
-
If you are satisfied about the changes made in the request, choose Approve. You can choose to approve a pull request even if no approval rules are configured for that pull request. This provides a clear record of your having reviewed the pull request and your approval of the changes. You can also choose to revoke your approval if you change your mind.

Note
You cannot approve a pull request if you created it.
-
When you are satisfied that all the code changes have been reviewed and agreed to, from the pull request, do one of the following:
-
If you want to close the pull request without merging branches, choose Close pull request.
-
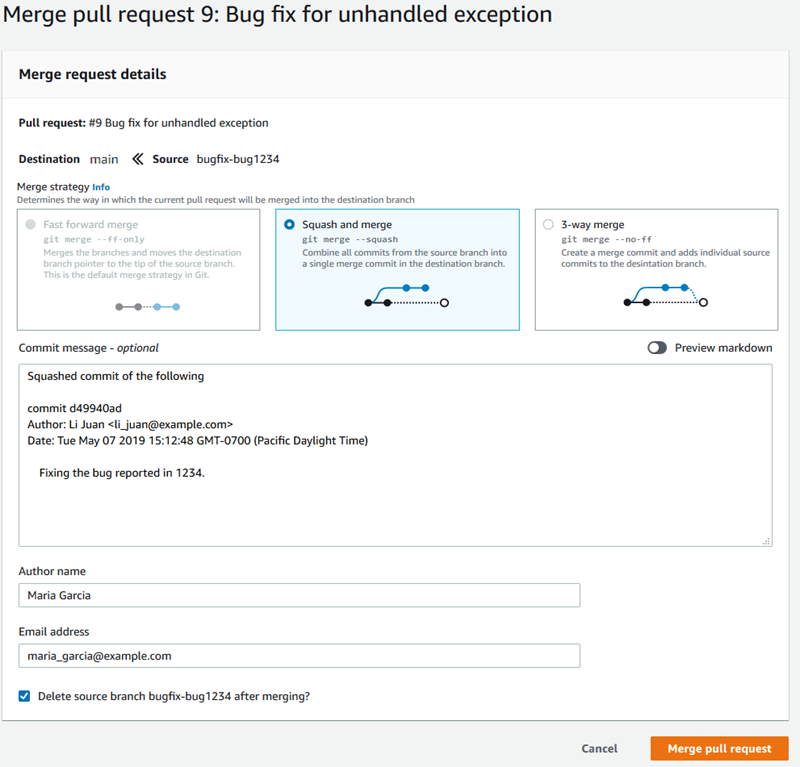
If you want to merge the branches and close the pull request, choose Merge. You can choose between the merge strategies available for your code, which depend on the differences between the source and destination branches, and whether to automatically delete the source branch after the merge is complete. After you have made your choices, choose Merge pull request to complete the merge.
-
If there are merge conflicts in the branches that cannot be resolved automatically, you can resolve them in the CodeCommit console, or you can use your local Git client to merge the branches and then push the merge. For more information, see Resolve conflicts in a pull request in an AWS CodeCommit repository.
Note
You can always manually merge branches, including pull request branches, by using the git merge command in your local repo and pushing your changes.
-
For more information, see Working with pull requests and Working with approval rule templates.
Step 5: Clean up
If you no longer need the CodeCommit repository, you should delete the CodeCommit repository and other resources you used in this exercise so you won't continue to be charged for the storage space.
Important
This action cannot be undone. After you delete this repository, you can no longer clone it to any local repo or shared repo. You also can no longer pull data from or push data to it, or perform any Git operations, from any local repo or shared repo.
If you configured notifications for your repository, deleting the repository also deletes the Amazon CloudWatch Events rule created for the repository. It does not delete the Amazon SNS topic used as a target for that rule.
If you configured triggers for your repository, deleting the repository does not delete the Amazon SNS topics or Lambda functions you configured as the targets of those triggers. Be sure to delete those resources if you don't need them. For more information, see Delete triggers from a repository.
To delete the CodeCommit repository
Open the CodeCommit console at https://console.aws.amazon.com/codesuite/codecommit/home
. -
In Repositories, choose the repository you want to delete. If you followed the naming convention in this topic, it is named MyDemoRepo.
-
In the navigation pane, choose Settings.
-
On the Settings page, in Delete repository, choose Delete repository.
-
Type
delete, and then choose Delete. The repository is permanently deleted.
Step 6: Next steps
Now that you have familiarized yourself with CodeCommit and some of its features, consider doing the following:
-
If you are new to Git and CodeCommit or want to review examples of using Git with CodeCommit, continue to the Getting started with Git and CodeCommit tutorial.
-
If you want to work with others in a CodeCommit repository, see Share a repository. (If you want to share your repository with users in another Amazon Web Services account, see Configure cross-account access to an AWS CodeCommit repository using roles.)
-
If you want to migrate a repository to CodeCommit, follow the steps in Migrate to CodeCommit.
-
If you want to add your repository to a continuous delivery pipeline, follow the steps in Simple Pipeline Walkthrough.
-
If you want to learn more about products and services that integrate with CodeCommit, including examples from the community, see Product and service integrations.
