End of support notice: On October 7th, 2026, AWS will discontinue support for AWS IoT Greengrass Version 1. After October 7th, 2026, you will no longer be able to access the AWS IoT Greengrass V1 resources. For more information, please visit Migrate from AWS IoT Greengrass Version 1.
How to configure optimized machine learning inference using the AWS Management Console
To follow the steps in this tutorial, you must be using AWS IoT Greengrass Core v1.10 or later.
You can use the SageMaker AI Neo deep learning compiler to optimize the prediction efficiency of native machine learning inference models in Tensorflow, Apache MXNet, PyTorch, ONNX, and XGBoost frameworks for a smaller footprint and faster performance. You can then download the optimized model and install the SageMaker AI Neo deep learning runtime and deploy them to your AWS IoT Greengrass devices for faster inference.
This tutorial describes how to use the AWS Management Console to configure a Greengrass group to run a Lambda inference example that recognizes images from a camera locally, without sending data to the cloud. The inference example accesses the camera module on a Raspberry Pi. In this tutorial, you download a prepackaged model that is trained by Resnet-50 and optimized in the Neo deep learning compiler. You then use the model to perform local image classification on your AWS IoT Greengrass device.
The tutorial contains the following high-level steps:
Prerequisites
To complete this tutorial, you need:
-
Raspberry Pi 4 Model B, or Raspberry Pi 3 Model B/B+, set up and configured for use with AWS IoT Greengrass. To set up your Raspberry Pi with AWS IoT Greengrass, run the Greengrass Device Setup script, or make sure that you have completed Module 1 and Module 2 of Getting started with AWS IoT Greengrass.
Note
The Raspberry Pi might require a 2.5A power supply
to run the deep learning frameworks that are typically used for image classification. A power supply with a lower rating might cause the device to reboot. -
Raspberry Pi Camera Module V2 - 8 megapixel, 1080p
. To learn how to set up the camera, see Connecting the camera in the Raspberry Pi documentation. -
A Greengrass group and a Greengrass core. To learn how to create a Greengrass group or core, see Getting started with AWS IoT Greengrass.
Note
This tutorial uses a Raspberry Pi, but AWS IoT Greengrass supports other platforms, such as Intel Atom and NVIDIA Jetson TX2. If using the Intel Atom example, you might need to install Python 3.6 instead of Python 3.7. For information about configuring your device so you can install the AWS IoT Greengrass Core software, see Setting up other devices.
For third party platforms that AWS IoT Greengrass does not support, you must run your Lambda function in non-containerized mode. To run in non-containerized mode, you must run your Lambda function as root. For more information, see Considerations when choosing Lambda function containerization and Setting the default access identity for Lambda functions in a group.
Step 1: Configure the Raspberry Pi
In this step, install updates to the Raspbian operating system, install the camera module software and Python dependencies, and enable the camera interface.
Run the following commands in your Raspberry Pi terminal.
-
Install updates to Raspbian.
sudo apt-get update sudo apt-get dist-upgrade -
Install the
picamerainterface for the camera module and other Python libraries that are required for this tutorial.sudo apt-get install -y python3-dev python3-setuptools python3-pip python3-picameraValidate the installation:
-
Make sure that your Python 3.7 installation includes pip.
python3 -m pipIf pip isn't installed, download it from the pip website
and then run the following command. python3 get-pip.py -
Make sure that your Python version is 3.7 or higher.
python3 --versionIf the output lists an earlier version, run the following command.
sudo apt-get install -y python3.7-dev -
Make sure that Setuptools and Picamera installed successfully.
sudo -u ggc_user bash -c 'python3 -c "import setuptools"'
sudo -u ggc_user bash -c 'python3 -c "import picamera"'
If the output doesn't contain errors, the validation is successful.
Note
If the Python executable installed on your device is
python3.7, usepython3.7instead ofpython3for the commands in this tutorial. Make sure that your pip installation maps to the correctpython3.7orpython3version to avoid dependency errors. -
-
Reboot the Raspberry Pi.
sudo reboot -
Open the Raspberry Pi configuration tool.
sudo raspi-config -
Use the arrow keys to open Interfacing Options and enable the camera interface. If prompted, allow the device to reboot.
-
Use the following command to test the camera setup.
raspistill -v -o test.jpgThis opens a preview window on the Raspberry Pi, saves a picture named
test.jpgto your current directory, and displays information about the camera in the Raspberry Pi terminal.
Step 2: Install the Amazon SageMaker Neo deep learning runtime
In this step, install the Neo deep learning runtime (DLR) on your Raspberry Pi.
Note
We recommend installing version 1.1.0 for this tutorial.
-
Sign in to your Raspberry Pi remotely.
ssh pi@your-device-ip-address -
Open the DLR documentation, open Installing DLR
, and locate the wheel URL for Raspberry Pi devices. Then, follow the instructions to install the DLR on your device. For example, you can use pip: pip3 installrasp3b-wheel-url -
After you install the DLR, validate the following configuration:
-
Make sure the
ggc_usersystem account can use the DLR library.sudo -u ggc_user bash -c 'python3 -c "import dlr"' -
Make sure NumPy is installed.
sudo -u ggc_user bash -c 'python3 -c "import numpy"'
-
Step 3: Create an inference Lambda function
In this step, create a Lambda function deployment package and Lambda function. Then, publish a function version and create an alias.
-
On your computer, download the DLR sample for Raspberry Pi from Machine learning samples.
-
Unzip the downloaded
dlr-py3-armv7l.tar.gzfile.cdpath-to-downloaded-sampletar -xvzf dlr-py3-armv7l.tar.gzThe
examplesdirectory in the extracted sample package contains function code and dependencies.-
inference.pyis the inference code used in this tutorial. You can use this code as a template to create your own inference function. -
greengrasssdkis version 1.5.0 of the AWS IoT Greengrass Core SDK for Python.Note
If a new version is available, you can download it and upgrade the SDK version in your deployment package. For more information, see AWS IoT Greengrass Core SDK for Python
on GitHub.
-
-
Compress the contents of the
examplesdirectory into a file namedoptimizedImageClassification.zip. This is your deployment package.cdpath-to-downloaded-sample/dlr-py3-armv7l/examples zip -r optimizedImageClassification.zip .The deployment package contains your function code and dependencies. This includes the code that invokes the Neo deep learning runtime Python APIs to perform inference with the Neo deep learning compiler models.
Note
Make sure the
.pyfiles and dependencies are in the root of the directory. -
Now, add the Lambda function to your Greengrass group.
From the Lambda console page, choose Functions and choose Create function.
-
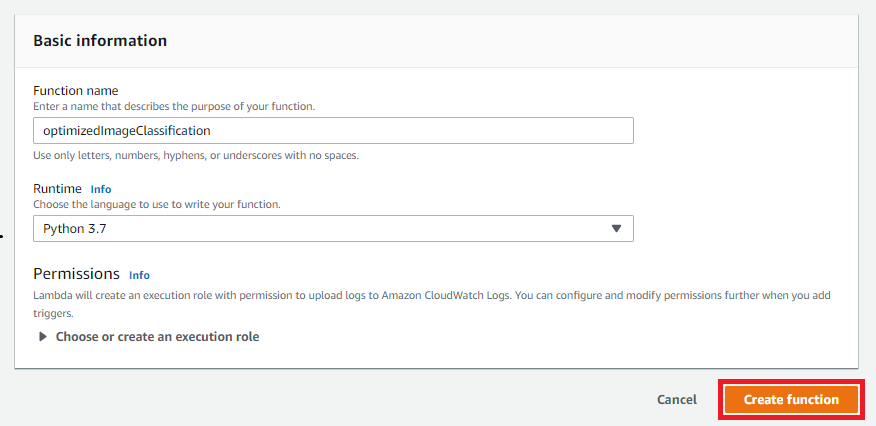
Choose Author from scratch and use the following values to create your function:
-
For Function name, enter
optimizedImageClassification. -
For Runtime, choose Python 3.7.
For Permissions, keep the default setting. This creates an execution role that grants basic Lambda permissions. This role isn't used by AWS IoT Greengrass.
-
-
Choose Create function.
Now, upload your Lambda function deployment package and register the handler.
-
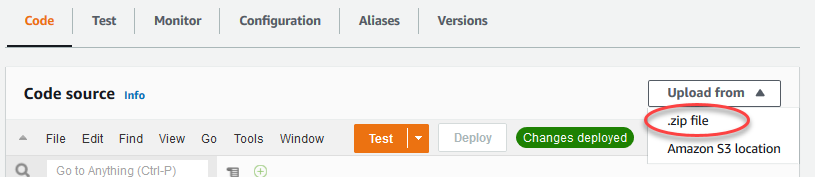
On the Code tab, under Code source, choose Upload from. From the dropdown, choose .zip file.
-
Choose your
optimizedImageClassification.zipdeployment package, and then choose Save. -
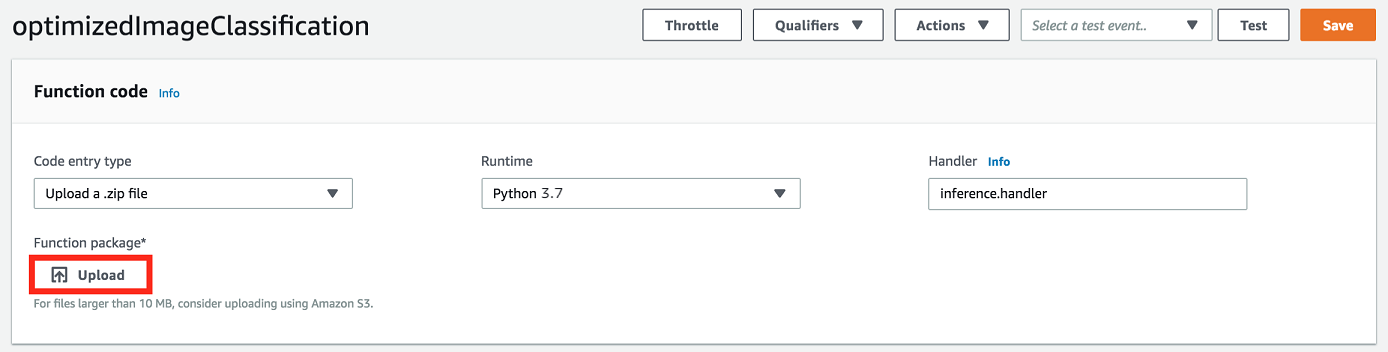
On the Code tab for the function, under Runtime settings, choose Edit, and then enter the following values.
-
For Runtime, choose Python 3.7.
-
For Handler, enter
inference.handler.
Choose Save.
-
Next, publish the first version of your Lambda function. Then, create an alias for the version.
Note
Greengrass groups can reference a Lambda function by alias (recommended) or by version. Using an alias makes it easier to manage code updates because you don't have to change your subscription table or group definition when the function code is updated. Instead, you just point the alias to the new function version.
-
From the Actions menu, choose Publish new version.

-
For Version description, enter
First
            version
, and then choose Publish. -
On the optimizedImageClassification: 1 configuration page, from the Actions menu, choose Create alias.

-
On the Create a new alias page, use the following values:
-
For Name, enter
mlTestOpt. -
For Version, enter
1.
Note
AWS IoT Greengrass doesn't support Lambda aliases for $LATEST versions.
-
-
Choose Create.
Now, add the Lambda function to your Greengrass group.
Step 4: Add the Lambda function to the Greengrass group
In this step, add the Lambda function to the group, and then configure its lifecycle.
First, add the Lambda function to your Greengrass group.
In the AWS IoT console navigation pane, under Manage, expand Greengrass devices, and then choose Groups (V1).
-
On the groups configuration page, choose the Lambda functions tab, and choose Add.
-
Choose the Lambda function and select optimizedImageClassification.
-
On the Lambda function version, choose the alias to the version that you published.
Next, configure the lifecycle of the Lambda function.
-
In the Lambda function configuration section, make the following updates.
Note
We recommend that you run your Lambda function without containerization unless your business case requires it. This helps enable access to your device GPU and camera without configuring device resources. If you run without containerization, you must also grant root access to your AWS IoT Greengrass Lambda functions.
-
To run without containerization:
-
For System user and group, choose
Another user ID/group
                    ID
. For System user ID, enter0. For System group ID, enter0.This allows your Lambda function to run as root. For more information about running as root, see Setting the default access identity for Lambda functions in a group.
Tip
You also must update your
config.jsonfile to grant root access to your Lambda function. For the procedure, see Running a Lambda function as root. -
For Lambda function containerization, choose No container.
For more information about running without containerization, see Considerations when choosing Lambda function containerization.
-
For Timeout, enter
10
                  seconds
. -
For Pinned, choose True.
For more information, see Lifecycle configuration for Greengrass Lambda functions.
-
Under Additional Parameter, for Read access to /sys directory, choose Enabled.
-
-
To run in containerized mode instead:
Note
We do not recommend running in containerized mode unless your business case requires it.
-
For System user and group, choose Use group default.
-
For Lambda function containerization, choose Use group default.
-
For Memory limit, enter
1024
                  MB
. -
For Timeout, enter
10
                  seconds
. -
For Pinned, choose True.
For more information, see Lifecycle configuration for Greengrass Lambda functions.
-
Under Additional Parameters, for Read access to /sys directory, choose Enabled.
-
-
-
Choose Add Lambda function.
Step 5: Add a SageMaker AI Neo-optimized model resource to the Greengrass group
In this step, create a resource for the optimized ML inference model and upload it to an Amazon S3 bucket. Then, locate the Amazon S3 uploaded model in the AWS IoT Greengrass console and affiliate the newly created resource with the Lambda function. This makes it possible for the function to access its resources on the core device.
-
On your computer, navigate to the
resnet50directory in the sample package that you unzipped in Step 3: Create an inference Lambda function.Note
If using the NVIDIA Jetson example, you need to use the
resnet18directory in the sample package instead. For more information, see Configuring an NVIDIA Jetson TX2.cdpath-to-downloaded-sample/dlr-py3-armv7l/models/resnet50This directory contains precompiled model artifacts for an image classification model trained with Resnet-50.
-
Compress the files inside the
resnet50directory into a file namedresnet50.zip.zip -r resnet50.zip . -
On the group configuration page for your AWS IoT Greengrass group, choose the Resources tab. Navigate to the Machine Learning section and choose Add machine learning resource. On the Create a machine learning resource page, for Resource name, enter
resnet50_model. -
For Model source, choose Use a model stored in S3, such as a model optimized through Deep Learning Compiler.
-
Under S3 URI, choose Browse S3.
Note
Currently, optimized SageMaker AI models are stored automatically in Amazon S3. You can find your optimized model in your Amazon S3 bucket using this option. For more information about model optimization in SageMaker AI, see the SageMaker AI Neo documentation.
-
Choose Upload a model.
-
On the Amazon S3 console tab, upload your zip file to an Amazon S3 bucket. For information, see How do I upload files and folders to an S3 bucket? in the Amazon Simple Storage Service User Guide.
Note
Your bucket name must contain the string
greengrass. Choose a unique name (such asgreengrass-dlr-bucket-). Don't use a period (user-id-epoch-time.) in the bucket name. -
In the AWS IoT Greengrass console tab, locate and choose your Amazon S3 bucket. Locate your uploaded
resnet50.zipfile, and choose Select. You might need to refresh the page to update the list of available buckets and files. -
In Destination path, enter
/ml_model.
This is the destination for the local model in the Lambda runtime namespace. When you deploy the group, AWS IoT Greengrass retrieves the source model package and then extracts the contents to the specified directory.
Note
We strongly recommend that you use the exact path provided for your local path. Using a different local model destination path in this step causes some troubleshooting commands provided in this tutorial to be inaccurate. If you use a different path, you must set up a
MODEL_PATHenvironment variable that uses the exact path you provide here. For information about environment variables, see AWS Lambda environment variables. -
If running in containerized mode:
-
Under System group owner and file access permissions, choose Specify system group and permissions.
-
Choose Read-only access and then choose Add resource.
-
Step 6: Add your camera device resource to the Greengrass group
In this step, create a resource for the camera module and affiliate it with the Lambda function. This makes it possible for the Lambda function to access the resource on the core device.
Note
If you run in non-containerized mode, AWS IoT Greengrass can access your device GPU and camera without configuring this device resource.
-
On the group configuration page, choose the the Resources tab.
-
On the the Local resources tab, choose Add local resource.
-
On the Add a local resource page, use the following values:
-
For Resource name, enter
videoCoreSharedMemory. -
For Resource type, choose Device.
-
For Local device path, enter
/dev/vcsm.The device path is the local absolute path of the device resource. This path can refer only to a character device or block device under
/dev. -
For System group owner and file access permissions, choose Automatically add file system permissions of the system group that owns the resource.
The Group owner file access permission option lets you grant additional file access permissions to the Lambda process. For more information, see Group owner file access permission.
-
-
At the bottom of the page, choose Add resource.
-
From the Resources tab, create another local resource by choosing Add and use the following values:
-
For Resource name, enter
videoCoreInterface. -
For Resource type, choose Device.
-
For Local device path, enter
/dev/vchiq. -
For System group owner and file access permissions, choose Automatically add file system permissions of the system group that owns the resource.
-
-
Choose Add resource.
Step 7: Add subscriptions to the Greengrass group
In this step, add subscriptions to the group. These subscriptions enable the Lambda function to send prediction results to AWS IoT by publishing to an MQTT topic.
-
On the group configuration page, choose the Subscriptions tab, and then choose Add subscription.
-
On the Create a subscription page, configure the source and target, as follows:
-
In Source type, choose Lambda function, and then choose optimizedImageClassification.
-
In Target type, choose Service, and then choose IoT Cloud.
-
In the Topic filter, enter
/resnet-50/predictions, and then choose Create subscription.
-
-
Add a second subscription. Choose the Subscriptions tab, choose Add subscription, and configure the source and target, as follows:
-
In Source type, choose Services, and then choose IoT Cloud.
-
In Target type, choose Lambda function, and then choose optimizedImageClassification.
-
In the Topic filter, enter
/resnet-50/test, and then choose Create subscription.
-
Step 8: Deploy the Greengrass group
In this step, deploy the current version of the group definition to the Greengrass core device. The definition contains the Lambda function, resources, and subscription configurations that you added.
-
Make sure that the AWS IoT Greengrass core is running. Run the following commands in your Raspberry Pi terminal, as needed.
-
To check whether the daemon is running:
ps aux | grep -E 'greengrass.*daemon'If the output contains a
rootentry for/greengrass/ggc/packages/, then the daemon is running.latest-core-version/bin/daemon To start the daemon:
cd /greengrass/ggc/core/
sudo ./greengrassd start
-
-
On the group configuration page, choose Deploy.
-
On the Lambda functions tab, select IP detector and choose Edit.
-
From the Edit IP detector settings dialog box, select Automatically detect and override MQTT broker endpoints and choose Save.
This enables devices to automatically acquire connectivity information for the core, such as IP address, DNS, and port number. Automatic detection is recommended, but AWS IoT Greengrass also supports manually specified endpoints. You're only prompted for the discovery method the first time that the group is deployed.
Note
If prompted, grant permission to create the Greengrass service role and associate it with your AWS account in the current AWS Region. This role allows AWS IoT Greengrass to access your resources in AWS services.
The Deployments page shows the deployment timestamp, version ID, and status. When completed, the status displayed for the deployment should be Completed.
For more information about deployments, see Deploy AWS IoT Greengrass groups to an AWS IoT Greengrass core. For troubleshooting help, see Troubleshooting AWS IoT Greengrass.
Test the inference example
Now you can verify whether the deployment is configured correctly. To test, you subscribe
to the /resnet-50/predictions topic and publish any message to the
/resnet-50/test topic. This triggers the Lambda function to take a photo with
your Raspberry Pi and perform inference on the image it captures.
Note
If using the NVIDIA Jetson example, make sure to use the
resnet-18/predictions and resnet-18/test topics instead.
Note
If a monitor is attached to the Raspberry Pi, the live camera feed is displayed in a preview window.
-
On the AWS IoT console home page, under Test, choose MQTT test client.
-
For Subscriptions, choose Subscribe to a Topic. Use the following values. Leave the remaining options at their defaults.
-
For Subscription topic, enter
/resnet-50/predictions. -
Under Additional configuration, for MQTT payload display, choose Display payloads as strings.
-
-
Choose Subscribe.
-
Choose Publish to a topic, enter
/resnet-50/testas the Topic name, and choose Publish. -
If the test is successful, the published message causes the Raspberry Pi camera to capture an image. A message from the Lambda function appears at the bottom of the page. This message contains the prediction result of the image, using the format: predicted class name, probability, and peak memory usage.
Configuring an Intel Atom
To run this tutorial on an Intel Atom device, you must provide source images, configure the Lambda function, and add another local device resource. To use the GPU for inference, make sure the following software is installed on your device:
-
OpenCL version 1.0 or later
-
Python 3.7 and pip
-
Download static PNG or JPG images for the Lambda function to use for image classification. The example works best with small image files.
Save your image files in the directory that contains the
inference.pyfile (or in a subdirectory of this directory). This is in the Lambda function deployment package that you upload in Step 3: Create an inference Lambda function.Note
If you're using AWS DeepLens, you can use the onboard camera or mount your own camera to perform inference on captured images instead of static images. However, we strongly recommend you start with static images first.
If you use a camera, make sure that the
awscamAPT package is installed and up to date. For more information, see Update your AWS DeepLens device in the AWS DeepLens Developer Guide. -
Edit the configuration of the Lambda function. Follow the procedure in Step 4: Add the Lambda function to the Greengrass group.
Note
We recommend that you run your Lambda function without containerization unless your business case requires it. This helps enable access to your device GPU and camera without configuring device resources. If you run without containerization, you must also grant root access to your AWS IoT Greengrass Lambda functions.
-
To run without containerization:
-
For System user and group, choose
Another user ID/group
                    ID
. For System user ID, enter0. For System group ID, enter0.This allows your Lambda function to run as root. For more information about running as root, see Setting the default access identity for Lambda functions in a group.
Tip
You also must update your
config.jsonfile to grant root access to your Lambda function. For the procedure, see Running a Lambda function as root. -
For Lambda function containerization, choose No container.
For more information about running without containerization, see Considerations when choosing Lambda function containerization.
-
Increase the Timeout value to 2 minutes. This ensures that the request does not time out too early. It takes a few minutes after setup to run inference.
-
For Pinned, choose True.
-
Under Additional Parameters, for Read access to /sys directory, choose Enabled.
-
-
To run in containerized mode instead:
Note
We do not recommend running in containerized mode unless your business case requires it.
-
Increase the Memory limit value to 3000 MB.
-
Increase the Timeout value to 2 minutes. This ensures that the request does not time out too early. It takes a few minutes after setup to run inference.
-
For Pinned, choose True.
-
Under Additional Parameters, for Read access to /sys directory, choose Enabled.
-
-
-
Add your Neo-optimized model resource to the group. Upload the model resources in the
resnet50directory of the sample package you unzipped in Step 3: Create an inference Lambda function. This directory contains precompiled model artifacts for an image classification model trained with Resnet-50. Follow the procedure in Step 5: Add a SageMaker AI Neo-optimized model resource to the Greengrass group with the following updates.-
Compress the files inside the
resnet50directory into a file namedresnet50.zip. -
On the Create a machine learning resource page, for Resource name, enter
resnet50_model. -
Upload the
resnet50.zipfile.
-
-
If running in containerized mode, add the required local device resource to grant access to your device GPU.
Note
If you run in non-containerized mode, AWS IoT Greengrass can access your device GPU without configuring device resources.
-
On the group configuration page, choose the Resources tab.
-
In the Local resources section, choose Add local resource.
-
Define the resource:
-
For Resource name, enter
renderD128. -
For Resource type, choose Device.
-
For Local device path, enter
/dev/dri/renderD128. -
For System group owner and file access permissions, choose Automatically add file system permissions of the system group that owns the resource.
-
-
Configuring an NVIDIA Jetson TX2
To run this tutorial on an NVIDIA Jetson TX2, provide source images, configure the Lambda function, and add more local device resources.
-
Make sure your Jetson device is configured so you can install the AWS IoT Greengrass Core software and use the GPU for inference. For more information about configuring your device, see Setting up other devices. To use the GPU for inference on an NVIDIA Jetson TX2, you must install CUDA 10.0 and cuDNN 7.0 on your device when you image your board with Jetpack 4.3.
-
Download static PNG or JPG images for the Lambda function to use for image classification. The example works best with small image files.
Save your image files in the directory that contains the
inference.pyfile. You can also save them in a subdirectory of this directory. This directory is in the Lambda function deployment package that you upload in Step 3: Create an inference Lambda function.Note
You can instead choose to instrument a camera on the Jetson board to capture the source images. However, we strongly recommend you start with static images first.
-
Edit the configuration of the Lambda function. Follow the procedure in Step 4: Add the Lambda function to the Greengrass group.
Note
We recommend that you run your Lambda function without containerization unless your business case requires it. This helps enable access to your device GPU and camera without configuring device resources. If you run without containerization, you must also grant root access to your AWS IoT Greengrass Lambda functions.
-
To run without containerization:
-
For Run as, choose
Another user ID/group
                    ID
. For UID, enter0. For GUID, enter0.This allows your Lambda function to run as root. For more information about running as root, see Setting the default access identity for Lambda functions in a group.
Tip
You also must update your
config.jsonfile to grant root access to your Lambda function. For the procedure, see Running a Lambda function as root. -
For Lambda function containerization, choose No container.
For more information about running without containerization, see Considerations when choosing Lambda function containerization.
-
Increase the Timeout value to 5 minutes. This ensures that the request does not time out too early. It takes a few minutes after setup to run inference.
-
For Pinned, choose True.
-
Under Additional Parameters, for Read access to /sys directory, choose Enabled.
-
-
To run in containerized mode instead:
Note
We do not recommend running in containerized mode unless your business case requires it.
-
Increase the Memory limit value. To use the provided model in GPU mode, use at least 2000 MB.
-
Increase the Timeout value to 5 minutes. This ensures that the request does not time out too early. It takes a few minutes after setup to run inference.
-
For Pinned, choose True.
-
Under Additional Parameters, for Read access to /sys directory, choose Enabled.
-
-
-
Add your Neo-optimized model resource to the group. Upload the model resources in the
resnet18directory of the sample package you unzipped in Step 3: Create an inference Lambda function. This directory contains precompiled model artifacts for an image classification model trained with Resnet-18. Follow the procedure in Step 5: Add a SageMaker AI Neo-optimized model resource to the Greengrass group with the following updates.-
Compress the files inside the
resnet18directory into a file namedresnet18.zip. -
On the Create a machine learning resource page, for Resource name, enter
resnet18_model. -
Upload the
resnet18.zipfile.
-
-
If running in containerized mode, add the required local device resources to grant access to your device GPU.
Note
If you run in non-containerized mode, AWS IoT Greengrass can access your device GPU without configuring device resources.
-
On the group configuration page, choose the Resources tab.
-
In the Local resources section, choose Add local resource.
-
Define each resource:
-
For Resource name and Device path, use the values in the following table. Create one device resource for each row in the table.
-
For Resource type, choose Device.
-
For System group owner and file access permissions, choose Automatically add file system permissions of the system group that owns the resource.
Name
Device path
nvhost-ctrl
/dev/nvhost-ctrl
nvhost-gpu
/dev/nvhost-gpu
nvhost-ctrl-gpu
/dev/nvhost-ctrl-gpu
nvhost-dbg-gpu
/dev/nvhost-dbg-gpu
nvhost-prof-gpu
/dev/nvhost-prof-gpu
nvmap
/dev/nvmap
nvhost-vic
/dev/nvhost-vic
tegra_dc_ctrl
/dev/tegra_dc_ctrl
-
-
-
If running in containerized mode, add the following local volume resource to grant access to your device camera. Follow the procedure in Step 5: Add a SageMaker AI Neo-optimized model resource to the Greengrass group.
Note
If you run in non-containerized mode, AWS IoT Greengrass can access your device camera without configuring device resources.
-
For Resource type, choose Volume.
-
For System group owner and file access permissions, choose Automatically add file system permissions of the system group that owns the resource.
Name
Source path
Destination path
shm
/dev/shm
/dev/shm
tmp
/tmp
/tmp
-
-
Update your group subscriptions to use the correct directory. Follow the procedure in Step 7: Add subscriptions to the Greengrass group with the following updates.
-
For your first topic filter, enter
/resnet-18/predictions. -
For your second topic filter, enter
/resnet-18/test.
-
-
Update your test subscriptions to use the correct directory. Follow the procedure in Test the inference example with the following updates.
-
For Subscriptions, choose Subscribe to a topic. For Subscription topic, enter
/resnet-18/predictions. -
On the
/resnet-18/predictionspage, specify the/resnet-18/testtopic to publish to.
-
Troubleshooting AWS IoT Greengrass ML inference
If the test is not successful, you can try the following troubleshooting steps. Run the commands in your Raspberry Pi terminal.
Check error logs
-
Switch to the root user and navigate to the
logdirectory. Access to AWS IoT Greengrass logs requires root permissions.sudo su cd /greengrass/ggc/var/log -
Check
runtime.logfor any errors.cat system/runtime.log | grep 'ERROR'You can also look in your user-defined Lambda function log for any errors:
cat user/your-region/your-account-id/lambda-function-name.log | grep 'ERROR'For more information, see Troubleshooting with logs.
Verify the Lambda function is successfully deployed
-
List the contents of the deployed Lambda in the
/lambdadirectory. Replace the placeholder values before you run the command.cd /greengrass/ggc/deployment/lambda/arn:aws:lambda:region:account:function:function-name:function-versionls -la -
Verify that the directory contains the same content as the
optimizedImageClassification.zipdeployment package that you uploaded in Step 3: Create an inference Lambda function.Make sure that the
.pyfiles and dependencies are in the root of the directory.
Verify the inference model is successfully deployed
-
Find the process identification number (PID) of the Lambda runtime process:
ps aux | greplambda-function-nameIn the output, the PID appears in the second column of the line for the Lambda runtime process.
-
Enter the Lambda runtime namespace. Be sure to replace the placeholder
pidvalue before you run the command.Note
This directory and its contents are in the Lambda runtime namespace, so they aren't visible in a regular Linux namespace.
sudo nsenter -tpid-m /bin/bash -
List the contents of the local directory that you specified for the ML resource.
Note
If your ML resource path is something other than
ml_model, you must substitute that here.cd /ml_model ls -lsYou should see the following files:
    56 -rw-r--r-- 1 ggc_user ggc_group     56703 Oct 29 20:07 model.json
196152 -rw-r--r-- 1 ggc_user ggc_group 200855043 Oct 29 20:08 model.params
   256 -rw-r--r-- 1 ggc_user ggc_group    261848 Oct 29 20:07 model.so
    32 -rw-r--r-- 1 ggc_user ggc_group     30564 Oct 29 20:08 synset.txt
Lambda function cannot find
/dev/dri/renderD128
This can occur if OpenCL cannot connect to the GPU devices it needs. You must create device resources for the necessary devices for your Lambda function.
Next steps
Next, explore other optimized models. For information, see the SageMaker AI Neo documentation.
