Getting Started with Amazon Kinesis Agent for Microsoft Windows
You can use Amazon Kinesis Agent for Microsoft Windows (Kinesis Agent for Windows) to collect, parse, transform, and stream logs, events, and metrics from your Windows fleet to various AWS services. The following information contains prerequisites and step-by-step instructions for installing and configuring Kinesis Agent for Windows.
Topics
Prerequisites
Before installing Kinesis Agent for Windows, ensure that you have the following prerequisites:
-
Familiarity with Kinesis Agent for Windows concepts. For more information, see Amazon Kinesis Agent for Microsoft Windows Concepts.
-
An AWS account for using the various AWS services related to your data pipeline. For information about creating and configuring an AWS account, see Setting Up an AWS account.
-
Microsoft .NET Framework 4.6 or later on each desktop or server that will run Kinesis Agent for Windows. For more information, see Install the .NET Framework for developers
in the Microsoft .NET documentation. To determine the latest version of the .NET Framework that is installed on a desktop or server, use the following PowerShell script:
[System.Version]( (Get-ChildItem 'HKLM:\SOFTWARE\Microsoft\NET Framework Setup\NDP' -recurse ` | Get-ItemProperty -Name Version -ErrorAction SilentlyContinue ` | Where-Object { ($_.PSChildName -match 'Full') } ` | Select-Object Version | Sort-Object -Property Version -Descending)[0]).Version -
The streams where you want to send data from Kinesis Agent for Windows (if using Amazon Kinesis Data Streams). Create the streams using the Kinesis Data Streams console
, the AWS CLI, or AWS Tools for Windows PowerShell. For more information, see Creating and Updating Data Streams in the Amazon Kinesis Data Streams Developer Guide. -
The Firehose delivery streams where you want to send data from Kinesis Agent for Windows (if using Amazon Data Firehose). Create delivery streams using the Firehose console
, the AWS CLI, or AWS Tools for Windows PowerShell. For more information, see Creating an Amazon Data Firehose Delivery Stream in the Amazon Data Firehose Developer Guide.
Setting Up an AWS account
If you do not have an AWS account, complete the following steps to create one.
To sign up for an AWS account
Follow the online instructions.
Part of the sign-up procedure involves receiving a phone call or text message and entering a verification code on the phone keypad.
When you sign up for an AWS account, an AWS account root user is created. The root user has access to all AWS services and resources in the account. As a security best practice, assign administrative access to a user, and use only the root user to perform tasks that require root user access.
To create an administrator user, choose one of the following options.
| Choose one way to manage your administrator | To | By | You can also |
|---|---|---|---|
| In IAM Identity Center (Recommended) |
Use short-term credentials to access AWS. This aligns with the security best practices. For information about best practices, see Security best practices in IAM in the IAM User Guide. |
Following the instructions in Getting started in the AWS IAM Identity Center User Guide. | Configure programmatic access by Configuring the AWS CLI to use AWS IAM Identity Center in the AWS Command Line Interface User Guide. |
| In IAM (Not recommended) |
Use long-term credentials to access AWS. | Following the instructions in Create an IAM user for emergency access in the IAM User Guide. | Configure programmatic access by Manage access keys for IAM users in the IAM User Guide. |
To sign up for AWS and create an administrator account
-
If you don't have an AWS account, open https://aws.amazon.com/
. Choose Create an AWS account, and then follow the online instructions. Part of the sign-up procedure involves receiving a phone call and entering a PIN using the phone keypad.
Sign in to the AWS Management Console and open the IAM console at https://console.aws.amazon.com/iam/
. -
In the navigation pane, choose Groups, and then choose Create New Group.
-
For Group Name, enter a name for your group, such as
Administrators, and then choose Next Step. -
In the list of policies, select the check box next to the AdministratorAccess policy. You can use the Filter menu and the Search box to filter the list of policies.
-
Choose Next Step. Choose Create Group, and your new group appears under Group Name.
-
In the navigation pane, choose Users, and then choose Create New Users.
-
In box 1, enter a user name, clear the check box next to Generate an access key for each user, and then choose Create.
-
In the list of users, choose the name (not the check box) of the user that you just created. You can use the Search box to search for the user name.
-
Choose the Groups tab, and then choose Add User to Groups.
-
Select the check box next to the administrators group, and then choose Add to Groups.
-
Choose the Security Credentials tab. Under Sign-In Credentials, choose Manage Password.
-
Select Assign a custom password, enter a password in the Password and Confirm Password boxes, and then choose Apply.
Installing Kinesis Agent for Windows
There are three ways that you can install Kinesis Agent for Windows on Windows:
Install using MSI (a Windows installer package).
-
Install from AWS Systems Manager, a set of services for administering servers and desktops.
-
Run a PowerShell script.
Note
The following instructions occasionally use the terms KinesisTap and AWSKinesisTap. These words mean
the same thing as Kinesis Agent for Windows, but you must specify them as-is when executing these
instructions.
Install Kinesis Agent for Windows using MSI
You can download the latest Kinesis Agent for Windows MSI package from the kinesis-agent-windows repository on GitHub
Alternatively, you can use the msiexecAWSKinesisTap.1.1.216.4.msi with the appropriate version of Kinesis Agent for Windows for your application.
To install Kinesis Agent for Windows silently:
msiexec /iAWSKinesisTap.1.1.216.4.msi/q
To log installation messages for troubleshooting in a file named logfile.log
msiexec /iAWSKinesisTap.1.1.216.4.msi/q /L*Vlogfile.log
To uninstall Kinesis Agent for Windows using the command prompt:
msiexec.exe /x {ADAB3982-68AA-4B45-AE09-7B9C03F3EBD3} /q
Install Kinesis Agent for Windows using AWS Systems Manager
Follow these steps to install Kinesis Agent for Windows using Systems Manager Run Command. For more information about Run
Command, see AWS Systems Manager Run
Command in the AWS Systems Manager User Guide. In addition to using Systems Manager Run Command, you can also use Systems Manager Maintenance Windows and State Manager to automate the deployment
of Kinesis Agent for Windows over time.
Note
Systems Manager installation for Kinesis Agent for Windows is available in the AWS Regions listed in AWS Systems Manager except the following:
cn-north-1
cn-northwest-1
All AWS GovCloud Regions.
To install Kinesis Agent for Windows using Systems Manager
-
Ensure that version 2.2.58.0 or later of the SSM Agent is installed on instances where you want to install Kinesis Agent for Windows. For more information, see Installing and configuring SSM Agent on Windows instances in the AWS Systems Manager User Guide.
Open the AWS Systems Manager console at https://console.aws.amazon.com/systems-manager/
. -
From the navigation pane, under Node Management, choose Run Command, and then choose Run Command.
-
From the Command document list, select the
AWS-ConfigureAWSPackagedocument.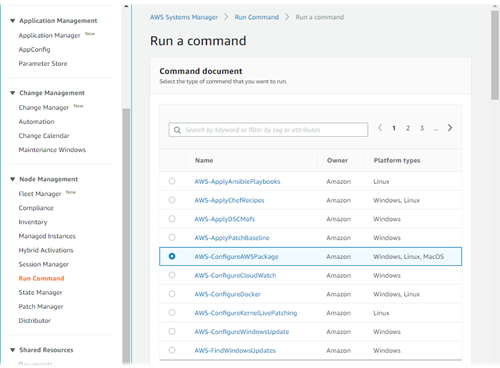
-
Under Command Parameters, for Name, enter
AWSKinesisTap. Leave other settings to their defaults.Note
Leave Version blank to specify the latest version of the
AWSKinesisTappackage. Optionally, you can enter a specific version to install.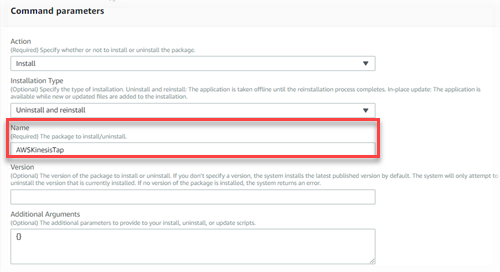
-
Under Targets, specify the instances on which to run the command. You can choose to specify instances based on tags associated with instances, you can choose instances manually, or you can specify a resource group that includes instances.
-
Leave all other settings to their defaults and choose Run.
Install Kinesis Agent for Windows Using PowerShell
Use a text editor to copy the following commands into a file and save it as a PowerShell script. We use InstallKinesisAgent.ps1 in the following example.
Param(
    [ValidateSet("prod", "beta", "test")]
    [string] $environment = 'prod',
    [string] $version,
    [string] $baseurl
)

# Self-elevate the script if required.
if (-Not ([Security.Principal.WindowsPrincipal] [Security.Principal.WindowsIdentity]::GetCurrent()).IsInRole([Security.Principal.WindowsBuiltInRole] 'Administrator')) {
    if ([int](Get-CimInstance -Class Win32_OperatingSystem | Select-Object -ExpandProperty BuildNumber) -ge 6000) {
        $CommandLine = '-File "' + $MyInvocation.MyCommand.Path + '" ' + $MyInvocation.UnboundArguments
        Start-Process -FilePath PowerShell.exe -Verb Runas -ArgumentList $CommandLine
        Exit
    }
}

# Allows input to change base url. Useful for testing.
if ($baseurl) {
    if (!$baseUrl.EndsWith("/")) {
        throw "Invalid baseurl param value. Must end with a trailing forward slash ('/')"
    }

    $kinesistapBaseUrl = $baseurl
} else {
    $kinesistapBaseUrl = "https://s3-us-west-2.amazonaws.com/kinesis-agent-windows/downloads/"
}

Write-Host "Using $kinesistapBaseUrl as base url"

$webClient = New-Object System.Net.WebClient

try {
    $packageJson = $webClient.DownloadString($kinesistapBaseUrl + 'packages.json' + '?_t=' + [System.DateTime]::Now.Ticks) | ConvertFrom-Json
} catch {
    throw "Downloading package list failed."
}


if ($version) {
    $kinesistapPackage = $packageJson.packages | Where-Object { $_.packageName -eq "AWSKinesisTap.$version.nupkg" }

    if ($null -eq $kinesistapPackage) {
        throw "No package found matching input version $version"
    }
} else {
    $packageJson = $packageJson.packages | Where-Object { $_.packageName -match ".nupkg" }
    $kinesistapPackage = $packageJson[0]
}

$packageName = $kinesistapPackage.packageName
$checksum = $kinesistapPackage.checksum

#Create %TEMP%/kinesistap if not exists
$kinesistapTempDir = Join-Path $env:TEMP 'kinesistap'
if (![System.IO.Directory]::Exists($kinesistapTempDir)) {[void][System.IO.Directory]::CreateDirectory($kinesistapTempDir)}

#Download KinesisTap.x.x.x.x.nupkg package
$kinesistapNupkgPath = Join-Path $kinesistapTempDir $packageName
$webClient.DownloadFile($kinesistapBaseUrl + $packageName, $kinesistapNupkgPath)
$kinesistapUnzipPath = $kinesistapNupkgPath.Replace('.nupkg', '')

# Calculates hash of downloaded file. Downlevel compatible using .Net hashing on PS < 4
if ($PSVersionTable.PSVersion.Major -ge 4) {
    $calculatedHash = Get-FileHash $kinesistapNupkgPath -Algorithm SHA256
    $hashAsString = $calculatedHash.Hash.ToLower()
} else {
    $sha256 = New-Object System.Security.Cryptography.SHA256CryptoServiceProvider
    $calculatedHash = [System.BitConverter]::ToString($sha256.ComputeHash([System.IO.File]::ReadAllBytes($kinesistapNupkgPath)))
    $hashAsString = $calculatedHash.Replace("-", "").ToLower()
}

if ($checksum -eq $hashAsString) {
	Write-Host 'Local file hash matches checksum.' -ForegroundColor Green
} else {
	throw ("Get-FileHash does not match! Package may be corrupted.")
}

#Delete Unzip path if not empty
if ([System.IO.Directory]::Exists($kinesistapUnzipPath)) {Remove-Item –Path $kinesistapUnzipPath -Recurse -Force}

#Unzip KinesisTap.x.x.x.x.nupkg package
$null = [System.Reflection.Assembly]::LoadWithPartialName('System.IO.Compression.FileSystem')
[System.IO.Compression.ZipFile]::ExtractToDirectory($kinesistapNupkgPath, $kinesistapUnzipPath)

#Execute chocolaeyInstall.ps1 in the package and wait for completion.
$installScript = Join-Path $kinesistapUnzipPath '\tools\chocolateyInstall.ps1'
& $installScript

# Verify service installed.
$serviceName = 'AWSKinesisTap'
$service = Get-Service -Name $serviceName -ErrorAction Ignore
if ($null -eq $service) {
    throw ("Service not installed correctly.")
} else {
    Write-Host "Kinesis Tap Installed." -ForegroundColor Green
    Write-Host "After configuring run the following to start the service: Start-Service -Name $serviceName." -ForegroundColor Green
}
Open an elevated command prompt window. In the directory where the file was downloaded, use the following command to run the script:
PowerShell.exe -File ".\InstallKinesisAgent.ps1"
To install a specific version of Kinesis Agent for Windows, add the -version option:
PowerShell.exe -File ".\InstallKinesisAgent.ps1" -version "version"
Replace version with a valid Kinesis Agent for Windows version number. For version information, see the kinesis-agent-windows repository on GitHub
There are many deployment tools which can remotely execute PowerShell scripts. They can be used to automate the installation of Kinesis Agent for Windows on fleets of servers or desktops.
Configuring and Starting Kinesis Agent for Windows
After installing Kinesis Agent for Windows, you must configure and start the agent. After that, no further operation intervention should be required.
To configure and start Kinesis Agent for Windows
-
Create and deploy a Kinesis Agent for Windows configuration file. This file configures sources, sinks, and pipes, along with other global configuration items.
For more information about Kinesis Agent for Windows configuration, see Configuring Amazon Kinesis Agent for Microsoft Windows.
For complete configuration file examples that you can customize and install, see Kinesis Agent for Windows Configuration Examples.
-
Open an elevated PowerShell command prompt window, and start Kinesis Agent for Windows using the following PowerShell command:
Start-Service -Name AWSKinesisTap
